狂神说学习笔记:SpringBoot
SpringBoot
1、SpringBoot简介
1.1、回顾什么是Spring
Spring是一个开源框架,2003 年兴起的一个轻量级的Java 开发框架,作者:Rod Johnson 。
Spring是为了解决企业级应用开发的复杂性而创建的,简化开发。
1.2、Spring是如何简化Java开发的
为了降低Java开发的复杂性,Spring采用了以下4种关键策略:
- 基于POJO的轻量级和最小侵入性编程,所有东西都是bean;
- 通过IOC,依赖注入(DI)和面向接口实现松耦合;
- 基于切面(AOP)和惯例进行声明式编程;
- 通过切面和模版减少样式代码,RedisTemplate,xxxTemplate
1.3、什么是SpringBoot
学过javaweb的同学就知道,开发一个web应用,从最初开始接触Servlet结合Tomcat, 跑出一个Hello Wolrld程序,是要经历特别多的步骤;后来就用了框架Struts,再后来是SpringMVC,到了现在的SpringBoot,过一两年又会有其他web框架出现;你们有经历过框架不断的演进,然后自己开发项目所有的技术也在不断的变化、改造吗?建议都可以去经历一遍;
言归正传,什么是SpringBoot呢,就是一个javaweb的开发框架,和SpringMVC类似,对比其他javaweb框架的好处,官方说是简化开发,约定大于配置, you can "just run",能迅速的开发web应用,几行代码开发一个http接口。
所有的技术框架的发展似乎都遵循了一条主线规律:从一个复杂应用场景 衍生 一种规范框架,人们只需要进行各种配置而不需要自己去实现它,这时候强大的配置功能成了优点;发展到一定程度之后,人们根据实际生产应用情况,选取其中实用功能和设计精华,重构出一些轻量级的框架;之后为了提高开发效率,嫌弃原先的各类配置过于麻烦,于是开始提倡“约定大于配置”,进而衍生出一些一站式的解决方案。
是的这就是Java企业级应用 -> J2EE -> spring -> springboot的过程。
随着 Spring 不断的发展,涉及的领域越来越多,项目整合开发需要配合各种各样的文件,慢慢变得不那么易用简单,违背了最初的理念,甚至人称配置地狱。Spring Boot 正是在这样的一个背景下被抽象出来的开发框架,目的为了让大家更容易的使用 Spring 、更容易的集成各种常用的中间件、开源软件;
Spring Boot 基于 Spring 开发,Spirng Boot 本身并不提供 Spring 框架的核心特性以及扩展功能,只是用于快速、敏捷地开发新一代基于 Spring 框架的应用程序。也就是说,它并不是用来替代 Spring 的解决方案,而是和 Spring 框架紧密结合用于提升 Spring 开发者体验的工具。Spring Boot 以约定大于配置的核心思想,默认帮我们进行了很多设置,多数 Spring Boot 应用只需要很少的 Spring 配置。同时它集成了大量常用的第三方库配置(例如 Redis、MongoDB、Jpa、RabbitMQ、Quartz 等等),Spring Boot 应用中这些第三方库几乎可以零配置的开箱即用。
简单来说就是SpringBoot其实不是什么新的框架,它默认配置了很多框架的使用方式,就像maven整合了所有的jar包,spring boot整合了所有的框架 。
Spring Boot 出生名门,从一开始就站在一个比较高的起点,又经过这几年的发展,生态足够完善,Spring Boot 已经当之无愧成为 Java 领域最热门的技术。
Spring Boot的主要优点:
- 为所有Spring开发者更快的入门
- 开箱即用,提供各种默认配置来简化项目配置
- 内嵌式容器简化Web项目
- 没有冗余代码生成和XML配置的要求
2、第一个SpringBoor程序
准备工作
我们将学习如何快速的创建一个Spring Boot应用,并且实现一个简单的Http请求处理。通过这个例子对Spring Boot有一个初步的了解,并体验其结构简单、开发快速的特性。
官方提供了一个快速生成的网站,IDEA集成了这样网站
2.1、项目创建方式
2.1.1、项目创建方式一:使用 Spring Initializr 的 Web 页面创建项目
Spring Initializr:https://start.spring.io/
2、填写项目信息,添加依赖 Spring Web
3、点击”Generate Project“按钮生成项目;下载此项目
4、解压项目包,并用 IDEA 以 Maven 项目导入,一路下一步即可,直到项目导入完毕。
5、如果是第一次使用,可能速度会比较慢,包比较多、需要耐心等待一切就绪。

2.1.2、项目创建方式二:使用 IDEA 直接创建项目
1、创建一个新项目
2、选择 spring initalizr , 可以看到默认就是去官网的快速构建工具那里实现
3、填写项目信息
4、选择初始化的组件(初学勾选 Web 即可)
5、填写项目路径
6、等待项目构建成功
2.1.3、项目结构分析
通过上面步骤完成了基础项目的创建。就会自动生成以下文件。
1、程序的主启动类
2、一个 application.properties 配置文件
3、一个 测试类
4、一个 pom.xml
2.2、项目创建详情(IDEA快速创建)
2.2.1、项目创建过程
-
选择Spring Initializr,输入项目详细信息

-
选择web支持(先不选)

-
删除多余文件

-
在pom.xml中配置
用来支持web
2.2.2、更改项目的端口号
-
在application.properties
2.3、项目编写
2.3.1、编写流程
-
在主程序的同级目录下,新建一个controller包,一定要在同级目录下,否则识别不到
-
在包中新建一个HelloController类
-
编写完毕后,从主程序启动项目,浏览器发起请求,看页面返回;控制台输出了 Tomcat 访问的端口号!

2.3.2、打包发布
将项目打成jar包,点击 maven的 package·

如果打包成功,则会在target目录下生成一个 jar 包
-
成功提示

-
打包好的路径

打成了jar包后,在存放路径处 shift+鼠标右键 用 Powershell 窗口 运行以下命令

2.3.3、彩蛋——修改控制台Banner样式
如何更改启动时显示的字符拼成的字母,SpringBoot呢?也就是 banner 图案
SpringBoot Banner在线生成工具:https://www.bootschool.net/ascii
-
在 resources 下创建
banner.txt,在其中添加想要的样式,例如: -
当文件图标下面出现角标(如图所示),表示已经被应用

-
应用效果

2.4、运行原理初探
2.4.1、pom.xml
父依赖
其中它主要是依赖一个父项目,主要是管理项目的资源过滤及插件!
点进去,发现还有一个父依赖
再点进去,这里才是真正管理SpringBoot应用里面所有依赖版本的地方,SpringBoot的版本控制中心
- spring-boot-dependencies:核心依赖在父工程中
- spring-boot-dependencies 中管理依赖的版本,所以在引入 SpringBoot 依赖的时候不需要指定版本
- spring-boot-starter-parent
- spring-boot-starter-parent 中配置资源过滤器
spring-boot-starter 启动器
- 启动器:就是 SpringBoot 的启动场景
- springboot-boot-starter-xxx 就是SpringBoot的场景启动器
- 比如 spring-boot-starter-web,会自动导入web环境所有的依赖
- springboot会将所有的功能场景,变成一个一个的启动器
- 需要使用什么功能,就需要找到对应的启动器
官网starter参考:https://docs.spring.io/spring-boot/docs/current/reference/html/using.html#using.build-systems.starters
2.4.2、主启动类
默认的主启动类
注解
-
@SpringBootApplication:标注在某个类上说明这个类是SpringBoot的主配置类 , SpringBoot就应该运行这个类的main方法来启动SpringBoot应用
-
@SpringBootConfiguration:SpringBoot的配置类 ,标注在某个类上 , 表示这是一个SpringBoot的配置类
- @Configuration:说明这是一个配置类 ,配置类就是对应Spring的xml 配置文件
- @Component :说明启动类本身也是Spring中的一个组件而已,负责启动应用
- @Configuration:说明这是一个配置类 ,配置类就是对应Spring的xml 配置文件
-
@ComponentScan:自动扫描并加载符合条件的组件或者bean , 将这个bean定义加载到IOC容器中
-
@EnableAutoConfiguration:开启自动配置功能
-
@AutoConfigurationPackage:自动配置包
- @Import({Registrar.class}):给容器导入注册组件
- Registrar.class 作用:将主启动类的所在包及包下面所有子包里面的所有组件扫描到Spring容器
- @Import({Registrar.class}):给容器导入注册组件
-
@Import({AutoConfigurationImportSelector.class}):给容器导入选择器组件
-
AutoConfigurationImportSelector :自动配置导入选择器
-
此类中有个获取所有的配置的方法
META-INF/spring.factories:自动配置的核心文件

-
这个方法又调用了 SpringFactoriesLoader 类的静态方法!我们进入SpringFactoriesLoader类loadFactoryNames() 方法
-
继续点击查看 loadSpringFactories 方法
-
-
-
-
-
自动配置原理分析图解:


spring.factories
我们根据源头打开spring.factories , 看到了很多自动配置的文件;这就是自动配置根源所在!
我们在上面的自动配置类随便找一个打开看看,比如 :AopAutoConfiguration

可以看到这些一个个的都是JavaConfig配置类,而且都注入了一些Bean,可以找一些自己认识的类,看着熟悉一下!
所以,自动配置真正实现是从classpath中搜寻所有的META-INF/spring.factories配置文件 ,并将其中对应的 org.springframework.boot.autoconfigure. 包下的配置项,通过反射实例化为对应标注了 @Configuration的JavaConfig形式的IOC容器配置类 , 然后将这些都汇总成为一个实例并加载到IOC容器中。
结论
- SpringBoot所有的自动配置都是在启动的时候扫描并加载:
spring.factories- 所有的自动配置类都在这里面,但不一定自动生效,要判断条件是否成立,只要导入对应的start,就有对应的启动器,有了启动器,自动装配就会生效,然后就配置成功了
- SpringBoot 在启动的时候从类路径下的 META-INF/spring.factories 中获取 EnableAutoConfiguration 指定的值
- 将这些值作为自动配置类导入容器 , 自动配置类就生效 , 帮我们进行自动配置工作
- 以前我们需要自动配置的东西,现在 springboot 帮我们做了
- 整个 JavaEE 的整体解决方案和自动配置都在 springboot-autoconfigure 的jar包中
- 它会把所有需要导入的组件,以类名的方式返回,这些组件就会被添加到容器中
- 它会给容器中导入非常多的自动配置类 (xxxAutoConfiguration), 就是给容器中导入这个场景需要的所有组件 , 并配置好这些组件
- 有了自动配置类 , 免去了我们手动编写配置注入功能组件等的工作
2.4.3、SpringApplication
Run
最初以为是一个main方法,其实是开启了一个服务
SpringApplication.run分析
分析该方法主要分两部分,一部分是SpringApplication的实例化,二是run方法的执行
SpringApplication
这个类主要做了以下四件事情
-
推断应用的类型是普通的项目还是Web项目
-
查找并加载所有可用初始化器 , 设置到initializers属性中
-
找出所有的应用程序监听器,设置到listeners属性中
-
推断并设置main方法的定义类,找到运行的主类
查看构造器:
run方法流程分析

3、YAML语法
3.1、概述
3.1.1、配置文件
SpringBoot使用一个全局的配置文件 , 配置文件名称是固定的
- application.properties
- 语法结构 :key=value
- application.yml
- 语法结构 :key:空格 value
配置文件的作用 :修改SpringBoot自动配置的默认值,因为SpringBoot在底层都给我们自动配置好了
3.1.2、YAML概述
YAML是 "YAML Ain't a Markup Language" (YAML不是一种标记语言)的递归缩写。在开发的这种语言时,YAML 的意思其实是:"Yet Another Markup Language"(仍是一种标记语言)
YAML A Markup Language:是一个标记语言
YAML is not Markup Language:不是一个标记语言
这种语言以数据作为中心,而不是以标记语言为重点!
以前的配置文件,大多数都是使用xml来配置;比如一个简单的端口配置,我们来对比下yaml和xml
yaml配置:
xml配置:
YAML语法
基础语法:
以此来表示一对键值对(空格不能省略);以空格的缩进来控制层级关系,只要是左边对齐的一列数据都是同一个层级的
注意:属性和值的大小写都是十分敏感的。例子:
值的写法
字面量:普通的值【数字,布尔值,字符串】
字面量直接写在后面就可以,字符串默认不用加上双引号或单引号;
"" 双引号,不会转义字符串里面的特殊字符,特殊字符会作为本身想表示的意思;
比如:name: "D \n t" 输出:D 换行 t
对象的写法
数组的写法
相比 yaml,properties 只能保存键值对
语法要求严格!
- 空格不能省略
- 以缩进来控制层级关系,只要是左边对齐的一列数据都是同一个层级的
- 属性和值的大小写都是十分敏感的
3.2、yaml给实体类赋值
-
创建 Person 和 Dog 实体类
Dog.javaPerson.java -
利用 YAML 注入
-
springboot配置注解处理器没有找到

解决办法:使用 @ConfigurationProperties 需要导入依赖
-
测试
-
结果:所有值都注入成功

3.2.1、配置文件占位符
- 配置文件还可以编写占位符生成随机数
- ${random.uuid}:表示随机UUID
- ${random.int}:表示随机整数
- ${person.hello:hhh}:表示 person 中的 hello 如果不存在就取默认值 hhh,存在就取存在的值
3.3、回顾properties配置
我们上面采用的 yaml 方法都是最简单的方式,开发中最常用的;也是 springboot 所推荐的!
那我们来唠唠其他的实现方式,道理都是相同的;
配置文件除了yml还有我们之前常用的properties , 我们没有讲,我们来唠唠!
-
【注意】properties配置文件在写中文的时候,会有乱码 , 我们需要去IDEA中设置编码格式为UTF-8
settings-->FileEncodings 中配置;

-
新建一个实体类 User
-
编辑配置文件
user.properties -
我们在User类上使用
@PropertySource指定配置文件,@Value来进行注入 -
Springboot测试
-
结果:注入成功

3.4、@ConfigurationProperties 与 @Value 对比
@Value 这个使用起来并不友好!我们需要为每个属性单独注解赋值,比较麻烦;
我们来看个功能对比图
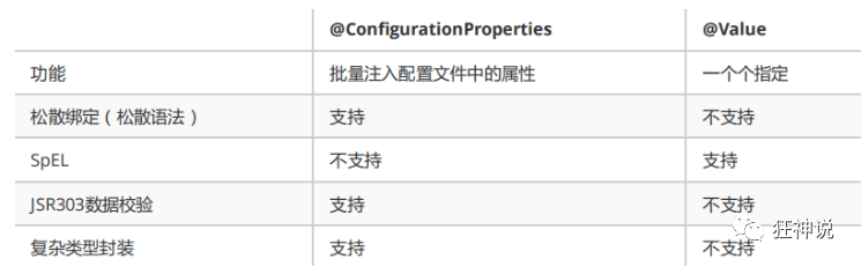
@ConfigurationProperties只需要写一次即可 ,@Value则需要每个字段都添加- 松散绑定(Relaxed binding)
比如例子 user: userName 也可以表示为 user: user-name(大写用-符号),user: username 表示为 user: user_name(小写用_符号),比如支持这种写法的就是支持松散绑定 - JSR303数据校验 , 这个就是我们可以在字段是增加一层过滤器验证 , 可以保证数据的合法性
- 复杂类型封装,yaml 中可以封装对象 , 使用 value 就不支持
结论
配置yml和配置properties都可以获取到值 , 强烈推荐 yml;
如果我们在某个业务中,只需要获取配置文件中的某个值,可以使用一下 @value;
如果说,我们专门编写了一个JavaBean来和配置文件进行一一映射,就直接@configurationProperties,不要犹豫!
4、JSR303校验及多环境切换
4.1、JSR303校验
Springboot中可以用 @Validated 来校验数据,如果数据异常则会统一抛出异常,方便异常中心统一处理。
-
使用
@Validated需要导入依赖 -
我们这里来写个注解让我们的 name 只能支持Email格式
-
结果:

使用数据校验,可以保证数据的正确性;
常见参数
4.2、多环境切换
profile 是 Spring 对不同环境提供不同配置功能的支持,可以通过激活不同的环境版本,实现快速切换环境
4.2.1、配置文档加载位置
外部加载配置文件的方式十分多,我们选择最常用的即可,在开发的资源文件中进行配置!

-
五种配置文件位置及运行优先级(低->高)
classpath:/classpath:/config/file:./file:/config/file:./cofig/*/
-
springboot 启动会扫描以下位置的application.properties或者application.yml文件作为Spring boot的默认配置文件:

优先级由高到底,高优先级的配置会覆盖低优先级的配置;
SpringBoot会从这五个位置全部加载主配置文件;互补配置;
4.2.2、多配置文件
我们在主配置文件编写的时候,文件名可以是 application-{profile}.properties/yml , 用来指定多个环境版本
例如:
- application-test.properties 代表测试环境配置
- application-dev.properties 代表开发环境配置
但是Springboot并不会直接启动这些配置文件,它默认使用 application.properties 主配置文件
我们需要通过一个配置来选择需要激活的环境:
相比 properties 需要写多个 properties文件,yaml 可以实现多文档模块
4.2.3、yaml多文档模块
和properties配置文件中一样,但是使用yml去实现不需要创建多个配置文件,更加方便了
注意:如果yml和properties同时都配置了端口,并且没有激活其他环境 , 默认会使用properties配置文件的!
5、自动装配原理
5.1、自动装配原理详解
5.1.1、概述
根据当前不同的条件判断,决定这个配置类是否生效!
- 一但这个配置类生效;这个配置类就会给容器中添加各种组件;
- 这些组件的属性是从对应的properties类中获取的,这些类里面的每一个属性又是和配置文件绑定的;
- 所有在配置文件中能配置的属性都是在xxxxProperties类中封装着;
- 配置文件能配置什么就可以参照某个功能对应的这个属性类
原理流程
-
我们在
spring.factories里随便点击一个自动装配类看它的源码,例如HttpEncodingAutoConfiguration
-
查看源码,我们发现
@EnableConfigurationProperties是从ServerProperties属性封装类中读取的属性来装配(结合下面的构造器引用的也是ServerProperties)
-
我们再点进
ServerProperties的源码,我们可以发现这里的原理和yaml给实体类赋值(点击跳转)中给实体类赋值的方式一致:读取配置文件中前缀为 server 的赋值属性
-
通过对比我们可以确认结论正确

这个就是自动装配的原理,也就是为什么我们在 properties 或 yaml 配置文件中配置能生效的原因
B站弹幕总结:自动配置类的配置本质就是配置组件,而自动配置类会依赖properties(这其中有很多属性),在yml文件写上自己想要的属性就好
5.1.2、精髓
1、SpringBoot启动会加载大量的自动配置类
2、我们看我们需要的功能有没有在SpringBoot默认写好的自动配置类当中;
3、我们再来看这个自动配置类中到底配置了哪些组件;(只要我们要用的组件存在在其中,我们就不需要再手动配置了)
4、给容器中自动配置类添加组件的时候,会从properties类中获取某些属性。我们只需要在配置文件中指定这些属性的值即可;
- xxxxAutoConfigurartion:自动配置类;给容器中添加组件
- xxxxProperties:封装配置文件中相关属性;
5.2、@Conditional
了解完自动装配的原理后,我们来关注一个细节问题,自动配置类必须在一定的条件下才能生效;
@Conditional派生注解(Spring注解版原生的@Conditional作用)
作用:必须是@Conditional指定的条件成立,才给容器中添加组件,配置配里面的所有内容才生效;
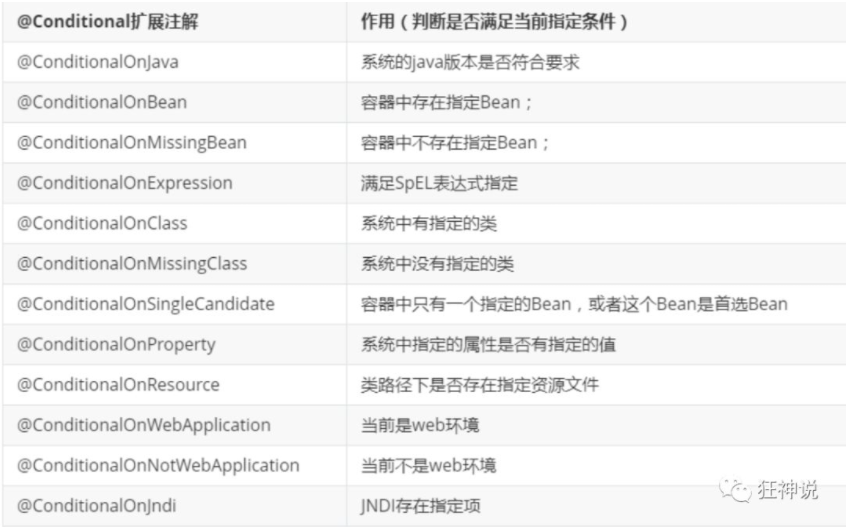
那么多的自动配置类,必须在一定的条件下才能生效;也就是说,我们加载了这么多的配置类,但不是所有的都生效了。
我们怎么知道哪些自动配置类生效?
我们可以通过启用 debug=true属性;来让控制台打印自动配置报告,这样我们就可以很方便的知道哪些自动配置类生效;
application.yaml
开启后就可以在控制台查看日志了。
-
Positive matches:(自动配置类启用的:正匹配)
-
Negative matches:(没有启动,没有匹配成功的自动配置类:负匹配)
-
Unconditional classes: (没有条件的类)
6、SpringBoot Web开发
核心:自动装配
springboot到底帮我们配置了什么?我们能不能进行修改?能修改哪些东西?能不能扩展?
- xxxxAutoConfiguration.. 向容器中自动配置组件
- xxxxProperties:自动配置类,装配配置文件中自定义的一些内容
6.1、Web开发静态资源处理
6.1.1、web开发要解决的问题
- 导入静态资源
- 首页
- jsp,模板引擎Thymeleaf
- 装配扩展SpringMVC
- 增删改查
- 拦截器
- 国际化
6.1.2、静态资源映射规则
首先,我们搭建一个普通的SpringBoot项目,回顾一下HelloWorld程序!
写请求非常简单,那我们要引入我们前端资源,我们项目中有许多的静态资源,比如css,js等文件,这个SpringBoot怎么处理呢?
如果我们是一个web应用,我们的main下会有一个webapp,我们以前都是将所有的页面导在这里面的,对吧!但是我们现在的pom呢,打包方式是为jar的方式,那么这种方式SpringBoot能不能来给我们写页面呢?当然是可以的,但是SpringBoot对于静态资源放置的位置,是有规定的!
我们先来聊聊这个静态资源映射规则:
SpringBoot中,SpringMVC的web配置都在 WebMvcAutoConfiguration 这个配置类里面;
我们可以去看看 WebMvcAutoConfigurationAdapter 中有很多配置方法;
有一个方法:addResourceHandlers 添加资源处理
读一下源代码:比如所有的 /webjars/** , 都需要去 classpath:/META-INF/resources/webjars/ 找对应的资源;
6.1.3、什么是webjars
Webjars本质就是以jar包的方式引入我们的静态资源 , 我们以前要导入一个静态资源文件,直接导入即可。
使用SpringBoot需要使用Webjars,我们可以去搜索一下:
要使用jQuery,我们只要要引入jQuery对应版本的pom依赖即可!
-
导入完毕,查看webjars目录结构,并访问Jquery.js文件!

-
访问:只要是静态资源,SpringBoot就会去对应的路径寻找资源,我们这里访问:

6.1.4、第二种静态资源映射规律
-
在springboot,我们可以使用一下方式处理静态数据
- webjars
localhost:8081/webjars/ - public,static,/**,resources
localhost:8081/
- webjars
-
优先级:resources>static(默认)>public
优先级和源码里的数组顺序一致:

6.1.5、自定义静态资源路径
我们也可以自己通过配置文件来指定一下,哪些文件夹是需要我们放静态资源文件的,在application.properties中配置;
一旦自己定义了静态文件夹的路径,原来的自动配置就都会失效了!
6.1.6、拓展:网站图标说明(了解即可)
与其他静态资源一样,Spring Boot在配置的静态内容位置中查找 favicon.ico。如果存在这样的文件,它将自动用作应用程序的favicon。
1、关闭SpringBoot默认图标
2、自己放一个图标在静态资源目录下,我放在 public 目录下
3、清除浏览器缓存!刷新网页,发现图标已经变成自己的了!
注:maven pom.xml中的spring-boot-starter-parent的版本要低才行,已经被淘汰(了解即可)
新版本的 springboot 直接把图标命名为 favicon.ico 放在 classpath:/static/下就可以了
注意:favicon.ico 尺寸不能太大
6.2、模板引擎Thymeleaf
6.2.1、模板引擎介绍
前端交给我们的页面,是html页面。如果是我们以前开发,我们需要把他们转成jsp页面,jsp好处就是当我们查出一些数据转发到JSP页面以后,我们可以用jsp轻松实现数据的显示,及交互等。
jsp支持非常强大的功能,包括能写Java代码,但是呢,我们现在的这种情况,SpringBoot这个项目首先是以jar的方式,不是war,像第二,我们用的还是嵌入式的Tomcat,所以呢,他现在默认是不支持jsp的。
那不支持jsp,如果我们直接用纯静态页面的方式,那给我们开发会带来非常大的麻烦,那怎么办呢?
SpringBoot推荐你可以来使用模板引擎:
模板引擎,我们其实大家听到很多,其实jsp就是一个模板引擎,还有用的比较多的freemarker,包括SpringBoot给我们推荐的Thymeleaf,模板引擎有非常多,但再多的模板引擎,他们的思想都是一样的,什么样一个思想呢我们来看一下这张图:
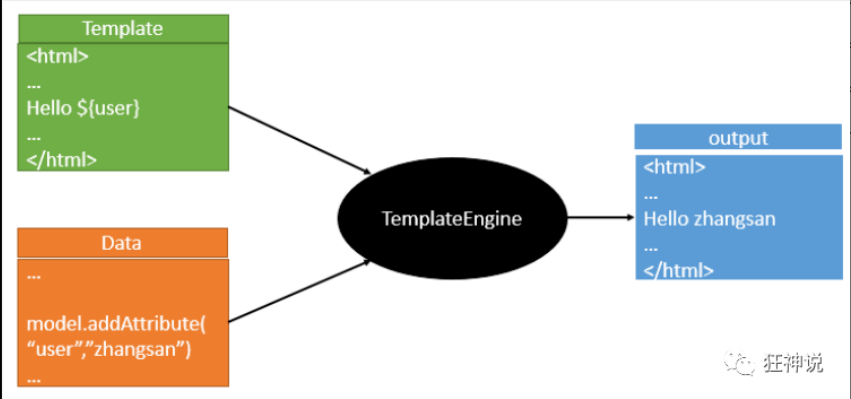
模板引擎的作用就是我们来写一个页面模板,比如有些值呢,是动态的,我们写一些表达式。而这些值,从哪来呢,就是我们在后台封装一些数据。然后把这个模板和这个数据交给我们模板引擎,模板引擎按照我们这个数据帮你把这表达式解析、填充到我们指定的位置,然后把这个数据最终生成一个我们想要的内容给我们写出去,这就是我们这个模板引擎,不管是jsp还是其他模板引擎,都是这个思想。只不过呢,就是说不同模板引擎之间,他们可能这个语法有点不一样。其他的我就不介绍了,我主要来介绍一下SpringBoot给我们推荐的Thymeleaf模板引擎,这模板引擎呢,是一个高级语言的模板引擎,他的这个语法更简单。而且呢,功能更强大。
我们呢,就来看一下这个模板引擎,那既然要看这个模板引擎。首先,我们来看SpringBoot里边怎么用。
6.2.2、引入Thymeleaf
怎么引入呢,对于springboot来说,什么事情不都是一个start的事情嘛,我们去在项目中引入一下。给大家三个网址:
Thymeleaf 官网:https://www.thymeleaf.org/
Thymeleaf 在Github 的主页:https://github.com/thymeleaf/thymeleaf
Spring官方文档:找到我们对应的版本
https://docs.spring.io/spring-boot/docs/2.6.7/reference/htmlsingle/#using.build-systems.starters
找到对应的pom依赖:可以适当点进源码看下本来的包!
Maven会自动下载jar包,我们可以去看下下载的东西;

6.2.3、测试Thymeleaf
通过查看ThymeleafProperties的源码,我们了解到 html 文件要存放在 templates下

测试
-
编写一个indexController
-
编写一个测试页面 index.html 放在 templates 目录下(使用thymeleaf需要导入约束:
xmlns:th="http://www.thymeleaf.org") -
启动项目请求测试

6.2.4、Thymeleaf的使用语法
-
我们可以使用任意的 th:attr 来替换Html中原生属性的值!
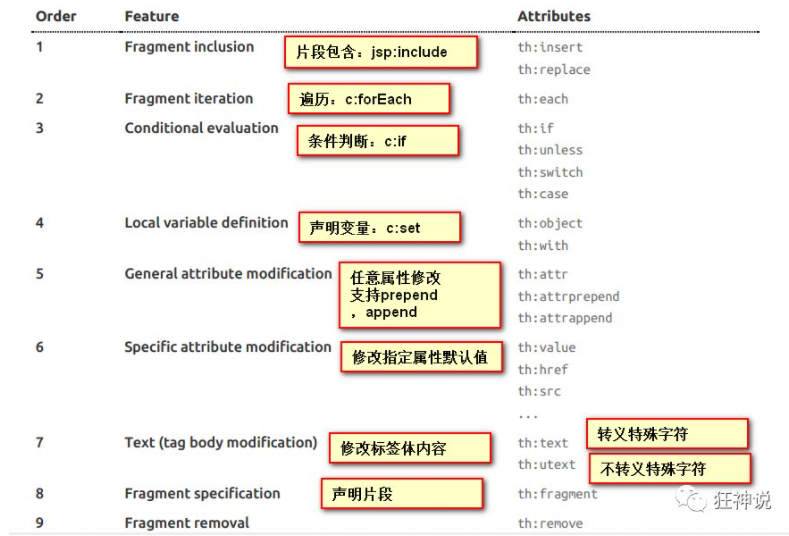
-
我们能写哪些表达式呢?
6.2.5、Thymeleaf语法测试
-
indexController -
index.html -
启动项目测试!

我们看完语法,很多样式,我们即使现在学习了,也会忘记,所以我们在学习过程中,需要使用什么,根据官方文档来查询,才是最重要的,要熟练使用官方文档!
6.3、MVC配置原理
学习网站:狂神说SpringBoot12:MVC自动配置原理 (qq.com)
在springboot中,有非常多的xxxx Configuration 帮助我们进行扩展配置,只要看到了这个定性,我们就要注意了!
6.3.1、官网阅读
在进行项目编写前,我们还需要知道一个东西,就是SpringBoot对我们的SpringMVC还做了哪些配置,包括如何扩展,如何定制。
只有把这些都搞清楚了,我们在之后使用才会更加得心应手。途径一:源码分析,途径二:官方文档!
Spring MVC Auto-configuration
Spring Boot provides auto-configuration for Spring MVC that works well with most applications.
-- Spring Boot为Spring MVC提供了自动配置,它可以很好地与大多数应用程序一起工作
The auto-configuration adds the following features on top of Spring’s defaults:
-- 自动配置在 Spring 默认设置的基础上增加了以下特性:
Inclusion of
ContentNegotiatingViewResolverandBeanNameViewResolverbeans包含视图解析器
Support for serving static resources, including support for WebJars
支持静态资源,包括 webjars
Automatic registration of
Converter,GenericConverter, andFormatterbeans自动注册转换器,通用转换器,格式化器
- 转换器,这就是我们网页提交数据到后台自动封装成为对象的东西,比如把"1"字符串自动转换为int类型
- 格式化器,比如页面给我们了一个2019-8-10,它会给我们自动格式化为Date对象
Support for
HttpMessageConverters支持网页信息转换器
- pringMVC用来转换Http请求和响应的的,比如我们要把一个User对象转换为JSON字符串
Automatic registration of
MessageCodesResolver定义错误代码生成规则的
Static
index.htmlsupport静态首页支持
Automatic use of a
ConfigurableWebBindingInitializerbean初始化数据绑定器:帮我们把请求数据绑定到JavaBean中
If you want to keep those Spring Boot MVC customizations and make more MVC customizations (interceptors, formatters, view controllers, and other features), you can add your own
@Configurationclass of typeWebMvcConfigurerbut without@EnableWebMvc.-- 如果您希望保留 Spring Boot MVC 定制并进行更多的 MVC 定制(拦截器、格式化程序、视图控制器和其他特性) ,可以添加您自己的
WebMvcConfigurer类型的@Configuration,但不要添加@EnableWebMvc。If you want to provide custom instances of
RequestMappingHandlerMapping,RequestMappingHandlerAdapter, orExceptionHandlerExceptionResolver, and still keep the Spring Boot MVC customizations, you can declare a bean of typeWebMvcRegistrationsand use it to provide custom instances of those components.-- 如果你想提供自定义的
RequestMappingHandlerMapping、RequestMappingHandlerAdapter或ExceptionHandlerExceptionResolver定制,你可以声明一个类型为WebMvcRegistrations的 bean,并使用它来提供这些组件的自定义实例。If you want to take complete control of Spring MVC, you can add your own
@Configurationannotated with@EnableWebMvc, or alternatively add your own@Configuration-annotatedDelegatingWebMvcConfigurationas described in the Javadoc of@EnableWebMvc.-- 如果你想完全控制 Spring MVC,你可以添加你自己的注释
@Configuration和@EnableWebMvc,或者像在@EnableWebMvc的 Javadoc 中描述的那样添加你自己的@Configuration注释DelegatingWebMvcConfiguration。
我们来仔细对照,看一下它怎么实现的,它告诉我们SpringBoot已经帮我们自动配置好了SpringMVC,然后自动配置了哪些东西呢?
ContentNegotiatingViewResolver 内容协商视图解析器
自动配置了ViewResolver,就是我们之前学习的SpringMVC的视图解析器;
即根据方法的返回值取得视图对象(View),然后由视图对象决定如何渲染(转发,重定向)。
我们去看看这里的源码:我们找到 WebMvcAutoConfiguration , 然后搜索ContentNegotiatingViewResolver。找到如下方法!
我们可以点进这类看看!找到对应的解析视图的代码
我们继续点getCandidateViews进去看,他是怎么获得候选的视图的呢?
getCandidateViews中看到他是把所有的视图解析器拿来,进行while循环,挨个解析!
Iterator var5 = this.viewResolvers.iterator();
所以得出结论:ContentNegotiatingViewResolver 这个视图解析器就是用来组合所有的视图解析器的
我们再去研究下他的组合逻辑,看到有个属性viewResolvers,看看它是在哪里进行赋值的!
既然它是在容器中去找视图解析器,我们是否可以猜想,我们就可以去实现一个视图解析器了呢?
我们可以自己给容器中去添加一个视图解析器;这个类就会帮我们自动的将它组合进来;我们去实现一下
-
我们在我们的主程序中去写一个视图解析器来试试;
-
怎么看我们自己写的视图解析器有没有起作用呢?
我们给 DispatcherServlet 中的 doDispatch方法 加个断点进行调试一下,因为所有的请求都会走到这个方法中

-
我们启动我们的项目,然后随便访问一个页面,看一下Debug信息
找到 this

找到视图解析器,我们看到我们自己定义的就在这里了

所以说,我们如果想要使用自己定制化的东西,我们只需要给容器中添加这个组件就好了!剩下的事情SpringBoot就会帮我们做了!
Formatter 格式化器
我们去看看这里的源码:我们找到 WebMvcAutoConfiguration , 然后搜索Formatter。找到如下方法!
点击format.getDate()去:
可以看到在我们的Properties文件中,我们可以进行自动配置它!
如果配置了自己的格式化方式,就会注册到Bean中生效,我们可以在配置文件中配置日期格式化的规则:
其余的就不一一举例了,大家可以下去多研究探讨即可!
修改SpringBoot的默认配置
这么多的自动配置,原理都是一样的,通过这个WebMVC的自动配置原理分析,我们要学会一种学习方式,通过源码探究,得出结论;这个结论一定是属于自己的,而且一通百通。
SpringBoot的底层,大量用到了这些设计细节思想,所以,没事需要多阅读源码!得出结论;
SpringBoot在自动配置很多组件的时候,先看容器中有没有用户自己配置的(如果用户自己配置@bean),如果有就用用户配置的,如果没有就用自动配置的;
如果有些组件可以存在多个,比如我们的视图解析器,就将用户配置的和自己默认的组合起来!
扩展使用SpringMVC
官方文档如下:
If you want to keep those Spring Boot MVC customizations and make more MVC customizations(interceptors, formatters, view controllers, and other features), you can add your own @Configuration class of type WebMvcConfigurer but without @EnableWebMvc.If you want to provide custom instances of RequestMappingHandlerMapping, RequestMappingHandlerAdapter, or ExceptionHandlerExceptionResolver, and still keep the Spring Boot MVC customizations, you can declare a bean of type WebMvcRegistrations and use it to provide custom instances of those components.
我们要做的就是编写一个@Configuration注解类,并且类型要为WebMvcConfigurer,还不能标注@EnableWebMvc注解;我们去自己写一个;我们新建一个包叫config,写一个类MyMvcConfig;
我们去浏览器访问一下:

确实也跳转过来了,只是没有传参!所以说,我们要扩展SpringMVC,官方就推荐我们这么去使用,既保SpringBoot留所有的自动配置,也能用我们扩展的配置!
我们可以去分析一下原理:
-
WebMvcAutoConfiguration是 SpringMVC的自动配置类,里面有一个类WebMvcAutoConfigurationAdapter -
这个类上有一个注解,在做其他自动配置时会导入:
@Import(EnableWebMvcConfiguration.class) -
我们点进
EnableWebMvcConfiguration这个类看一下,它继承了一个父类:DelegatingWebMvcConfiguration这个父类中有这样一段代码:
-
我们可以在这个类中去寻找一个我们刚才设置的viewController当做参考,发现它调用了一个
-
我们点
addViewControllers进去看一下
所以得出结论:所有的WebMvcConfiguration都会被作用,不止Spring自己的配置类,我们自己的配置类当然也会被调用;
全面接管SpringMVC
官方文档:
If you want to take complete control of Spring MVC, you can add your own @Configuration annotated with @EnableWebMvc, or alternatively add your own @Configuration-annotated DelegatingWebMvcConfiguration as described in the Javadoc of @EnableWebMvc.
全面接管即:SpringBoot对SpringMVC的自动配置不需要了,所有都是我们自己去配置!
只需在我们的配置类中要加一个@EnableWebMvc。
我们看下如果我们全面接管了SpringMVC了,我们之前SpringBoot给我们配置的静态资源映射一定会无效,我们可以去测试一下;
不加注解之前,访问首页:

给配置类加上注解:@EnableWebMvc

我们发现所有的SpringMVC自动配置都失效了!回归到了最初的样子;
当然,我们开发中,不推荐使用全面接管SpringMVC
思考问题?为什么加了一个注解,自动配置就失效了!我们看下注解源码:
-
这里发现它是导入了一个类,我们可以继续进去看
-
它继承了一个父类 WebMvcConfigurationSupport
-
我们来回顾一下Webmvc自动配置类
发现
@ConditionalOnMissingBean(WebMvcConfigurationSupport.class),只有WebMvcConfigurationSupport.class不存在的时候才生效,而使用了@EnableWebMvc会自动导入DelegatingWebMvcConfiguration.class,DelegatingWebMvcConfiguration本身有继承了WebMvcConfigurationSupport,所以WebMvc自动配置类就没有生效,导致访问首页出现了404
总结一句话:@EnableWebMvc将WebMvcConfigurationSupport的组件导入进来了;
而导入的WebMvcConfigurationSupport只是 SpringMVC 最基本的功能!
在SpringBoot中会有非常多的扩展配置,只要看见了这个,我们就应该多留心注意~
7、员工管理系统
7.1、准备工作
bootstrap模板:
https://getbootstrap.com/docs/4.0/examples/
或者 百度链接:https://pan.baidu.com/s/1URaFmN6rt2AzDOwVogWBNQ 提取码:bruc
清理多余的文件或者直接创建新的项目,把 asserts 放 static 下,html 放 templates 下(样式加载不出来可以尝试重启IDEA)
项目结构:

7.1.1、导入依赖
导入 lombok 依赖,还要在 IDEA 上安装 lombok 插件
导入 Thymeleaf 模板依赖
7.1.2、POJO
Department.java
employee.java
7.1.3、DAO
DepartmentDao.java
EmployeeDao.java
7.2、首页实现
-
视图解析
-
修改 html 的引用静态资源 为 Thymeleaf 动态引用,为了防止在不同根目录下找不到静态资源
index.html404.htmldashboard.htmllist.html
注意点:所有页面的静态资源都需要使用 Thymeleaf 接管;@{}
7.3、国际化
国际化:internationalization(简称 i18n,以 i 为开头,n 为结尾,中间18个字母)
在资讯领域,国际化(i18n)指让产品(出版物,软件,硬件等)无需做大的改变就能够适应不同的语言和地区的需要。对程序来说,在不修改内部代码的情况下,能根据不同语言及地区显示相应的界面。
我们需要使前端页面国际化,在此之前IDEA需要先安装 Resource Bundle Editor 插件来实现 properties 文件的可视化界面

-
在 resource 下创建一个 i18n 的包,添加
login.properties和login_zh_CN.properties我们发现他们直接被整合起来
-
右键 Resource Bundle 'login' 可以直接创建 properties 文件

-
点开 properties,左下角是可视化配置

-
点开可视化界面,添加 tip,会发现右边有多个语言的配置框,输入不同的参数

-
我们会发现不同的 properties 里有着刚才输入不同的配置
login.propertieslogin_en_US.propertieslogin_zh_CN.properties -
在
application.properties里配置我们文件的真实路径 -
修改首页的国际化部分(Thymeleaf获取国际化内容:
#{}) -
修改首页下面的 a 标签
Thymeleaf 的携带参数用括号括起来
-
在 config 包下创建
MyLocaleResolver -
接着在容器
MyMvcConfig中注册MyLocaleResolver -
测试


注意点:
- 我们需要配置 i18n 文件
- 我们如果需要在项目中进行按钮自动切换,我们需要自定义一个组件
LocaleResolver - 记得将自己写的组件配置到 spring 容器中
@Bean #{}使用国际化内容
7.4、登录功能实现
实现登录时对用户名密码判断,如果错误就返回错误信息,成功就重定向到首页
-
修改
index.html,为用户名和密码输入框添加 name 属性,用来传参。并在主页设置一个 msg 来接收错误参数 -
编写一个 LoginController
-
在自定义视图解析器 MyMvcConfig 中添加以下代码,用来实现登录后的重定向
7.5、登录拦截器
想要自定义拦截器,必须实现 HandlerInterceptor 接口
-
编写一个
LoginHandlerInterceptor -
修改
LoginController,将登录成功后的用户名放在 Session 中 -
把该拦截器注册到容器中,并设置拦截规则
7.6、账号注销
通过移除 Session 的 loginUser 来实现账号注销
-
在
LoginController中添加如下代码, -
修改
dashboard.html
7.7、展示员工列表
7.7.1、提取公共页面
提取公共页面有利于我们代码的复用,简化各个html的代码量
-
在 templates 下创建 commons 文件夹,在里面创建一个
commons.html来存放公共页面(由于头部导航栏和侧边栏在各个页面都存在,我们可以直接提取出来当做公共页面)commons.html: -
将
list.html放入 emp 文件夹下,在dashboard.html和list.html中调用公共页面dashboard.html:list.html:
7.7.2、修改员工展示列表
-
编写 EmployeeController 类
-
修改点击侧边栏:员工管理 发出的请求为
th:href="@{/emps}" -
修改
list.html中列表 main -
效果

7.8、增加员工实现
-
在
list.html增加添加按钮 -
在 EmployeeController 类里加入跳转请求
注意:这里是 Get 方法
-
在 templates/emp 下编写一个
add.html -
在 EmployeeController 类里加入增加员工请求
-
我们可以在
application.properties中设置读取日期的格式
7.9、修改员工信息
-
修改
list.html的编辑按钮为 a 标签 -
在 EmployeeController 类里加入跳转请求
注意:这里是 Get 方法
-
在 templates/emp 下编写一个
update.html -
由于方法的复用,我们不需要写额外的请求方法来修改员工信息,直接调用增加员工的请求,效果是一致的。
因为dao层模拟数据库用的是Map,而Map的特点是:主键唯一。所以只要保持主键一致就能达到覆盖修改的效果,就不需要再单独编写新的方法
7.10、删除员工实现
-
修改
list.html的删除按钮为 a 标签 -
在 EmployeeController 类里加入增加员工请求
7.11、404处理
-
在templates下建立一个error文件夹,把
404.html放进去springboot会自动帮我们配置处理,在出现404的时候会自动跳转到我们写好的
404.html中 -
修改
404.html的公共页面
8、如何写一个网站
前端:
- 模板:别人写好的,我们拿来改成自己需要的
- 框架:组件:我们自己手动拼接! Bootstrap,Layui,semantic-ui,element-ui
- 栅格系统
- 导航栏
- 侧边栏
- 表单
8.1、开发网站心得
- 前端搞定:页面长什么样:数据
- 设计数据库(数据库设计难点!)
- 前端让他能够自动运行,独立化工程
- 数据接口如何对接:json,对象 all in one!
- 前后端联调测试!‘
小心得
- 有一套自己熟悉的后台模板:工作必要!——>X-admin
- 前端界面:至少自己能够通过前端框架,组合出来一个网站页面
- index - about - blog - post - user
- 让这个页面能够独立运行!
8.2、后面的学习内容
- 整合JDBC
- 整合Mybatis 重点
- 整合Druid 重点
- Shiro:安全 重点
- Spring Security:安全 重点
- 异步任务~,邮件发送,定时任务
- Swagger
- Dubbo + Zookeeper
9、SpringBoot整合
9.1、整合JDBC
9.1.1、简介
对于数据访问层,无论是 SQL(关系型数据库) 还是 NOSQL(非关系型数据库),Spring Boot 底层都是采用 Spring Data 的方式进行统一处理。
Spring Boot 底层都是采用 Spring Data 的方式进行统一处理各种数据库,Spring Data 也是 Spring 中与 Spring Boot、Spring Cloud 等齐名的知名项目。
Sping Data 官网:https://spring.io/projects/spring-data
数据库相关的启动器 :可以参考官方文档:
https://docs.spring.io/spring-boot/docs/2.6.7/reference/htmlsingle/#using.build-systems.starters
9.1.2、JDBC
去新建一个项目测试:springboot-04-data;引入相关模块!基础模块(这里也要勾选Spring-Web)

项目建好后,发现自动帮我们导入了如下的启动器
application.yml配置文件连接数据库

测试类测试

小结
Spring Boot 2.6.7 默认使用HikariDataSource 数据源,而以前版本,如 Spring Boot 1.5 默认使用 org.apache.tomcat.jdbc.pool.DataSource 作为数据源
HikariDataSource 号称 Java WEB 当前速度最快的数据源,相比于传统的 C3P0 、DBCP、Tomcat jdbc 等连接池更加优秀;
可以使用 spring.datasource.type 指定自定义的数据源类型,值为 要使用的连接池实现的完全限定名。
关于数据源我们并不做介绍,有了数据库连接,显然就可以 CRUD 操作数据库了。但是我们需要先了解一个对象 JdbcTemplate
9.1.3、JDBCTemplate
1、有了数据源(com.zaxxer.hikari.HikariDataSource),然后可以拿到数据库连接(java.sql.Connection),有了连接,就可以使用原生的 JDBC 语句来操作数据库;
2、即使不使用第三方第数据库操作框架,如 MyBatis等,Spring 本身也对原生的JDBC 做了轻量级的封装,即JdbcTemplate。
3、数据库操作的所有 CRUD 方法都在 JdbcTemplate 中。
4、Spring Boot 不仅提供了默认的数据源,同时默认已经配置好了 JdbcTemplate 放在了容器中,程序员只需自己注入即可使用
5、JdbcTemplate 的自动配置是依赖 org.springframework.boot.autoconfigure.jdbc 包下的 JdbcTemplateAutoConfiguration 类
JdbcTemplate主要提供以下几类方法:
- execute方法:可以用于执行任何SQL语句,一般用于执行DDL语句;
- update方法及batchUpdate方法:update方法用于执行新增、修改、删除等语句;batchUpdate方法用于执行批处理相关语句;
- query方法及queryForXXX方法:用于执行查询相关语句;
- call方法:用于执行存储过程、函数相关语句。
测试
JdbcController类
- 进行测试即可完成CURD的基本操作!
9.2、整合Druid数据源
9.2.1、简介
Java程序很大一部分要操作数据库,为了提高性能操作数据库的时候,又不得不使用数据库连接池。
Druid 是阿里巴巴开源平台上一个数据库连接池实现,结合了 C3P0、DBCP 等 DB 池的优点,同时加入了日志监控。
Druid 可以很好的监控 DB 池连接和 SQL 的执行情况,天生就是针对监控而生的 DB 连接池。
Druid已经在阿里巴巴部署了超过600个应用,经过一年多生产环境大规模部署的严苛考验。
Spring Boot 2.0 以上默认使用 Hikari 数据源,可以说 Hikari 与 Driud 都是当前 Java Web 上最优秀的数据源,我们来重点介绍 Spring Boot 如何集成 Druid 数据源,如何实现数据库监控。
Github地址:https://github.com/alibaba/druid/
com.alibaba.druid.pool.DruidDataSource 基本配置参数如下:


9.2.2、配置数据源
添加上 Druid 数据源依赖
查看项目依赖,导入成功

在 application.yaml里配置数据源
我们还需要导入 Log4j 的依赖
DruidConfig 配置类
-
现在需要程序员自己为 DruidDataSource 绑定全局配置文件中的参数,再添加到容器中,而不再使用 Spring Boot 的自动生成了;我们需要自己添加 DruidDataSource 组件到容器中,并绑定属性
-
配置Druid数据源监控
Druid 数据源具有监控的功能,并提供了一个 web 界面方便用户查看,类似安装 路由器 时,人家也提供了一个默认的 web 页面。所以第一步需要设置 Druid 的后台管理页面,比如 登录账号、密码 等;配置后台管理;
访问后台路径:http://localhost:8081/druid/

-
配置 Druid web 监控 filter 过滤器
平时在工作中,按需求进行配置即可,主要用作监控!
9.3、整合Mybatis
9.3.1、简介
官方文档:http://mybatis.org/spring-boot-starter/mybatis-spring-boot-autoconfigure/
Maven仓库地址:https://mvnrepository.com/artifact/org.mybatis.spring.boot/mybatis-spring-boot-starter/2.1.1
9.3.2、测试
导入 MyBatis 所需要的依赖
在application.yml里编写数据库配置
- 在 test 里测试是否连上数据库
创建一个 User 实体类
创建一个 UserMapper 类
创建以下结构文件

UserMapper.xml
在 application.yml中配置 Mybatis
创建一个 UserController 类
测试是否成功
10、SpringSecurity
10.1、SpringSecurity简介
Spring Security 是针对Spring项目的安全框架,也是Spring Boot底层安全模块默认的技术选型,他可以实现强大的Web安全控制,对于安全控制,我们仅需要引入 spring-boot-starter-security 模块,进行少量的配置,即可实现强大的安全管理!
记住几个类:
- WebSecurityConfigurerAdapter:自定义Security策略
- AuthenticationManagerBuilder:自定义认证策略
- @EnableWebSecurity:开启WebSecurity模式
Spring Security的两个主要目标是 “认证” 和 “授权”(访问控制)。
“认证”(Authentication)
身份验证是关于验证您的凭据,如用户名/用户ID和密码,以验证您的身份。
身份验证通常通过用户名和密码完成,有时与身份验证因素结合使用。
“授权” (Authorization)
授权发生在系统成功验证您的身份后,最终会授予您访问资源(如信息,文件,数据库,资金,位置,几乎任何内容)的完全权限。
这个概念是通用的,而不是只在Spring Security 中存在。
web安全简介
在 Web 开发中,安全一直是非常重要的一个方面。安全虽然属于应用的非功能性需求,但是应该在应用开发的初期就考虑进来。如果在应用开发的后期才考虑安全的问题,就可能陷入一个两难的境地:一方面,应用存在严重的安全漏洞,无法满足用户的要求,并可能造成用户的隐私数据被攻击者窃取;另一方面,应用的基本架构已经确定,要修复安全漏洞,可能需要对系统的架构做出比较重大的调整,因而需要更多的开发时间,影响应用的发布进程。因此,从应用开发的第一天就应该把安全相关的因素考虑进来,并在整个应用的开发过程中。
市面上存在比较有名的:Shiro,Spring Security !
Shiro 与 Spring Security:相似,除了类不一样,名字不一样
作用:认证,授权
10.2、SpringSecurity环境搭建
-
创建一个新项目
springboot-06-springsecurity,添加web模块、Thymeleaf模块、SpringSecurity模块
或者自己添加依赖:
-
导入静态资源:
资源地址:https://gitee.com/KyDestroy/spring-boot-study/tree/master

注意:由于semantic-ui官网域名改变,html中引用的js链接
https://cdn.bootcss.com/semantic-ui/2.4.1/semantic.min.css一律改成https://cdn.bootcdn.net/ajax/libs/semantic-ui/2.4.1/semantic.min.css -
在
application.properties中关闭模板引擎的缓存,方便调试 -
创建一个 RouterController 类
10.3、认证授权和认证
目前,我们的测试环境,是谁都可以访问的,我们使用 Spring Security 增加上认证和授权的功能
-
确保引入 Spring Security 模块
-
编写 Spring Security 配置类
-
可以参考https://docs.spring.io/spring-security/reference/servlet/configuration/java.html#:~:text=The%20custom%20DSL%20can%20then%20be%20used%20like%20this%3A来编写
-
需要基础
WebSecurityConfigurerAdapter并重写configure(HttpSecurity http)和configure(AuthenticationManagerBuilder auth)方法,使用方法可以直接点开源码查看注释
-
-
测试,发现,登录成功,并且每个角色只能访问自己认证下的规则!
-
如果需要用数据库来配置认证,就如官网的说明

10.4、注销及权限控制
10.4.1、注销
-
在 SecurityConfig 类里设置注销
-
在 index.html 页面添加以下代码

-
测试成功,注销后自动跳回首页
10.4.2、权限控制
-
导入 security-thymeleaf 整合包依赖
注意:高版本 springboot 用的是
thymeleaf-extras-springsecurity5而不是thymeleaf-extras-springsecurity4 -
修改 index.html 导航栏
-
导入命名空间
-
增加认证判断
-
角色功能块认证
sec:authorize="hasRole('xxx')"
-
-
SecurityConfig 配置类
-
测试
-
vip1

-
vip2

-
vip3

-
10.5、记住我及首页定制
10.5.1、"记住我"功能实现
-
SecurityConfig 配置类
- 在 SecurityConfig 配置类中的 configure 方法中定义方法
-
运行测试

- 登录时点击记住我功能,之后关闭浏览器,然后重新打开浏览器访问,发现用户依旧存在,因为spring security帮我们将登录信息存储在Cookie中14天!!!
- 点击注销时,spring security 帮我们自动删除了这个 Cookie!
10.5.2、定制登录页功能实现
-
SecurityConfig 配置类
- 在 SecurityConfig 配置类中的 configure 方法中定义方法
-
login.html更改- 表单的账号密码部分
-
修改 SecurityConfig 配置类
-
测试
-
登录页面

-
登录成功后进入首页

-
总结:Spring Security 的使用多看源码
11、Shiro
11.1、Shiro简介
11.1.1、什么是Shiro
- Apache Shiro是一个Java 的安全(权限)框架。
- Shiro可以非常容易的开发出足够好的应用,其不仅可以用在JavaSE环境,也可以用在JavaEE环境。
- Shiro可以完成,认证,授权,加密,会话管理,Web集成,缓存等.
- 下载地址: http://shiro.apache.org/

11.1.2、Shiro的功能

- Authentication: 身份认证、登录,验证用户是不是拥有相应的身份;
- Authorization:授权,即权限验证,验证某个已认证的用户是否拥有某个权限,即判断用户能否进行什么操作,如:验证某个用户是否拥有某个角色,或者细粒度的验证某个用户对某个资源是否具有某个权限!
- Session Manager: 会话管理,即用户登录后就是第1次会话,在没有退出之前,它的所有信息都在会话中;会话可以是普通的JavaSE环境,也可以是Web环境;
- Cryptography: 加密,保护数据的安全性,如密码加密存储到数据库中,而不是明文存储;
- Web Support: Web支持,可以非常容易的集成到Web环境;
- Caching: 缓存,比如用户登录后,其用户信息,拥有的角色、权限不必每次去查,这样可以提高效率
- Concurrency: Shiro支持多线程应用的并发验证,即,如在一个线程中开启另-一个线程,能把权限自动的传 播过去
- Testing:提供测试支持;
- RunAs:允许一个用户假装为另-一个用户(如果他们允许)的身份进行访问;
- Remember Me:记住我,这个是非常常见的功能,即一次登录后, 下次再来的话不用登录了
11.1.3、Shiro架构
-
外部结构
从外部来看
Shiro,即从应用程序角度来观察如何使用shiro完成工作:
- subject: 应用代码直接交互的对象是Subject, 也就是说Shiro的对外API核心就是Subject, Subject代表了当前的用户,这个用户不-定是一个具体的人,与当前应用交互的任何东西都是Subject,如网络爬虫,机器人等,与Subject的所有交互都会委托给SecurityManager; Subject其实是一一个门面, SecurityManageer 才是 实际的执行者
- SecurityManager: 安全管理器,即所有与安全有关的操作都会与SercurityManager交互, 并且它管理着所有的Subject,可以看出它是Shiro的核心,它负责与Shiro的其他组件进行交互,它相当于SpringMVC的DispatcherServlet的角色
- Realm: Shiro从Realm获取安全数据 (如用户,角色,权限),就是说SecurityManager要验证用户身份,那么它需要从Realm获取相应的用户进行比较,来确定用户的身份是否合法;也需要从Realm得到用户相应的角色、权限,进行验证用户的操作是否能够进行,可以把Realm看DataSource
-
内部结构

- Subject: 任何可以与应用交互的用户;
- Security Manager:相当于SpringMVC中的DispatcherSerlet; 是Shiro的心脏, 所有具体的交互都通过Security Manager进行控制,它管理者所有的Subject, 且负责进行认证,授权,会话,及缓存的管理。
- Authenticator:负责Subject认证, 是-一个扩展点,可以自定义实现;可以使用认证策略(Authentication Strategy),即什么情况下算用户认证通过了;
- Authorizer:授权器,即访问控制器,用来决定主体是否有权限进行相应的操作;即控制着用户能访问应用中 的那些功能;
- Realm: 可以有-一个或者多个的realm, 可以认为是安全实体数据源,即用于获取安全实体的,可以用JDBC实现,也可以是内存实现等等,由用户提供;所以- -般在应用中都需要实现自己的realm
- SessionManager:管理Session生 命周期的组件,而Shiro并不仅仅可以用在Web环境,也可以用在普通的JavaSE环境中
- CacheManager: 缓存控制器,来管理如用户,角色,权限等缓存的;因为这些数据基本上很少改变,放到缓存中后可以提高访问的性能;
- Cryptography:密码模块,Shiro 提高了一些常见的加密组件用于密码加密, 解密等
11.2、Shiro快速开始
11.2.1、准备工作
官方项目路径:shiro/pom.xml at main · apache/shiro · GitHub
-
创建一个普通的maven项目,然后删除
src目录,创建一个新model——>hello-shiro
-
pom.xml

-
log4j2.xml和shiro.ini

-
log4j2.xml -
shiro.ini
-
-
java包下的Quickstart运行类
-
运行结果

11.2.2、Quickstart类简述原理
-
将在SpringBoot中集成~
11.3、SpringBoot整合Shiro环境搭建
11.3.1、基础配置
-
新建SpringBoot项目,勾选
web和thymeleaf
-
templates下新建index.html -
controller包下新建MyController -
测试

11.3.2、测试
-
shiro-spring的maven包
-
配置类

-
UserRealm -
ShiroConfig
-
-
导入静态资源

-
add 和 update页面只有一个普通的h1标签
-
index.html
-
-
MyController控制类添加跳转
-
测试

- 可以正常地进行页面跳转!为后面做准备
11.4、Shiro实现登录拦截
具体实现
-
ShiroConfig类
-
在 ShiroFilterFactoryBean 方法中加入下面代码
-
-
MyController类中添加跳转事务
-
在templates包下添加login页面
-
测试
-
点击update时

-
页面被拦截,回到登录页面

-
11.5、Shiro实现用户认证
实现流程
-
UserRealm类
-
认证方法
-
-
MyController页面跳转类
-
更改
login.html -
测试
-
当用户成功登录后才有权限使用
add和update功能
原理:调用 Shiro 中的认证功能!
-
11.6、Shiro整合Mybatis
11.6.1、项目框架
-
项目结构

-
数据库的user表

11.6.2、项目实现流程
-
maven导入包
-
在
application.properties配置别名和mapper位置 -
在
application.yml配置 druid -
POJO层
- 实体类User
-
Mapper层
- UserMapper接口类
- UserMapper接口实现类
UserMapper.xml
-
Service层
- UserService业务接口类
- UserService业务接口实现类
UserServiceImpl
-
UserRealm类
-
测试

成功连接上数据库
11.7、Shiro请求授权实现
实现流程
-
数据库层面
-
添加多一个字段,用来存储用户的授权


注意:应该是 perms
-
项目所要用的数据库

-
-
实体类User添加新字段
-
ShiroConfig配置类
-
ShiroFilterFactoryBean 方法
-
只要添加授权代码
-
-
UserRealm配置类
-
认证方法中返回值修改
-
授权方法修改
-
-
MyController类设置无授权处理
-
测试
以 KyDestroy 为例
-
进入add界面成功

-
进入update界面失败

-
11.8、Shiro整合Thymeleaf
实现流程
-
导入shiro-thymeleaf整合包
-
ShiroConfig类
-
修改登陆页面
index.html -
测试
-
没登录的状态下

-
拥有add权限登录的状态下

-
拥有update权限登录的状态下

-
12、Swagger
学习目标:
- 了解Swagger的作用和概念
- 了解前后端分离
- 在SpringBoot中集成Swagger
12.1、Swagger简介

1、前后端分离:
- Vue + Springboot 开发模式
- 后端时代:前端只用管理静态页面;html—>后端。模板引擎 JSP—>后端是主力
2、前后端分离时代:
- 前端 :前端控制层、视图层【前端团队】
- 伪造后端数据,json。已经存在了,不需要后端,前端工程依旧能跑起来
- 后端:后端控制层、服务层、数据访问层【后端团队】
- 前后端通过API进行交互【交互方式】
- 前后端相对独立且松耦合;
- 前后端甚至可以部署在不同的服务器上
3、产生的问题:
- 前后端集成,前端或者后端无法做到“及时协商,尽早解决”,最终导致问题集中爆发
4、解决方案
- 首先定义schema [ 计划的提纲 ],并实时跟踪最新的API,降低集成风险
- 早些年:指定word计划文档
- 前后端分离:
- 前端测试后端接口:postman
- 后端提供接口,需要实施更新最新的消息及改动!
5、Swagger诞生
- 号称世界上最流行的API框架
- Restful Api 文档在线自动生成器 => API 文档 与API 定义同步更新
- 直接运行,在线测试API
- 支持多种语言 (如:Java,PHP等)
- 官网:https://swagger.io/
12.2、第一个Swagger程序
12.2.1、前期准备
SpringBoot集成Swagger => springfox,两个jar包
-
Springfox-swagger2
-
swagger-springmvc
注意:3.0用
springfox-boot-starter
12.2.2、项目测试
-
创建一个普通的SpringBoot项目,支持web应用
-
添加Maven依赖
-
编写HelloController,测试确保运行成功!
-
配置Swagger ==》Config
-
SwaggerConfig
-
-
需要在
application.properties中配置 -
在运行主类添加
@EnableOpenApi
-
测试运行:http://localhost:8080/swagger-ui/index.html (Swagger3.0版本的访问链接)

12.3、Swagger的配置
12.3.1、配置基本页面
-
SwaggerConfig配置类
-
Swagger实例Bean是Docket,所以通过配置Docket实例来配置Swaggger
-
Docket 实例关联上 apiInfo()
-
可以通过apiInfo()属性配置文档信息
-
-
测试访问:http://localhost:8080/swagger-ui/index.html

12.3.2、配置扫描接口
基本方法
-
SwaggerConfig配置类
-
RequestHandlerSelectors配置的一些方法
-
PathSelectors配置的一些方法
-
12.3.3、配置Swagger开关
Swagger在生产环境中使用,在发布的时候不使用
-
判断是不是生产环境 flag=false
-
注入enable(flag)
-
创建 dev(生产环境)和 prod(发布环境)的配置文件
application-dev.propertiesapplication-prod.properties在
application.properties中选择环境 -
修改SwaggerConfig配置类
通过enable()方法配置是否启用swagger,如果是false,swagger将不能在浏览器中访问了
测试:http://localhost:8080/swagger-ui/index.html
-
环境为 dev 时,开启Swagger

-
环境为 prod 时,关闭Swagger

12.3.4、配置API分组
实现步骤
-
在SwaggerConfig配置类的docket方法中
如果没有配置分组,默认是default。通过groupName()方法即可配置分组
-
配置多个分组方法
-
配置多个docket
-
-
测试:http://localhost:8080/swagger-ui/index.html

12.3.5、常见注解
注解的简单说明
-
Swagger的所有注解定义在io.swagger.annotations包下(下面是常见的)
Swagger注解 简单说明 @Api(tags = "xxx模块说明") 作用在模块类上 @ApiOperation("xxx接口说明") 作用在接口方法上 @ApiModel("xxxPOJO说明") 作用在模型类上:如VO、BO @ApiModelProperty(value = "xxx属性说明",hidden = true) 作用在类方法和属性上,hidden设置为true可以隐藏该属性 @ApiParam("xxx参数说明") 作用在参数、方法和字段上,类似@ApiModelProperty
举例讲解上述五个注解
-
HelloController页面控制跳转类
-
User类
-
测试
-
模块类中

-
实体类模型中

-
12.3.6、拓展
测试数据
- 可以在Swagger界面测试请求
-
测试前准备
-
HelloController页面控制跳转类
-
User类中添加Set方法
-
-
测试步骤
①点击Try it out

②输入伪造的数据

③发现响应体中成功传入数据

皮肤
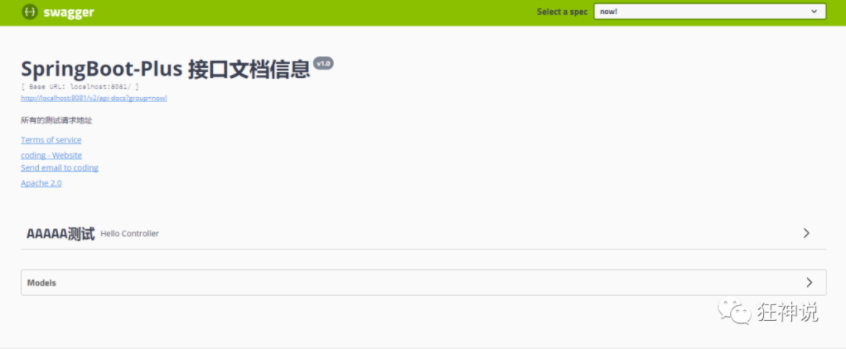
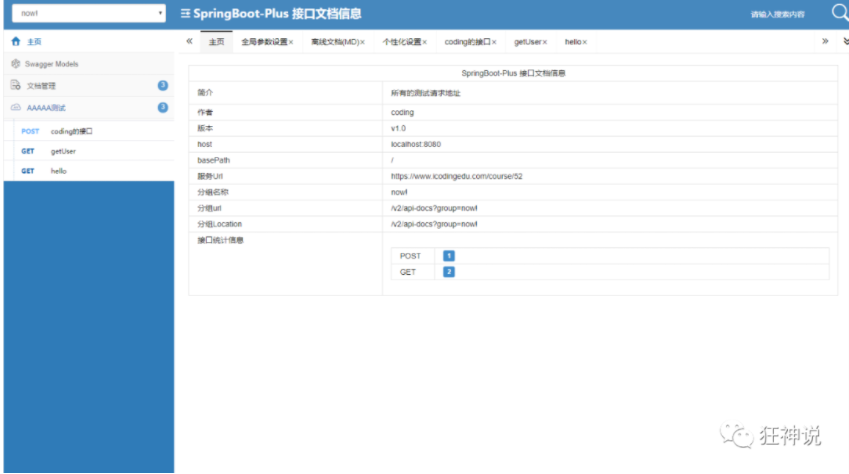
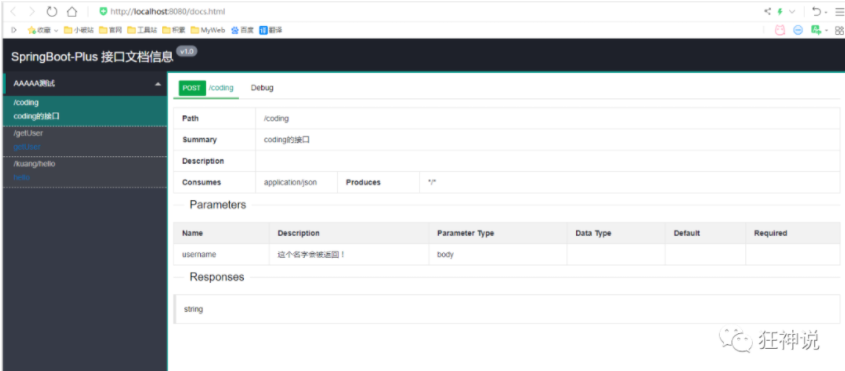
- bootstrap-ui 访问 http://localhost:8080/doc.html
- Layui-ui 访问 http://localhost:8080/docs.html
- mg-ui 访问 http://localhost:8080/document.html

12.4、Swagger总结
- 我们可以通过Swagger给一些比较难理解的属性或者接口,增加注释信息
- 接口文档要实时更新
- 可以在线测试
Swagger是一个优秀的工具,几乎所有大公司都有使用它!
【注意点】在正式发布的时候,关闭Swagger!!!处于安全考虑,也同时节省运行内存!!!
13、异步、邮件、定时任务
13.1、异步任务
为什么要使用异步处理任务?
异步处理任务,比如我们在网站上发送邮件,后台会去发送邮件,此时前台会造成响应不动,直到邮件发送完毕,响应才会成功,所以我们一般会采用多线程的方式去处理这些任务。
两个注解:
- @EnableAsync //SpringBoot启动类
- @Async //执行方法
测试
-
在业务层 service 中定义AsyncService类
-
在控制层 controller 中定义AsyncController控制类
-
在主启动类 Springboor09TestApplication 添加开启异步测试
-
测试:http://localhost:8080/hello
- 网页瞬间响应,后台代码依旧执行
13.2、邮件任务
13.2.1、概述
邮件发送,在我们的日常开发中,也非常的多,Springboot也帮我们做了支持
- 邮件发送需要引入spring-boot-start-mail
- SpringBoot 自动配置MailSenderAutoConfiguration
- 定义MailProperties内容,配置在application.yml中
- 自动装配JavaMailSender
- 测试邮件发送
13.2.2、使用步骤
-
导入spring-boot-starter-mail依赖
-
配置文件
application.yaml版application.properties版- 获取授权码:在QQ邮箱中的设置->账户->开启pop3和smtp服务
-
测试类中进行测试
-
测试:
-
简单的邮件发送

-
复杂的邮件发送

查看邮箱,邮件接收成功!
我们只需要使用Thymeleaf进行前后端结合即可开发自己网站邮件收发功能了!
-
拓展:封装成一个方法
13.3、定时执行任务
13.3.1、概述
项目开发中经常需要执行一些定时任务,比如需要在每天凌晨的时候,分析一次前一天的日志信息,Spring为我们提供了异步执行任务调度的方式,提供了两个接口。
- TaskExecutor接口
- TaskScheduler接口
两个注解:
- @EnableScheduling //SpringBoot启动类
- @Scheduled //执行方法
13.3.2、使用步骤
-
ScheduledService业务类
-
在SpringBoot主启动类中添加注释
-
我们来详细了解下cron表达式
-
常用的表达式
14、Dubbo和Zookeeper集成
14.1、分布式理论
14.1.1、什么是分布式系统?
在《分布式系统原理与范型》一书中有如下定义:“分布式系统是若干独立计算机的集合,这些计算机对于用户来说就像单个相关系统”;
分布式系统是由一组通过网络进行通信、为了完成共同的任务而协调工作的计算机节点组成的系统。分布式系统的出现是为了用廉价的、普通的机器完成单个计算机无法完成的计算、存储任务。其目的是利用更多的机器,处理更多的数据。
分布式系统(distributed system)是建立在网络之上的软件系统。
首先需要明确的是,只有当单个节点的处理能力无法满足日益增长的计算、存储任务的时候,且硬件的提升(加内存、加磁盘、使用更好的CPU)高昂到得不偿失的时候,应用程序也不能进一步优化的时候,我们才需要考虑分布式系统。因为,分布式系统要解决的问题本身就是和单机系统一样的,而由于分布式系统多节点、通过网络通信的拓扑结构,会引入很多单机系统没有的问题,为了解决这些问题又会引入更多的机制、协议,带来更多的问题。。。
14.1.2、Dubbo文档
随着互联网的发展,网站应用的规模不断扩大,常规的垂直应用架构已无法应对,分布式服务架构以及流动计算架构势在必行,急需一个治理系统确保架构有条不紊的演进。
在Dubbo的官网文档有这样一张图
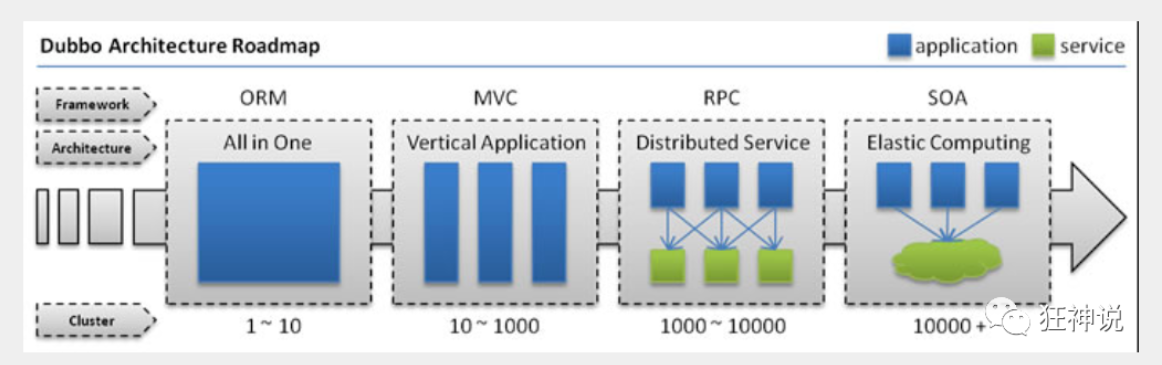
单一应用架构
当网站流量很小时,只需一个应用,将所有功能都部署在一起,以减少部署节点和成本。此时,用于简化增删改查工作量的数据访问框架(ORM)是关键。
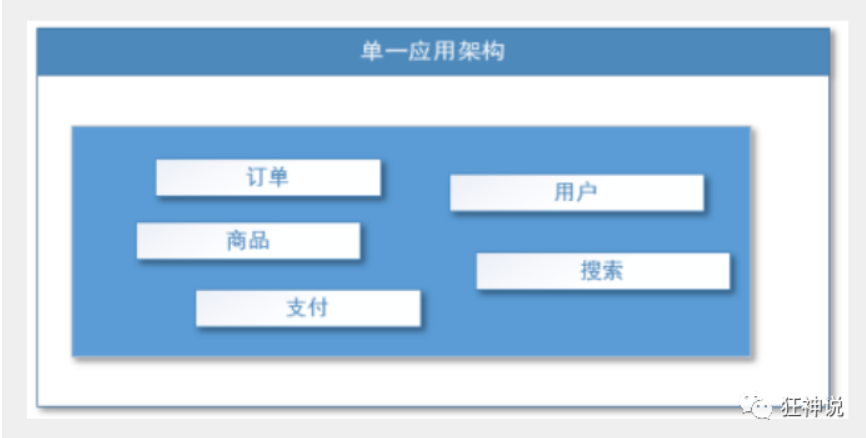
适用于小型网站,小型管理系统,将所有功能都部署到一个功能里,简单易用。
1、性能扩展比较难
2、协同开发问题
3、不利于升级维护
垂直应用架构
当访问量逐渐增大,单一应用增加机器带来的加速度越来越小,将应用拆成互不相干的几个应用,以提升效率。此时,用于加速前端页面开发的Web框架(MVC)是关键。
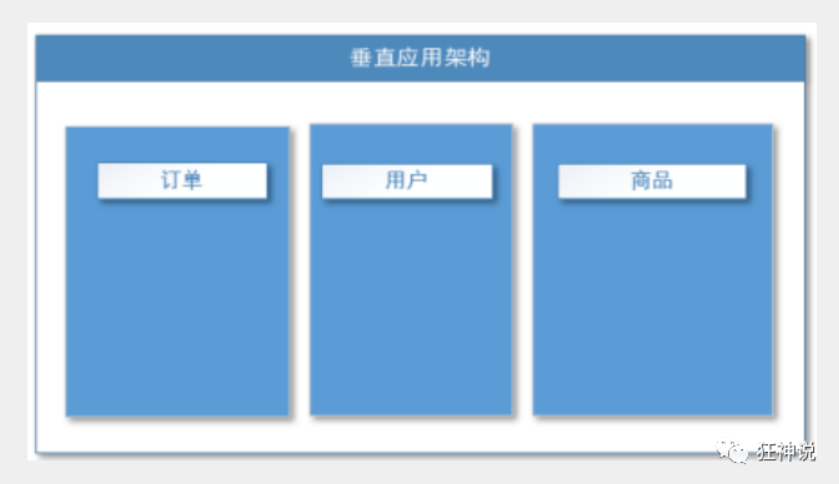
通过切分业务来实现各个模块独立部署,降低了维护和部署的难度,团队各司其职更易管理,性能扩展也更方便,更有针对性。
缺点:公用模块无法重复利用,开发性的浪费
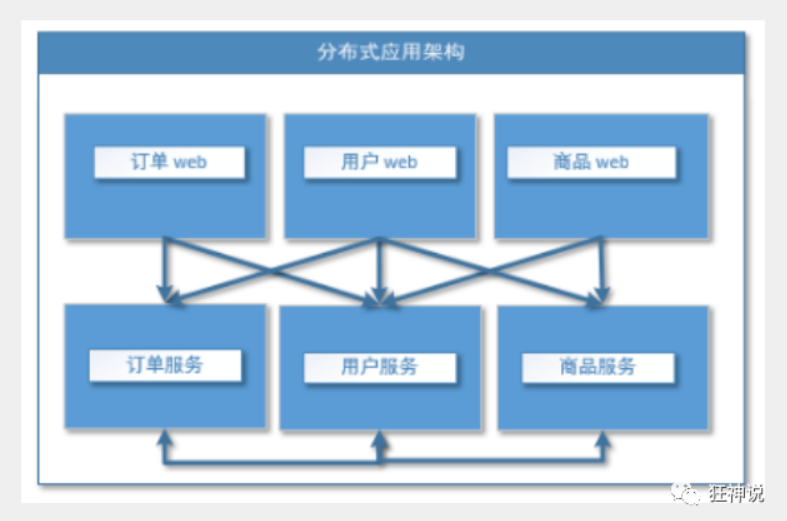
分布式服务架构
当垂直应用越来越多,应用之间交互不可避免,将核心业务抽取出来,作为独立的服务,逐渐形成稳定的服务中心,使前端应用能更快速的响应多变的市场需求。此时,用于提高业务复用及整合的分布式服务框架(RPC)是关键。
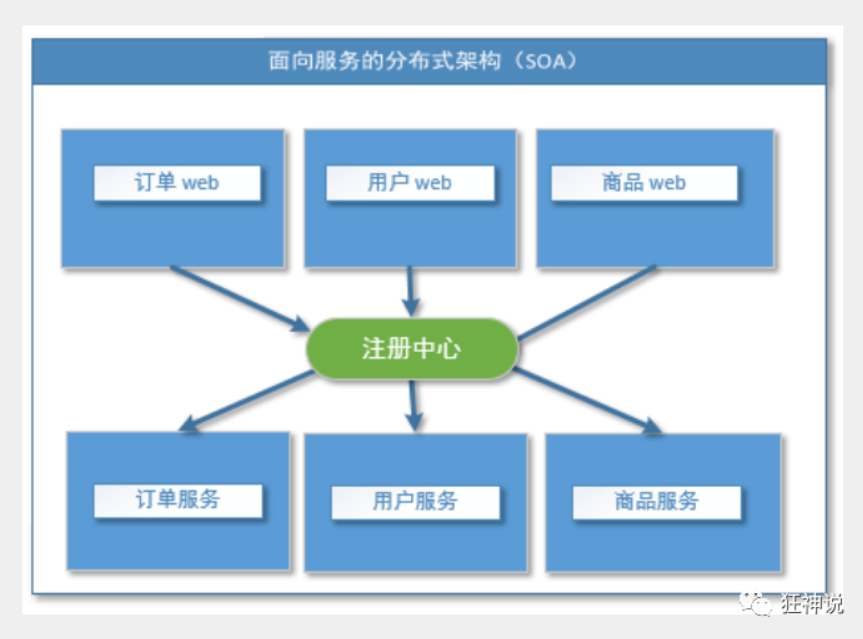
流动计算架构
当服务越来越多,容量的评估,小服务资源的浪费等问题逐渐显现,此时需增加一个调度中心基于访问压力实时管理集群容量,提高集群利用率。此时,用于提高机器利用率的资源调度和治理中心(SOA)[ Service Oriented Architecture]是关键。
14.2、什么是RPC
14.2.1、概述
RPC【Remote Procedure Call】是指远程过程调用,是一种进程间通信方式,他是一种技术的思想,而不是规范。它允许程序调用另一个地址空间(通常是共享网络的另一台机器上)的过程或函数,而不用程序员显式编码这个远程调用的细节。即程序员无论是调用本地的还是远程的函数,本质上编写的调用代码基本相同。
也就是说两台服务器A,B,一个应用部署在A服务器上,想要调用B服务器上应用提供的函数/方法,由于不在一个内存空间,不能直接调用,需要通过网络来表达调用的语义和传达调用的数据。为什么要用RPC呢?就是无法在一个进程内,甚至一个计算机内通过本地调用的方式完成的需求,比如不同的系统间的通讯,甚至不同的组织间的通讯,由于计算能力需要横向扩展,需要在多台机器组成的集群上部署应用。RPC就是要像调用本地的函数一样去调远程函数;
推荐阅读文章:https://www.jianshu.com/p/2accc2840a1b
14.2.2、RPC基本原理
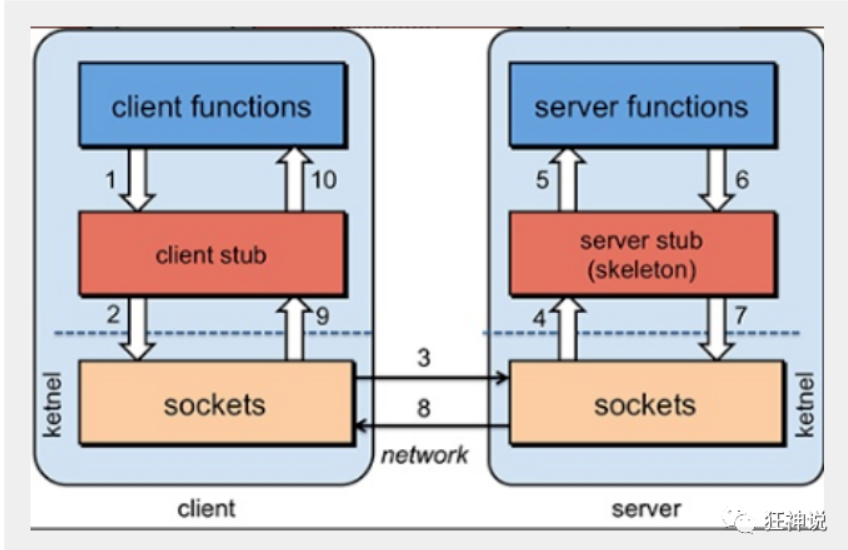
步骤解析:

RPC两个核心模块:通讯,序列化
14.3、Dubbo
14.3.1、什么是dubbo
Apache Dubbo |ˈdʌbəʊ| 是一款高性能、轻量级的开源Java RPC框架,它提供了三大核心能力:面向接口的远程方法调用,智能容错和负载均衡,以及服务自动注册和发现。
dubbo官网 http://dubbo.apache.org/zh-cn/index.html
1.了解Dubbo的特性
2.查看官方文档
14.3.2、dubbo基本概念
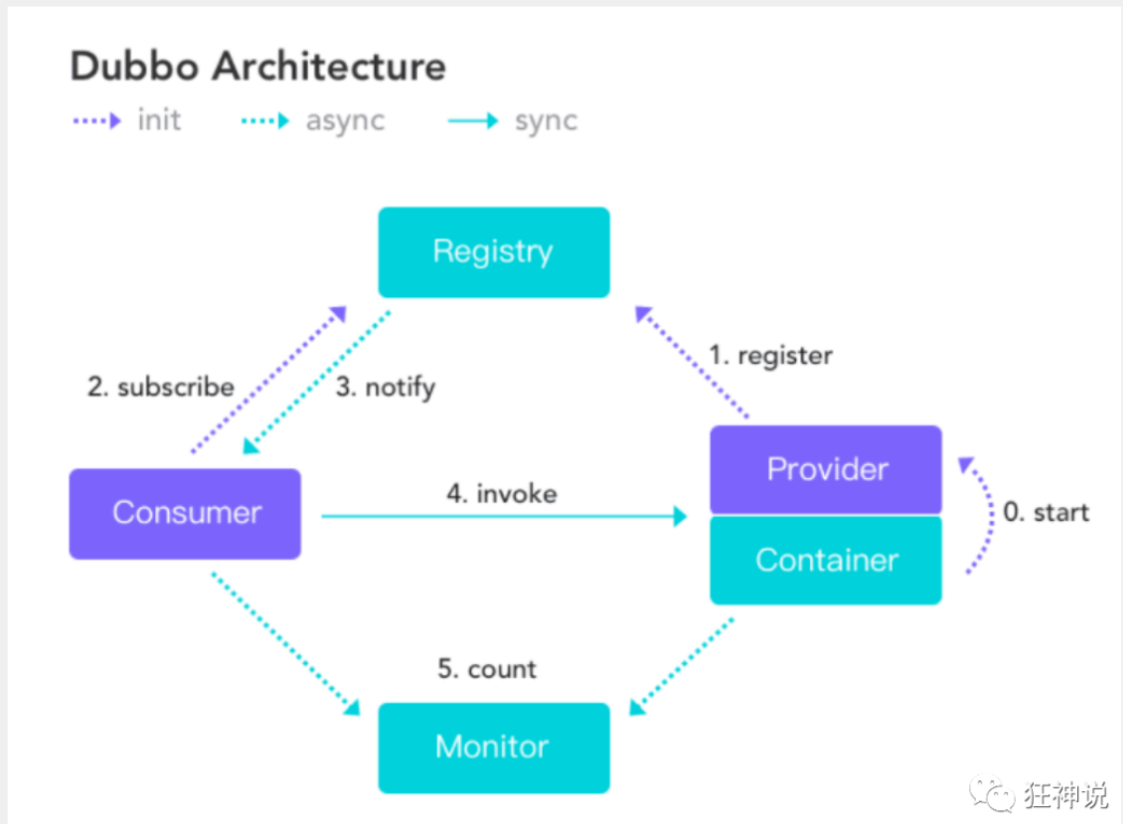
服务提供者(Provider):暴露服务的服务提供方,服务提供者在启动时,向注册中心注册自己提供的服务。
服务消费者(Consumer):调用远程服务的服务消费方,服务消费者在启动时,向注册中心订阅自己所需的服务,服务消费者,从提供者地址列表中,基于软负载均衡算法,选一台提供者进行调用,如果调用失败,再选另一台调用。
注册中心(Registry):注册中心返回服务提供者地址列表给消费者,如果有变更,注册中心将基于长连接推送变更数据给消费者
监控中心(Monitor):服务消费者和提供者,在内存中累计调用次数和调用时间,定时每分钟发送一次统计数据到监控中心
调用关系说明
-
服务容器负责启动,加载,运行服务提供者。
-
服务提供者在启动时,向注册中心注册自己提供的服务。
-
服务消费者在启动时,向注册中心订阅自己所需的服务。
-
注册中心返回服务提供者地址列表给消费者,如果有变更,注册中心将基于长连接推送变更数据给消费者。
-
服务消费者,从提供者地址列表中,基于软负载均衡算法,选一台提供者进行调用,如果调用失败,再选另一台调用。
-
服务消费者和提供者,在内存中累计调用次数和调用时间,定时每分钟发送一次统计数据到监控中心。
14.4、Dubbo环境搭建(Window下安装zookeeper)
点进dubbo官方文档,推荐我们使用Zookeeper 注册中心
下载链接:Apache ZooKeeper
下载版本:3.8.0

- 注意:3.5版本后要下载bin文件
-
解压后打开 conf,将
zoo_sample.cfg复制一份改名为zoo.cfg -
将
dataDir=./删掉,加入下列命令 -
打开bin文件夹的
zkServer.cmd(注意要用管理员模式)
-
使用
zkCli.cmd测试ls /:列出Zookeeper根下保存的所有节点create -e /dt 123:创建一个 /dt 节点,值为123
get /dt:获取 /dt 节点的值
我们再来看下节点

14.5、Windows下安装dubbo-admin
dubbo本身并不是服务软件。它其实就是一个jar包,能够帮助你的java程序连接到zookeeper,并利用zookeeper消费、提供服务。
但是为了让用户更好的管理监控更多的dubbo服务,官方提供了一个可视化的监控程序dubbo-admin,不过这个监控即使不装也不影响使用。
我们这里来安装一下:
-
下载dubbo-admin
-
解压进入目录
修改 dubbo-admin\scr\main\resources\application.properties 指定zookeeper地址
-
在项目目录下打包 dubbo-admin
- 如果打包失败,切换环境变量的jdk版本为1.8
-
执行 dubbo/target 下的
dubbo-admin-0.0.1-SNAPSHOT.jar- 注意:Zookeeper的服务一定要打开
执行完毕,我们去访问一下 http://localhost:7001/,这时候我们需要输入登录账号的密码,默认root-root

登录成功后,查看界面

14.6、总结
-
小结
zookeeper:注册中心
dubbo-admin:一个监控管理后台,查看我们注册了哪些服务,哪些服务被消费了
Dubbo:jar包
-
步骤
前提:zookeeper服务已经开启!
- 提供者提供服务
- 导入依赖
- 配置注册中心的地址,以及服务发现名,和要扫描的包~
- 在想要被注册的服务上面~ 增加一个注解 @DubboService
- 消费者如何消费
- 导入依赖
- 配置注册中心的地址,配置自己的服务名
- 从远程注入服务~ @DubboReference
- 提供者提供服务
14.7、服务注册与发现实战
14.7.1、步骤
-
创建一个空项目
-
File->New->Module

-
添加web支持

-
删除多余的文件

-
导入依赖
注意:dubbo-spring-boot-starter不要用3.0版本以上会报错
[新版的坑] Zookeeper及其依赖包,解决日志冲突,还需要剔除日志依赖
-
项目结构

-
Service层
-
TicketService
-
TicketServiceImpl
-
-
application.properties
-
-
再File->New->Module

-
一样添加添加web支持
-
一样删除多余的文件
-
给消费者导入依赖(跟生产者一致)
-
项目结构

-
Service层
-
UserService
-
TicketService
-
-
application.properties修改端口号
-
-
测试
-
开启ZooKeeper

-
命令行运行
dubbo-admin-0.0.1-SNAPSHOT.jar -
运行 ProviderServerApplication 启动类(生产者)
-
访问:http://localhost:7001/governance/providers


我们能发现
TicketServiceImpl已经注册到Dubbo里 -
运行 ConsumerServerApplicationTests 测试类 (消费者)
-
结果

-
15、回顾和展望


【推荐】国内首个AI IDE,深度理解中文开发场景,立即下载体验Trae
【推荐】编程新体验,更懂你的AI,立即体验豆包MarsCode编程助手
【推荐】抖音旗下AI助手豆包,你的智能百科全书,全免费不限次数
【推荐】轻量又高性能的 SSH 工具 IShell:AI 加持,快人一步
· 分享4款.NET开源、免费、实用的商城系统
· 全程不用写代码,我用AI程序员写了一个飞机大战
· MongoDB 8.0这个新功能碉堡了,比商业数据库还牛
· 白话解读 Dapr 1.15:你的「微服务管家」又秀新绝活了
· 上周热点回顾(2.24-3.2)