狂神说学习笔记:ElasticSearch
ElasticSearch
参考视频:https://www.bilibili.com/video/BV17a4y1x7zq
6.x 和 7.x 区别很大,6.x 的API(原生API、RestFul高级)
为什么要使用ElasticSearch
SQL:like %xx% 如果是大数据,查询很慢,索引!
ElasticSearch:搜索!(百度、github、淘宝、电商)
聊聊Doug Cutting
1998年9月4日,Google公司在美国硅谷成立。正如大家所知,它是一家做搜索引擎起家的公司。

无独有偶,一位名叫Doug Cutting的美国工程师,也迷上了搜索引擎。他做了一个用于文本搜索的函数库(姑且理解为软件的功能组件),命名为Lucene。

Lucene是用JAVA写成的,目标是为各种中小型应用软件加入全文检索功能。因为好用而且开源(代码公开),非常受程序员们的欢迎。
早期的时候,这个项目被发布在Doug Cutting的个人网站和SourceForge(一个开源软件网站)。后来,2001年底,Lucene成为Apache软件基金会jakarta项目的一个子项目。

2004年,Doug Cutting再接再励,在Lucene的基础上,和Apache开源伙伴Mike Cafarella合作,开发了一款可以代替当时的主流搜索的开源搜索引擎,命名为Nutch。

Nutch是一个建立在Lucene核心之上的网页搜索应用程序,可以下载下来直接使用。它在Lucene的基础上加了网络爬虫和一些网页相关的功能,目的就是从一个简单的站内检索推广到全球网络的搜索上,就像Google一样。
Nutch在业界的影响力比Lucene更大。
大批网站采用了Nutch平台,大大降低了技术门槛,使低成本的普通计算机取代高价的Web服务器成为可能。甚至有一段时间,在硅谷有了一股用Nutch低成本创业的潮流。(大数据!)
随着时间的推移,无论是Google还是Nutch,都面临搜索对象“体积”不断增大的问题。
尤其是Google,作为互联网搜索引擎,需要存储大量的网页,并不断优化自己的搜索算法,提升搜索效率。

在这个过程中,Google确实找到了不少好办法,并且无私地分享了出来。开源!
2003年,Google发表了一篇技术学术论文,公开介绍了自己的谷歌文件系统 GFS(Google File System)。这是Google公司为了存储海量搜索数据而设计的专用文件系统。
第二年,也就是2004年,Doug Cutting基于Google的GFS论文,实现了分布式文件存储系统,并将它命名为NDFS(Nutch Distributed File System)。

还是2004年,Google又发表了一篇技术学术论文,介绍自己的MapReduce编程模型。这个编程模型,用于大规模数据集(大于1TB)的并行分析运算。
第二年(2005年),Doug Cutting又基于MapReduce,在Nutch搜索引擎实现了该功能。

2006年,当时依然很厉害的Yahoo(雅虎)公司,招安了Doug Cutting。

这里要补充说明一下雅虎招安Doug的背景:2004年之前,作为互联网开拓者的雅虎,是使用Google搜索引擎作为自家搜索服务的。在2004年开始,雅虎放弃了Google,开始自己研发搜索引擎。所以。。。
加盟Yahoo之后,Doug Cutting将NDFS和MapReduce进行了升级改造,并重新命名为Hadoop(NDFS也改名为HDFS,Hadoop Distributed File System)。
这个,就是后来大名鼎鼎的大数据框架系统——Hadoop的由来。而Doug Cutting,则被人们称为Hadoop之父。

Hadoop这个名字,实际上是Doug Cutting他儿子的黄色玩具大象的名字。所以,Hadoop的Logo,就是一只奔跑的黄色大象。

我们继续往下说。
还是2006年,Google又发论文了。
这次,它们介绍了自己的BigTable。这是一种分布式数据存储系统,一种用来处理海量数据的非关系型数据库。
Doug Cutting当然没有放过,在自己的hadoop系统里面,引入了BigTable,并命名为HBase。

好吧,反正就是紧跟Google时代步伐,你出什么,我学什么。
所以,Hadoop的核心部分,基本上都有Google的影子。

2008年1月,Hadoop成功上位,正式成为Apache基金会的顶级项目。
同年2月,Yahoo宣布建成了一个拥有1万个内核的Hadoop集群,并将自己的搜索引擎产品部署在上面。
7月,Hadoop打破世界纪录,成为最快排序1TB数据的系统,用时209秒。
回到主题
在学习ElasticSearch之前,先简单了解一下Lucene:
- Doug Cutting开发
- 是apache软件基金会4 jakarta项目组的一个子项目
- 是一个开放源代码的全文检索引擎工具包
- 不是一个完整的全文检索引擎,而是一个全文检索引擎的架构,提供了完整的查询引擎和索引引擎,部分文本分析引擎(英文与德文两种西方语言)
- 当前以及最近几年最受欢迎的免费Java信息检索程序库。
Lucene和ElasticSearch的关系:
- ElasticSearch是基于Lucene 做了一下封装和增强
一、ElasticSearch概述
Elaticsearch,简称为es,es是一个开源的高扩展的分布式全文检索引擎,它可以近乎实时的存储、检索数据;本身扩展性很好,可以扩展到上百台服务器,处理PB级别(大数据时代)的数据。es也使用java开发并使用Lucene作为其核心来实现所有索引和搜索的功能,但是它的目的是 通过简单的RESTful API来隐藏Lucene的复杂性,从而让全文搜索变得简单 。
据国际权威的数据库产品评测机构DB Engines的统计,在2016年1月,ElasticSearch已超过Solr等,成为排名第一的搜索引擎类应用。
历史
多年前,一个叫做Shay Banon的刚结婚不久的失业开发者,由于妻子要去伦敦学习厨师,他便跟着也去了。在他找工作的过程中,为了给妻子构建一个食谱的搜索引擎,他开始构建一个早期版本的Lucene。
直接基于Lucene工作会比较困难,所以Shay开始抽象Lucene代码以便lava程序员可以在应用中添加搜索功能。他发布了他的第一个开源项目,叫做“Compass”。
后来Shay找到一份工作,这份工作处在高性能和内存数据网格的分布式环境中,因此高性能的、实时的、分布式的搜索引擎也是理所当然需要的。然后他决定重写Compass库使其成为一个独立的服务叫做Elasticsearch。
第一个公开版本出现在2010年2月,在那之后Elasticsearch已经成为Github上最受欢迎的项目之一,代码贡献者超过300人。一家主营Elasticsearch的公司就此成立,他们一边提供商业支持一边开发新功能,不过Elasticsearch将永远开源且对所有人可用。
Shay的妻子依旧等待着她的食谱搜索……
谁在使用:
1、维基百科,类似百度百科,全文检索,高亮,搜索推荐/2(权重,百度!)
2、The Guardian (国外新闻网站) ,类似搜狐新闻,用户行为日志(点击,浏览,收藏,评论) +社交网络数据(对某某新闻的相关看法) ,数据分析,给到每篇新闻文章的作者,让他知道他的文章的公众反馈(好,坏,热门,垃圾,鄙视,崇拜)
3、Stack Overflow (国外的程序异常讨论论坛) ,,IT问题,程序的报错,提交上去,有人会跟你讨论和回答,全文检索,搜索相关问题和答案,程序报错了,就会将报错信息粘贴到里面去,搜索有没有对应的答案
4、GitHub (开源代码管理),搜索 上千亿行代码
5、电商网站,检索商品
6、日志数据分析,logstash采集日志,ES进行复杂的数据分析,ELK技术,elasticsearch+logstash+kibana
7、商品价格监控网站,用户设定某商品的价格阈值,当低于该阈值的时候,发送通知消息给用户,比如说订阅牙膏的监控,如果高露洁牙膏的家庭套装低于50块钱,就通知我,我就去买
8、BI系统,商业智能, Business Intelligence。比如说有个大型商场集团,BI ,分析一下某某区域最近3年的用户消费 金额的趋势以及用户群体的组成构成,产出相关的数张报表, **区,最近3年,每年消费金额呈现100%的增长,而且用户群体85%是高级白领,开一个新商场。ES执行数据分析和挖掘, Kibana进行数据可视化
9、国内:站内搜索(电商,招聘,门户,等等),IT系统搜索(OA,CRM,ERP,等等),数据分析(ES热门的一一个使用场景)
ES和 solr 的差别
1、ElasticSearch简介
Elasticsearch是一个实时分布式搜索和分析引擎。 它让你以前所未有的速度处理大数据成为可能。
它用于 全文搜索、结构化搜索、分析以及将这三者混合使用:
维基百科使用Elasticsearch提供全文搜索并高亮关键字,以及输入实时搜索(search-asyou-type)和搜索纠错(did-you-mean)等搜索建议功能。
英国卫报使用Elasticsearch结合用户日志和社交网络数据提供给他们的编辑以实时的反馈,以便及时了解公众对新发表的文章的回应。
StackOverflow结合全文搜索与地理位置查询,以及more-like-this功能来找到相关的问题和答案。
Github使用Elasticsearch检索1300亿行的代码。
但是Elasticsearch不仅用于大型企业,它还让像DataDog以及Klout这样的创业公司将最初的想法变成可扩展的解决方案。
Elasticsearch可以在你的笔记本上运行,也可以在数以百计的服务器上处理PB级别的数据。
Elasticsearch是一个基于Apache Lucene™的开源搜索引擎。无论在开源还是专有领域, Lucene可被认为是迄今为止最先进、性能最好的、功能最全的搜索引擎库。
但是, Lucene只是一个库。 想要使用它,你必须使用Java来作为开发语言并将其直接集成到你的应用中,更糟糕的是, Lucene非常复杂,你需要深入了解检索的相关知识来理解它是如何工作的。
Elasticsearch也使用Java开发并使用Lucene作为其核心来实现所有索引和搜索的功能,但是它的目的是通过简单的RESTful API来隐藏Lucene的复杂性,从而让全文搜索变得简单。
2、Solr简介
Solr是Apache下的一个顶级开源项目,采用Java开发,它是基于Lucene的全文搜索服务器。Solr提供了比Lucene更为丰富的查询语言,同时实现了可配置、可扩展,并对索引、搜索性能进行了优化
Solr可以独立运行,运行在letty. Tomcat等这些Selrvlet容器中 , Solr 索引的实现方法很简单,用POST方法向Solr服务器发送一个描述Field及其内容的XML文档, Solr根据xml文档添加、删除、更新索引。Solr 搜索只需要发送HTTP GET请求,然后对Solr返回xml、json等格式的查询结果进行解析,组织页面布局。
Solr不提供构建UI的功能, Solr提供了一个管理界面,通过管理界面可以查询Solr的配置和运行情况。
solr是基于lucene开发企业级搜索服务器,实际上就是封装了lucene.
Solr是一个独立的企业级搜索应用服务器,它对外提供类似于Web-service的API接口。用户可以通过http请求,向搜索引擎服务器提交-定格式的文件,生成索引;也可以通过提出查找请求,并得到返回结果。
3、Lucene简介
Lucene是apache软件基金会4 jakarta项目组的一个子项目,是一个开放源代码的全文检索引擎工具包,但它不是一个完整的全文检索引擎,而是一个全文检索引擎的架构,提供了完整的查询引擎和索引引擎,部分文本分析引擎(英文与德文两种西方语言)。Lucene的目的是为软件开发人员提供一个简单易用的工具包,以方便的在目标系统中实现全文检索的功能,或者是以此为基础建立起完整的全文检索引擎。Lucene是一套用于全文检索和搜寻的开源程式库,由Apache软件基金会支持和提供。Lucene提供了一个简单却强大的应用程式接口,能够做全文索引和搜寻。在Java开发环境里Lucene是一个成熟的免费开源工具。就其本身而言,Lucene是当前以及最近几年最受欢迎的免费java信息检索程序库。人们经常提到信息检索程序库,虽然与搜索引擎有关,但不应该将信息检索程序库与搜索引擎相混淆。
Lucene是一个全文检索引擎的架构。那什么是全文搜索引擎?
全文搜索引擎是名副其实的搜索引擎,国外具代表性的有Google、Fast/AllTheWeb、AltaVista、Inktomi、Teoma、WiseNut等,国内著名的有百度(Baidu )。它们都是通过从互联网上提取的各个网站的信息(以网页文字为主)而建立的数据库中,检索与用户查询条件匹配的相关记录,然后按一定的排列顺序将结果返回给用户,因此他们是真正的搜索引擎。
从搜索结果来源的角度,全文搜索引擎又可细分为两种,一种是拥有自己的检索程序( Indexer ),俗称"蜘蛛" ( Spider )程序或"机器人" ( Robot )程序,并自建网页数据库,搜索结果直接从自身的数据库中调用,如上面提到的7家引擎;另一种则是租用其他引擎的数据库,并按自定的格式排列搜索结果,如Lycos引擎。
4、ElasticSearch与Solr比较
-
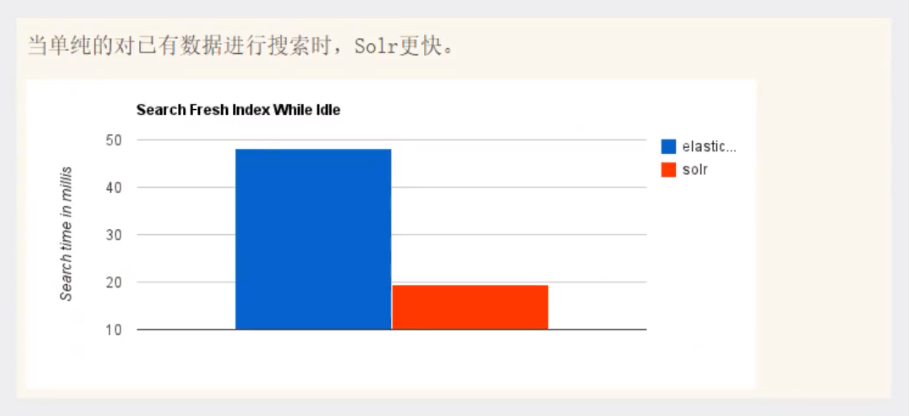
当单纯的对已有数据进行搜索时,Solr更快
-
 当实时建立索引时,Solr会产生io阻塞,查询性能较差,ElasticSearch具有明显的优势
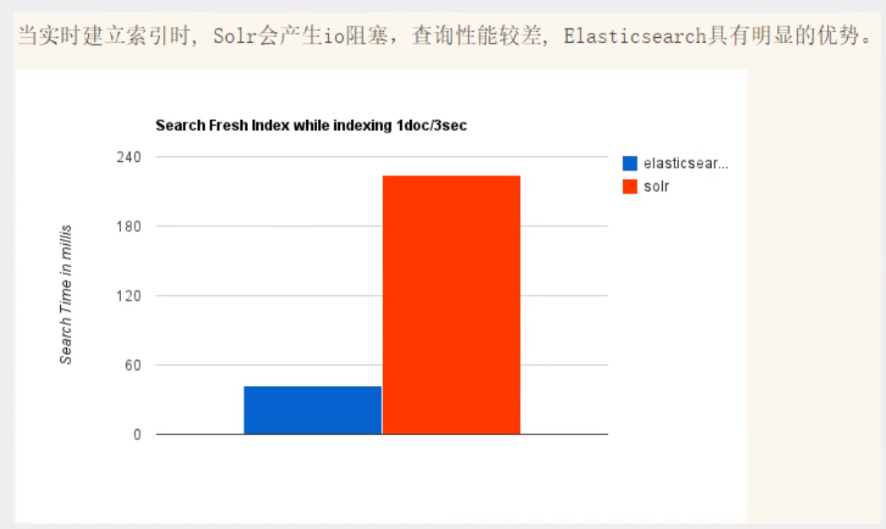
- 随着数据量的增加,Solr的搜索效率会变得更低,而ElasticSearch却没有明显的变化

- 转变我们的搜索基础设施后从Solr ElasticSearch,我们看见一个即时~ 50x提高搜索性能!
 ElasticSearch vs Solr 总结
1、es基本是开箱即用(解压就可以用!) ,非常简单。Solr安装略微复杂一丢丢!
2、Solr 利用Zookeeper进行分布式管理,而Elasticsearch 自身带有分布式协调管理功能 。
3、Solr 支持更多格式的数据,比如JSON、XML、 CSV ,而Elasticsearch仅支持json文件格式。
4、Solr 官方提供的功能更多,而Elasticsearch本身更注重于核心功能,高级功能多有第三方插件提供,例如图形化界面需要kibana友好支撑
5、 Solr 查询快,但更新索引时慢(即插入删除慢) ,用于电商等查询多的应用;
- ES建立索引快(即查询慢) ,即实时性查询快,用于facebook新浪等搜索。
- Solr是传统搜索应用的有力解决方案,但Elasticsearch更适用于新兴的实时搜索应用。
6、Solr比较成熟,有一个更大,更成熟的用户、开发和贡献者社区,而Elasticsearch相对开发维护者较少,更新太快,学习使用成本较高。
二、ElasticSearch安装
官网:https://www.elastic.co/cn/elasticsearch/
JDK8,最低要求
使用Java开发,必须保证ElasticSearch的版本与Java的核心jar包版本对应!(Java环境保证没错)

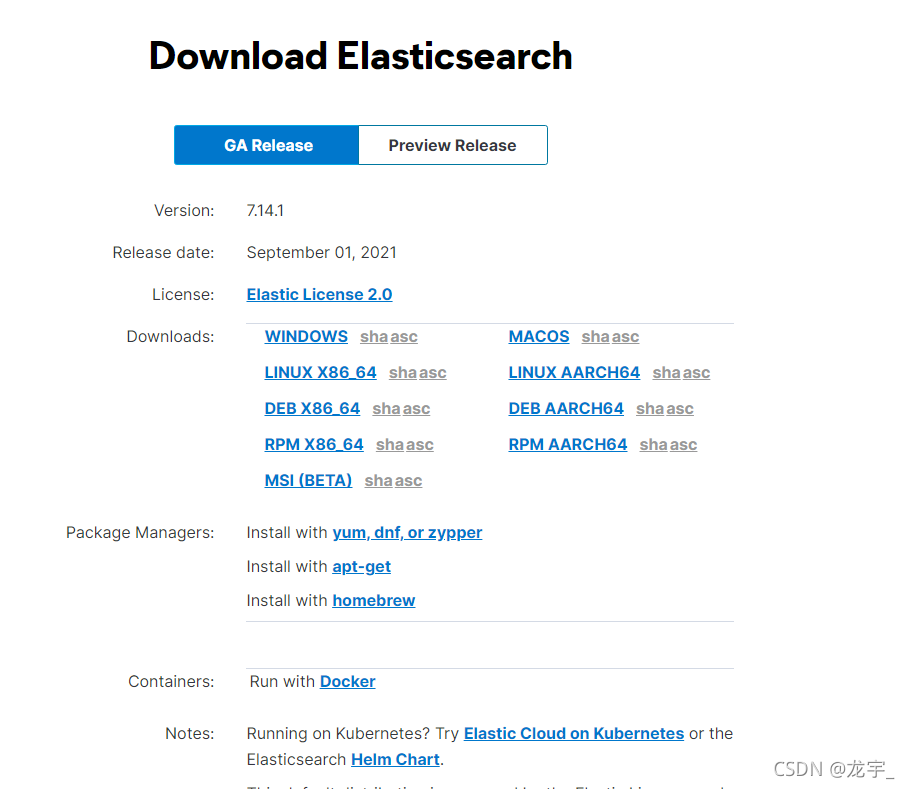
下载地址:https://www.elastic.co/cn/downloads/elasticsearch
历史版本下载:https://www.elastic.co/cn/downloads/past-releases/
官网下载巨慢,可以使用华为云镜像
- ElasticSearch: https://mirrors.huaweicloud.com/elasticsearch/?C=N&O=D
- logstash: https://mirrors.huaweicloud.com/logstash/?C=N&O=D
- kibana: https://mirrors.huaweicloud.com/kibana/?C=N&O=D
- elasticsearch-analysis-ik: https://github.com/medcl/elasticsearch-analysis-ik/releases
- cerebro: https://github.com/lmenezes/cerebro/releases
2.1、Windows下安装
1、解压即可(尽量将ElasticSearch相关工具放在统一目录下)
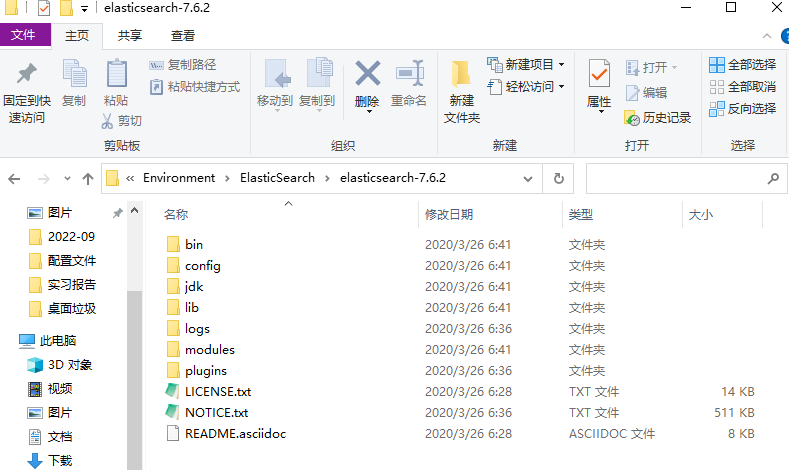
2、熟悉目录
bin	启动文件
config 配置文件目录
	1og4j2 日志配置文件
	jvm.options java虚拟机相关的配置(默认启动占1g内存,内容不够需要自己调整)
	elasticsearch.yml elasticsearch的配置文件! 默认9200端口!跨域!
1ib  相关jar包
modules 功能模块目录
plugins 插件目录 ik分词器
3、启动
一定要检查自己的java环境是否配置好
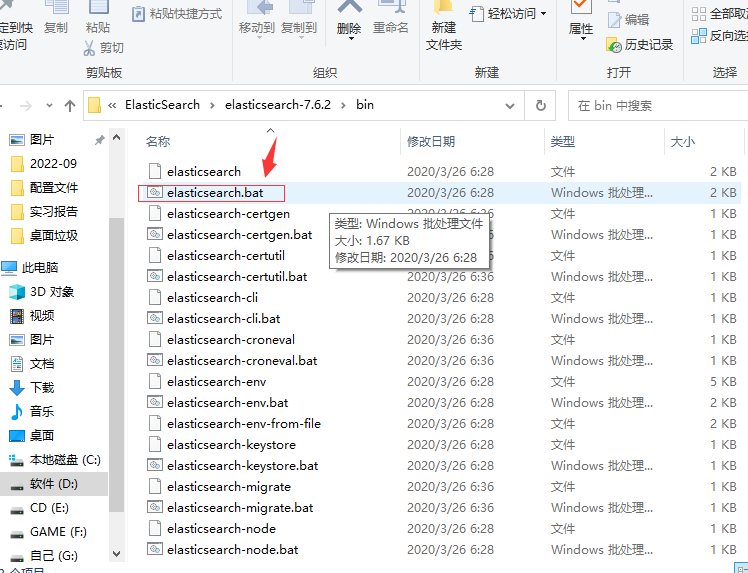
双击启动
注意:如果启动后闪退,可能是文件目录有中午或者空格造成的
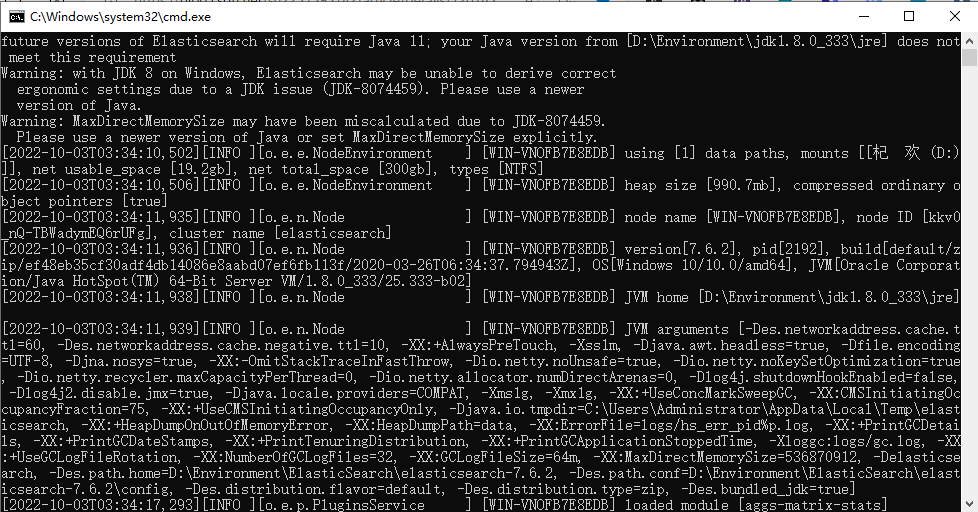
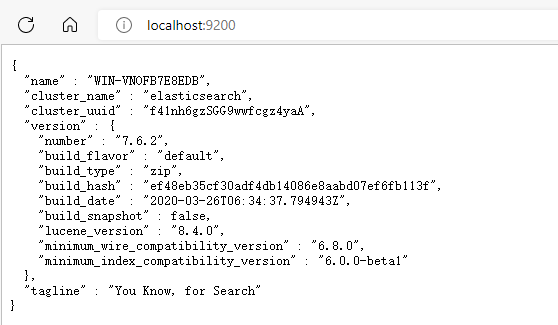
2.2、安装可视化界面
elasticsearch-head
使用前提:需要安装nodejs
下载地址:https://github.com/mobz/elasticsearch-head
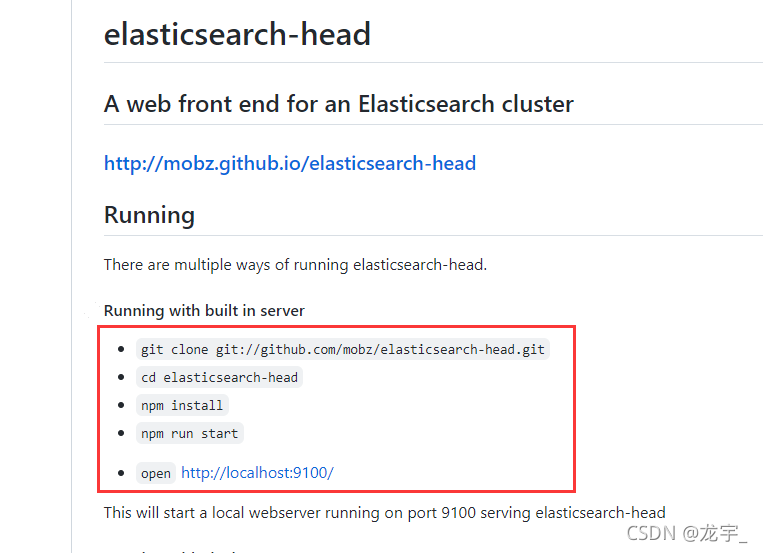 安装依赖
安装依赖 npm install
安装依赖 npm install
运行 npm start
也可以直接安装浏览器elasticsearch插件
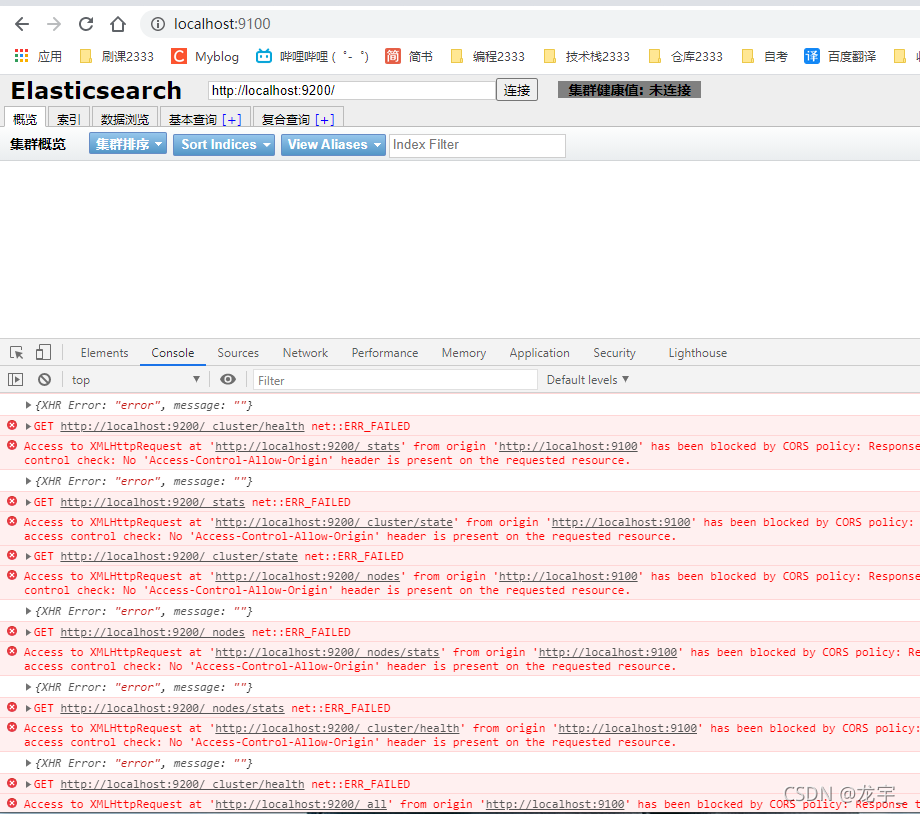 发现存在跨域问题
开启跨域(在elasticsearch解压目录config下elasticsearch.yml中添加)
# 开启跨域
http.cors.enabled: true
# 所有人访问
http.cors.allow-origin: "*"
1234
注意配置文件中不要带注释,可能会闪退
重启elasticsearch

创建一个索引


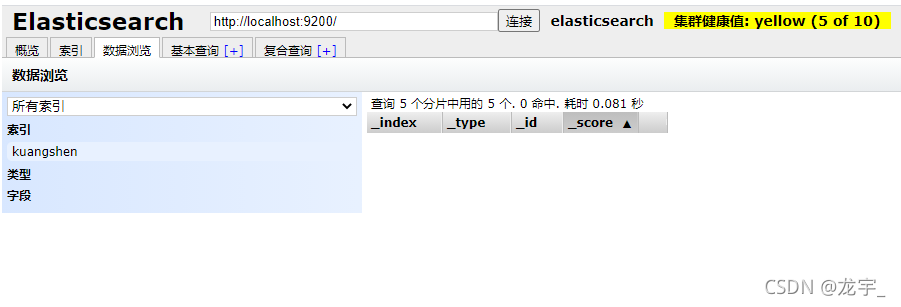
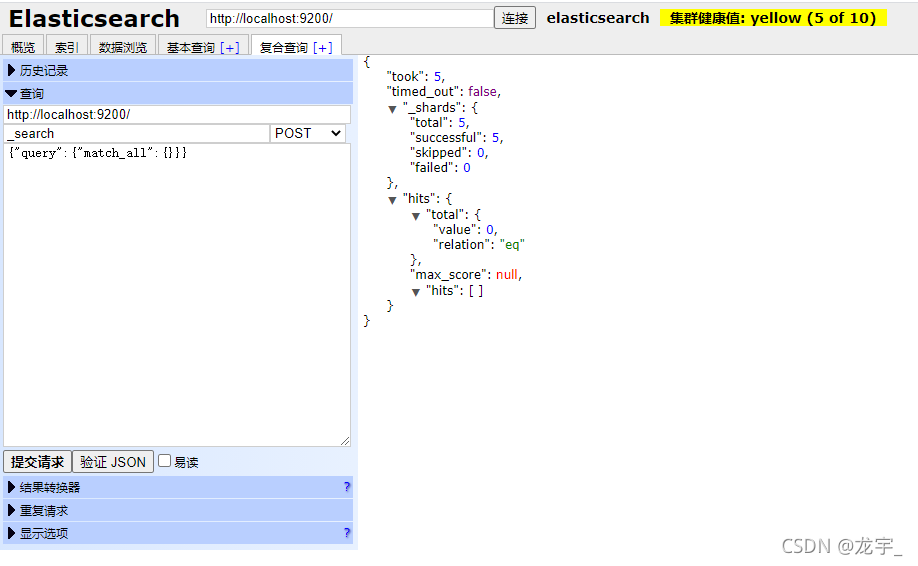
如何理解
- 如果你是初学者
- 索引 可以看做 “数据库”
- 类型 可以看做 “表”
- 文档 可以看做 “库中的数据(表中的行)”
这个head,我们只是把它当做可视化数据展示工具,之后所有的查询都在kibana中进行
- 因为不支持json格式化,不方便
2.3、了解ELK
ELK是Elasticsearch、Logstash、 Kibana三大开源框架首字母大写简称。市面上也被成为Elastic Stack。
其中Elasticsearch是一个基于Lucene、分布式、通过Restful方式进行交互的近实时搜索平台框架。
像类似百度、谷歌这种大数据全文搜索引擎的场景都可以使用Elasticsearch作为底层支持框架,可见Elasticsearch提供的搜索能力确实强大,市面上很多时候我们简称Elasticsearch为es。
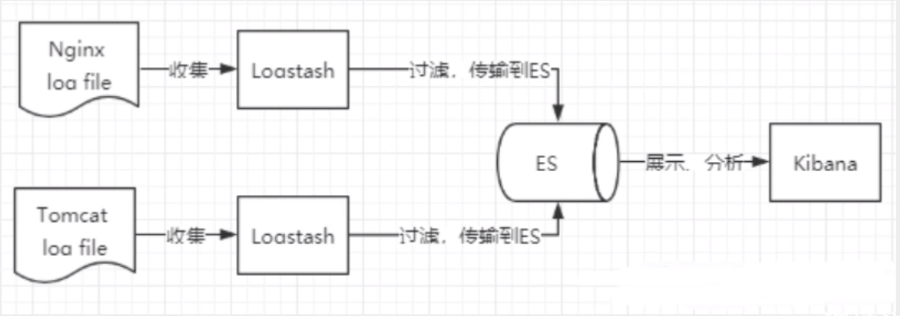
Logstash是ELK的中央数据流引擎,用于从不同目标(文件/数据存储/MQ )收集的不同格式数据,经过过滤后支持输出到不同目的地(文件/MQ/redis/elasticsearch/kafka等)。
Kibana可以将elasticsearch的数据通过友好的页面展示出来 ,提供实时分析的功能。
市面上很多开发只要提到ELK能够一致说出它是一个日志分析架构技术栈总称 ,但实际上ELK不仅仅适用于日志分析,它还可以支持其它任何数据分析和收集的场景,日志分析和收集只是更具有代表性。并非唯一性。
收集清洗数据(Logstash) ==> 搜索、存储(ElasticSearch) ==> 展示(Kibana)
2.4、安装kibana
Kibana是一个针对ElasticSearch的开源分析及可视化平台,用来搜索、查看交互存储在Elasticsearch索引中的数据。使用Kibana ,可以通过各种图表进行高级数据分析及展示。Kibana让海量数据更容易理解。它操作简单,基于浏览器的用户界面可以快速创建仪表板( dashboard )实时显示Elasticsearch查询动态。设置Kibana非常简单。无需编码或者额外的基础架构,几分钟内就可以完成Kibana安装并启动Elasticsearch索引监测。
官网:https://www.elastic.co/cn/kibana/
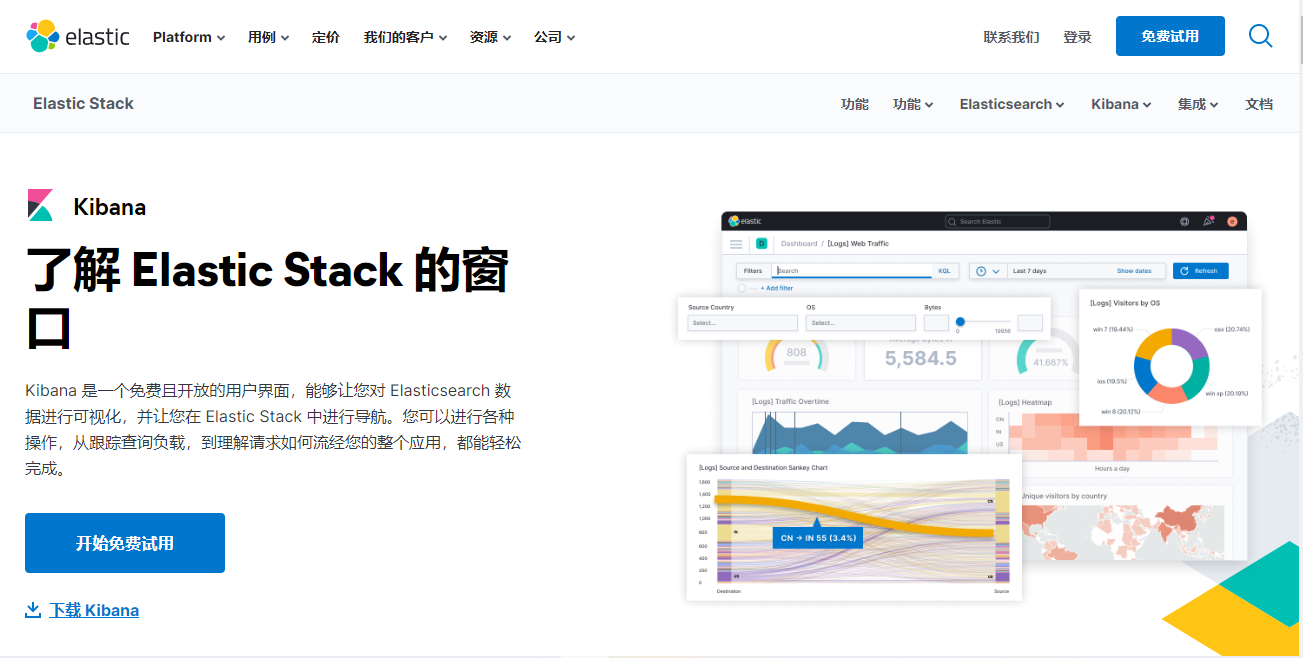
下载地址:https://www.elastic.co/cn/downloads/kibana
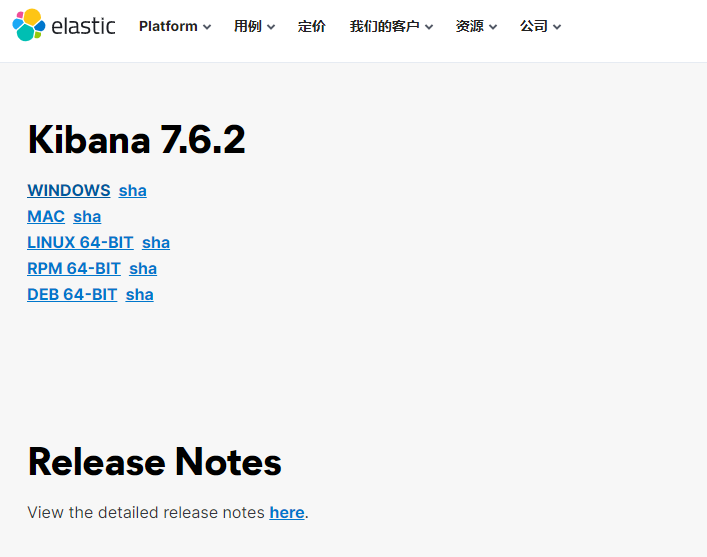
版本需要与ElasticSearch版本对应
华为云镜像: https://mirrors.huaweicloud.com/kibana/?C=N&O=D
1、安装
解压即可(尽量将ElasticSearch相关工具放在统一目录下)
2、启动
进入到 kibana\bin 目录下,双击启动(需要先开启ElasticSearch服务)


4、开发工具(Postman、curl、head、谷歌浏览器插件)
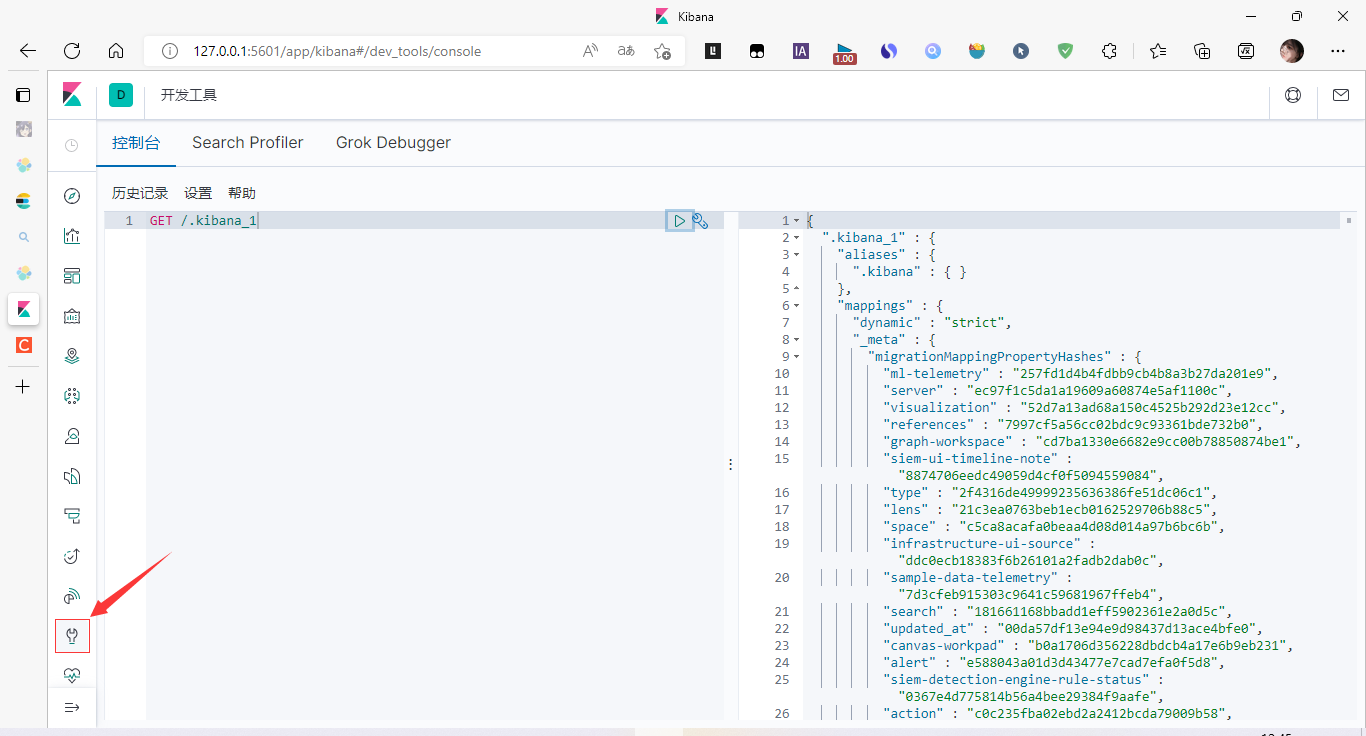
如果说,你在英文方面不太擅长,kibana是支持汉化的
5、kibana汉化
编辑器打开kibana解压目录/config/kibana.yml,添加

重启kibana
6、汉化成功
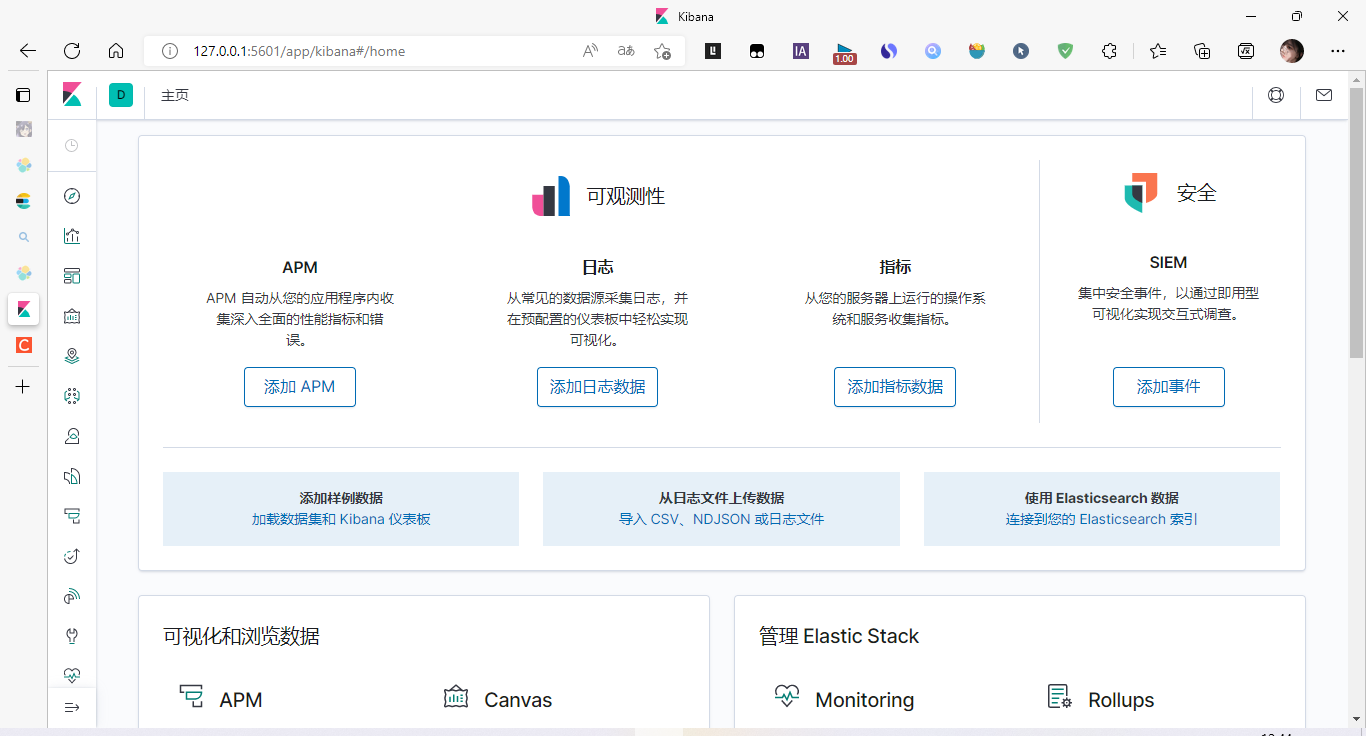
三、ElasticSearch核心概念
3.1、概述
集群,节点,索引,类型,文档,分片,映射是什么?
1、索引(ElasticSearch)
包多个分片
2、字段类型(映射)mapping
字段类型映射(字段是整型,还是字符型…)
3、文档(documents)
4、分片(Lucene索引,倒排索引)
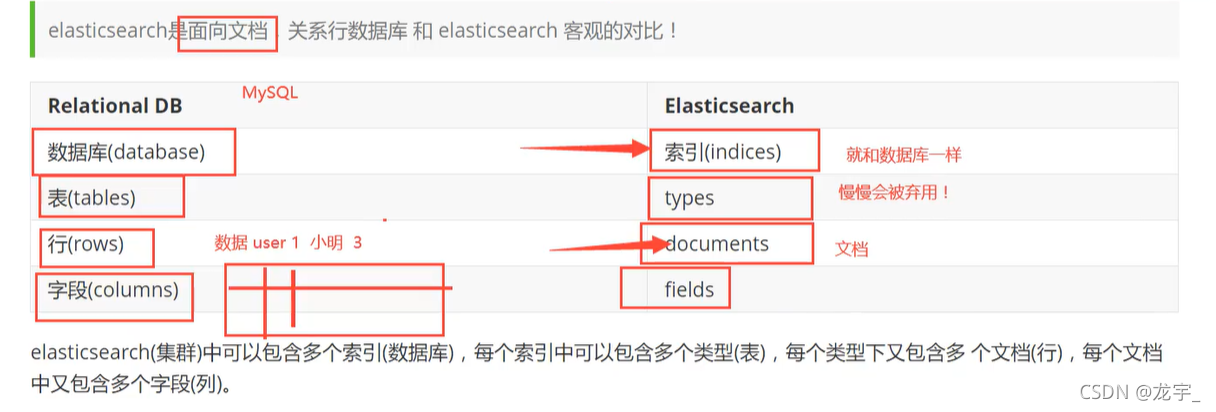
elasticsearch是面向文档,关系型数据库和elasticsearch客观的对比!一切都是json!
| Relational DB | Elasticsearch |
|---|---|
| 数据库(database) | 索引(indices) |
| 表(tables) | types |
| 行(rows) | documents |
| 字段(columns) | fields |
elasticsearch(集群)中可以包含多个索引(数据库) ,每个索引中可以包含多个类型(表) ,每个类型下又包含多个文档(行) ,每个文档中又包含多个字段(列)。
物理设计:
elasticsearch在后台把每个索引划分成多个分片。每个分片可以在集群中的不同服务器间迁移
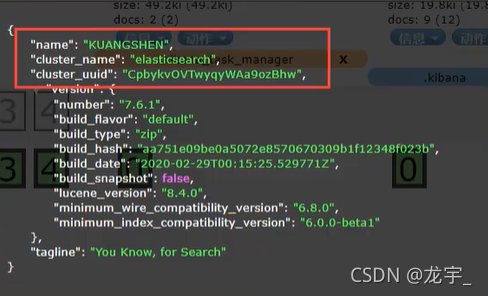
一个人就是一个集群! ,即启动的ElasticSearch服务,默认就是一个集群,且默认集群名为elasticsearch
逻辑设计:
一个索引类型中,包含多个文档,比如说文档1,文档2。当我们索引一篇文档时,可以通过这样的一个顺序找到它:索引->类型->文档id,通过这个组合我们就能索引到某个具体的文档。注意:ID不必是整数,实际上它是一个字符串。
3.2、文档
文档(”行“)
就是我们的一条条的记录
之前说elasticsearch是面向文档的,那么就意味着索引和搜索数据的最小单位是文档, elasticsearch中,文档有几个重要属性:
- 自我包含, 一篇文档同时包含字段和对应的值,也就是同时包含key:value !
- 可以是层次型的,一个文档中包含自文档,复杂的逻辑实体就是这么来的!
- 灵活的结构,文档不依赖预先定义的模式,我们知道关系型数据库中,要提前定义字段才能使用,在elasticsearch中,对于字段是非常灵活的,有时候,我们可以忽略该字段,或者动态的添加一个新的字段。
尽管我们可以随意的新增或者忽略某个字段,但是,每个字段的类型非常重要,比如一一个年龄字段类型,可以是字符串也可以是整形。因为elasticsearch会保存字段和类型之间的映射及其他的设置。这种映射具体到每个映射的每种类型,这也是为什么在elasticsearch中,类型有时候也称为映射类型。
3.3、类型
类型(“表”)
类型是文档的逻辑容器,就像关系型数据库一样,表格是行的容器。类型中对于字段的定 义称为映射,比如name映射为字符串类型。我们说文档是无模式的 ,它们不需要拥有映射中所定义的所有字段,比如新增一个字段,那么elasticsearch是怎么做的呢?elasticsearch会自动的将新字段加入映射,但是这个字段的不确定它是什么类型, elasticsearch就开始猜,如果这个值是18 ,那么elasticsearch会认为它是整形。但是elasticsearch也可能猜不对 ,所以最安全的方式就是提前定义好所需要的映射,这点跟关系型数据库殊途同归了,先定义好字段,然后再使用,别整什么幺蛾子。
3.4、索引
索引(“库”)
就是数据库!
索引是映射类型的容器, elasticsearch中的索引是一个非常大的文档集合。索|存储了映射类型的字段和其他设置。然后它们被存储到了各个分片上了。我们来研究下分片是如何工作的。
物理设计:节点和分片如何工作
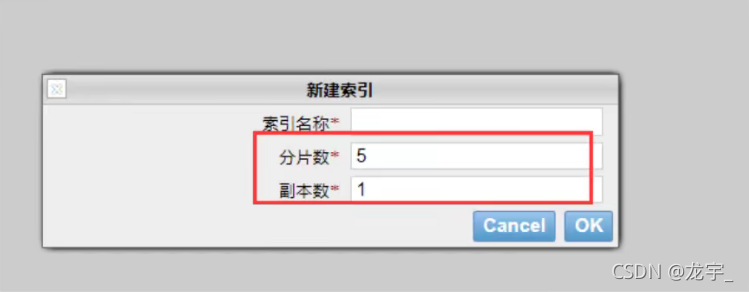
一个集群至少有一 个节点,而一个节点就是一个elasricsearch进程 ,节点可以有多个索引默认的,如果你创建索引,那么索引将会有个5个分片( primary shard ,又称主分片)构成的,每一个主分片会有一个副本( replica shard ,又称复制分片)
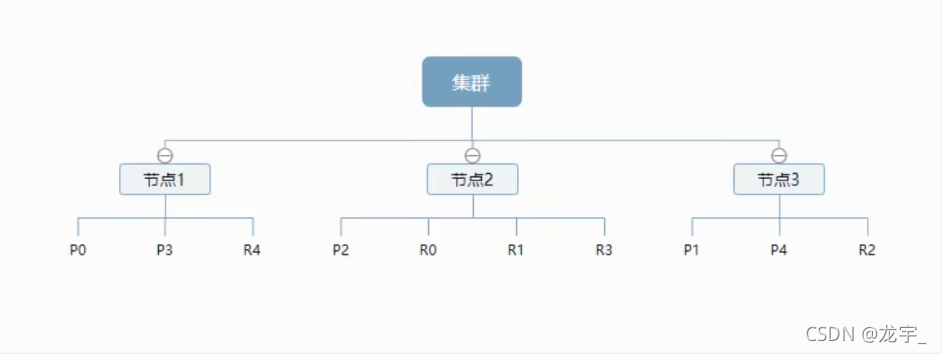
上图是一个有3个节点的集群,可以看到主分片和对应的复制分片都不会在同-个节点内,这样有利于某个节点挂掉了,数据也不至于丢失。实际上, 一个分片是一个Lucene索引, 一个包含倒排索引的文件目录,倒排索引的结构使得elasticsearch在不扫描全部文档的情况下,就能告诉你哪些文档包含特定的关键字。不过,等等,倒排索引是什么鬼?
3.5、倒排索引
elasticsearch使用的是一种称为倒排索引 |的结构,采用Lucene倒排索作为底层。这种结构适用于快速的全文搜索,一个索引由文档中所有不重复的列表构成,对于每一个词,都有一个包含它的文档列表。 例如,现在有两个文档,每个文档包含如下内容:
Study every day, good good up to forever  # 文档1包含的内容
To forever, study every day,good good up  # 文档2包含的内容
为为创建倒排索引,我们首先要将每个文档拆分成独立的词(或称为词条或者tokens) ,然后创建一一个包含所有不重 复的词条的排序列表,然后列出每个词条出现在哪个文档:
| term | doc_1 | doc_2 |
|---|---|---|
| Study | √ | x |
| To | x | x |
| every | √ | √ |
| forever | √ | √ |
| day | √ | √ |
| study | x | √ |
| good | √ | √ |
| every | √ | √ |
| to | √ | x |
| up | √ | √ |
现在,我们试图搜索 to forever,只需要查看包含每个词条的文档
| term | doc_1 | doc_2 |
|---|---|---|
| to | √ | x |
| forever | √ | √ |
| total | 2 | 1 |
两个文档都匹配,但是第一个文档比第二个匹配程度更高。如果没有别的条件,现在,这两个包含关键字的文档都将返回。
再来看一个示例,比如我们通过博客标签来搜索博客文章。那么倒排索引列表就是这样的一个结构:

如果要搜索含有python标签的文章,那相对于查找所有原始数据而言,查找倒排索引后的数据将会快的多。只需要查看标签这一栏,然后获取相关的文章ID即可。完全过滤掉无关的所有数据,提高效率!
elasticsearch的索引和Lucene的索引对比
在elasticsearch中,索引(库)这个词被频繁使用,这就是术语的使用。在elasticsearch中 ,索引被分为多个分片,每份分片是-个Lucene的索引。所以一个elasticsearch索引是由多 个Lucene索引组成的。别问为什么,谁让elasticsearch使用Lucene作为底层呢!如无特指,说起索引都是指elasticsearch的索引。
接下来的一切操作都在kibana中Dev Tools下的Console里完成。基础操作!
四、IK分词器(elasticsearch插件)
4.1、IK分词器
中文分词器
分词:即把一段中文或者别的划分成一个个的关键字,我们在搜索时候会把自己的信息进行分词,会把数据库中或者索引库中的数据进行分词,然后进行一一个匹配操作,默认的中文分词是将每个字看成一个词(不使用用IK分词器的情况下),比如“我爱狂神”会被分为”我”,”爱”,”狂”,”神” ,这显然是不符合要求的,所以我们需要安装中文分词器ik来解决这个问题。
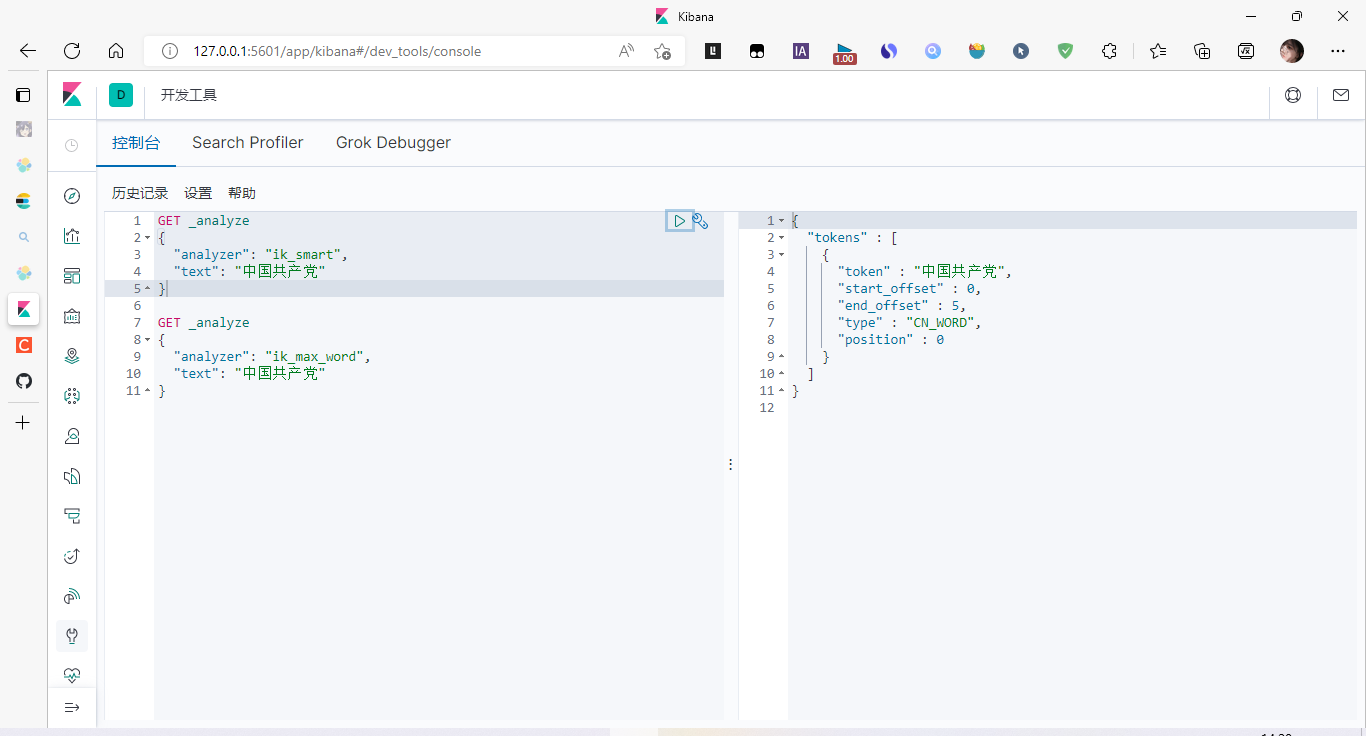
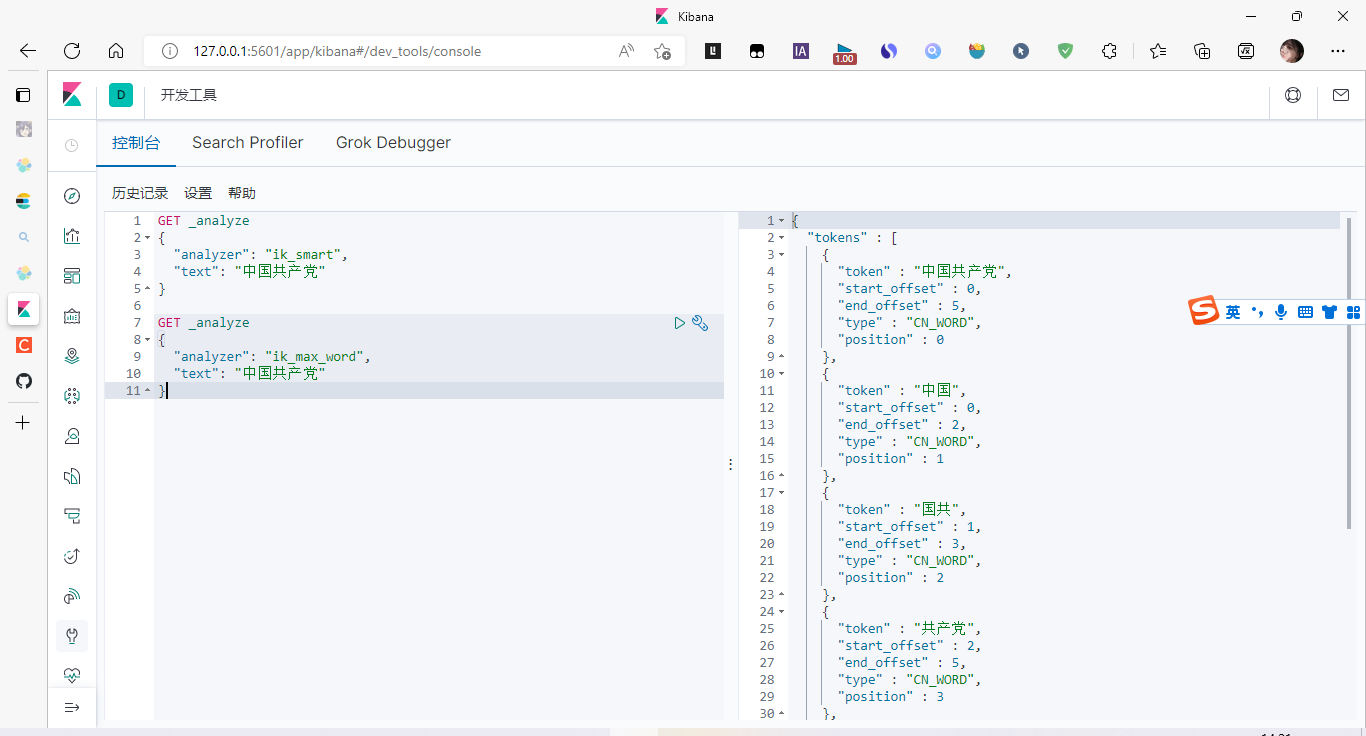
IK提供了两个分词算法: (ik_smart和ik_max_word ),其中ik_smart为最少切分,ik_max_word为最细粒度划分!
1、下载
版本要与ElasticSearch版本对应
下载地址:https://github.com/medcl/elasticsearch-analysis-ik/releases
2、安装
ik文件夹是自己创建的
解压放入到es对应的plugins下即可
3、重启观察ES,发现ik插件被加载了
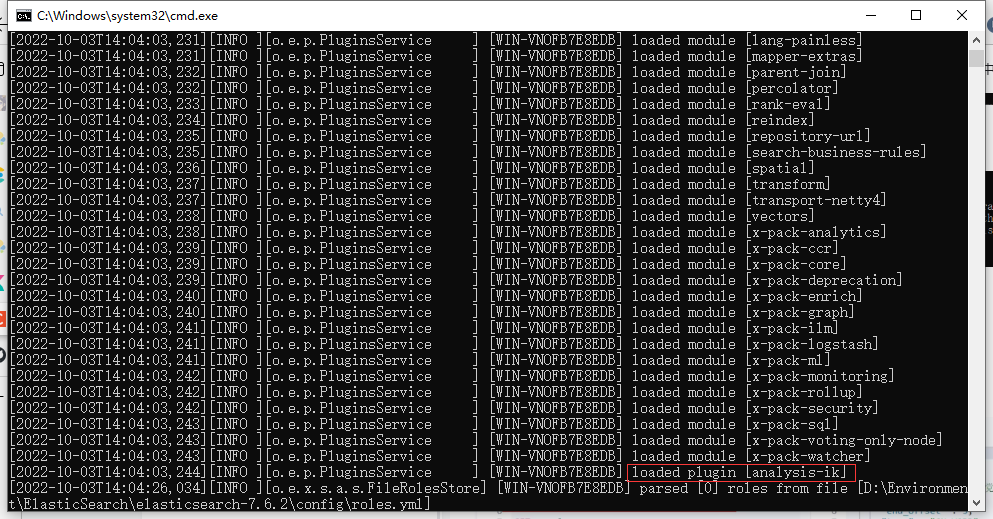
4、elasticsearch-plugin 可以通过这个命令来查看加载进来的插件

5、使用kibana测试
查看不同的分词效果
ik_smart:最少切分
ik_max_word:最细粒度划分(穷尽词库的可能)
我们输入 超级喜欢狂神说java
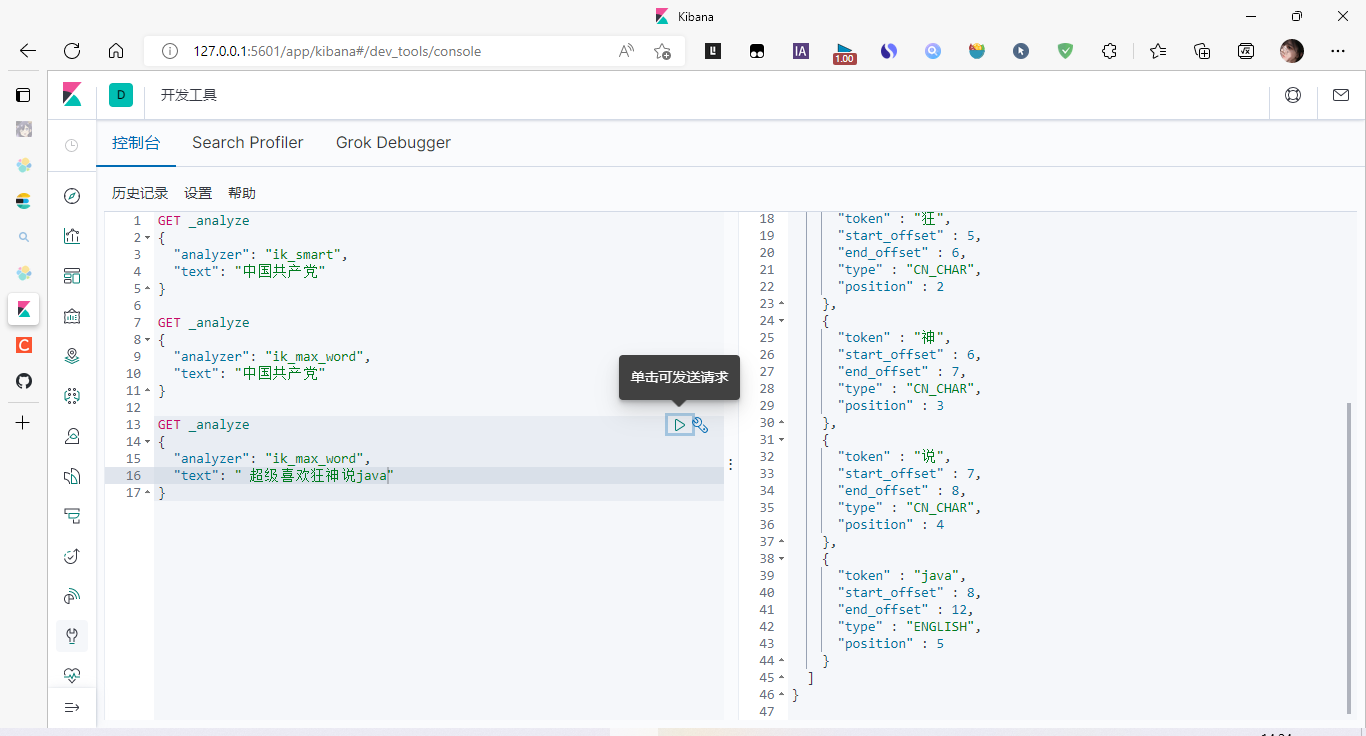
发现问题:狂神说被拆开了!
这种自己需要的词,需要自己加到我们的分词器的字典中!
ik 分词器增加自己的配置
添加自定义的词添加到扩展字典中
elasticsearch目录/plugins/ik/config/IKAnalyzer.cfg.xml
创建 kuang.dic 字典文件,添加字典内容

打开 IKAnalyzer.cfg.xml 文件,扩展字典
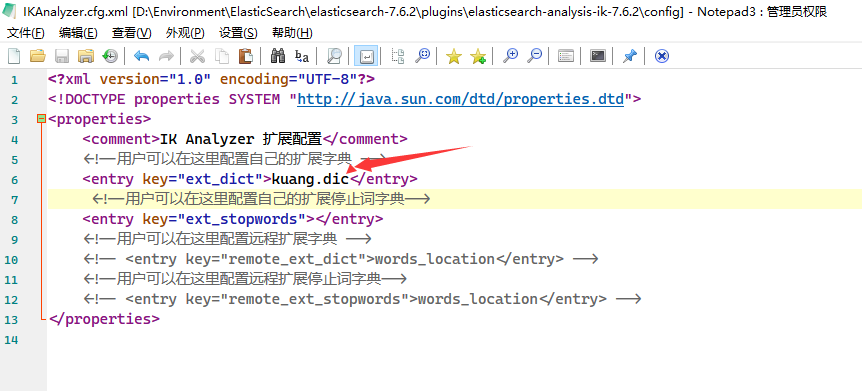
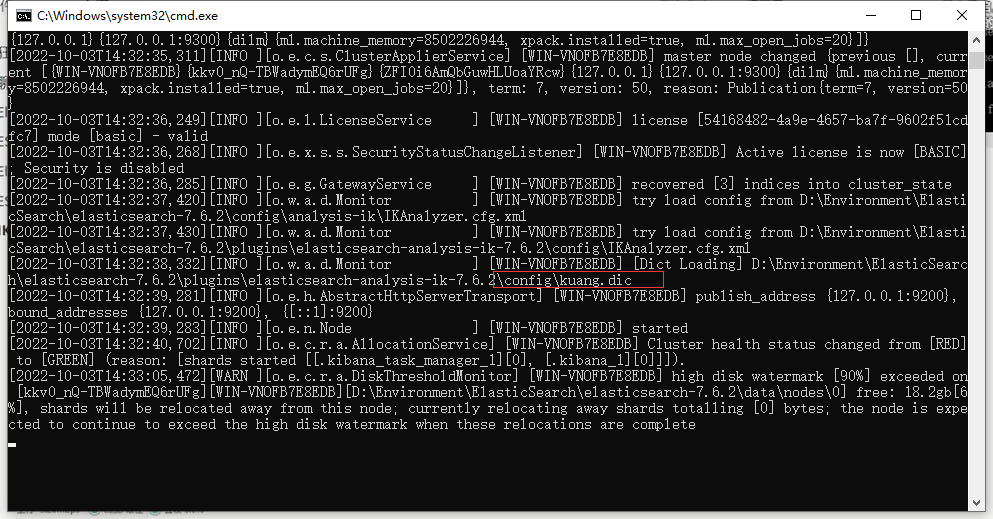
重启ElasticSearch,再次使用kibana测试
加载了自己的
测试kibana
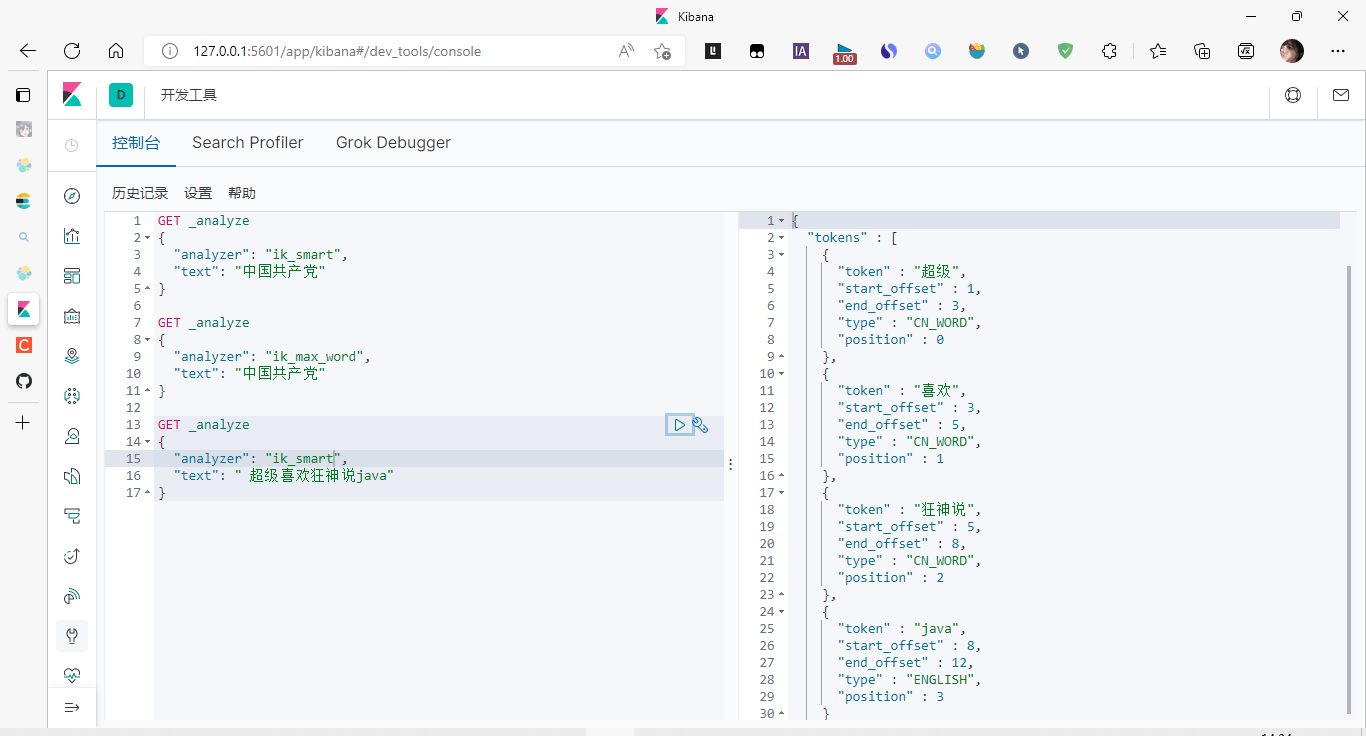
以后的话,我们需要自己配置分词就在自己定义的dic文件进行配置即可!
五、Rest风格说明
一种软件架构风格,而不是标准,只是提供了一组设计原则和约束条件。它主要用于客户端和服务器交互类的软件。基于这个风格设计的软件可以更简洁,更有层次,更易于实现缓存等机制。
5.1、基本Rest命令说明:
| method | url地址 | 描述 |
|---|---|---|
| PUT(创建,修改) | localhost:9200/索引名称/类型名称/文档id | 创建文档(指定文档id) |
| POST(创建) | localhost:9200/索引名称/类型名称 | 创建文档(随机文档id) |
| POST(修改) | localhost:9200/索引名称/类型名称/文档id/_update | 修改文档 |
| DELETE(删除) | localhost:9200/索引名称/类型名称/文档id | 删除文档 |
| GET(查询) | localhost:9200/索引名称/类型名称/文档id | 查询文档通过文档ID |
| POST(查询) | localhost:9200/索引名称/类型名称/文档id/_search | 查询所有数据 |
5.2、关于索引的基本操作
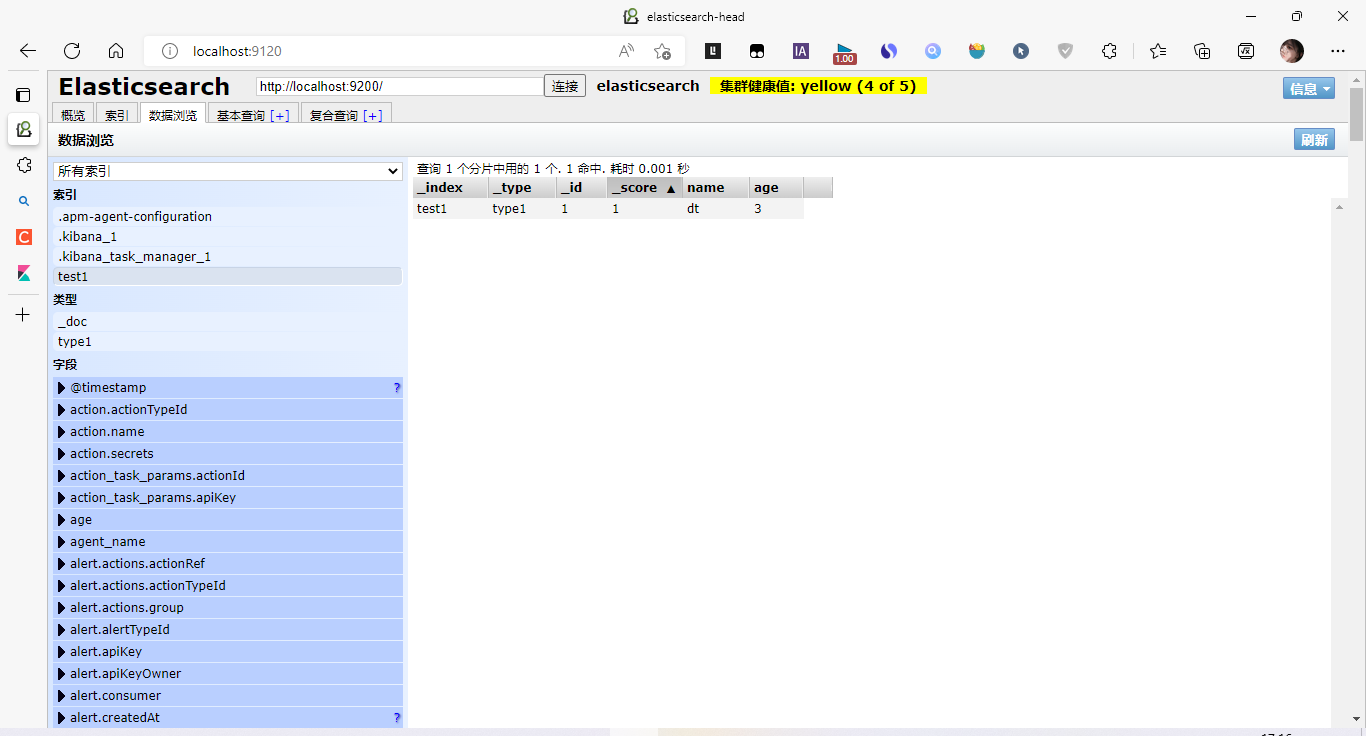
1、创建一个索引,添加
PUT /索引名/~类型名~/文档id
{请求体}
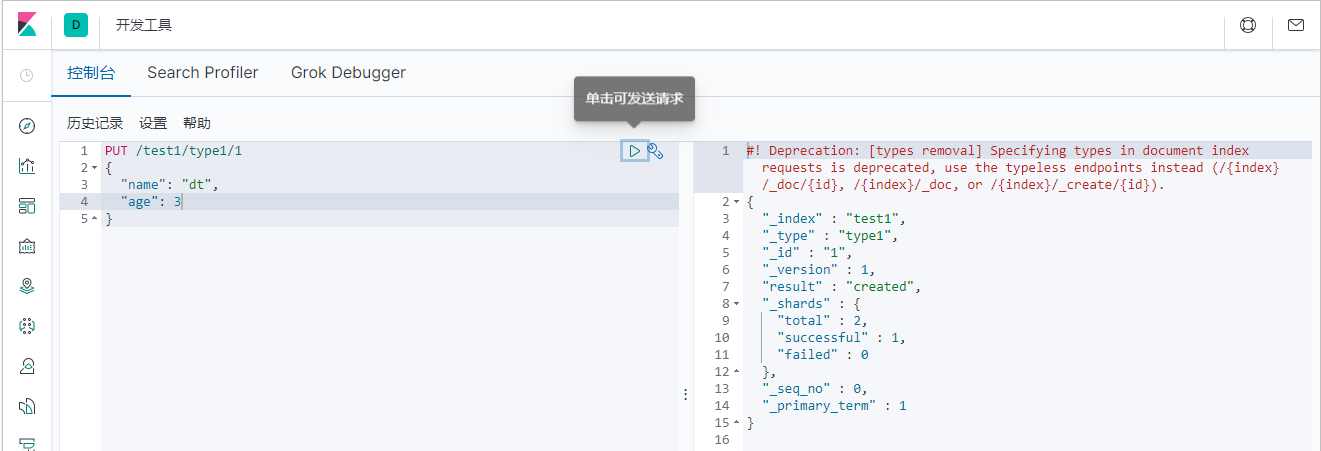
完成了自动增加索引!数据也成功的添加了,这就是我说大家在初期可以把它当做数据库学习的原因!
2、字段数据类型
-
字符串类型
text、keyword
- text:支持分词,全文检索,支持模糊、精确查询,不支持聚合,排序操作;text类型的最大支持的字符长度无限制,适合大字段存储;
- keyword:不进行分词,直接索引、支持模糊、支持精确匹配,支持聚合、排序操作。keyword类型的最大支持的长度为——32766个UTF-8类型的字符,可以通过设置ignore_above指定自持字符长度,超过给定长度后的数据将不被索引,无法通过term精确匹配检索返回结果。
-
数值型
long、Integer、short、byte、double、float、half float、scaled float
-
日期类型
date
-
te布尔类型
boolean
-
二进制类型
binary
等等…
3、指定字段的类型(使用PUT)
创建规则 类似于建库(建立索引和字段对应类型),也可看做规则的建立

4、获取规则
可以通过 GET 请求获取具体的信息

5、查看默认信息
_doc 默认类型(default type),type 在未来的版本中会逐渐弃用,因此产生一个默认类型进行代替
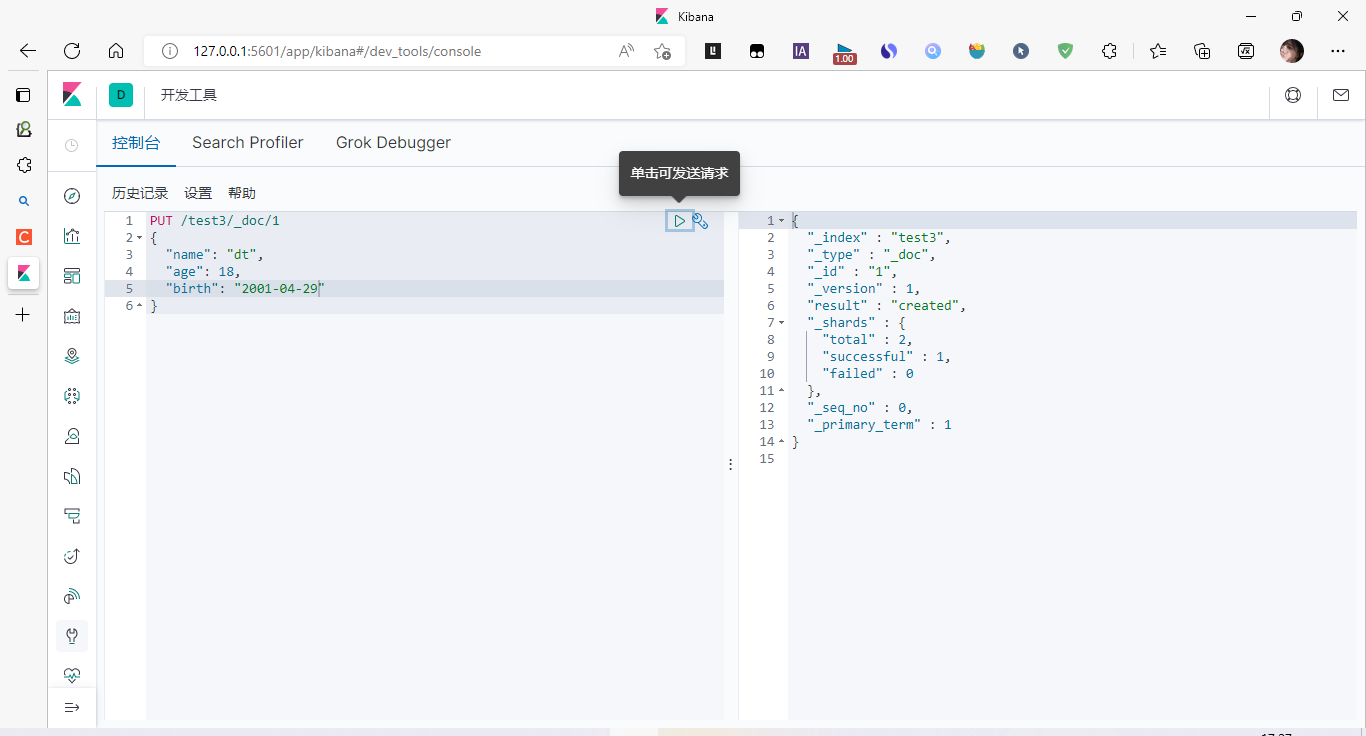
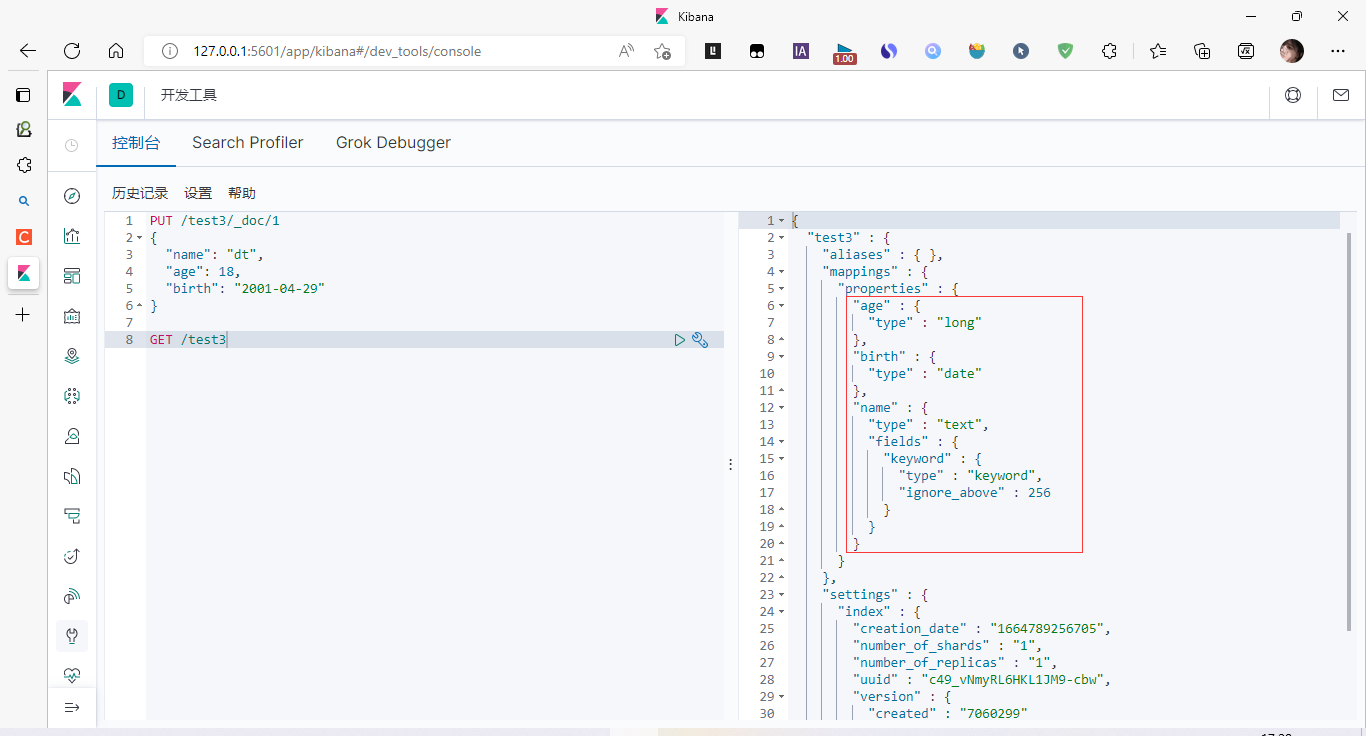
如果自己的文档字段没有指定,那么es就会给我们默认配置字段类型!
扩展:通过命令 elasticsearch索引情况!通过get _cat/ 可以获取ElasticSearch的当前的很多信息!

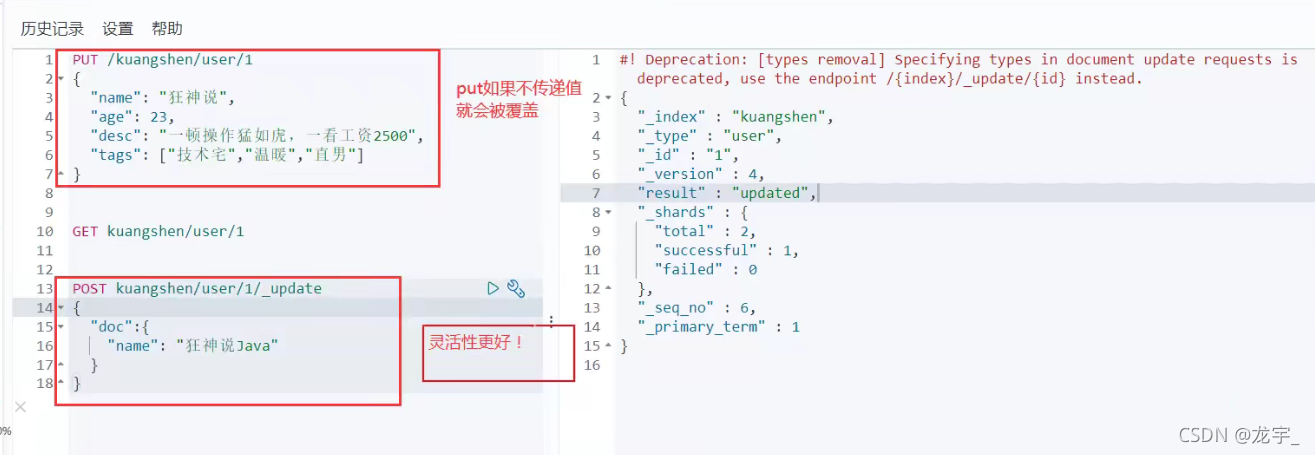
6、修改
两种方案
-
旧的(使用put覆盖原来的值)
版本+1(_version)

但是如果漏掉某个字段没有写,那么更新是没有写的字段 ,会消失
-
新的(使用post的update)
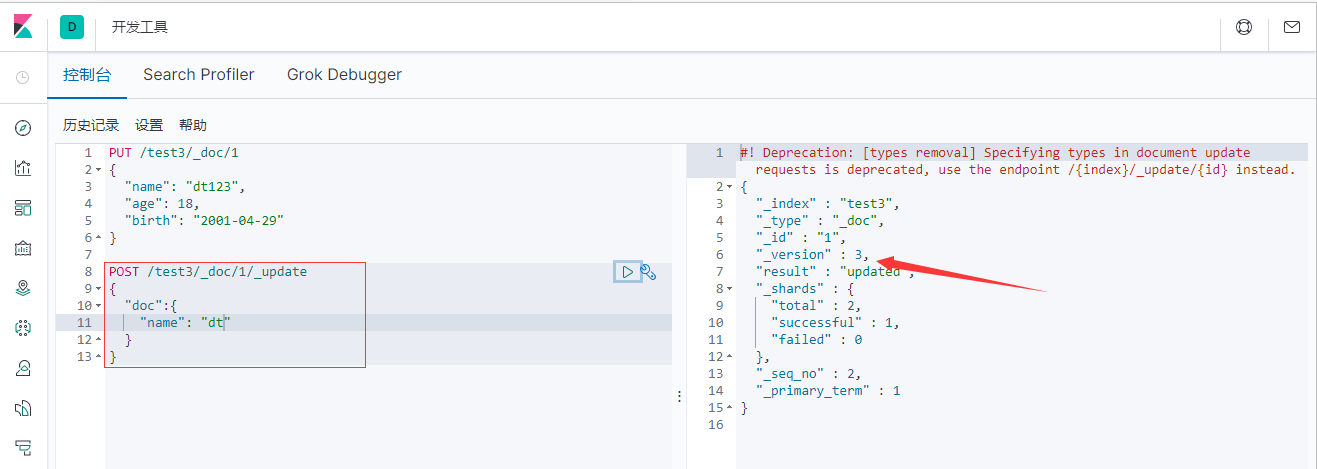
version会改变,需要注意doc,不会丢失字段
7、删除
通过DELETE 命令实现删除,根据你的请求来判断是删除索引还是删除文档记录!
使用RESTFUL 风格是我们ES推荐大家使用的!

5.3、关于文档的基本操作(重点)
基本操作
1、添加数据 PUT
PUT /kaungshen/user/1
{
  "name": "dt",
  "age": 18,
  "desc": "一顿操作猛如虎,一看工资两千五",
  "tags": ["技术宅", "温暖", "直男"]
}

PUT /kaungshen/user/2
{
  "name": "张三",
  "age": 18,
  "desc": "法外狂徒",
  "tags": ["和蔼", "直男"]
}

PUT /kaungshen/user/3
{
  "name": "小帅",
  "age": 20,
  "desc": "主角光环附体",
  "tags": ["命硬", "直男"]
}

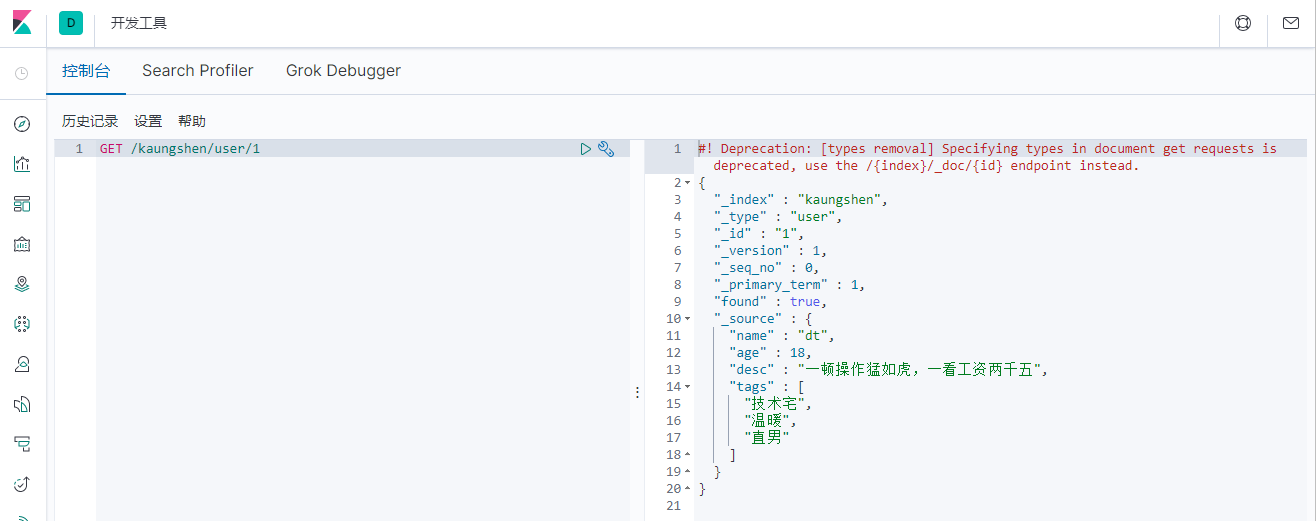
2、获取数据 GET
GET /kuangshen/user/1
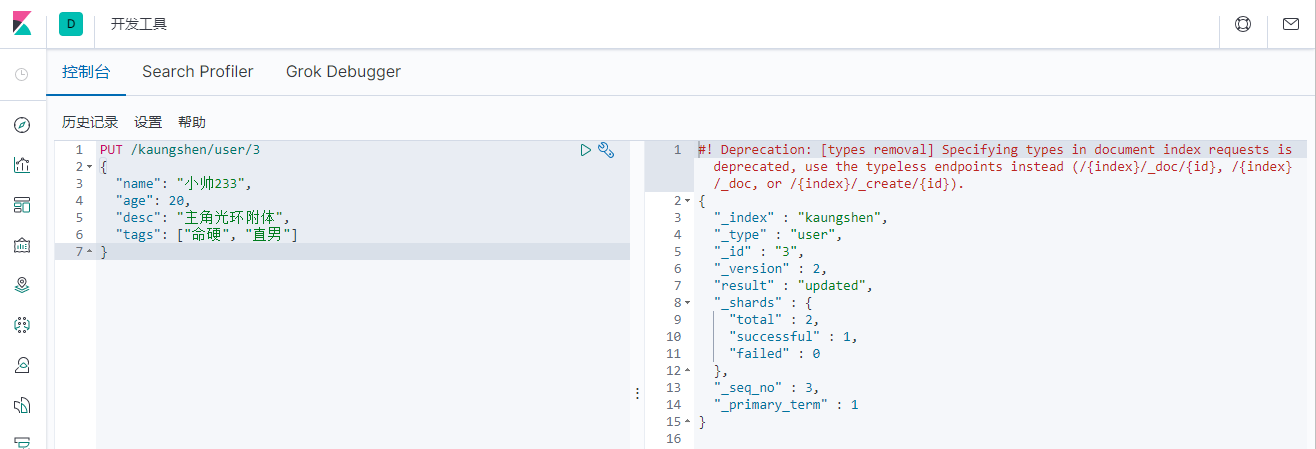
3、更新数据 PUT
PUT /kaungshen/user/3
{
  "name": "小帅233",
  "age": 20,
  "desc": "主角光环附体",
  "tags": ["命硬", "直男"]
}
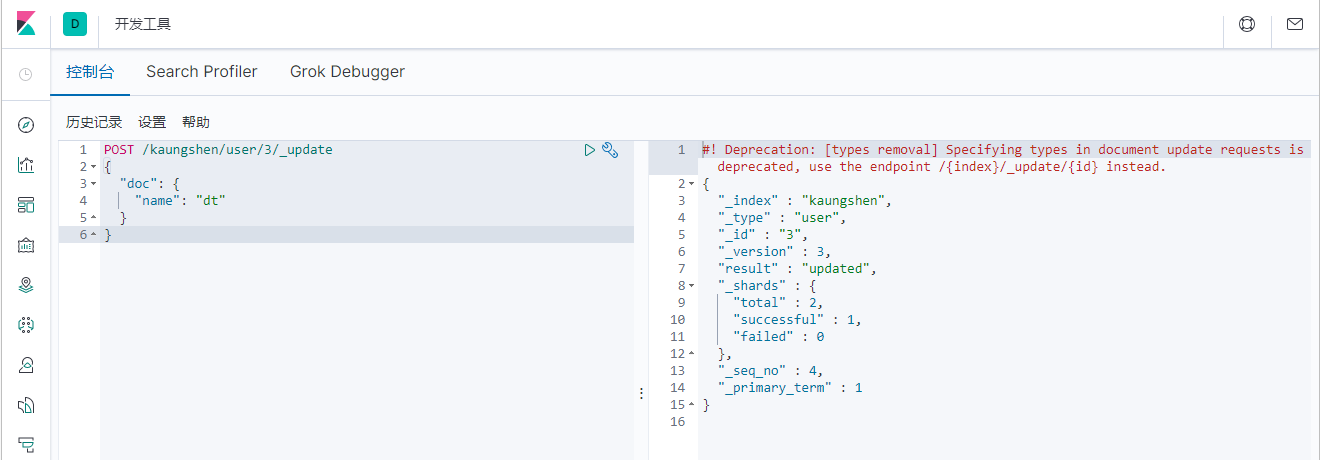
4、Post _update,推荐使用这种更新方式!
POST /kaungshen/user/3/_update
{
  "doc": {
    "name": "dt"
  }
}
PUT 更新和 POST_update 更新区别
5、查询
简单的搜索
GET kuangshen/user/1
简单的条件查询,可以根据默认的映射规则,产生基本的查询!
GET /kaungshen/user/_search?q=name:dt
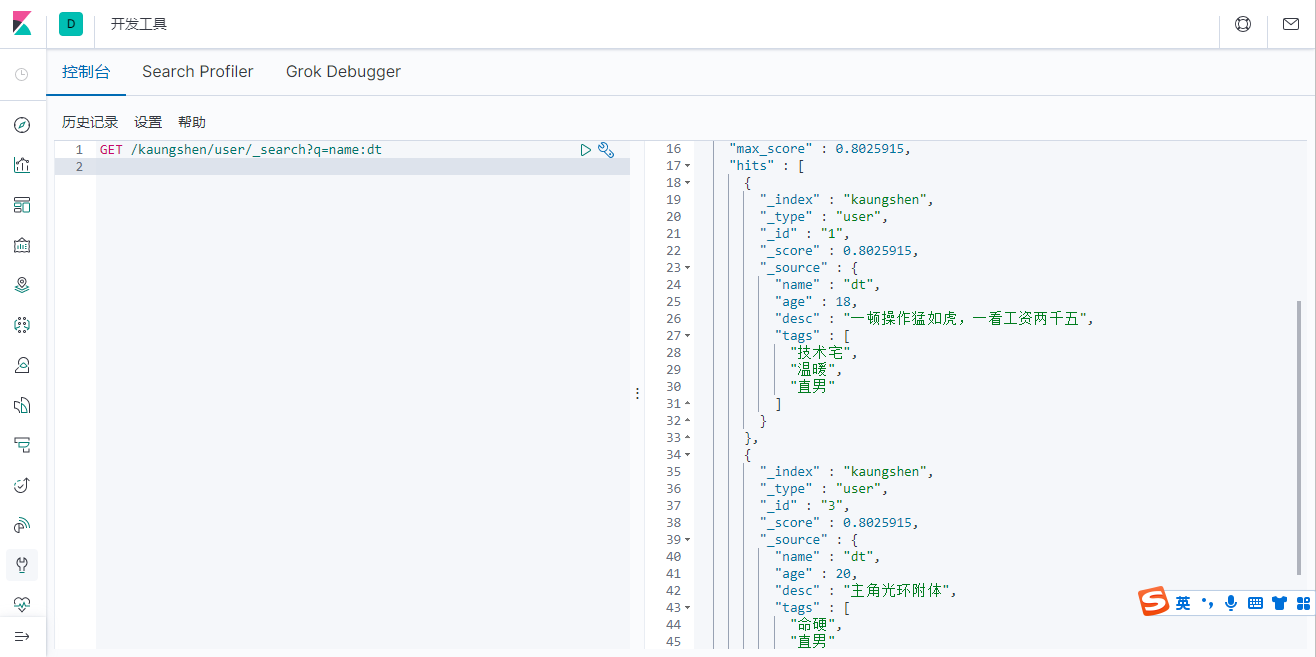
这边name是text 所以做了分词的查询 如果是keyword就不会分词搜索了
复杂操作
复杂操作搜索 select(排序,分页,高亮,模糊查询,精准查询)
GET /kaungshen/user/_search
{
  "query": {
    "match": {
      "name": "dt"
    }
  }
}
注意:这里的name是模糊查询
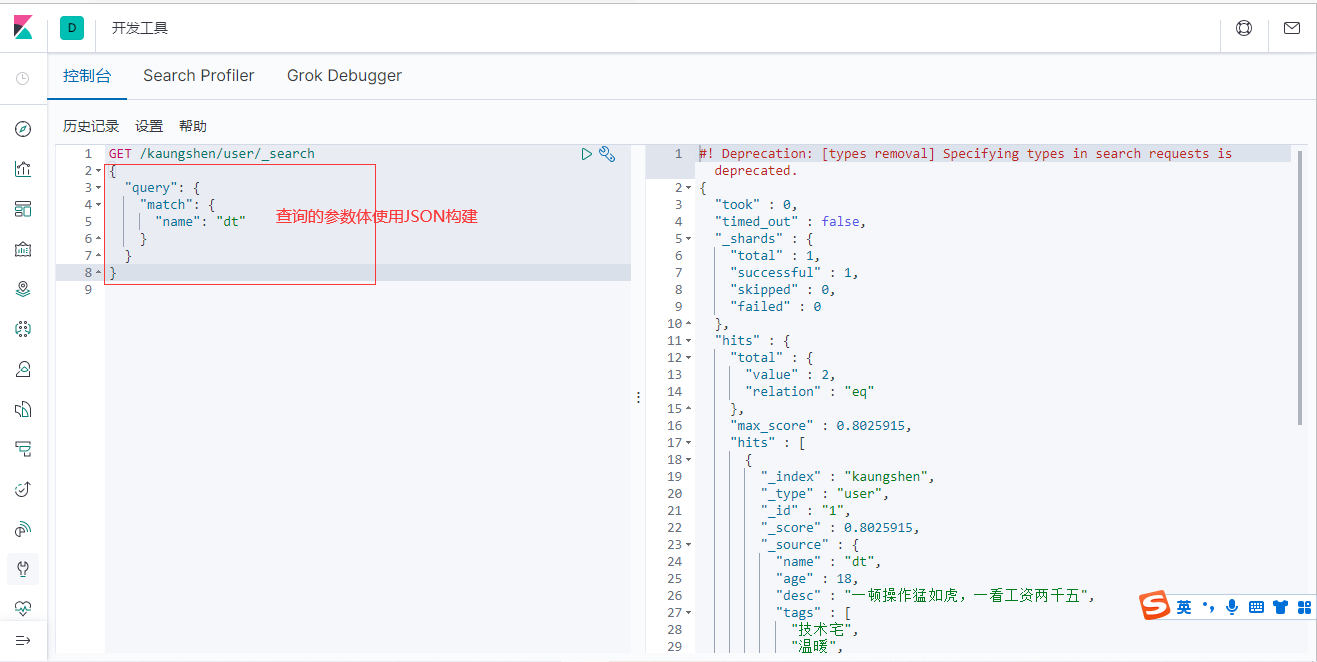
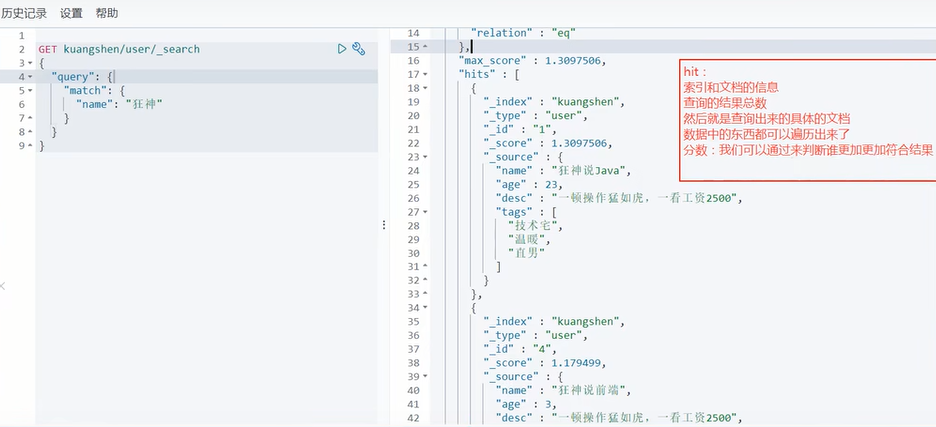
过滤
输出结果,不想要那么多,只展示列表中某些字段
GET /kaungshen/user/_search
{
  "query": {
    "match": {
      "name": "dt"
    }
  },
  "_source": ["name", "desc"]
}
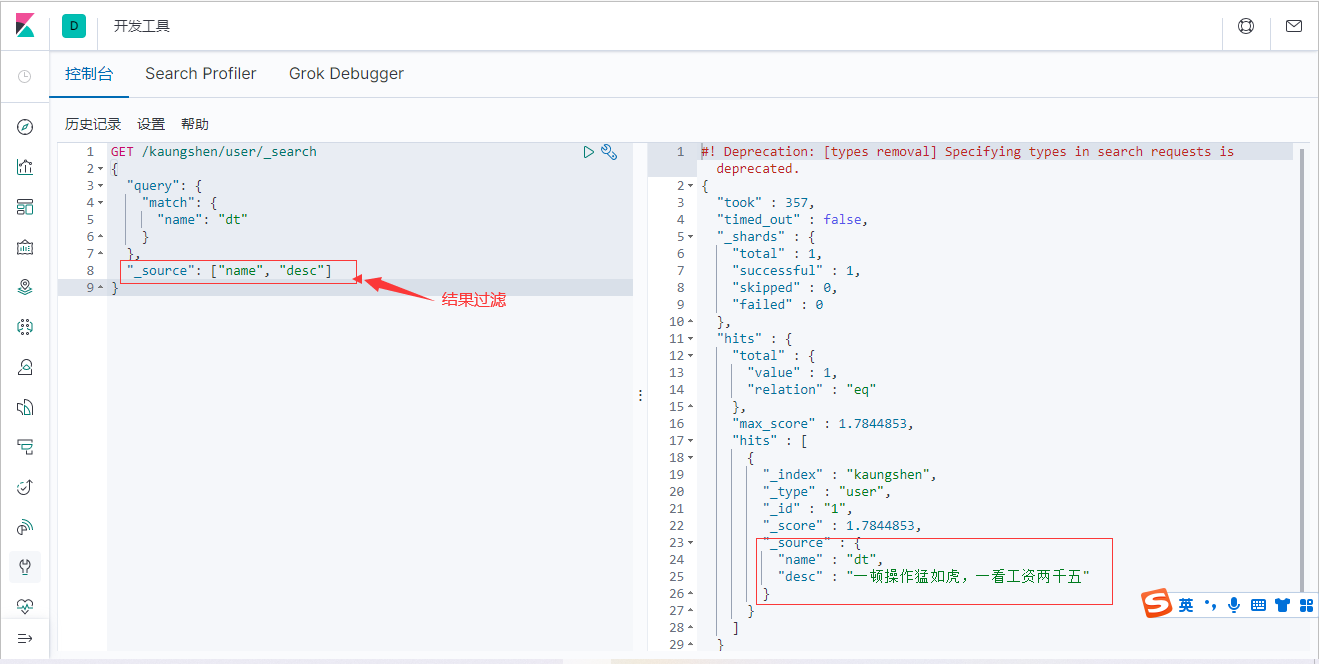
我们之后使用java操作es,所有的方法和对象就是这里面的key
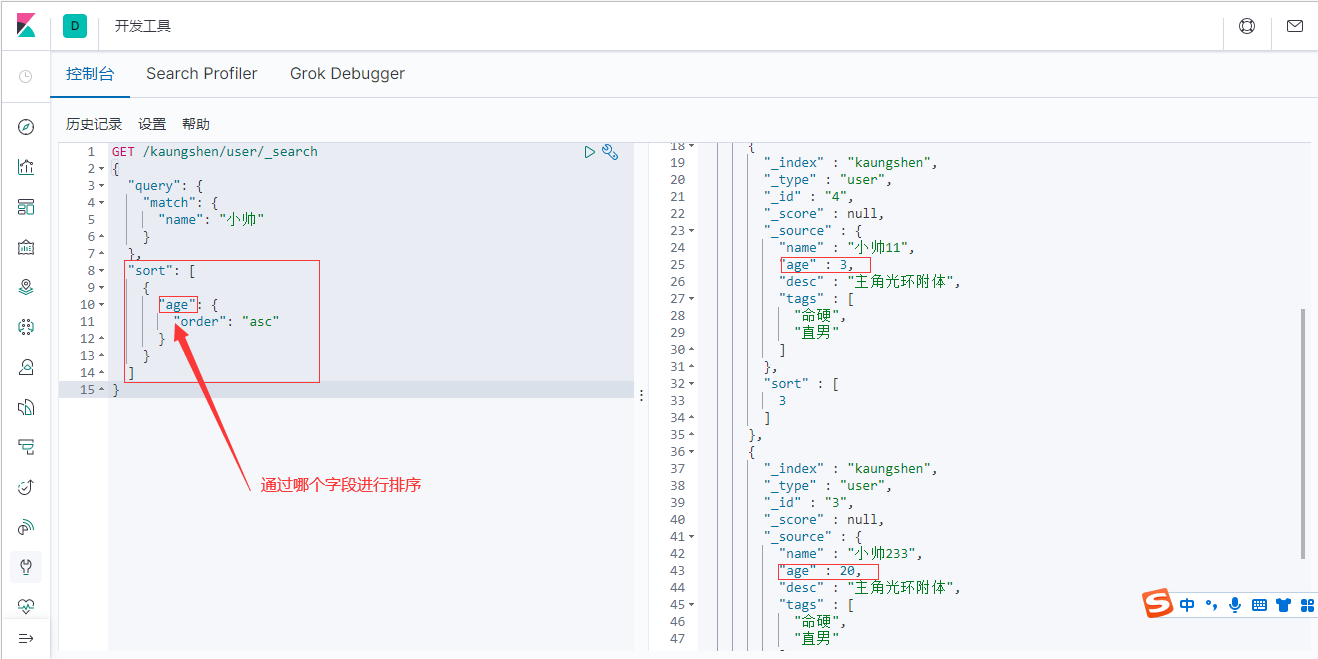
排序
GET /kaungshen/user/_search
{
  "query": {
    "match": {
      "name": "小帅"
    }
  },
  "sort": [
    {
      "age": {
        "order": "asc"
      }
    }
  ]
}
分页
GET /kaungshen/user/_search
{
  "query": {
    "match": {
      "name": "小帅"
    }
  },
  "from": 0,
  "size": 1
}
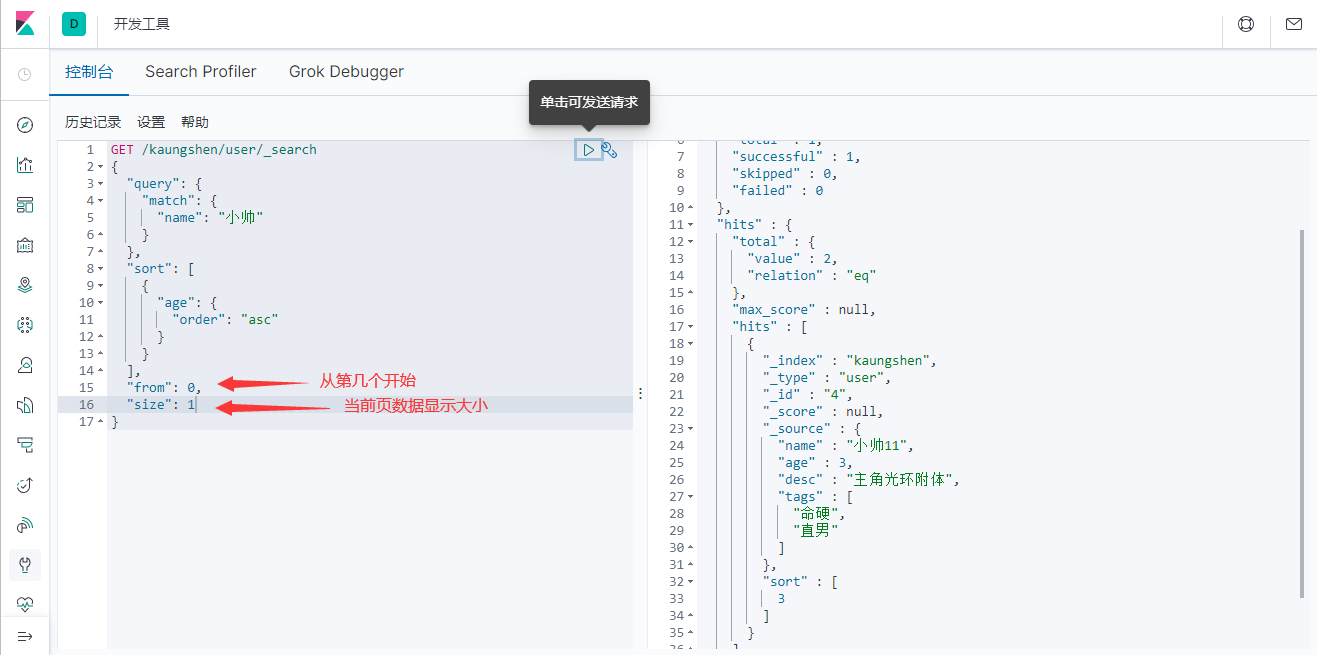
数据下标还是从0开始的,和学的所有数据结构是一样的!
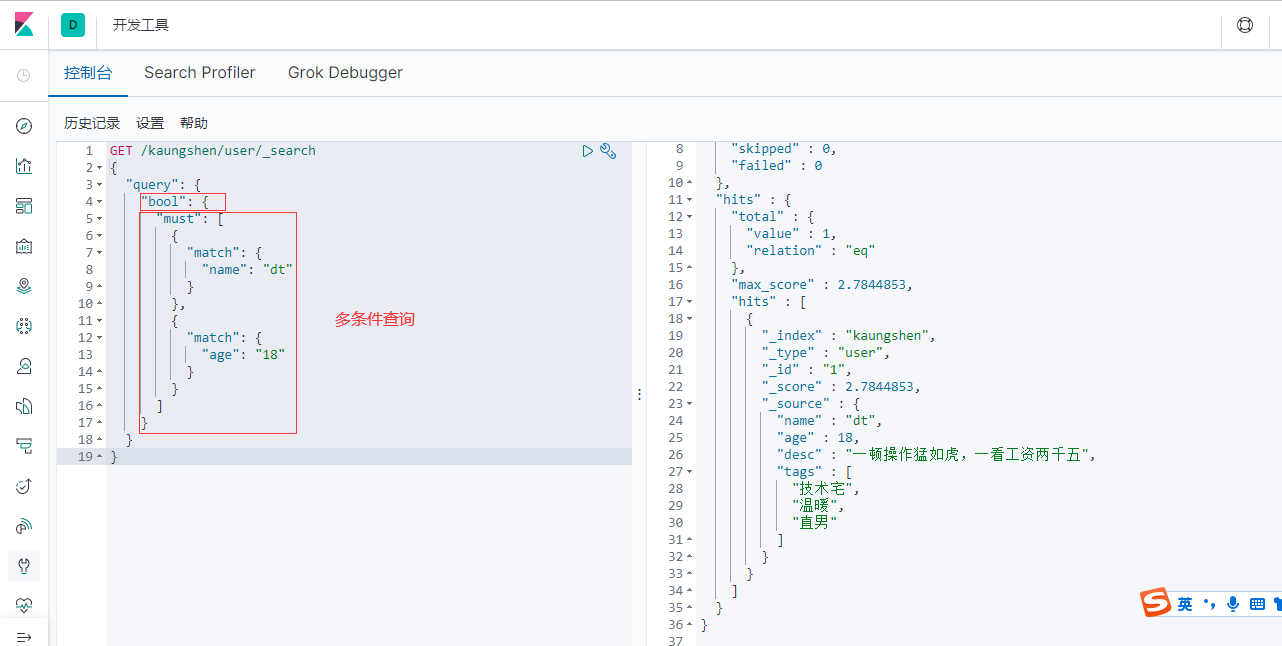
多条件查询
布尔值查询
- must(and),所有的条件都要符合 where id=1 and name = xxx
GET /kaungshen/user/_search
{
  "query": {
    "bool": {
      "must": [
        {
          "match": {
            "name": "dt"
          }
        },
        {
          "match": {
            "age": "18"
          }
        }
      ]
    }
  }
}
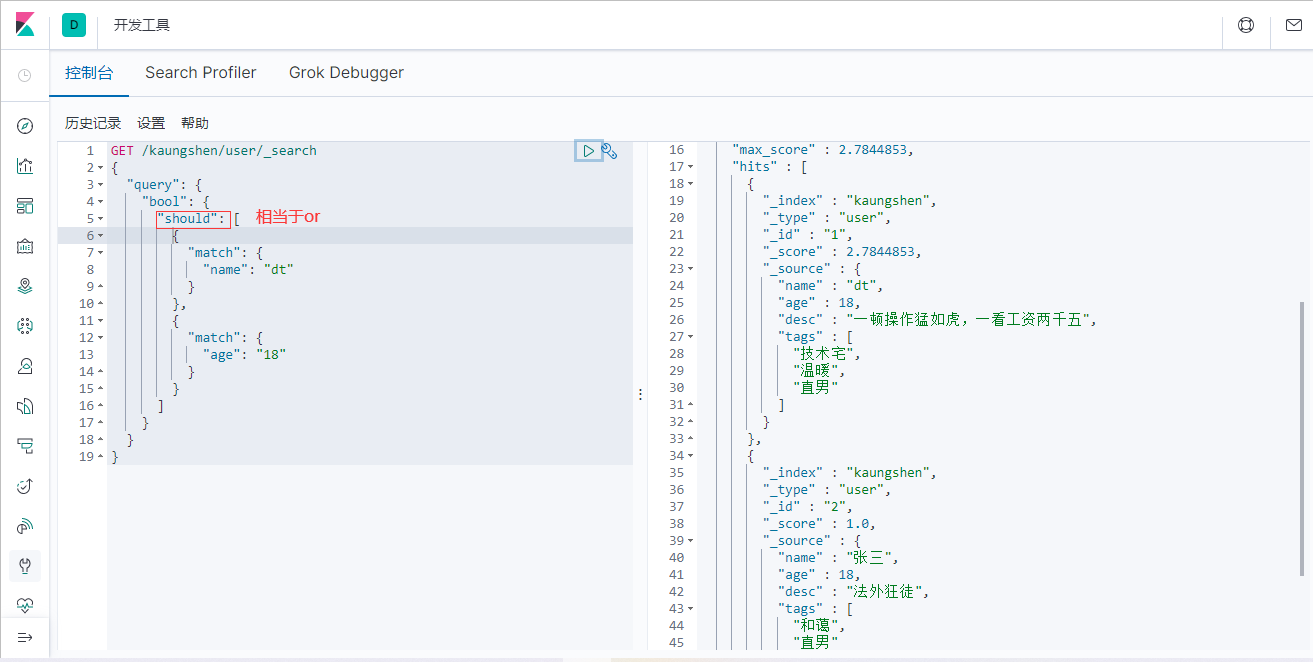
- should(or),所有的条件都要符合 where id=1 or name = xxx
GET /kaungshen/user/_search
{
  "query": {
    "bool": {
      "should": [
        {
          "match": {
            "name": "dt"
          }
        },
        {
          "match": {
            "age": "18"
          }
        }
      ]
    }
  }
}
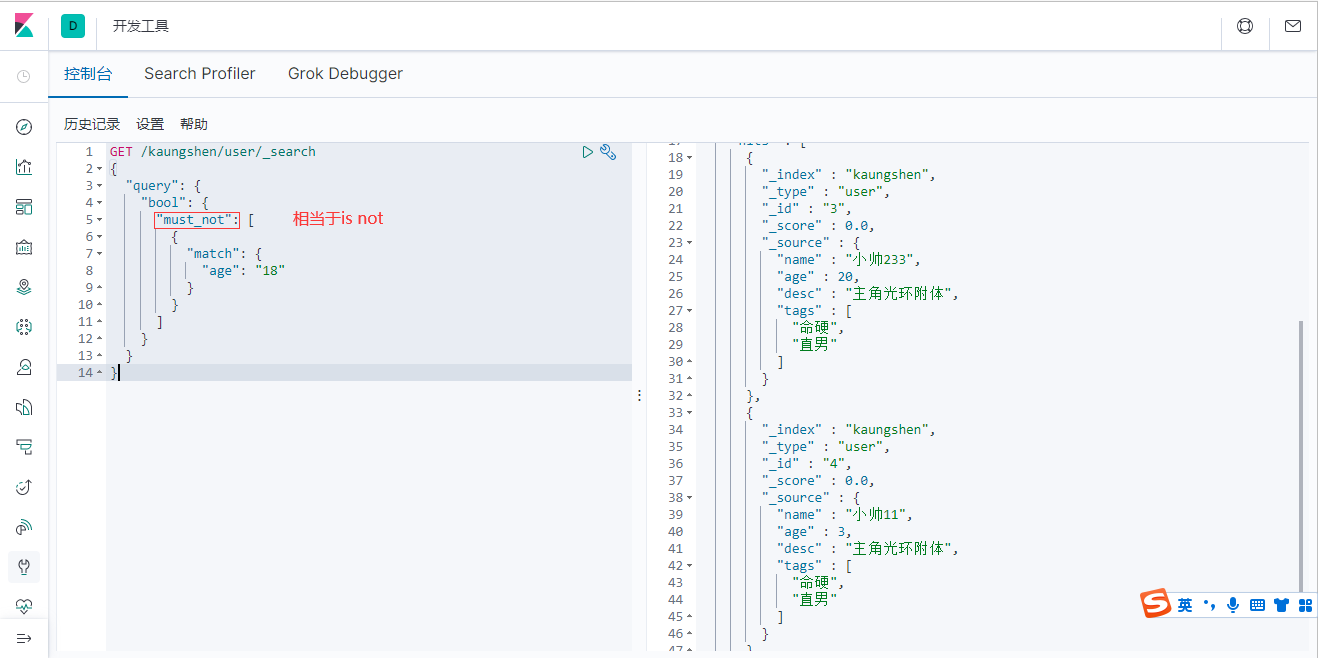
- must_not(not)
GET /kaungshen/user/_search
{
  "query": {
    "bool": {
      "must_not": [
        {
          "match": {
            "age": "18"
          }
        }
      ]
    }
  }
}
过滤器 filter
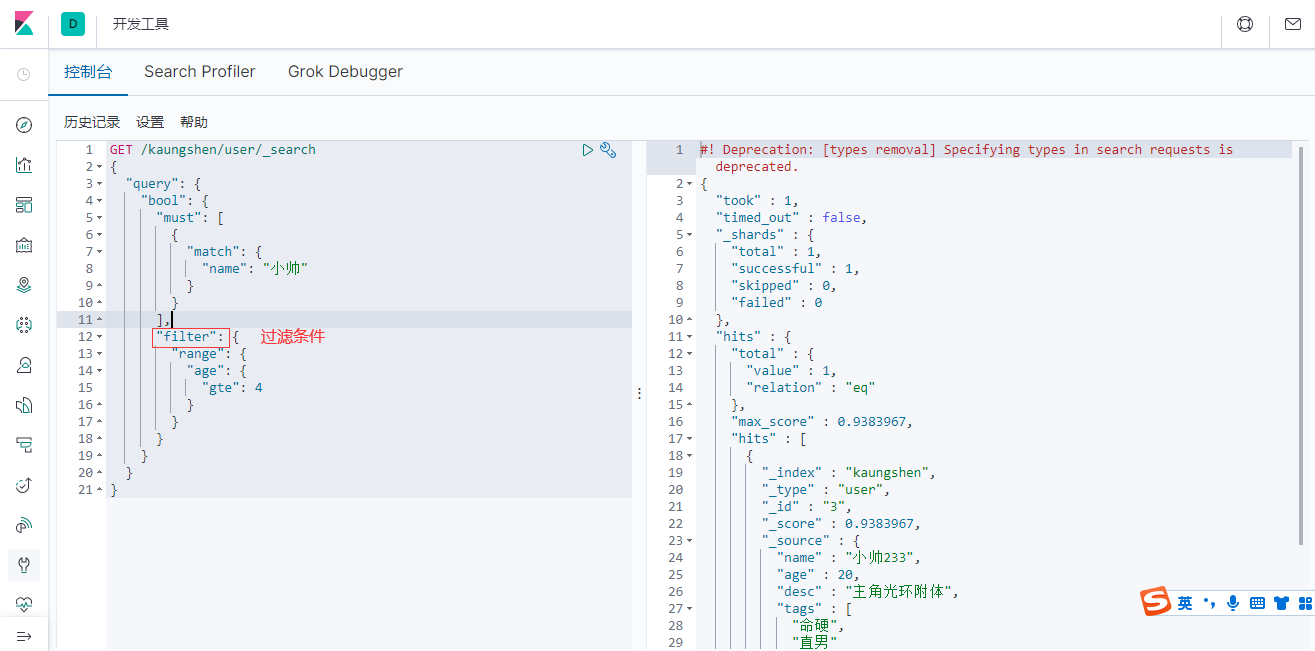
| gt | 大于 |
|---|---|
| gte | 大于等于 |
| lt | 小于 |
| lte | 小于等于 |
GET /kaungshen/user/_search
{
  "query": {
    "bool": {
      "must": [
        {
          "match": {
            "name": "小帅"
          }
        }
      ],
      "filter": {
        "range": {
          "age": {
            "gte": 3,
            "lte": 20
          }
        }
      }
    }
  }
}
可以使用多个条件进行过滤
匹配多个条件(数组)

精确查询
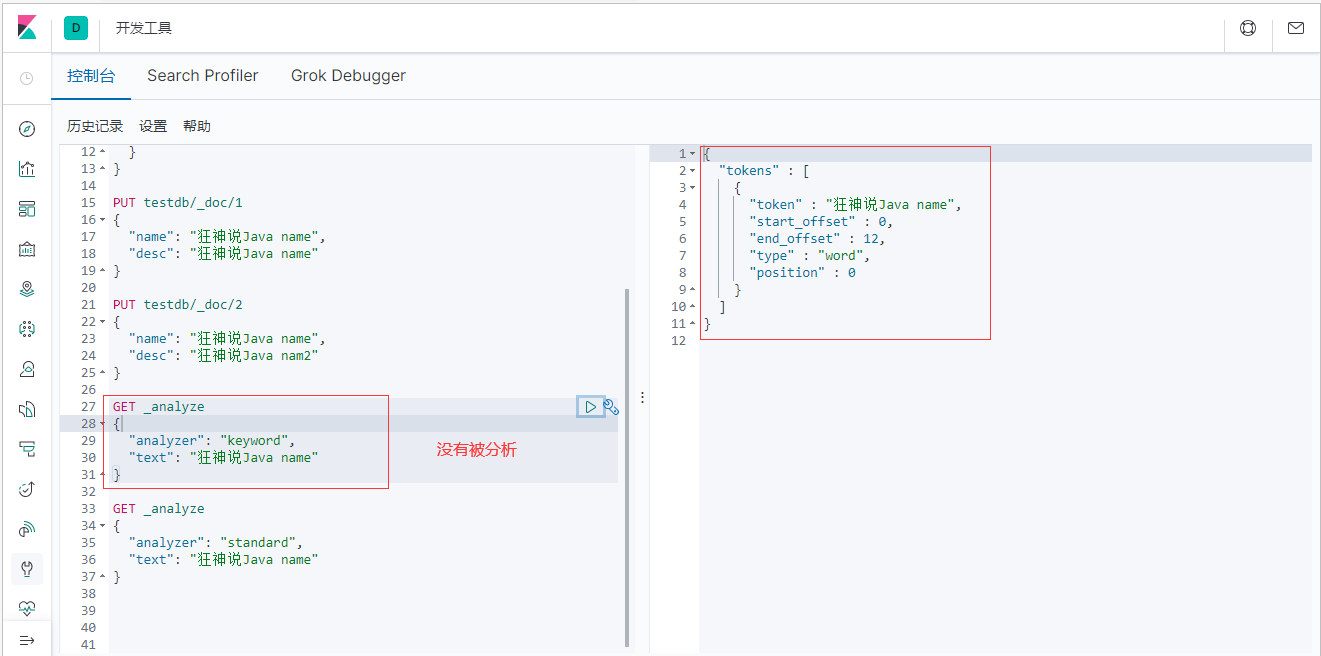
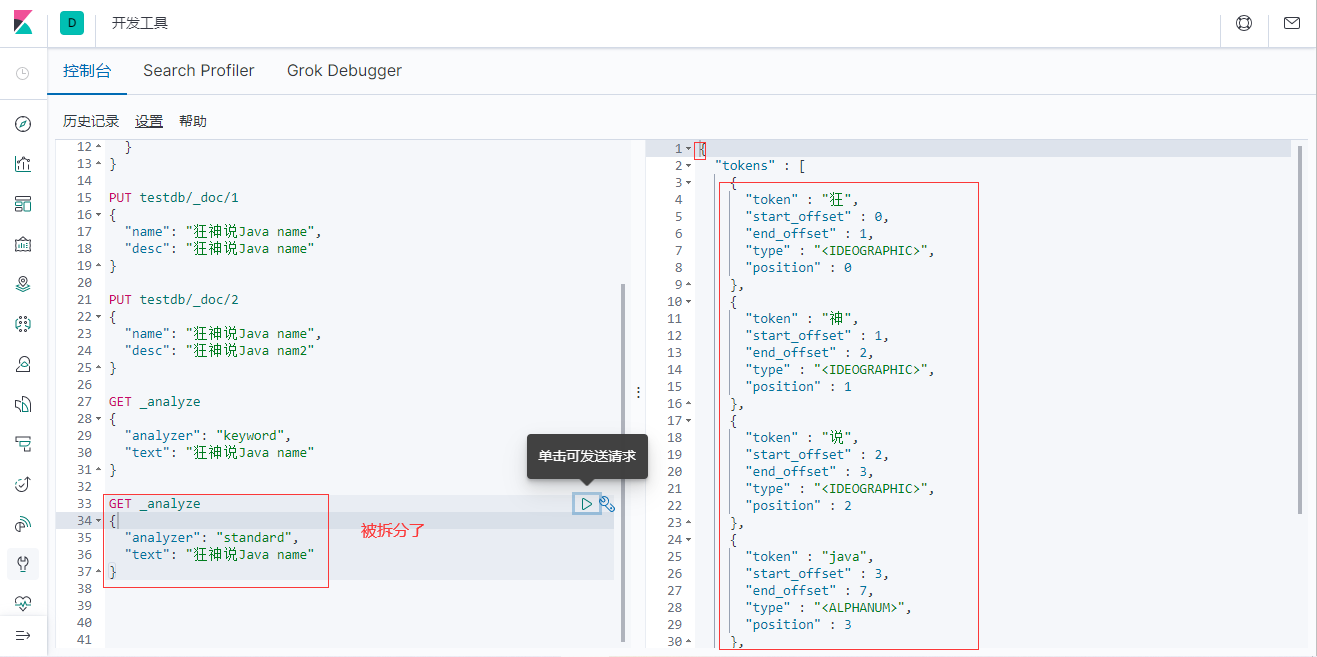
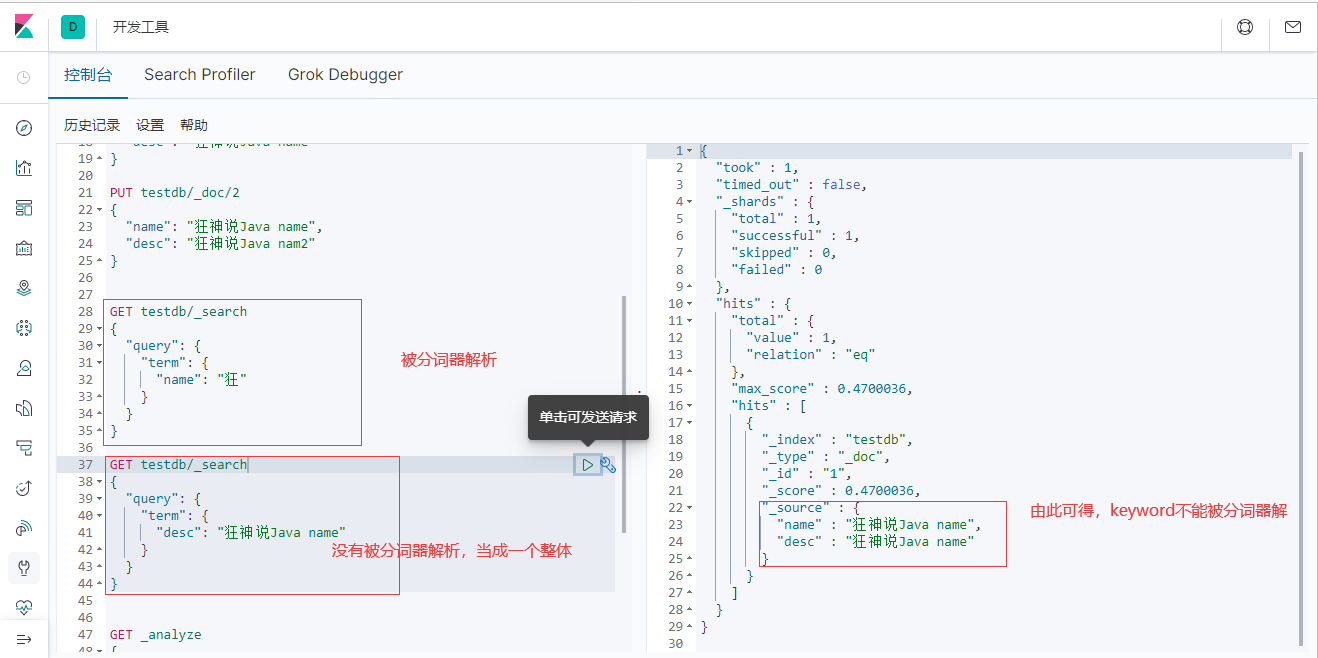
term查询是直接通过倒排索引指定的词条进程精确查找的
关于分词
- term,直接查询精确的
- match,会使用分词器解析!(先分析文档,然后通过分析的文档进行查询)
两个类型 text keyword
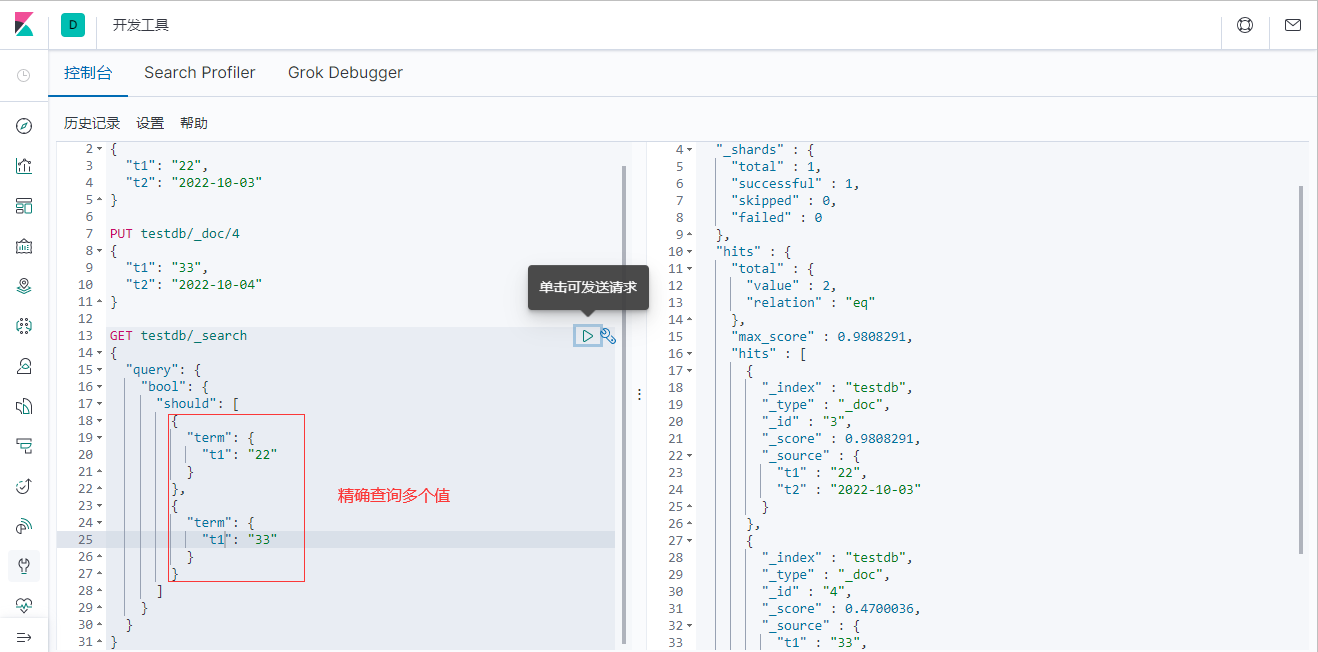
多个值匹配精确查询
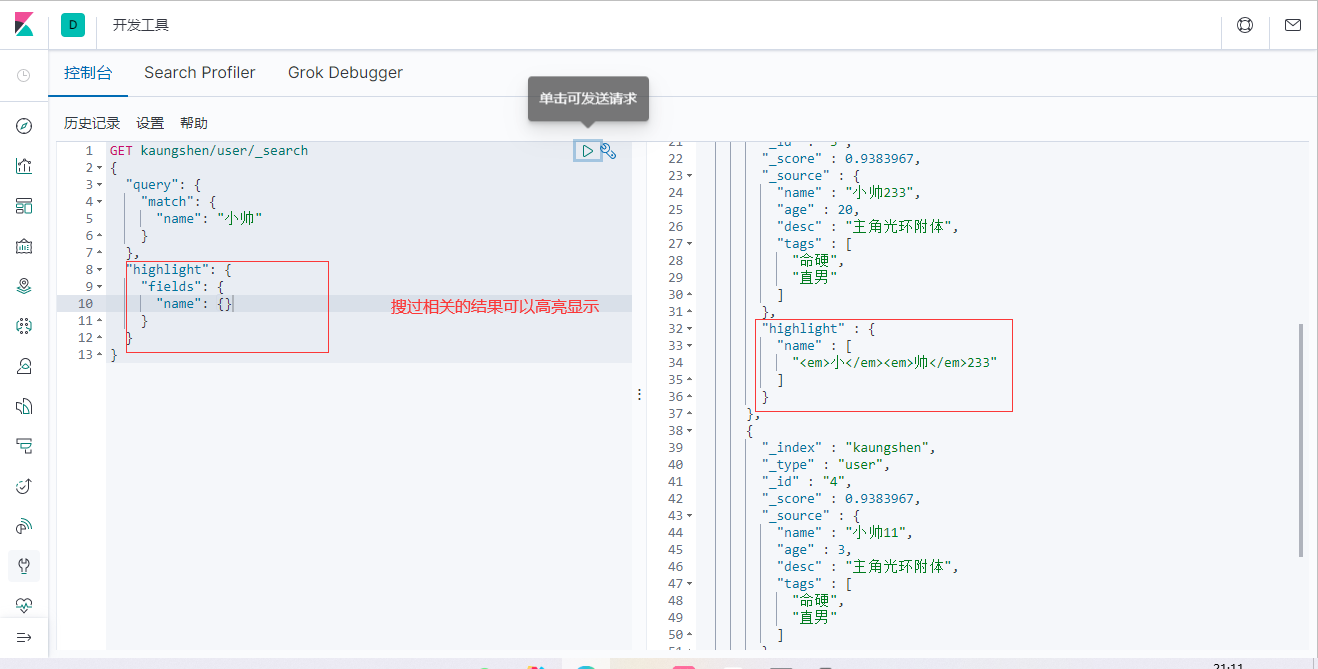
高亮
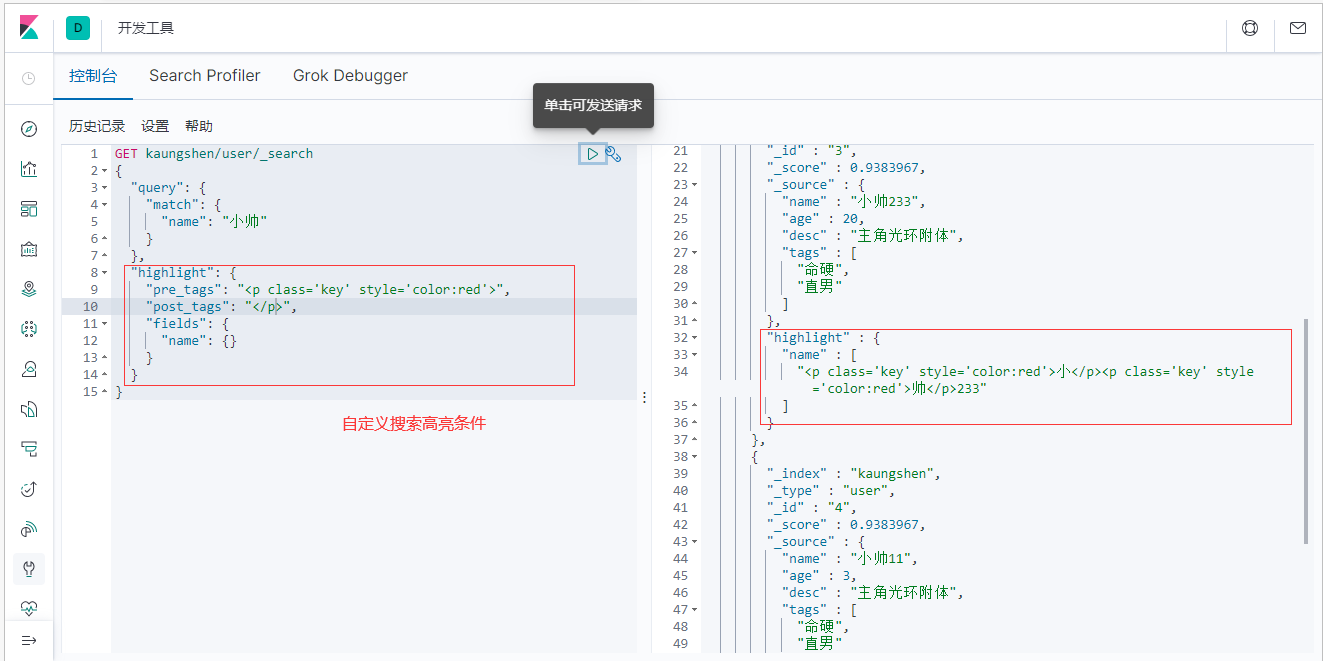
还能自定义高亮的样式
这些mysql也能做,只是效率比较低
- 匹配
- 按条件匹配
- 精确匹配
- 区间范围匹配
- 匹配字段过滤
- 多条件查询
- 高亮查询
六、Springboot集成
找官方文档
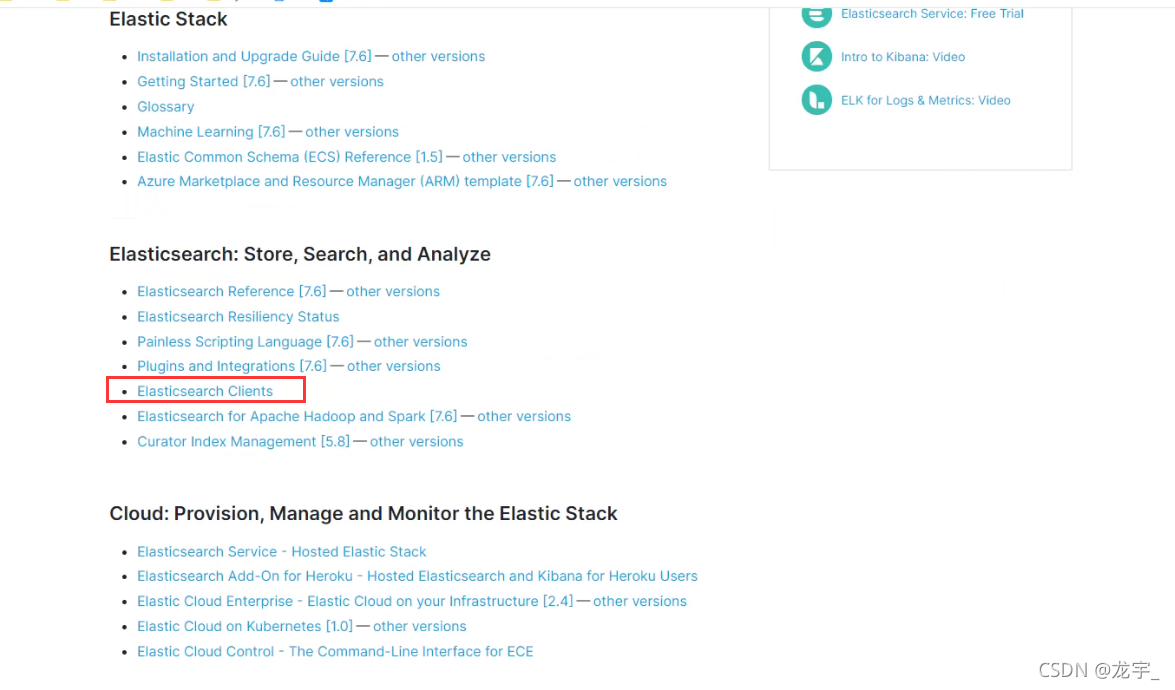
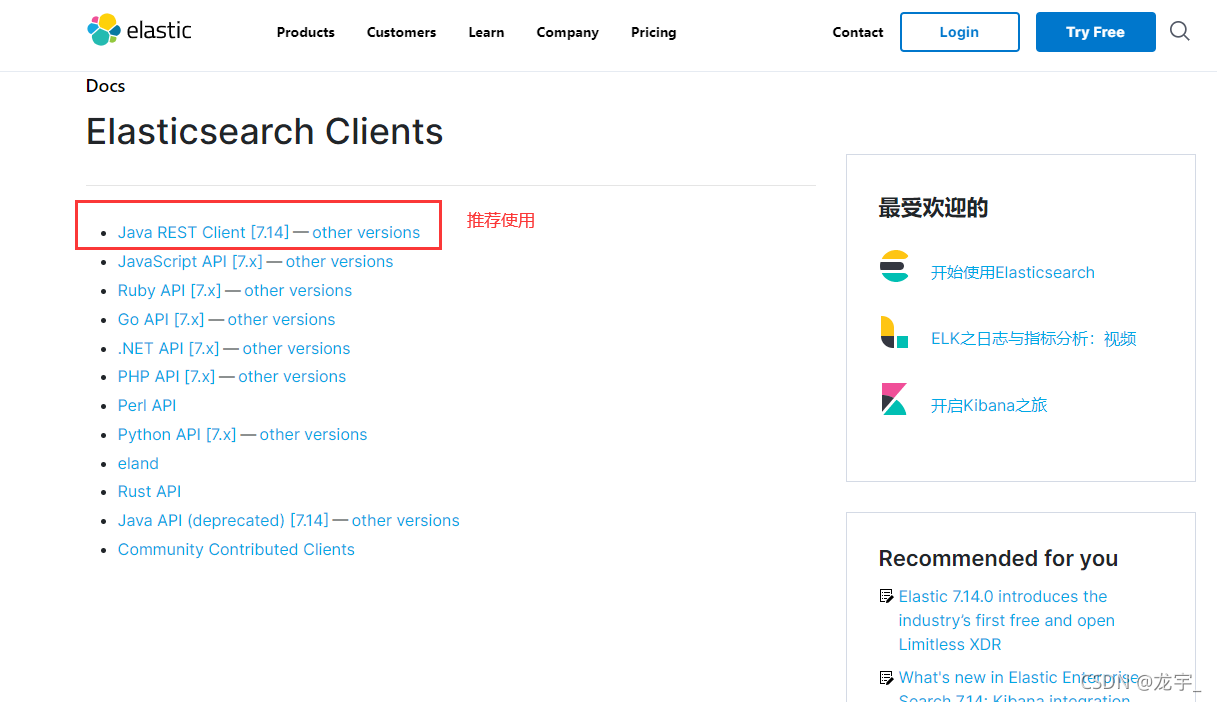
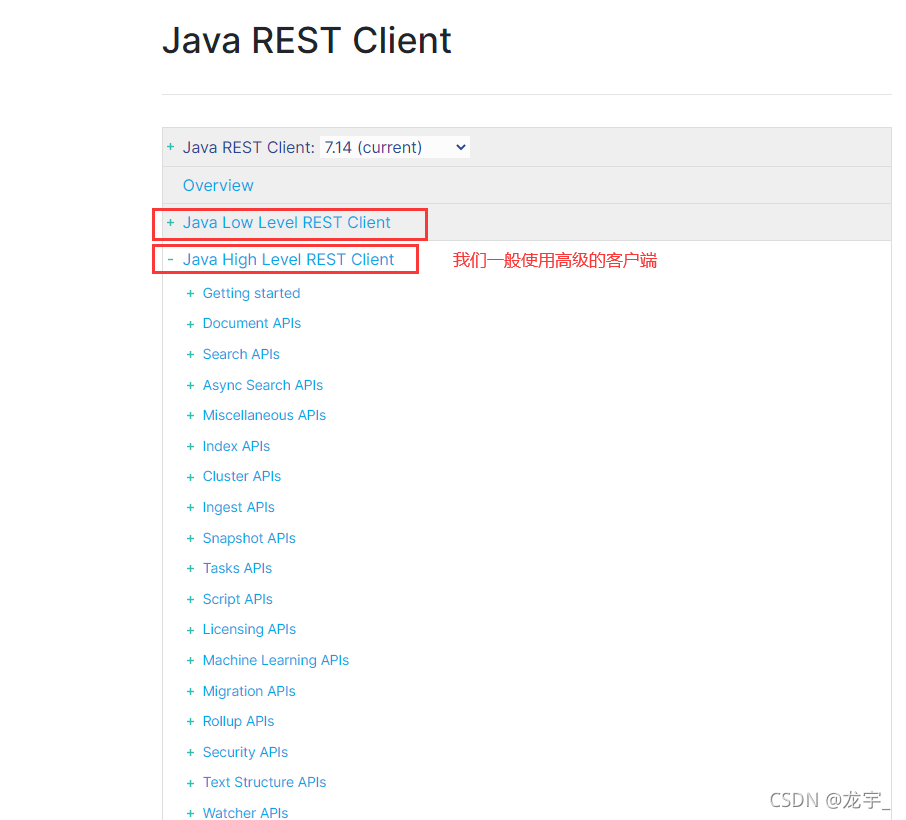
1、找到原生的依赖
<dependency>
    <groupId>org.elasticsearch.client</groupId>
    <artifactId>elasticsearch-rest-high-level-client</artifactId>
    <version>7.6.2</version>
</dependency>
注意下spring-boot的parent包内的依赖的es的版本是不是你对应的版本
不是的话就在pom文件下写个properties的版本
<!--这边配置下自己对应的版本-->
<properties>
    <java.version>1.8</java.version>
    <elasticsearch.version>7.6.2</elasticsearch.version>
</properties>
2、找对象
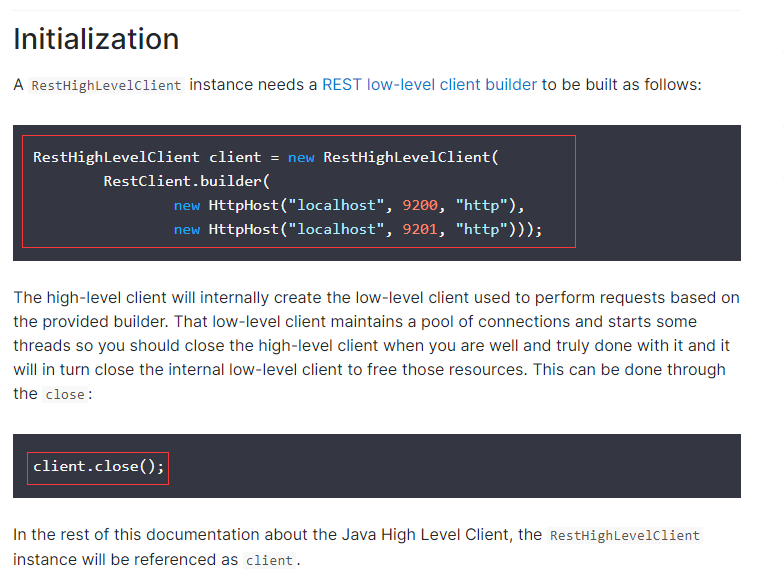
3、分析这个类中的方法即可!
配置基本的项目
1、创建一个空项目 dt-elasticsearch-api并添加一个springboot模块 dt-es-api
2、选择依赖

3、选择jdk版本
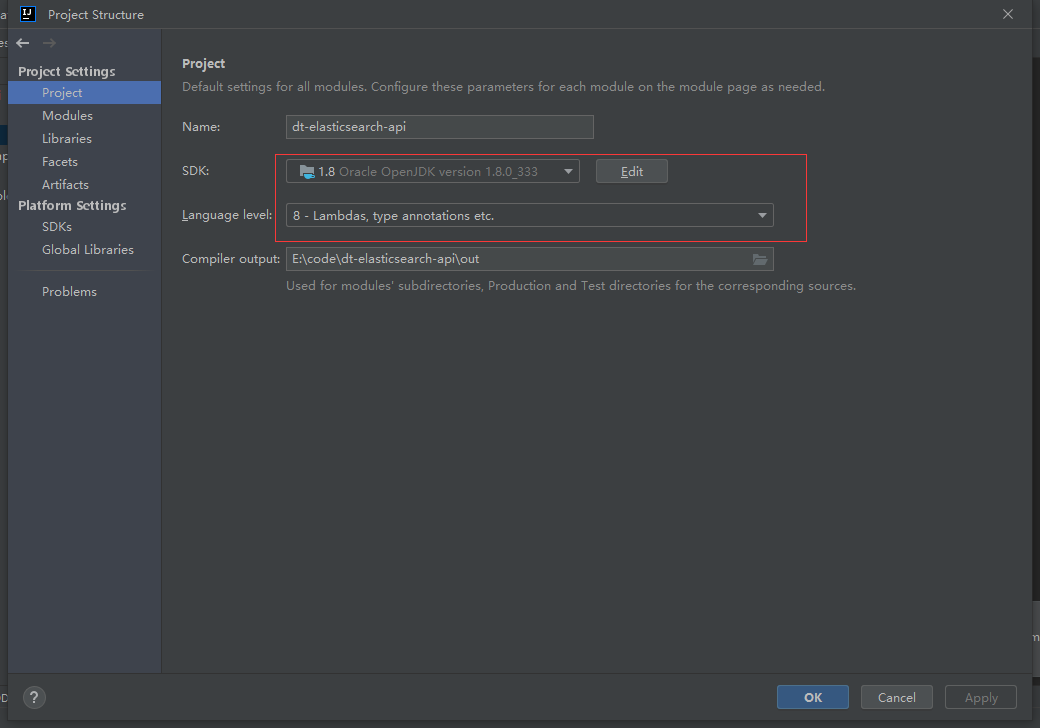
4、选择模块版本为8
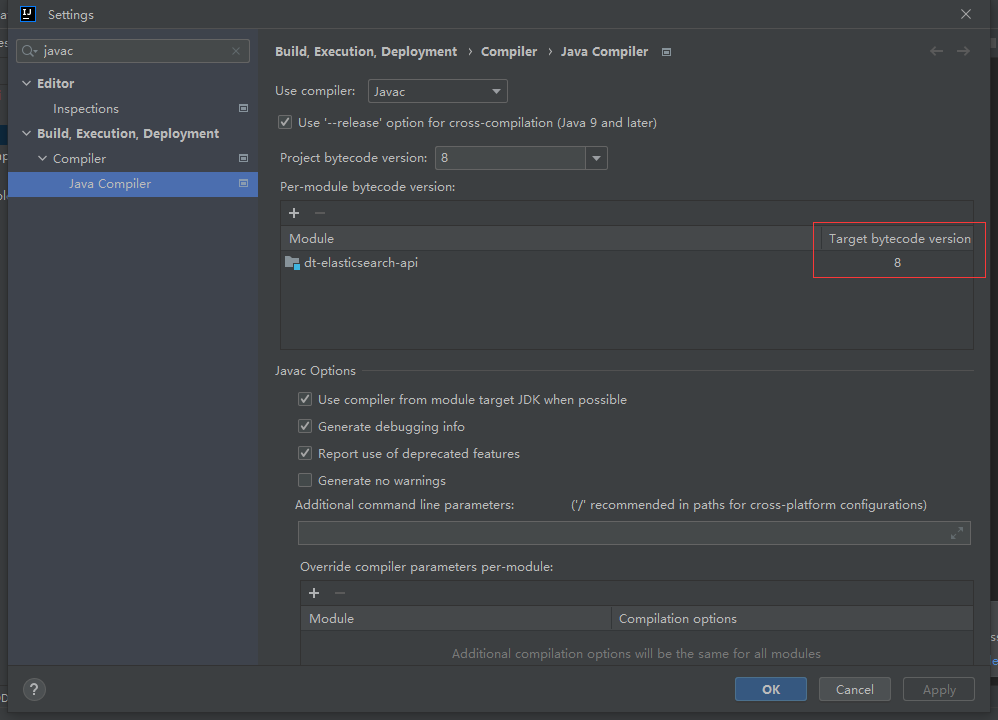
5、javascript改成ES6规范

6、一定要保证我们导入的依赖和我们本地的es版本一致

7、新建配置类
// 1、找对象
// 2、放到spring中待用
// 3、如果是springboot 就先分析源码
@Configuration
public class ElasticSearchClientConfig {

    @Bean
    public RestHighLevelClient restHighLevelClient() {
        RestHighLevelClient client = new RestHighLevelClient(
                RestClient.builder(new HttpHost("127.0.0.1", 9200, "http"))
        );
        return client;
    }

}
查看自动配置源码:
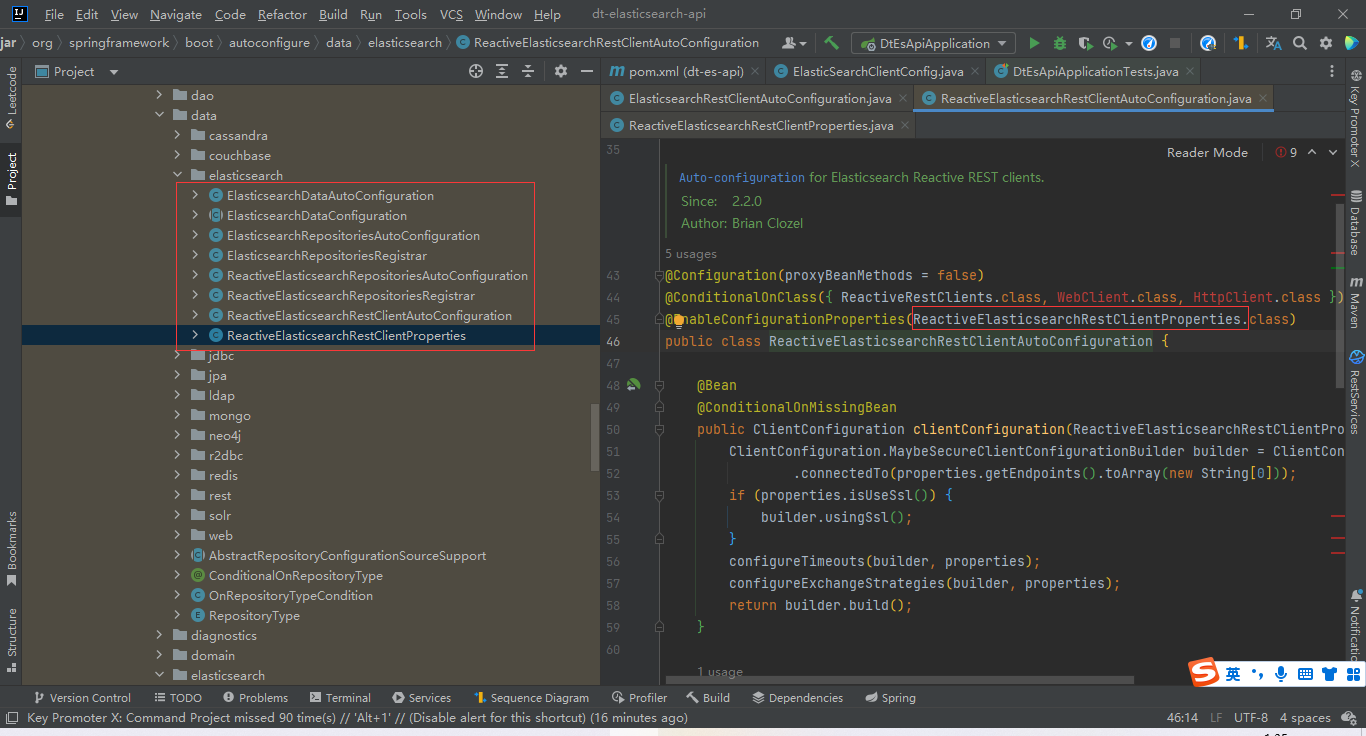
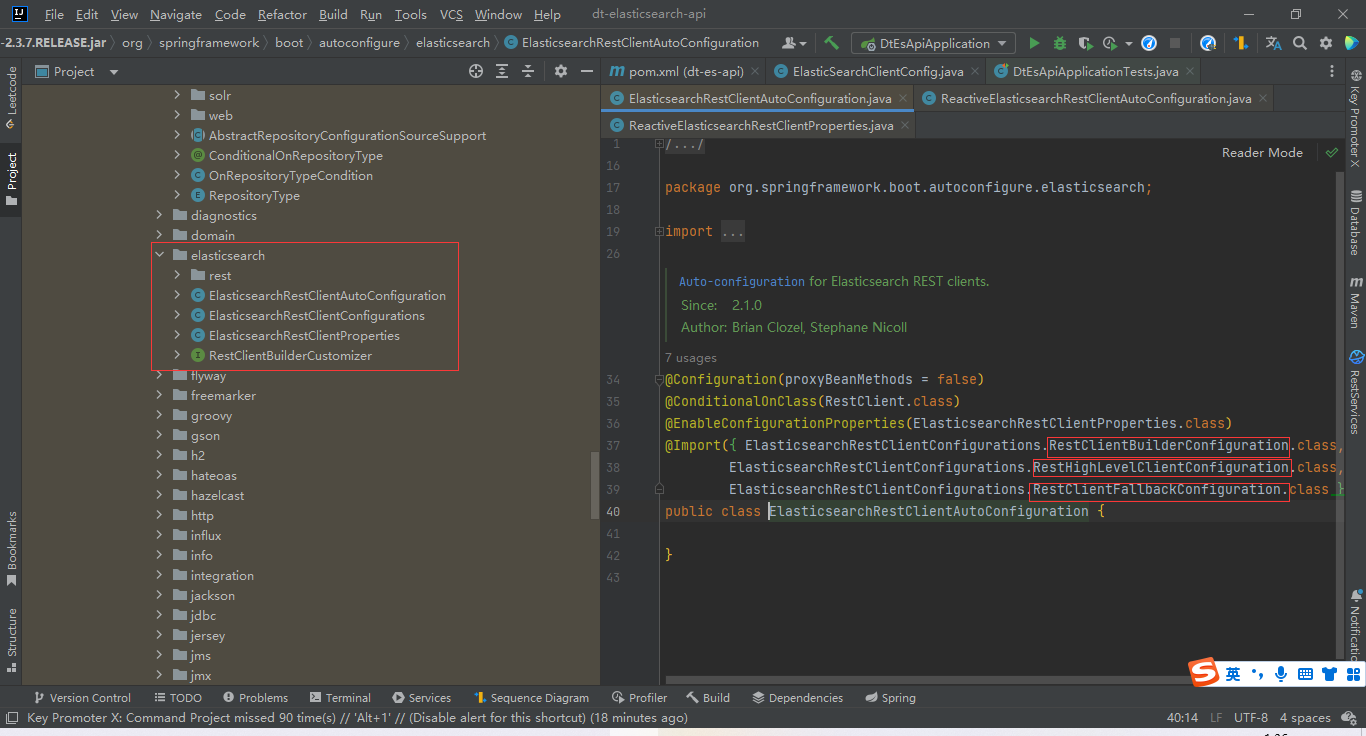
虽然这里导入了3个类,都是静态内部类,核心类就一个RestClientBuilderConfiguration.class
/*
 * Copyright 2012-2020 the original author or authors.
 *
 * Licensed under the Apache License, Version 2.0 (the "License");
 * you may not use this file except in compliance with the License.
 * You may obtain a copy of the License at
 *
 *      https://www.apache.org/licenses/LICENSE-2.0
 *
 * Unless required by applicable law or agreed to in writing, software
 * distributed under the License is distributed on an "AS IS" BASIS,
 * WITHOUT WARRANTIES OR CONDITIONS OF ANY KIND, either express or implied.
 * See the License for the specific language governing permissions and
 * limitations under the License.
 */

package org.springframework.boot.autoconfigure.elasticsearch;

import java.net.URI;
import java.net.URISyntaxException;
import java.time.Duration;

import org.apache.http.HttpHost;
import org.apache.http.auth.AuthScope;
import org.apache.http.auth.Credentials;
import org.apache.http.auth.UsernamePasswordCredentials;
import org.apache.http.client.config.RequestConfig;
import org.apache.http.impl.client.BasicCredentialsProvider;
import org.apache.http.impl.nio.client.HttpAsyncClientBuilder;
import org.elasticsearch.client.RestClient;
import org.elasticsearch.client.RestClientBuilder;
import org.elasticsearch.client.RestHighLevelClient;

import org.springframework.beans.factory.ObjectProvider;
import org.springframework.boot.autoconfigure.condition.ConditionalOnClass;
import org.springframework.boot.autoconfigure.condition.ConditionalOnMissingBean;
import org.springframework.boot.context.properties.PropertyMapper;
import org.springframework.context.annotation.Bean;
import org.springframework.context.annotation.Configuration;
import org.springframework.util.StringUtils;

/**
 * Elasticsearch rest client infrastructure configurations.
 *
 * @author Brian Clozel
 * @author Stephane Nicoll
 * @author Vedran Pavic
 * @author Evgeniy Cheban
 */
class ElasticsearchRestClientConfigurations {

   @Configuration(proxyBeanMethods = false)
   @ConditionalOnMissingBean(RestClientBuilder.class)
   static class RestClientBuilderConfiguration {

      @Bean
      RestClientBuilderCustomizer defaultRestClientBuilderCustomizer(ElasticsearchRestClientProperties properties) {
         return new DefaultRestClientBuilderCustomizer(properties);
      }

       // RestClientBuilder
      @Bean
      RestClientBuilder elasticsearchRestClientBuilder(ElasticsearchRestClientProperties properties,
            ObjectProvider<RestClientBuilderCustomizer> builderCustomizers) {
         HttpHost[] hosts = properties.getUris().stream().map(this::createHttpHost).toArray(HttpHost[]::new);
         RestClientBuilder builder = RestClient.builder(hosts);
         builder.setHttpClientConfigCallback((httpClientBuilder) -> {
            builderCustomizers.orderedStream().forEach((customizer) -> customizer.customize(httpClientBuilder));
            return httpClientBuilder;
         });
         builder.setRequestConfigCallback((requestConfigBuilder) -> {
            builderCustomizers.orderedStream().forEach((customizer) -> customizer.customize(requestConfigBuilder));
            return requestConfigBuilder;
         });
         builderCustomizers.orderedStream().forEach((customizer) -> customizer.customize(builder));
         return builder;
      }

      private HttpHost createHttpHost(String uri) {
         try {
            return createHttpHost(URI.create(uri));
         }
         catch (IllegalArgumentException ex) {
            return HttpHost.create(uri);
         }
      }

      private HttpHost createHttpHost(URI uri) {
         if (!StringUtils.hasLength(uri.getUserInfo())) {
            return HttpHost.create(uri.toString());
         }
         try {
            return HttpHost.create(new URI(uri.getScheme(), null, uri.getHost(), uri.getPort(), uri.getPath(),
                  uri.getQuery(), uri.getFragment()).toString());
         }
         catch (URISyntaxException ex) {
            throw new IllegalStateException(ex);
         }
      }

   }

   @Configuration(proxyBeanMethods = false)
   @ConditionalOnClass(RestHighLevelClient.class)
   static class RestHighLevelClientConfiguration {
       // RestHighLevelClient 高级客户端,后面项目会用到的客户端
      @Bean
      @ConditionalOnMissingBean
      RestHighLevelClient elasticsearchRestHighLevelClient(RestClientBuilder restClientBuilder) {
         return new RestHighLevelClient(restClientBuilder);
      }

      @Bean
      @ConditionalOnMissingBean
      RestClient elasticsearchRestClient(RestClientBuilder builder,
            ObjectProvider<RestHighLevelClient> restHighLevelClient) {
         RestHighLevelClient client = restHighLevelClient.getIfUnique();
         if (client != null) {
            return client.getLowLevelClient();
         }
         return builder.build();
      }

   }

   @Configuration(proxyBeanMethods = false)
   static class RestClientFallbackConfiguration {
       // RestClient 普通的客户端
      @Bean
      @ConditionalOnMissingBean
      RestClient elasticsearchRestClient(RestClientBuilder builder) {
         return builder.build();
      }

   }

   static class DefaultRestClientBuilderCustomizer implements RestClientBuilderCustomizer {

      private static final PropertyMapper map = PropertyMapper.get();

      private final ElasticsearchRestClientProperties properties;

      DefaultRestClientBuilderCustomizer(ElasticsearchRestClientProperties properties) {
         this.properties = properties;
      }

      @Override
      public void customize(RestClientBuilder builder) {
      }

      @Override
      public void customize(HttpAsyncClientBuilder builder) {
         builder.setDefaultCredentialsProvider(new PropertiesCredentialsProvider(this.properties));
      }

      @Override
      public void customize(RequestConfig.Builder builder) {
         map.from(this.properties::getConnectionTimeout).whenNonNull().asInt(Duration::toMillis)
               .to(builder::setConnectTimeout);
         map.from(this.properties::getReadTimeout).whenNonNull().asInt(Duration::toMillis)
               .to(builder::setSocketTimeout);
      }

   }

   private static class PropertiesCredentialsProvider extends BasicCredentialsProvider {

      PropertiesCredentialsProvider(ElasticsearchRestClientProperties properties) {
         if (StringUtils.hasText(properties.getUsername())) {
            Credentials credentials = new UsernamePasswordCredentials(properties.getUsername(),
                  properties.getPassword());
            setCredentials(AuthScope.ANY, credentials);
         }
         properties.getUris().stream().map(this::toUri).filter(this::hasUserInfo)
               .forEach(this::addUserInfoCredentials);
      }

      private URI toUri(String uri) {
         try {
            return URI.create(uri);
         }
         catch (IllegalArgumentException ex) {
            return null;
         }
      }

      private boolean hasUserInfo(URI uri) {
         return uri != null && StringUtils.hasLength(uri.getUserInfo());
      }

      private void addUserInfoCredentials(URI uri) {
         AuthScope authScope = new AuthScope(uri.getHost(), uri.getPort());
         Credentials credentials = createUserInfoCredentials(uri.getUserInfo());
         setCredentials(authScope, credentials);
      }

      private Credentials createUserInfoCredentials(String userInfo) {
         int delimiter = userInfo.indexOf(":");
         if (delimiter == -1) {
            return new UsernamePasswordCredentials(userInfo, null);
         }
         String username = userInfo.substring(0, delimiter);
         String password = userInfo.substring(delimiter + 1);
         return new UsernamePasswordCredentials(username, password);
      }

   }

}
具体的API测试
索引的操作
1、创建索引
@Autowired
private RestHighLevelClient restHighLevelClient;

// 测试索引的创建
@Test
void createIndexTest() throws IOException {
    // 创建索引请求
    CreateIndexRequest request = new CreateIndexRequest("dt_index");
    // 客户端执行创建请求 IndicesClient,请求后获得响应
    CreateIndexResponse createIndexResponse = restHighLevelClient.indices().create(request, RequestOptions.DEFAULT);
    System.out.println(createIndexResponse);
}

2、判断索引是否存在
// 测试获取索引,只能判断其是否存在
@Test
void existIndexTest() throws IOException {
    GetIndexRequest request = new GetIndexRequest("dt_index");
    boolean exists = restHighLevelClient.indices().exists(request, RequestOptions.DEFAULT);
    System.out.println(exists);
}
3、删除索引
// 测试索引的删除
@Test
void deleteIndexTest() throws IOException {
    DeleteIndexRequest request = new DeleteIndexRequest("dt_index");
    AcknowledgedResponse delete = restHighLevelClient.indices().delete(request, RequestOptions.DEFAULT);
    System.out.println(delete.isAcknowledged());
}
文档的操作
1、先添加一个实体类
@Data
@AllArgsConstructor
@NoArgsConstructor
@Component
public class User {
    private String name;
    private int age;
}
2、导入fastjson依赖
<dependency>
    <groupId>com.alibaba</groupId>
    <artifactId>fastjson</artifactId>
    <version>1.2.83</version>
</dependency>
3、添加文档
// 测试添加文档
@Test
void addDocumentTest() throws IOException {
    // 创建对象
    User user = new User("dt", 18);
    // 创建请求
    IndexRequest request = new IndexRequest("dt_index");

    // 规则 put /dt_index/_doc/1
    request.id("1");
    request.timeout(TimeValue.timeValueSeconds(1));
    request.timeout("1s");

    // 将我们的数据放入请求 json
    request.source(JSON.toJSONString(user), XContentType.JSON);

    // 客户端发送请求
    IndexResponse indexResponse = restHighLevelClient.index(request, RequestOptions.DEFAULT);

    System.out.println(indexResponse.toString());
    System.out.println(indexResponse.status());
}

数据成功放入

4、判断文档是否存在
// 判断文档是否存在 get /dt_index/_doc/1
@Test
void existsDocumentTest() throws IOException {
    GetRequest getRequest = new GetRequest("dt_index", "1");
    // 不获取返回的 _source 的上下文了
    getRequest.fetchSourceContext(new FetchSourceContext(false));
    getRequest.storedFields("_none_");

    boolean exists = restHighLevelClient.exists(getRequest, RequestOptions.DEFAULT);
    System.out.println(exists);
}
5、获取文档的信息
// 获取文档的信息
@Test
void getDocumentTest() throws IOException {
    GetRequest getRequest = new GetRequest("dt_index", "1");
    GetResponse getResponse = restHighLevelClient.get(getRequest, RequestOptions.DEFAULT);
    // 打印文档的内容
    System.out.println(getResponse.getSourceAsString());
    // 返回的全部内容和命令一样
    System.out.println(getResponse);
}

6、更新文档的信息
// 更新文档的信息
@Test
void updateDocumentTest() throws IOException {
    UpdateRequest updateRequest = new UpdateRequest("dt_index", "1");
    updateRequest.timeout("1s");

    User user = new User("KyDestroy", 21);
    updateRequest.doc(JSON.toJSONString(user), XContentType.JSON);

    UpdateResponse updateResponse = restHighLevelClient.update(updateRequest, RequestOptions.DEFAULT);
    System.out.println(updateResponse.status());
}
更新成功

7、删除文档的信息
// 删除文档的信息
@Test
void deleteDocumentTest() throws IOException {
    DeleteRequest deleteRequest = new DeleteRequest("dt_index", "1");
    deleteRequest.timeout("1s");

    DeleteResponse deleteResponse = restHighLevelClient.delete(deleteRequest, RequestOptions.DEFAULT);
    System.out.println(deleteResponse.status());
}
8、批量插入文档
// 批量插入数据
@Test
void bulkRequestTest() throws IOException {
    BulkRequest bulkRequest = new BulkRequest();
    bulkRequest.timeout("10s");

    ArrayList<User> userList = new ArrayList<>();
    userList.add(new User("dt1", 18));
    userList.add(new User("dt2", 18));
    userList.add(new User("dt3", 18));
    userList.add(new User("KyDestroy1", 18));
    userList.add(new User("KyDestroy2", 18));
    userList.add(new User("KyDestroy3", 18));

    // 批处理请求
    for (int i = 0; i < userList.size(); i++) {
        // 批量更新和批量删除,就在这里修改对应的请求就可以了
        bulkRequest.add(
                new IndexRequest("dt_index")
                .id("" + i+1)
                .source(JSON.toJSONString(userList.get(i)), XContentType.JSON)
        );
        BulkResponse bulkResponse = restHighLevelClient.bulk(bulkRequest, RequestOptions.DEFAULT);
        // 是否失败,返回false代表成功
        System.out.println(bulkResponse.hasFailures());
    }
}
批量插入成功

9、查询
// 查询
// SearchRequest 搜索请求
// SearchSourceBuilder 条件构造
// HighLightBuilder 构建高亮
// TermQueryBuilder  精确查询
// MatchAllQueryBuilder 匹配所有
// xxx QueryBuilder 对应我们刚才看到的命令!
@Test
void searchRequestTest() throws IOException {
    SearchRequest searchRequest = new SearchRequest("dt_index");
    // 构建搜索的条件
    SearchSourceBuilder sourceBuilder = new SearchSourceBuilder();

    // 查询条件,我们可以使用 QueryBuilders 工具来实现
    // QueryBuilders.termQuery  精确
    //QueryBuilders.matchAllQuery 匹配所有

    // 中文查询,查不出来这个样子QueryBuilders.termQuery("xxxx.keyword", "xxxx");
    TermQueryBuilder termQueryBuilder = QueryBuilders.termQuery("name", "dt1");
    // MatchAllQueryBuilder matchAllQueryBuilder = QueryBuilders.matchAllQuery();
    sourceBuilder.query(termQueryBuilder);
    sourceBuilder.timeout(new TimeValue(60, TimeUnit.SECONDS));

    searchRequest.source(sourceBuilder);

    SearchResponse searchResponse = restHighLevelClient.search(searchRequest, RequestOptions.DEFAULT);
    System.out.println(JSON.toJSONString(searchResponse.getHits()));
    System.out.println("================");
    for (SearchHit documentFields : searchResponse.getHits().getHits()) {
        System.out.println(documentFields.getSourceAsMap());
    }

}
返回结果:

七、实战
最终实现效果
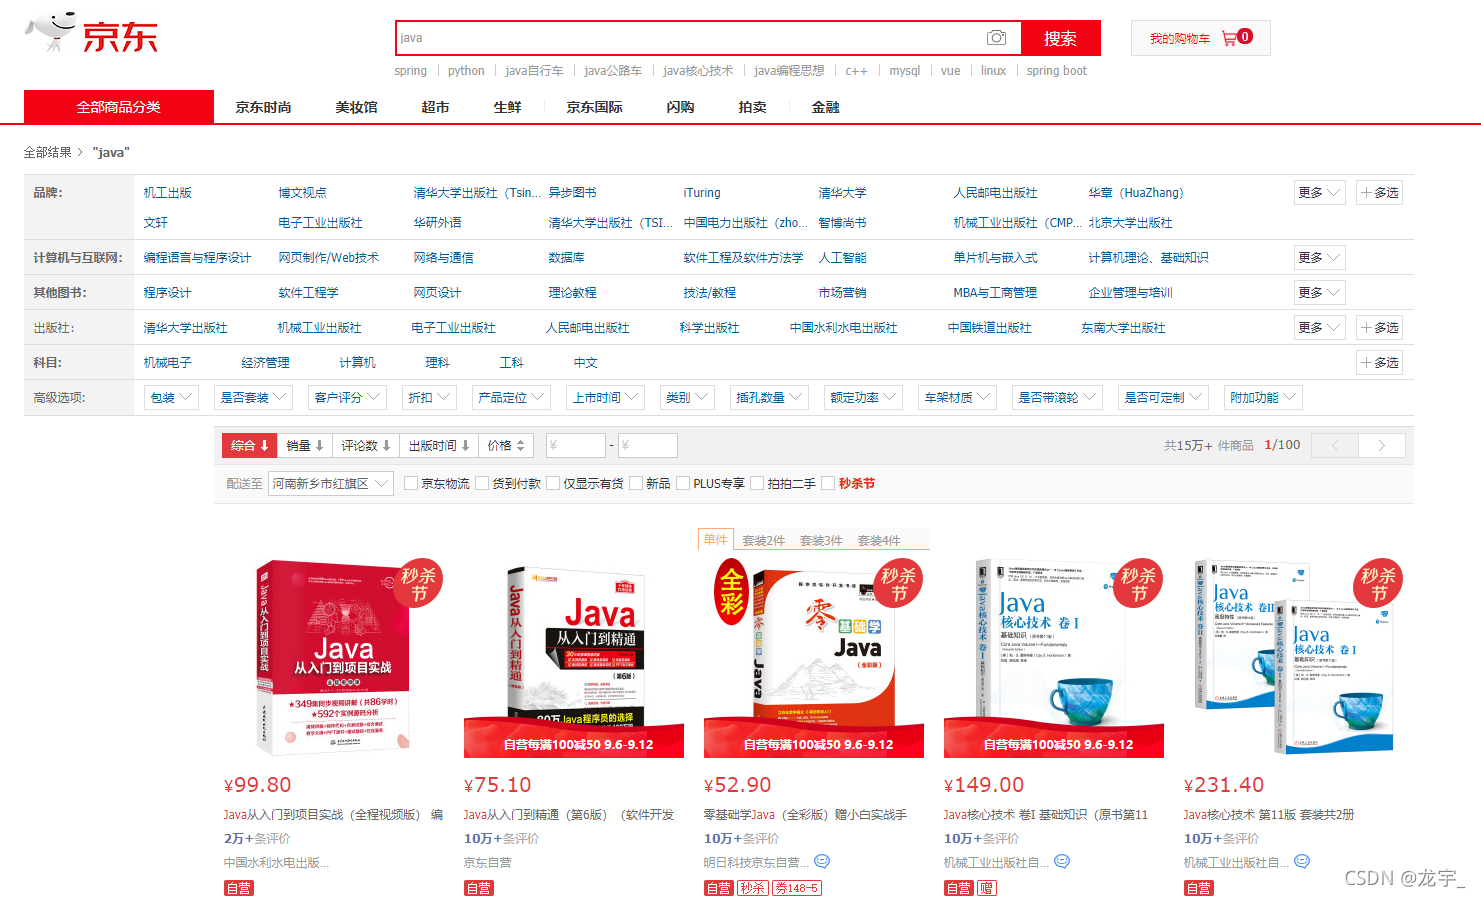
7.1、搭建项目
1、新建module
导入依赖
<dependencies>
    <dependency>
        <groupId>com.alibaba</groupId>
        <artifactId>fastjson</artifactId>
        <version>1.2.83</version>
    </dependency>
    <dependency>
        <groupId>org.springframework.boot</groupId>
        <artifactId>spring-boot-starter-data-elasticsearch</artifactId>
    </dependency>
    <dependency>
        <groupId>org.springframework.boot</groupId>
        <artifactId>spring-boot-starter-thymeleaf</artifactId>
    </dependency>
    <dependency>
        <groupId>org.springframework.boot</groupId>
        <artifactId>spring-boot-starter-web</artifactId>
    </dependency>

    <dependency>
        <groupId>org.springframework.boot</groupId>
        <artifactId>spring-boot-devtools</artifactId>
        <scope>runtime</scope>
        <optional>true</optional>
    </dependency>
    <dependency>
        <groupId>org.springframework.boot</groupId>
        <artifactId>spring-boot-configuration-processor</artifactId>
        <optional>true</optional>
    </dependency>
    <dependency>
        <groupId>org.projectlombok</groupId>
        <artifactId>lombok</artifactId>
        <optional>true</optional>
    </dependency>
    <dependency>
        <groupId>org.springframework.boot</groupId>
        <artifactId>spring-boot-starter-test</artifactId>
        <scope>test</scope>
        <exclusions>
            <exclusion>
                <groupId>org.junit.vintage</groupId>
                <artifactId>junit-vintage-engine</artifactId>
            </exclusion>
        </exclusions>
    </dependency>
</dependencies>
2、修改配置文件
server.port=9090
# 关闭 thymeleaf 的缓存
spring.thymeleaf.cache=fals
3、导入前端测试页面
前端素材:https://gitee.com/wumen123/ElasticSearch?_from=gitee_search
4、创建IndexController
@Controller
public class IndexController {
    @GetMapping({"/","/index"})
    public String index() {
        return "index";
    }
}
5、测试访问 http://localhost:9090/
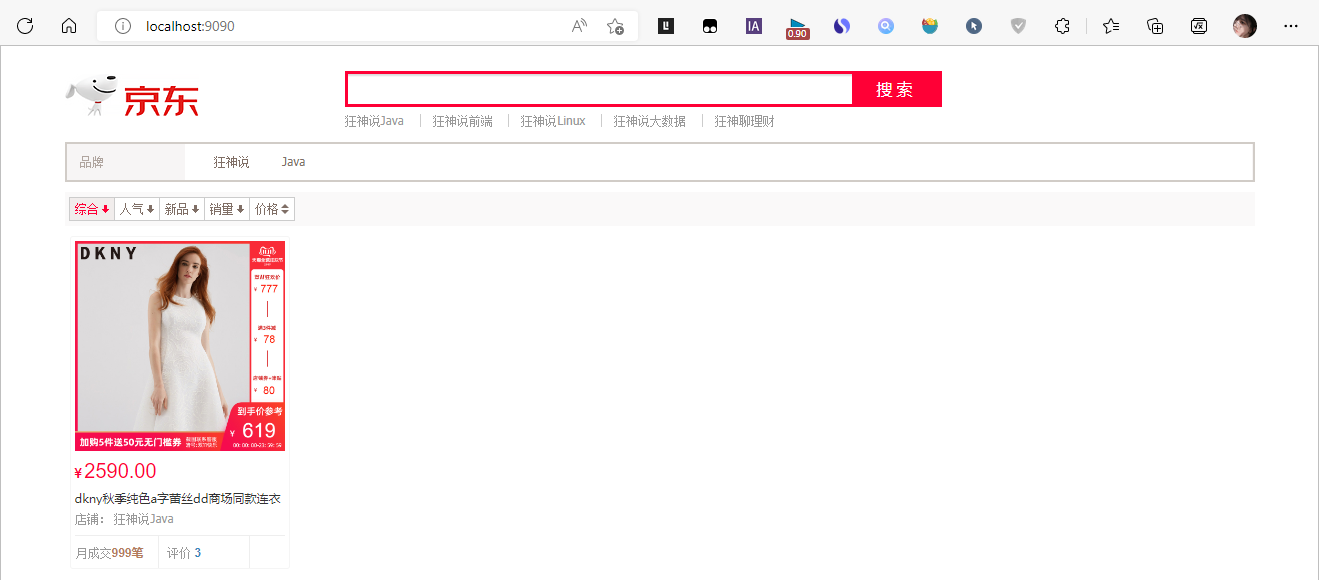
7.2、爬虫
数据问题?数据库获取,消息队列中获取,都可以成为数据源,爬虫!
爬取数据:(获取请求返回的页面信息,筛选出我们想要的数据就可以了!)
1、导入 jsoup 包
<!--解析网页json tik2包可以爬取电影音乐-->
<!--解析网页json-->
<dependency>
    <groupId>org.jsoup</groupId>
    <artifactId>jsoup</artifactId>
    <version>1.14.2</version>
</dependency>
2、创建 HtmlParseUtil 工具类
@Component
public class HtmlParseUtil {

    public List<Content> parseJD(String keywords) throws IOException {
        List<Content> goodList = new ArrayList<>();
        // 获得请求 https://search.jd.com/Search?keyword=java
        // 前提:需要联网,不能获取ajax数据
        String url = "https://search.jd.com/Search?keyword=" + keywords;

        // 解析网页 (jsoup返回Document就是浏览器的Document对象)
        Document document = Jsoup.parse(new URL(url), 30000);
        // 所有在js中可以使用的方法,这里都能用
        Element element = document.getElementById("J_goodsList");
        // 获取所有的li元素
        Elements elements = element.getElementsByTag("li");
        // 获取元素中的内容,这里el,就是每一个li标签
        for (Element el : elements) {
            // 关于图片特别多的网站,所有的图片都是延迟加载的 source-data-lazy-img
            String img = el.getElementsByTag("img").eq(0).attr("data-lazy-img");
            String price = el.getElementsByClass("p-price").eq(0).text();
            String title = el.getElementsByClass("p-name").eq(0).text();

            Content content = new Content();
            content.setTitle(title)
                    .setImg(img)
                    .setPrice(price);
            goodList.add(content);
        }
        return goodList;
    }

}
3、实体类
@Data
@AllArgsConstructor
@NoArgsConstructor
@Accessors(chain = true)
public class Content {
    private String title;
    private String img;
    private String price;
}
4、config包
// 1、找对象
// 2、放到spring中待用
// 3、如果是springboot 就先分析源码
@Configuration
public class ElasticSearchClientConfig {

    @Bean
    public RestHighLevelClient restHighLevelClient() {
        RestHighLevelClient client = new RestHighLevelClient(
                RestClient.builder(new HttpHost("127.0.0.1", 9200, "http"))
        );
        return client;
    }

}
5、service调用
@Autowired
private RestHighLevelClient restHighLevelClient;

// 1.解析数据放入es索引中
public Boolean parseContent(String keywords) throws IOException {
    List<Content> contents = new HtmlParseUtil().parseJD(keywords);
    // 把查询的数据放入 es 中
    BulkRequest bulkRequest = new BulkRequest();
    bulkRequest.timeout(new TimeValue(2, TimeUnit.MINUTES));

    for (int i = 0; i < contents.size(); i++) {
        bulkRequest.add(
                new IndexRequest("jd_goods")
                        .source(JSON.toJSONString(contents.get(i)), XContentType.JSON)
        );
    }
    BulkResponse bulk = restHighLevelClient.bulk(bulkRequest, RequestOptions.DEFAULT);
    return !bulk.isFragment();
}
6、controller层
@Autowired
private ContentService contentService;

@GetMapping("/parse/{keywords}")
public Boolean parse(@PathVariable("keywords") String keywords) throws IOException {
    return contentService.parseContent(keywords);
}
7、通过接口调用后数据存入了es中
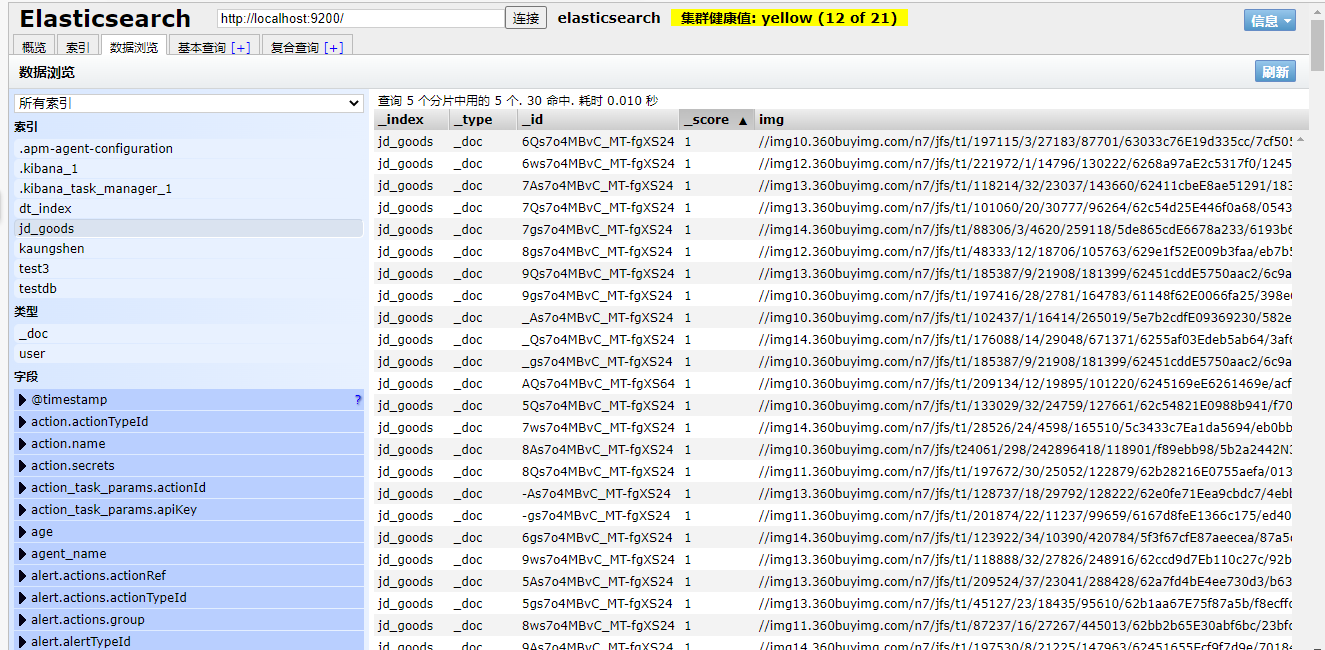
8、分页查询
service层
// 2.获取这些数据,实现搜索功能
public List<Map<String, Object>> searchPage(String keyword, int pageNo, int pageSize) throws IOException {
    if (pageSize <= 1) {
        pageNo = 1;
    }

    // 条件搜索
    SearchRequest searchRequest = new SearchRequest("jd_goods");
    SearchSourceBuilder sourceBuilder = new SearchSourceBuilder();

    // 分页
    sourceBuilder.from(pageNo);
    sourceBuilder.size(pageSize);

    // 精准匹配
    TermQueryBuilder termQueryBuilder = QueryBuilders.termQuery("title", keyword);
    sourceBuilder.query(termQueryBuilder);
    sourceBuilder.timeout(new TimeValue(60, TimeUnit.SECONDS));

    // 执行搜素
    searchRequest.source(sourceBuilder);
    SearchResponse searchResponse = restHighLevelClient.search(searchRequest, RequestOptions.DEFAULT);
    // 解析结果
    List<Map<String, Object>> list = new ArrayList<>();
    for (SearchHit documentFields : searchResponse.getHits().getHits()) {
        list.add(documentFields.getSourceAsMap());
    }
    return list;
}
9、controller层
@GetMapping("/search//{keyword}/{pageNo}/{pageSize}")
public List<Map<String, Object>> search(@PathVariable("keyword") String keyword,
                                        @PathVariable("pageNo") int pageNo,
                                        @PathVariable("pageSize") int pageSize) throws IOException {
    return contentService.searchPage(keyword, pageNo, pageSize);
}
访问:http://localhost:9090/search/java/1/10
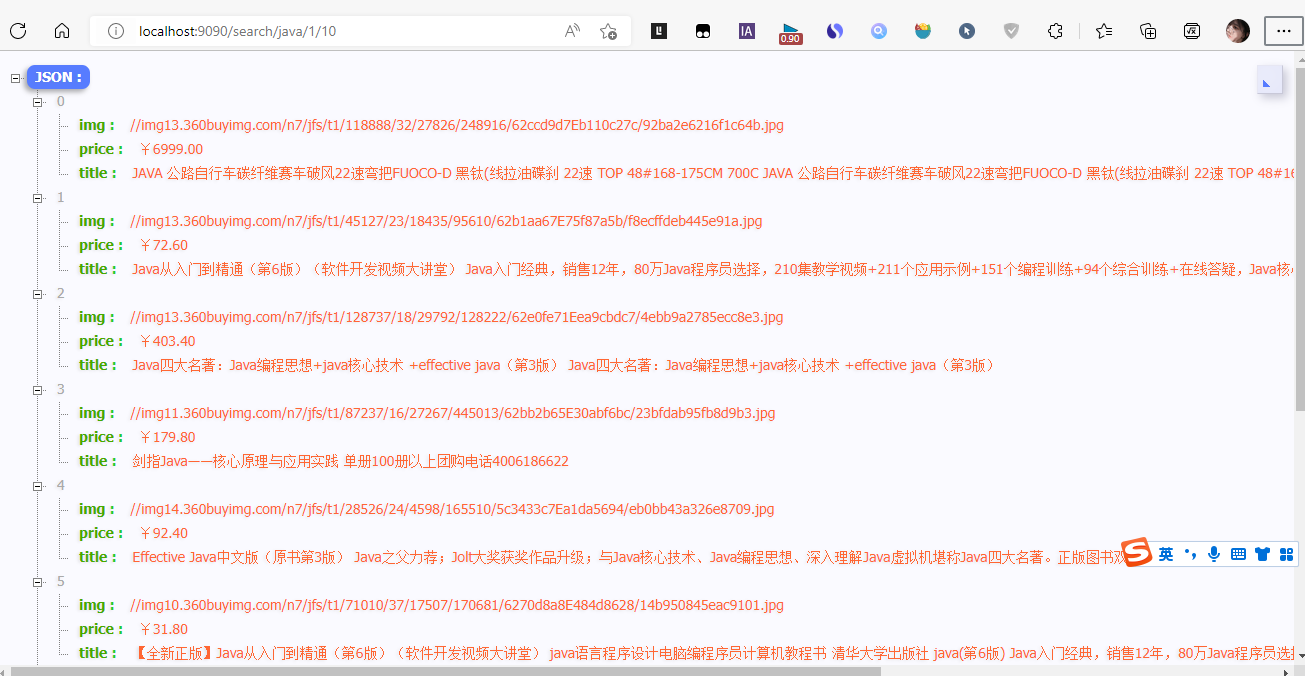
注:这里使用的JSON格式化插件是JSON Handle
7.3、前后端分离
加载并引入Vue.min.js和axios.js
如果安装了nodejs,可以按如下步骤
npm install vue
npm install axios
修改静态页面
引入js
<script th:src="@{/js/vue.min.js}"></script>
<script th:src="@{/js/axios.min.js}"></script>
修改后的index.html
<!DOCTYPE html>
<html xmlns:th="http://www.thymeleaf.org">

<head>
    <meta charset="utf-8"/>
    <title>狂神说Java-ES仿京东实战</title>
    <link rel="stylesheet" th:href="@{/css/style.css}"/>
</head>

<body class="pg">
<div class="page" id="app">
    <div id="mallPage" class=" mallist tmall- page-not-market ">

        <!-- 头部搜索 -->
        <div id="header" class=" header-list-app">
            <div class="headerLayout">
                <div class="headerCon ">
                    <!-- Logo-->
                    <h1 id="mallLogo">
                        <img th:src="@{/images/jdlogo.png}" alt="">
                    </h1>

                    <div class="header-extra">

                        <!--搜索-->
                        <div id="mallSearch" class="mall-search">
                            <form name="searchTop" class="mallSearch-form clearfix">
                                <fieldset>
                                    <legend>天猫搜索</legend>
                                    <div class="mallSearch-input clearfix">
                                        <div class="s-combobox" id="s-combobox-685">
                                            <div class="s-combobox-input-wrap">
                                                <input v-model="keyword" type="text" autocomplete="off" value="dd" id="mq"
                                                       class="s-combobox-input" aria-haspopup="true">
                                            </div>
                                        </div>
                                        <button type="submit" @click.prevent="searchKey" id="searchbtn">搜索</button>
                                    </div>
                                </fieldset>
                            </form>
                            <ul class="relKeyTop">
                                <li><a>狂神说Java</a></li>
                                <li><a>狂神说前端</a></li>
                                <li><a>狂神说Linux</a></li>
                                <li><a>狂神说大数据</a></li>
                                <li><a>狂神聊理财</a></li>
                            </ul>
                        </div>
                    </div>
                </div>
            </div>
        </div>

        <!-- 商品详情页面 -->
        <div id="content">
            <div class="main">
                <!-- 品牌分类 -->
                <form class="navAttrsForm">
                    <div class="attrs j_NavAttrs" style="display:block">
                        <div class="brandAttr j_nav_brand">
                            <div class="j_Brand attr">
                                <div class="attrKey">
                                    品牌
                                </div>
                                <div class="attrValues">
                                    <ul class="av-collapse row-2">
                                        <li><a href="#"> 狂神说 </a></li>
                                        <li><a href="#"> Java </a></li>
                                    </ul>
                                </div>
                            </div>
                        </div>
                    </div>
                </form>

                <!-- 排序规则 -->
                <div class="filter clearfix">
                    <a class="fSort fSort-cur">综合<i class="f-ico-arrow-d"></i></a>
                    <a class="fSort">人气<i class="f-ico-arrow-d"></i></a>
                    <a class="fSort">新品<i class="f-ico-arrow-d"></i></a>
                    <a class="fSort">销量<i class="f-ico-arrow-d"></i></a>
                    <a class="fSort">价格<i class="f-ico-triangle-mt"></i><i class="f-ico-triangle-mb"></i></a>
                </div>

                <!-- 商品详情 -->
                <div class="view grid-nosku">

                    <div class="product" v-for="result in results">
                        <div class="product-iWrap">
                            <!--商品封面-->
                            <div class="productImg-wrap">
                                <a class="productImg">
                                    <img :src="result.img">
                                </a>
                            </div>
                            <!--价格-->
                            <p class="productPrice">
                                <em>{{result.price}}</em>
                            </p>
                            <!--标题-->
                            <p class="productTitle">
                                <a> {{result.title}} </a>
                            </p>
                            <!-- 店铺名 -->
                            <div class="productShop">
                                <span>店铺: 狂神说Java </span>
                            </div>
                            <!-- 成交信息 -->
                            <p class="productStatus">
                                <span>月成交<em>999笔</em></span>
                                <span>评价 <a>3</a></span>
                            </p>
                        </div>
                    </div>
                </div>
            </div>
        </div>
    </div>
</div>

<script th:src="@{/js/vue.min.js}"></script>
<script th:src="@{/js/axios.min.js}"></script>
<script>

    new Vue({
        el: '#app',
        data: {
            keyword: '', // 搜索的关键字
            results: [], //搜索的结果
        },
        methods: {
            searchKey() {
                let keyword = this.keyword;
                // console.log(keyword);
                // 对接后端的接口
                axios.get('/search/' + keyword + '/1/10').then(res => {
                    // console.log(res.data);
                    this.results = res.data;    // 绑定数据
                })
            },
        }
    })

</script>

</body>
</html>
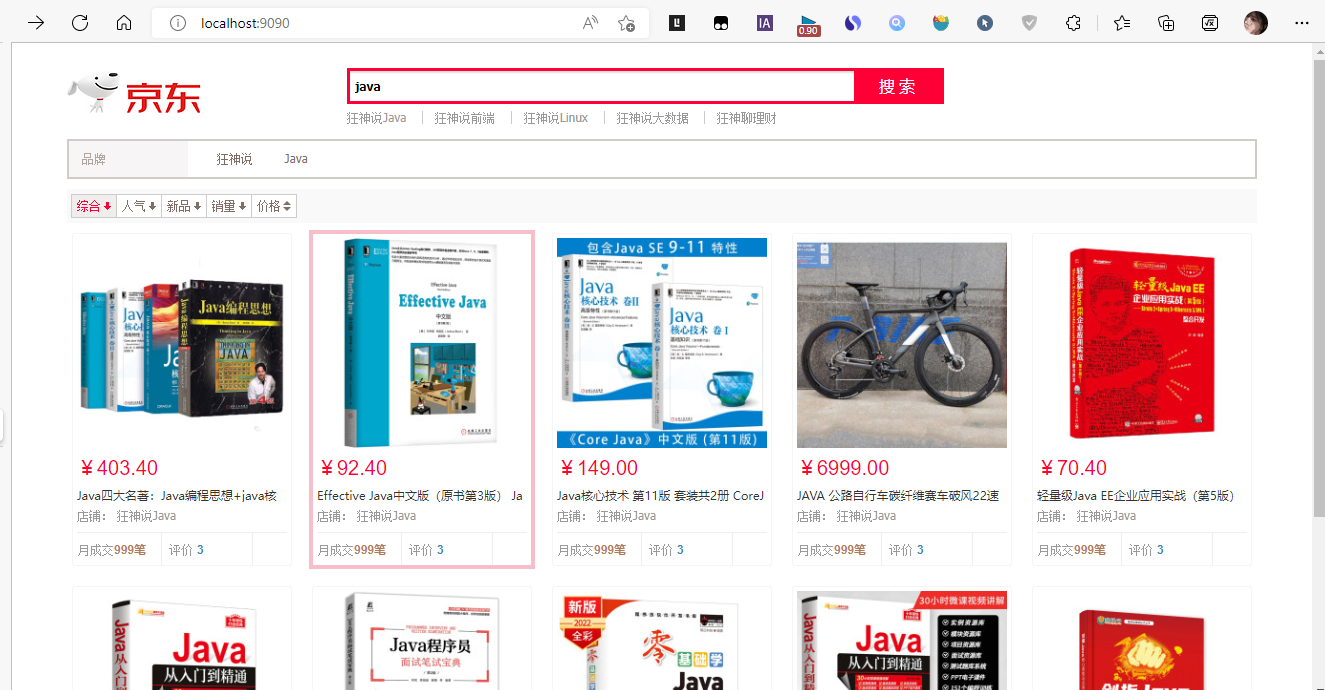
测试搜索
7.4、搜索高亮
service(实现高亮)
// 3.获取这些数据,实现高亮功能
public List<Map<String, Object>> searchPageHighlightBuilder(String keyword, int pageNo, int pageSize) throws IOException {
    if (pageSize <= 1) {
        pageNo = 1;
    }

    // 条件搜索
    SearchRequest searchRequest = new SearchRequest("jd_goods");
    SearchSourceBuilder sourceBuilder = new SearchSourceBuilder();

    // 分页
    sourceBuilder.from(pageNo);
    sourceBuilder.size(pageSize);

    // 精准匹配
    TermQueryBuilder termQueryBuilder = QueryBuilders.termQuery("title", keyword);
    sourceBuilder.query(termQueryBuilder);
    sourceBuilder.timeout(new TimeValue(60, TimeUnit.SECONDS));

    // 高亮
    HighlightBuilder highlightBuilder = new HighlightBuilder();
    highlightBuilder.field("title");
    highlightBuilder.requireFieldMatch(false); // 关闭多个高亮显示
    highlightBuilder.preTags("<span style='color:red'>");
    highlightBuilder.postTags("</span>");
    sourceBuilder.highlighter(highlightBuilder);

    // 执行搜素
    searchRequest.source(sourceBuilder);
    SearchResponse searchResponse = restHighLevelClient.search(searchRequest, RequestOptions.DEFAULT);
    // 解析结果
    List<Map<String, Object>> list = new ArrayList<>();
    for (SearchHit documentFields : searchResponse.getHits().getHits()) {
        Map<String, HighlightField> highlightFields = documentFields.getHighlightFields();
        HighlightField title = highlightFields.get("title");
        Map<String, Object> sourceAsMap = documentFields.getSourceAsMap(); // 原来的结果
        // 解析高亮的字段,将原来的字段换为我们高亮的字段即可!
        if (title!=null) {
            Text[] fragments = title.fragments();
            String n_Title = "";
            for (Text text : fragments) {
                n_Title += text;
            }
            // 高亮字段替换掉原来的
            sourceAsMap.put("title", n_Title);
        }
        list.add(sourceAsMap);
    }
    return list;
}
替换controller层使用的方法
@GetMapping("/search//{keyword}/{pageNo}/{pageSize}")
public List<Map<String, Object>> search(@PathVariable("keyword") String keyword,
                                        @PathVariable("pageNo") int pageNo,
                                        @PathVariable("pageSize") int pageSize) throws IOException {
    return contentService.searchPageHighlightBuilder(keyword, pageNo, pageSize);
}
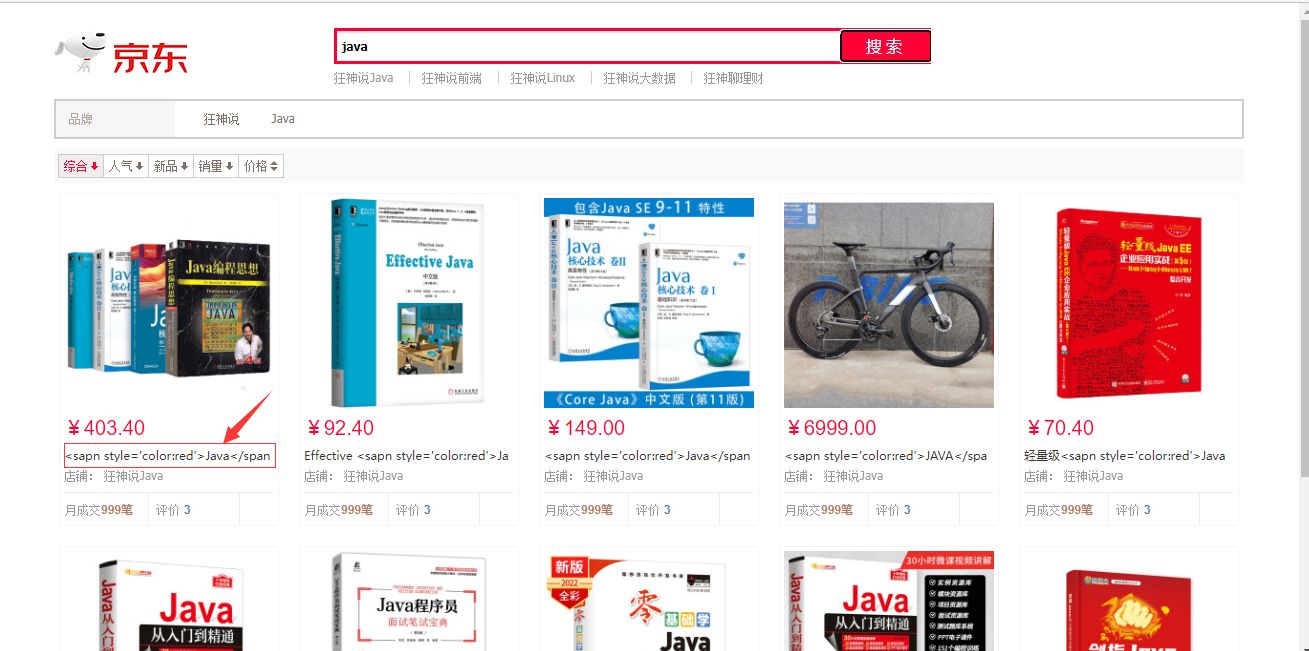
替换成功,但不显示样式
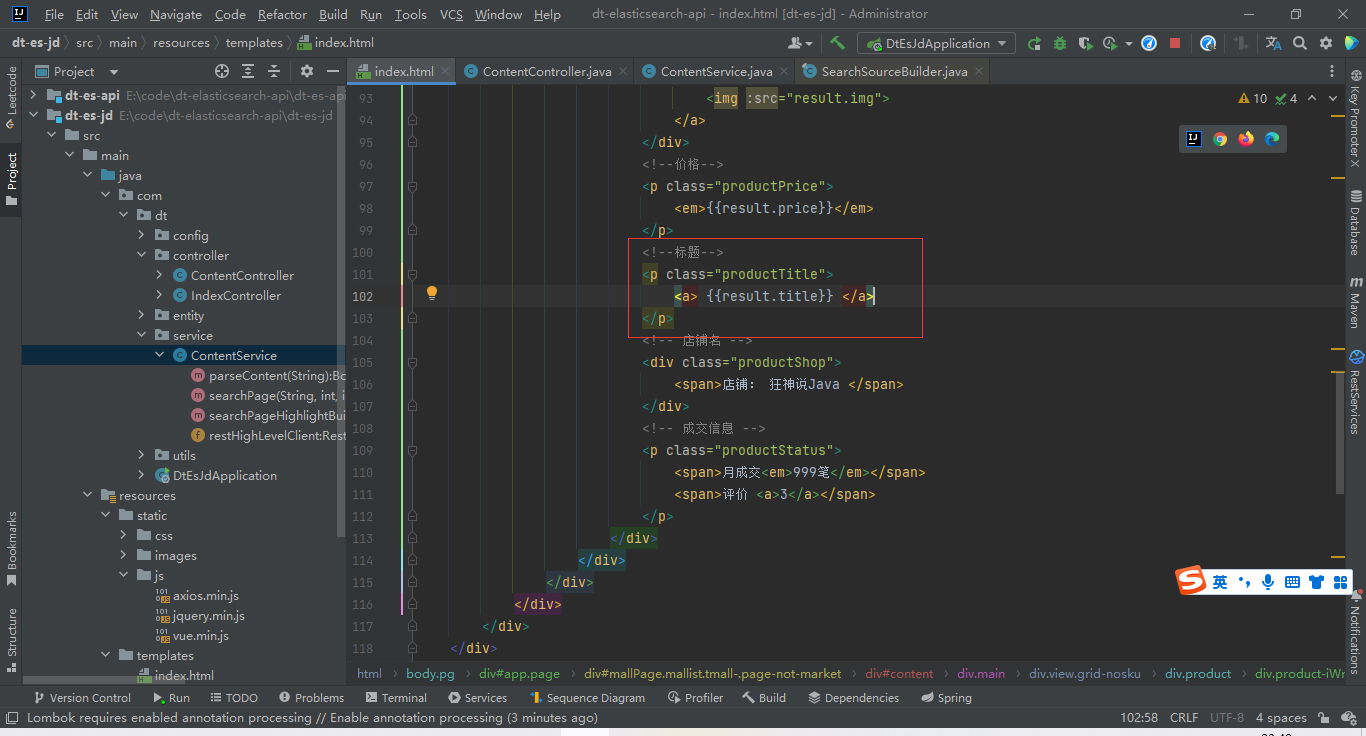
需要修改html样式,解析
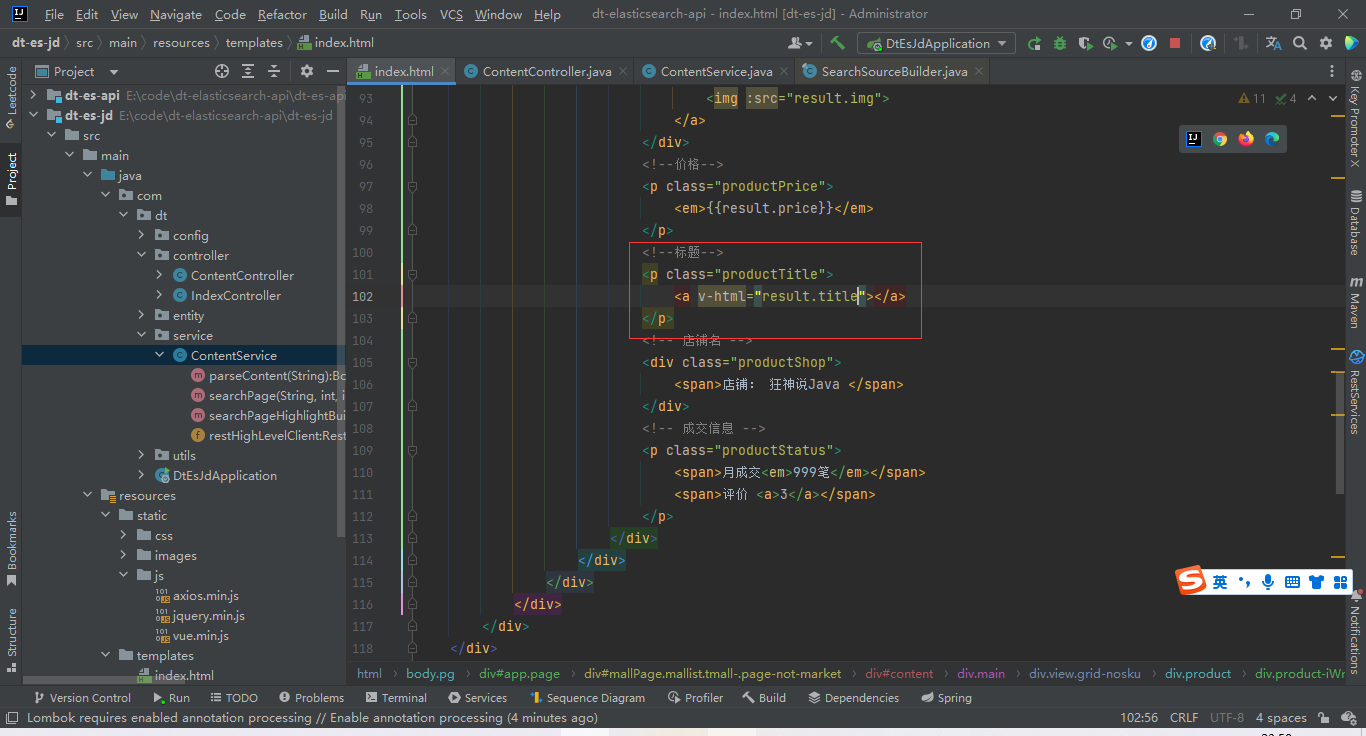
改成
再次测试


