狂神说学习笔记:JUC并发编程
1|0JUC并发编程
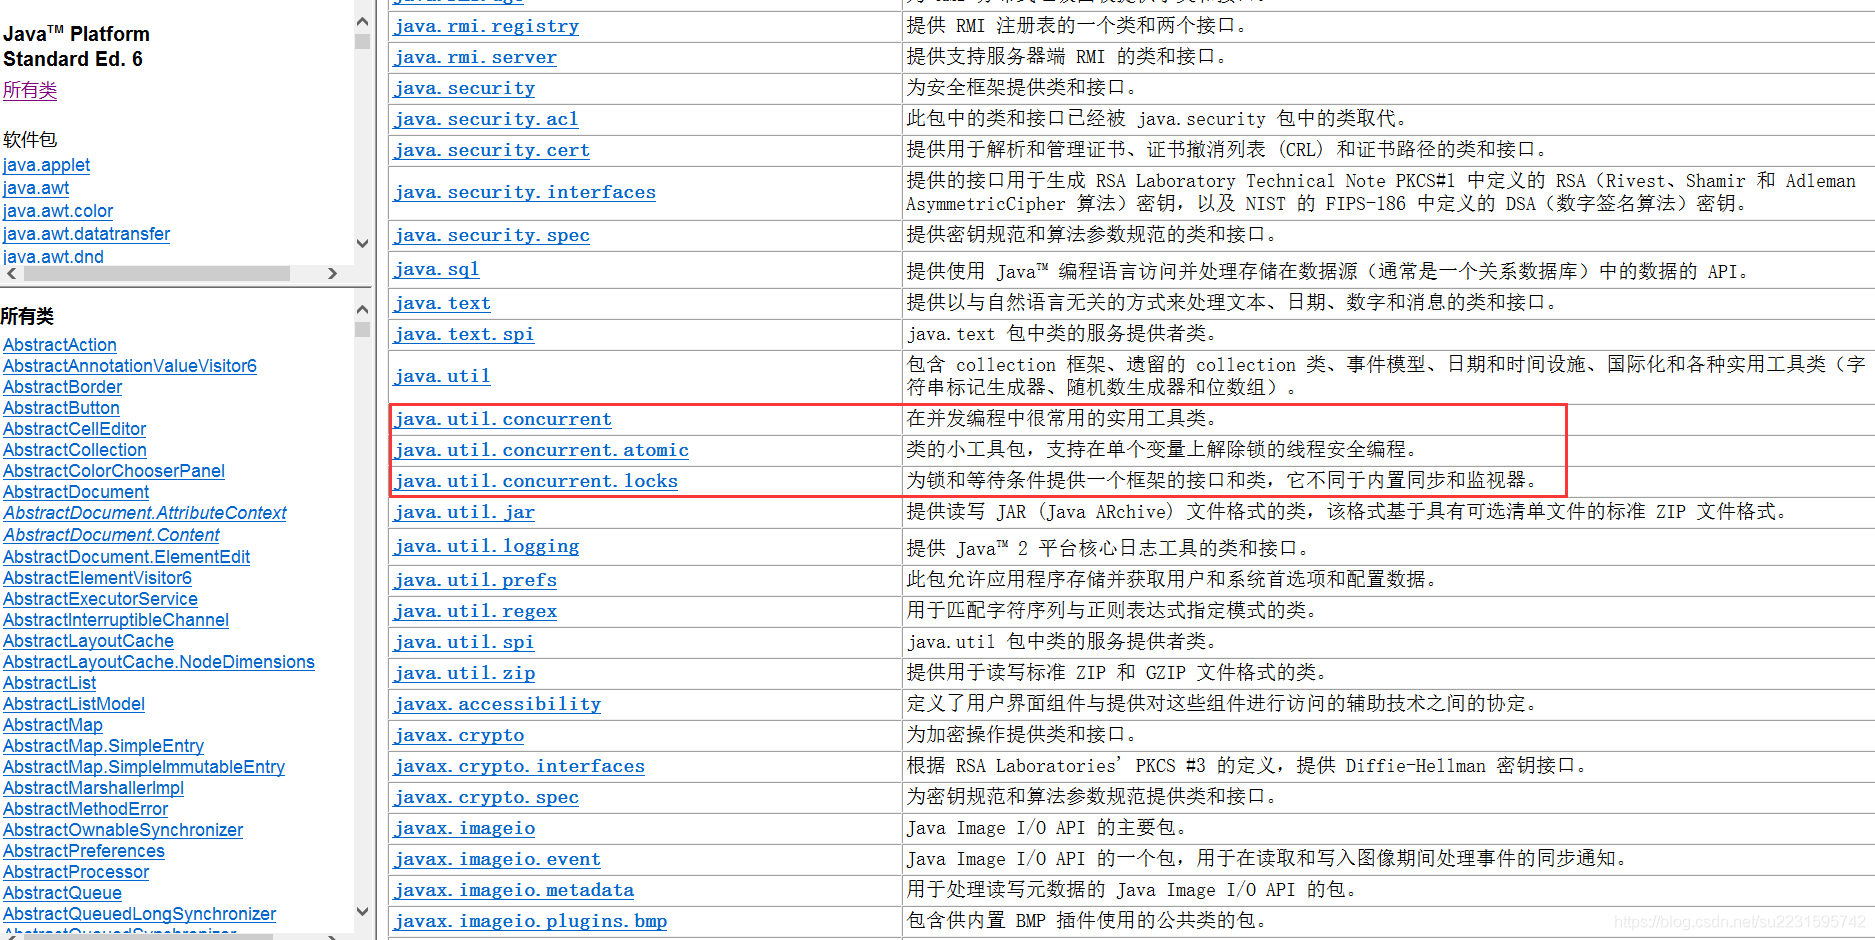
1|11、什么是JUC
JUC:java.util.concurrent
Runnable 没有返回值、效率相比入 Callable 相对较低!
1|22、线程和进程
进程:一个程序,QQ.exe,music.exe 本质是程序的集合,
一个进程往往可以包含多个线程,至少包含一个!
Java默认有几个线程? 2个,main 和 GC
线程:开了一个进程Typora,写字,自动保存(线程负责的)
开启线程,对于Java而言:Thread、Runnable、Callable
Java 真的可以开启线程吗? 开不了
1|02.1、并发、并行
并发编程:并发、并行
并发(多个线程操作同一个资源)
- CPU一核,模拟出来多条线程,天下武功,为快不破,快速交替
并行(多个人一起行走)
- CPU多核,多个线程可以同时执行;线程池
并发编程的本质:充分利用CPU的资源
1|02.2、线程有几个状态
1|02.3、wait/sleep 区别
1、来自不同的类
- wait = > Object
- sleep => Thread
2、关于锁的释放
wait会释放锁,sleep睡觉了,抱着锁睡觉,不会释放!
3、使用的范围是不同的
- wait 必须在同步代码块中
- sleep 可以在任何敌方睡
4、是否需要捕获异常(忽略)
- wait 必须需要捕获异常
- sleep 必须要捕获异常
1|33、Lock锁(重点)
1|03.1、传统Synchronized
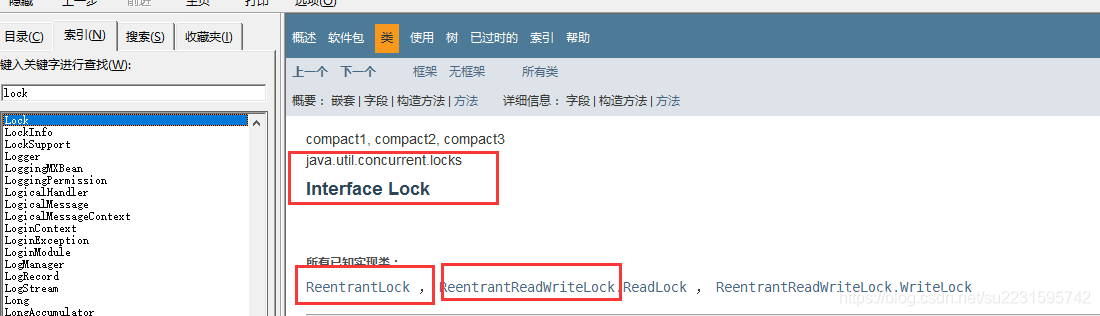
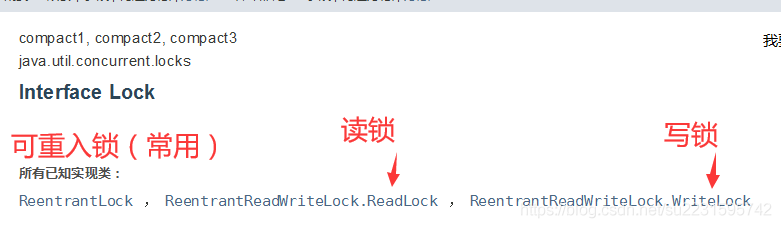
1|03.2、Lock 接口


公平锁:十分公平:可以先来后到
非公平锁:十分不公平:可以插队(默认是非公平锁)
1|03.3、Synchronized 和 Lock 区别
1、Synchronized 内置的Java关键字,Lock 是一个java类
2、Synchronized 无法判断获取锁的状态,Lock 可以判断是获取到了锁
3、Synchronized 会自动释放锁,Lick 必须要手动释放锁!如果不释放就会 死锁
4、Synchronized 线程1(获得锁,阻塞)、线程2(等待,傻傻的等);Lock 锁就不一定会等待下去
5、Synchronized 可重入锁,不可以中段的,非公平;Lock,可重入锁,可以判断锁,非公平(可以自己设置)
6、Synchronized 适合锁少量的代码同步问题,Lock 适合锁大量的同步代码!
锁是什么,如何判断锁的是谁?
1|44、生产者和消费者问题
面试:单例模式、排序算法、生产者和消费者、死锁
1|04.1、生产者和消费者问题 Synchronized 版
1|04.1.1、问题存在,A B C D 4 个线程! 虚假唤醒
结果:
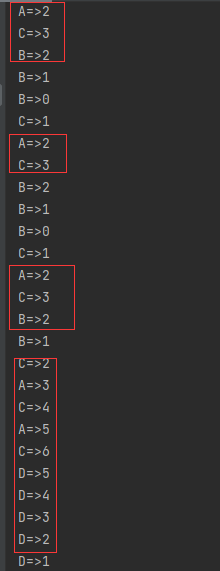

解决办法:if 改为 while 判断(防止虚假唤醒问题)
结果正常:

1|04.2、JUC版的生产者和消费者问题
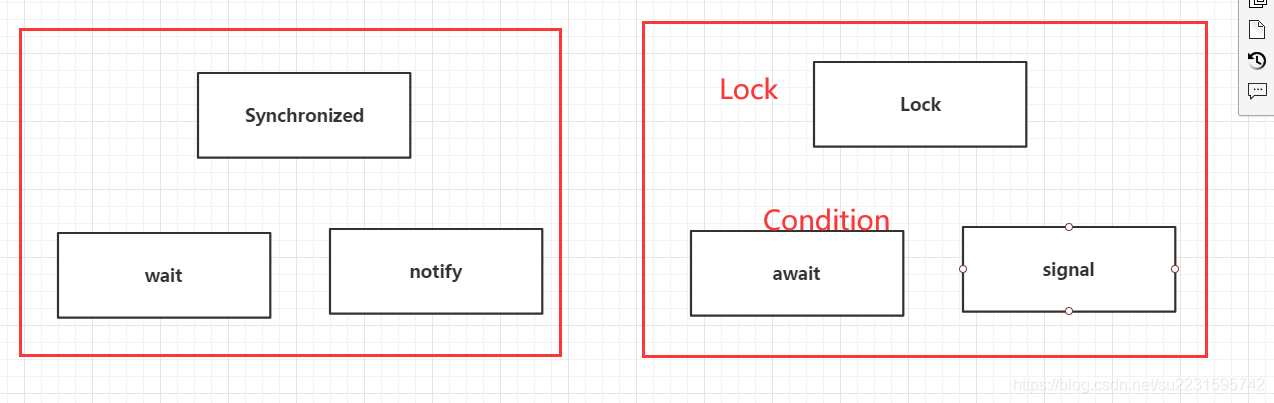
通过Lock 找到 Condition

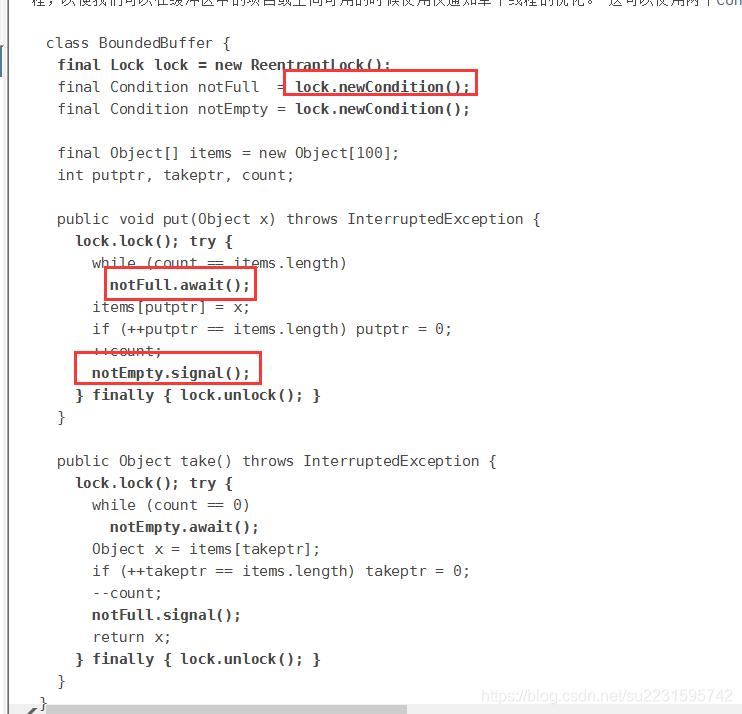
代码实现:
问题:随机的状态,我希望能有序执行ABCD

任何一个新的技术,绝对不是仅仅只是覆盖了原来的技术,优势和补充!
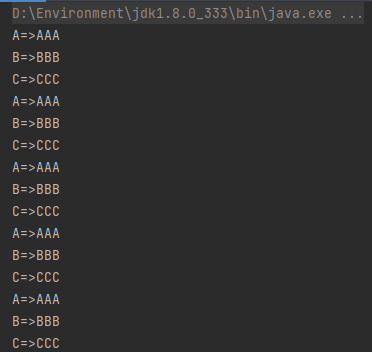
1|04.3、Condition 精准的通知和唤醒线程
代码实现:
结果:
1|55、8锁现象
如何判断锁的是谁!永远的知道什么锁,锁到底锁的是谁!
8锁,就是关于锁的8个问题
- 1、标准情况下,两个线程先打印 发短信 还是 打电话? 1/发短信 2/打电话
- 2、sendSms延迟4秒,两个线程先打印 发短信 还是 打电话? 1/发短信 2/打电话
- 3、增加了一个普通方法!先执行 发短信 还是 hello? 1/hello(普通方法) 2/发短信
- 4、两个对象、两个同步方法,先执行 发短信 还是 打电话? 1/打电话 2/发短信
- 5、增加两个静态的同步方法,只有一个对象,先打印 发短信 还是 打电话? 1/发短信 2/打电话 (锁的是Class)
- 6、两个对象!增加两个静态的同步方法,只有一个对象,先打印 发短信 还是 打电话? 1/发短信 2/打电话 (锁的还是Class)
- 7、一个静态同步方法,一个普通同步方法,只有一个对象,先打印 发短信 还是 打电话? 1/打电话 2/发短信
- 8、一个静态同步方法,一个普通同步方法,两个对象,先打印 发短信 还是 打电话? 1/打电话 2/发短信
小结:
new this 具体的一个手机
static Class 唯一的模板
1|66、集合类不安全
1|06.1、List 不安全
运行有概率会报错:
java.util.ConcurrentModificationException:并发修改异常
解决方案:
-
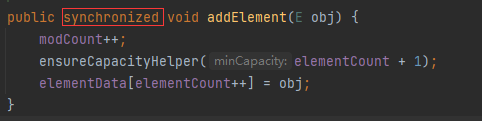
使用 Vector 类,因为 Vector 的 add 方法带有synchronized 关键字,线程安全(Vector为JDK1.0出的,ArrayList为JDK1.2出的)
-
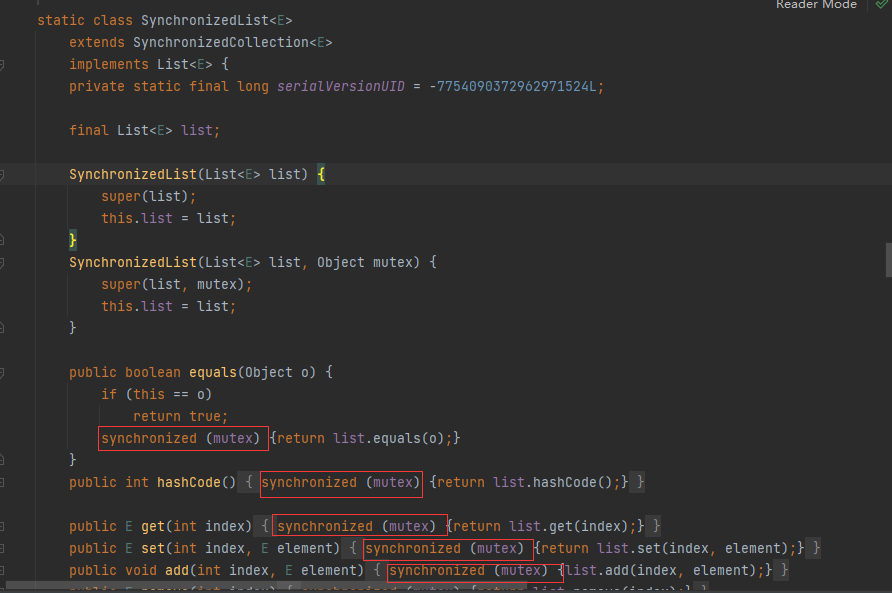
使用 Collections.synchronizedList 包装 ArrayList类

SynchronizedRandomAccessList 类继承的是 SynchronizedList 类,而 SynchronizedList 类可以看到所有的操作都是上了锁的,synchronized (mutex),锁对象是mutex是来自SynchronizedCollection父类
-
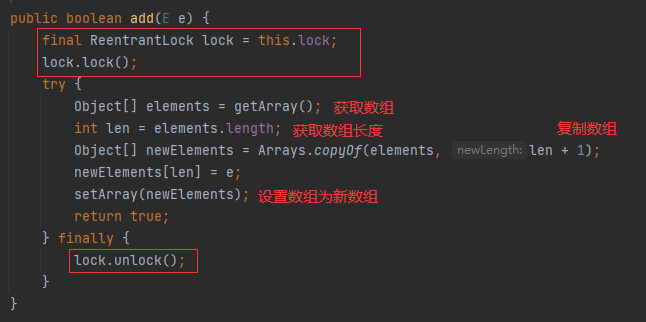
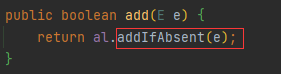
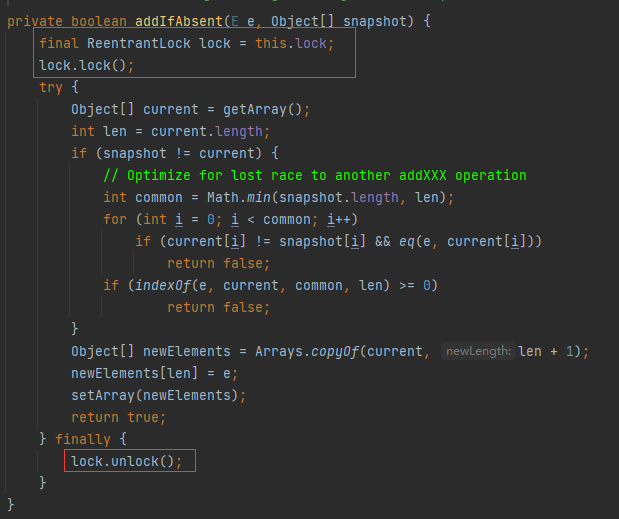
使用 CopyOnWriteArrayList 类,它的 add 方法 使用的是 Lock 的 ReentrantLock锁(可重入锁)
1|06.2、Set 不安全
运行有概率会报错:

java.util.ConcurrentModificationException 并发修改异常
解决方案:
-
使用 Collections.synchronizedSet 包装 HashSet

SynchronizedSet 类可以看到继承 SynchronizedCollection 父类

而父类所有操作都上了锁

-
使用 CopyOnWriteArraySet 类,底层和 CopyOnWriteArrayList 类相似,都用了 Lock 的 ReentrantLock锁(可重入锁)

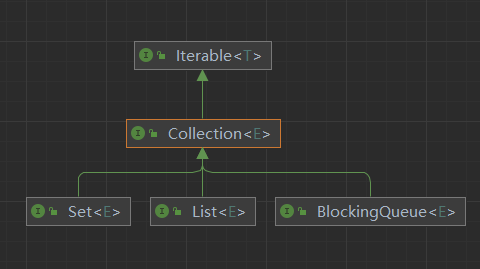
1|06.2.1、HashSet底层是什么?
本质:
add 方法的本质:
1|06.3、Map不安全
回顾Map的基本操作

运行报错:
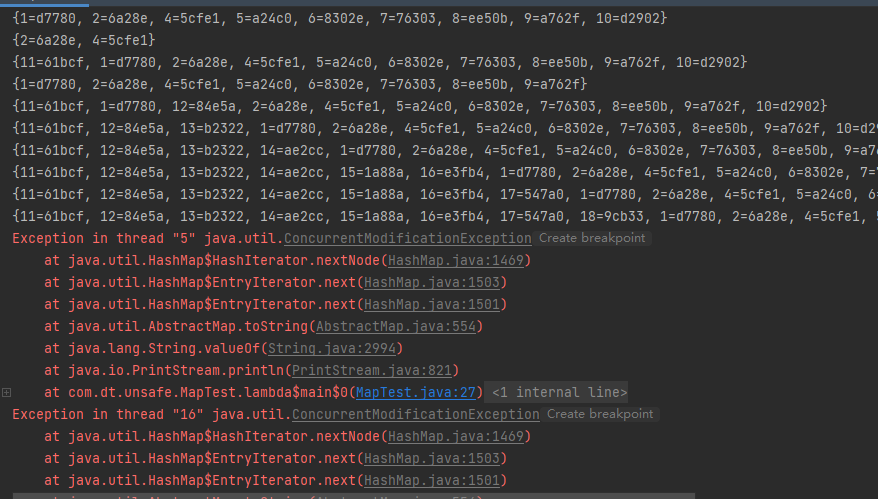
java.util.ConcurrentModificationException 并发修改异常
解决方案:
-
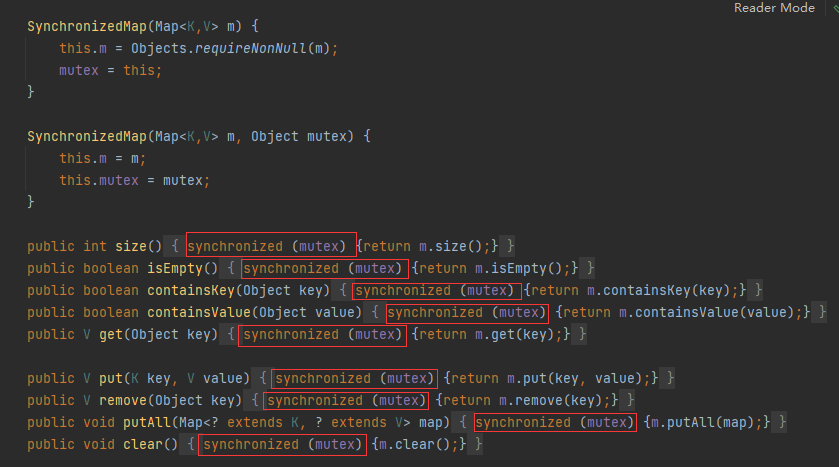
使用 Collections.synchronizedMap 包装 HashMap

可以看到 SynchronizedMap 所有操作都上了锁
-
使用 ConcurrentHashMap 类
put() 调用了 putVal()
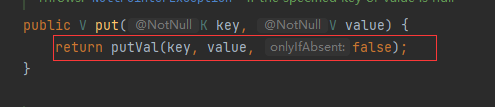
而 putVal() 中使用了 synchronized 同步块

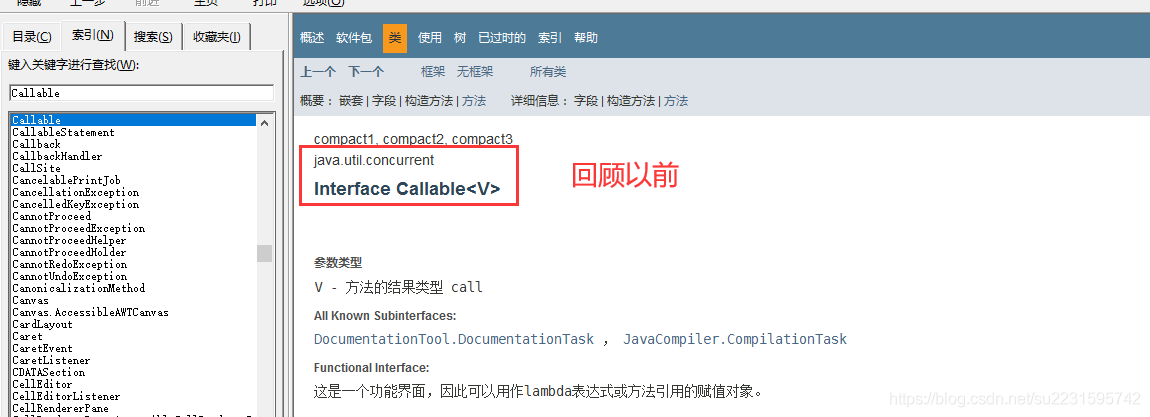
1|77、Callable(简单)
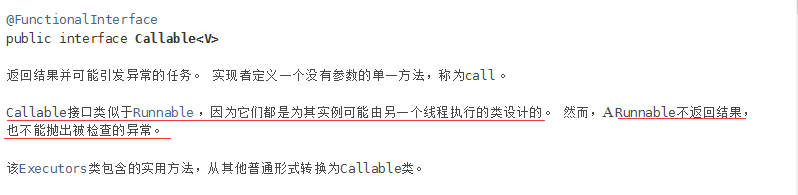
Callable 相较于 Runnable 的区别
1、Callable 可以有返回值
2、Callable 可以抛出异常
3、方法不同,Runnable是run() Callable是call()
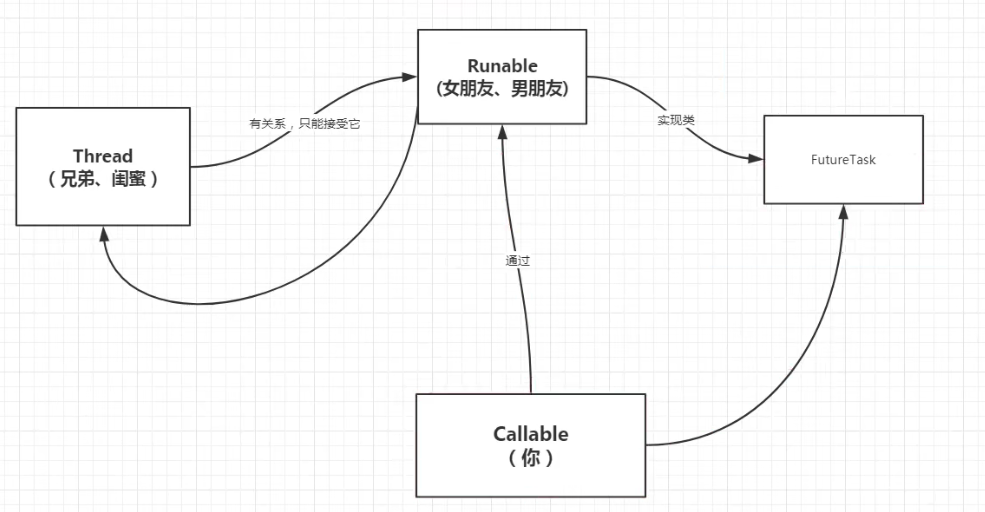
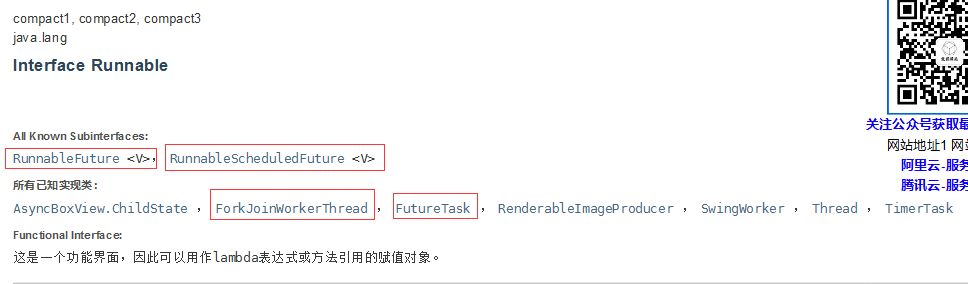
论 Thread 如何调用 Callable

代码测试
运行结果:
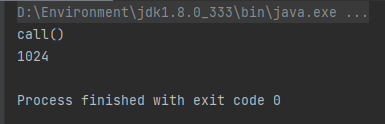
细节:
1、会保存数据在 outcome 中,第二次会判断 status 然后直接 return,只执行一次 FutureTask 的 run 方法

2、结果可能需要等待,会阻塞!
1|88、常用的辅助类(必会)
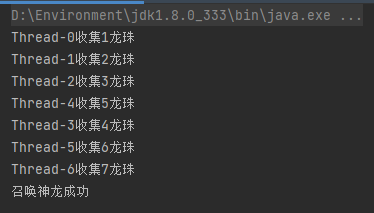
1|08.1、CountDownLatch

代码演示
结果:

原理:
countDownLatch.countDown(); // 数量-1
countDownLatch.await(); // 等待计数器归零,然后再向下执行
每次有线程调用 countDown() 数量-1,假设计数器变为0,countDownLatch.await() 就会被唤醒,继续执行!
1|08.2、CyclicBarrier

加法计数器
代码演示
结果:
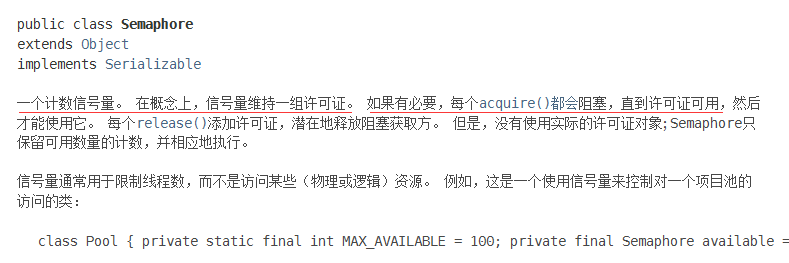
1|08.3、Semaphore
Semaphore:信号量
代码演示
抢车位!
6车—3个停车位置
运行结果:线程释放完后其他线程才能进入
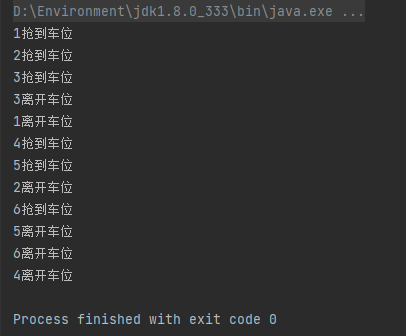
原理:
semaphore.acquire() 获得,假设如果已经满了,等待,等待被释放为止!
semaphore.release(); 释放,会将当前的信号量释放 + 1,然后唤醒等待的线程!
作用: 多个共享资源互斥的使用!并发限流,控制最大的线程数!
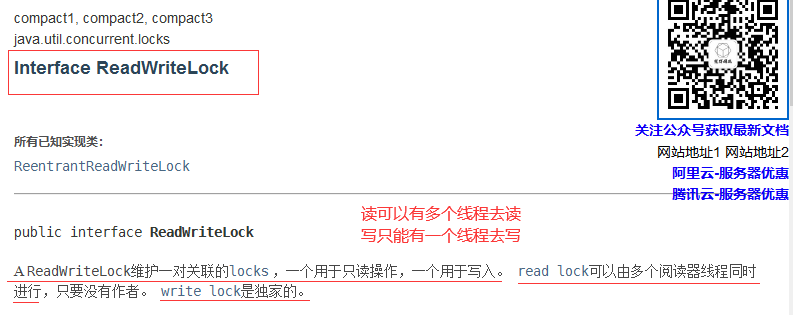
1|99、读写锁
ReadWriteLock
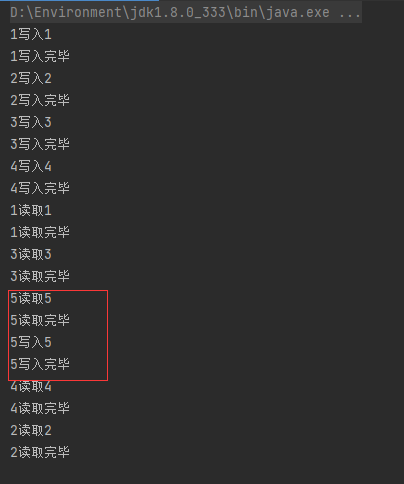
未加读写锁之前
运行结果:发现写入的时候被插队了
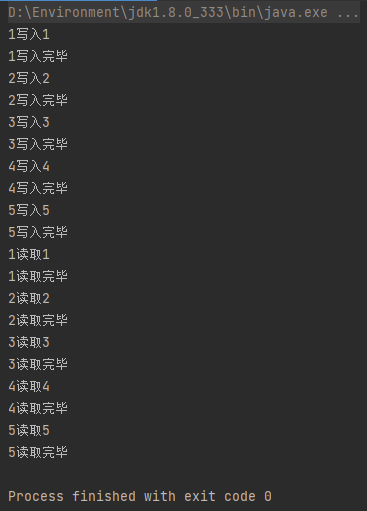
加上读写锁后
结果:不会存在插队
要点:
- 独占锁、排它锁(写锁):一次只能被一个线程占有
- 共享锁(读锁):多个线程可以同时占有
- ReadWriteLock
- 读-读 可以共存!
- 读-写 不能共存!
- 写-写 不能共存!
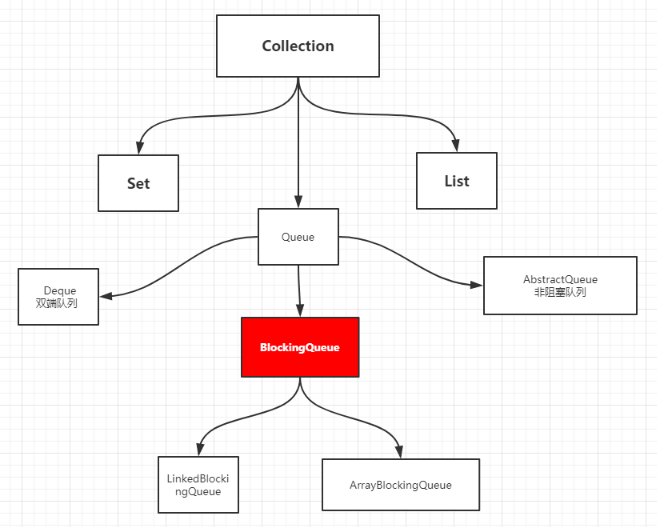
1|1010、阻塞队列
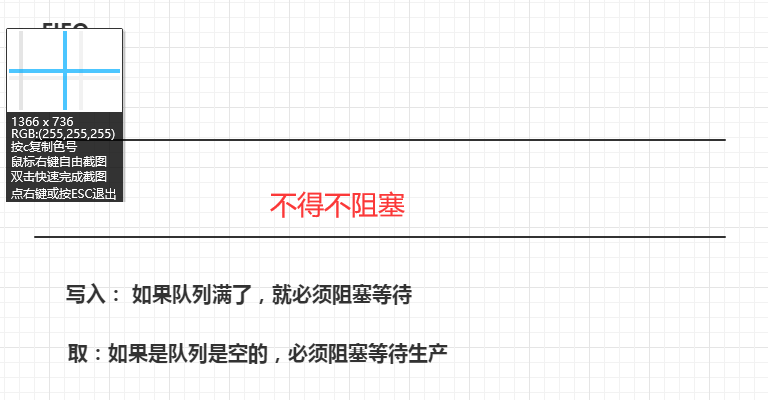
阻塞队列:
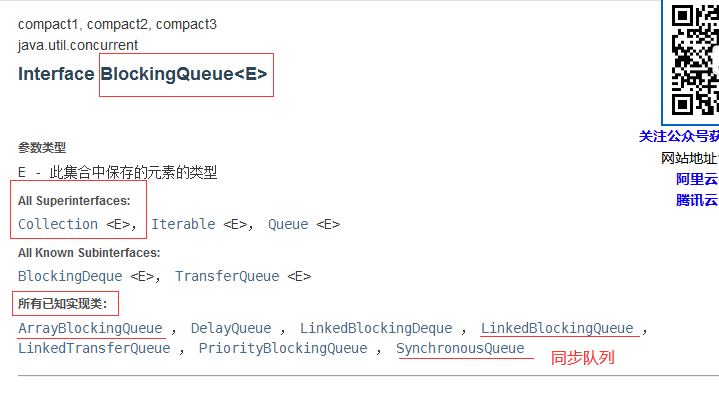

1|010.1、BlockingQueue
BlockingQueue 不是新的东西
什么情况下我们会使用 阻塞队列:多线程并发处理,线程池!
学会使用队列
添加、移除
四组API
| 方式 | 抛出异常 | 有返回值,不抛出异常 | 阻塞 等待 | 超时等待 |
|---|---|---|---|---|
| 添加 | add | offer() | put() | offer(,) |
| 移除 | remove | poll() | take() | poll(,) |
| 检测队首元素 | element | peek | - | - |
代码演示
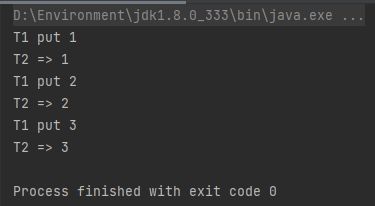
1|010.2、SynchronousQueue 同步队列
没有容量,
进去一个元素,必须等待取出来之后,才能再往里面放一个元素!
put:放入 take:取出
代码演示
运行结果:
1|1111、线程池(重点)
线程池:三大方法、7大参数、4种拒绝策略
1|011.1、池化技术
程序的运行,本质:占用系统的资源!优化资源的使用!=> 池化技术
线程池,连接池,内存池,对象池(创建和销毁,十分浪费资源)
池化技术:事先准备好一些资源,有人要用,就来我这里拿,用完之后还给我
线程池的好处:
- 降低资源的消耗
- 提高响应的速度
- 方便管理
线程复用、可以控制最大并发数、管理线程
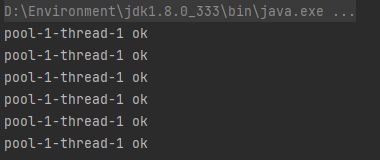
1|011.2、线程池:三大方法
以下为阿里巴巴规范手册中:

代码演示
Executors.newSingleThreadExecutor()单个线程运行:
Executors.newFixedThreadPool(5)固定线程池大小运行:
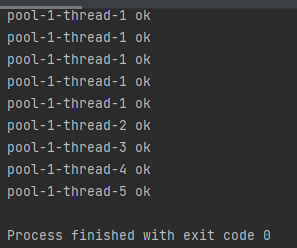
Executors.newCachedThreadPool()可伸缩大小运行:

1|011.3、7大参数
源码分析:
举个例子理解:

手动创建一个线程池
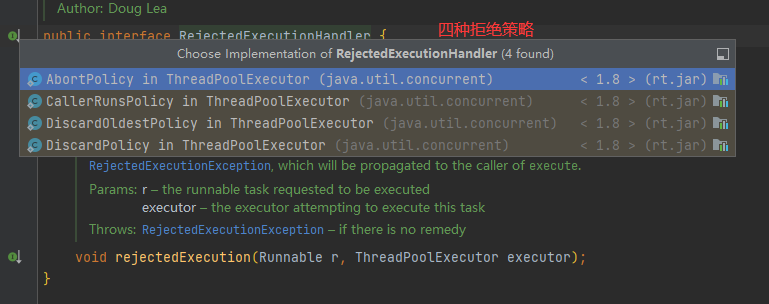
1|011.4、4种拒绝策略
1|011.5、小结及IO密集型和CPU密集型拓展
池的最大的大小如何去设置!
了解:IO密集型,CPU密集型:(调优)
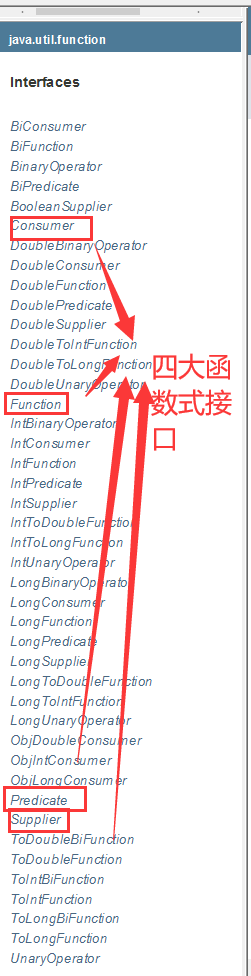
1|1212、四大函数式接口(必需掌握)
新时代的程序员:lambda表达式、链式编程、函数式接口、Stream流式计算
1|012.1、函数式接口:
只有一个方法的接口
代码测试:
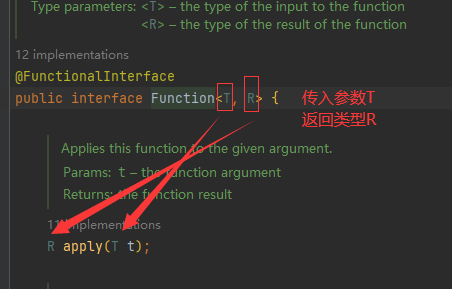
Function函数式接口
1|012.2、断定型接口:
有一个输入参数,返回值只能是 布尔值!

1|012.3、Consumer 消费型接口
只有输入,没有返回值

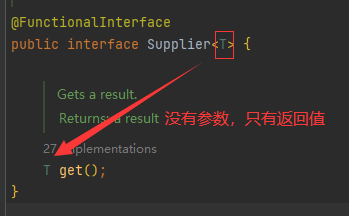
1|012.4、Supplier 供给型接口
没有参数,只有返回值
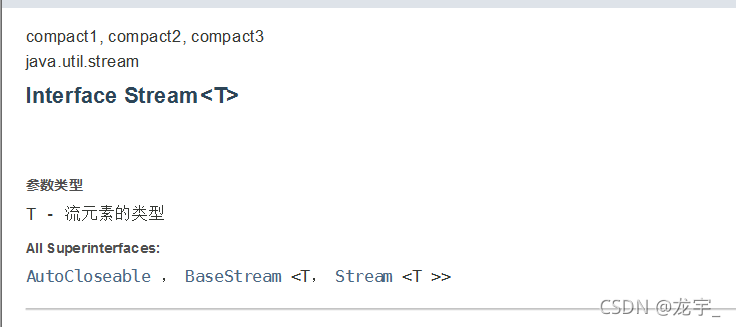
1|1313、Stream流式计算
1|0什么是Stream流式计算
Stream(流)是一个来自数据源的元素队列并支持聚合操作
大数据时代:存储 + 计算
集合、MySQL 本质就是存储东西的;
计算都应该交给流来操作!
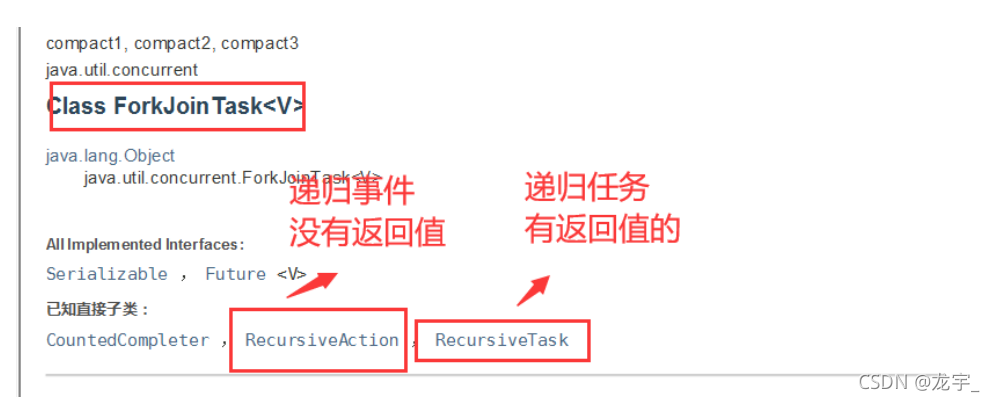
1|1414、ForkJoin
什么是 ForkJoin
ForkJoin 在 JDK 1.7 , 并行执行任务!提高效率。大数据量!
大数据:Map Reduce (把大任务拆分为小任务)

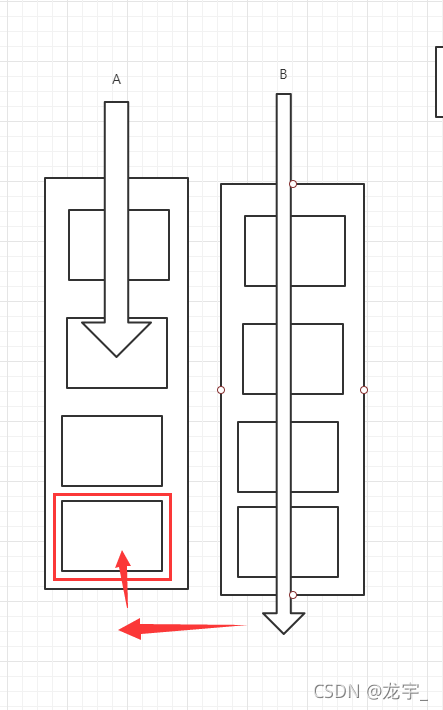
ForkJoin 特点:工作窃取
这个里面维护的都是双端队列
ForkJoin

测试
1|1515、异步回调
Future 设计的初衷: 对将来的某个事件的结果进行建模

1|1616、JMM
请你谈谈你对 Volatile 的理解
Volatile 是 Java 虚拟机提供的轻量级的同步机制
1、保证可见性
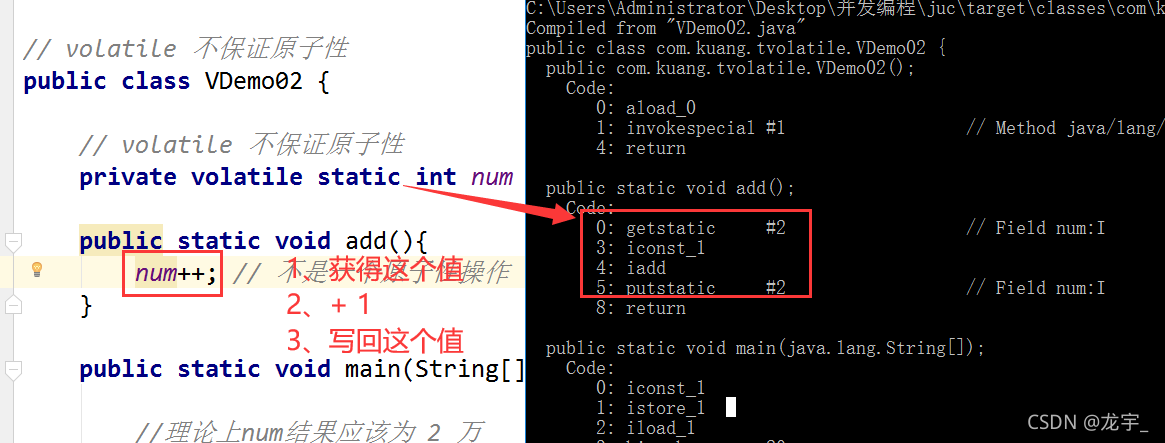
2、不保证原子性
3、禁止指令重排
1|0什么是JMM
JMM(Java memory model): Java内存模型。不存在的东西,概念!约定!
关于JMM的一些同步的约定:
1、线程解锁前,必须把共享变量 立刻 刷回主存。
2、线程加锁前,必须读取主存中的最新值到工作内存中!
3、加锁和解锁是同一把锁
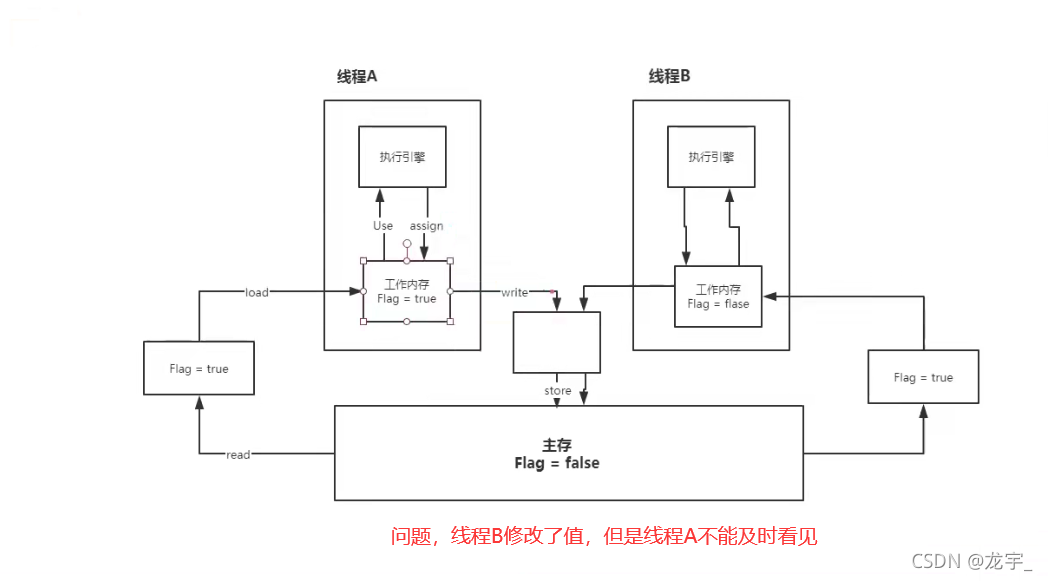
线程 工作内存 、主内存
8种操作:

这里是先store再write
内存交互操作有8种,虚拟机实现必须保证每一个操作都是原子的,不可在分的(对于double和long类型的变量来说,load、store、read和write操作在某些平台上允许例外)
- lock (锁定):作用于主内存的变量,把一个变量标识为线程独占状态
- unlock (解锁):作用于主内存的变量,它把一个处于锁定状态的变量释放出来,释放后的变量才可以被其他线程锁定
- read (读取):作用于主内存变量,它把一个变量的值从主内存传输到线程的工作内存中,以便随后的load动作使用
- load (载入):作用于工作内存的变量,它把read操作从主存中变量放入工作内存中
- use (使用):作用于工作内存中的变量,它把工作内存中的变量传输给执行引擎,每当虚拟机遇到一个需要使用到变量的值,就会使用到这个指令
- assign (赋值):作用于工作内存中的变量,它把一个从执行引擎中接受到的值放入工作内存的变量副本中
- store (存储):作用于主内存中的变量,它把一个从工作内存中一个变量的值传送到主内存中,以便后续的write使用
- write (写入):作用于主内存中的变量,它把store操作从工作内存中得到的变量的值放入主内存的变量中
JMM对这八种指令的使用,制定了如下规则:
- 不允许read和load、store和write操作之一单独出现。即使用了read必须load,使用了store必须write
- 不允许线程丢弃他最近的assign操作,即工作变量的数据改变了之后,必须告知主存
- 不允许一个线程将没有assign的数据从工作内存同步回主内存
- 一个新的变量必须在主内存中诞生,不允许工作内存直接使用一个未被初始化的变量。就是怼变量实施use、store操作之前,必须经过assign和load操作
- 一个变量同一时间只有一个线程能对其进行lock。多次lock后,必须执行相同次数的unlock才能解锁
- 如果对一个变量进行lock操作,会清空所有工作内存中此变量的值,在执行引擎使用这个变量前,必须重新load或assign操作初始化变量的值
- 如果一个变量没有被lock,就不能对其进行unlock操作。也不能unlock一个被其他线程锁住的变量
对一个变量进行unlock操作之前,必须把此变量同步回主内存
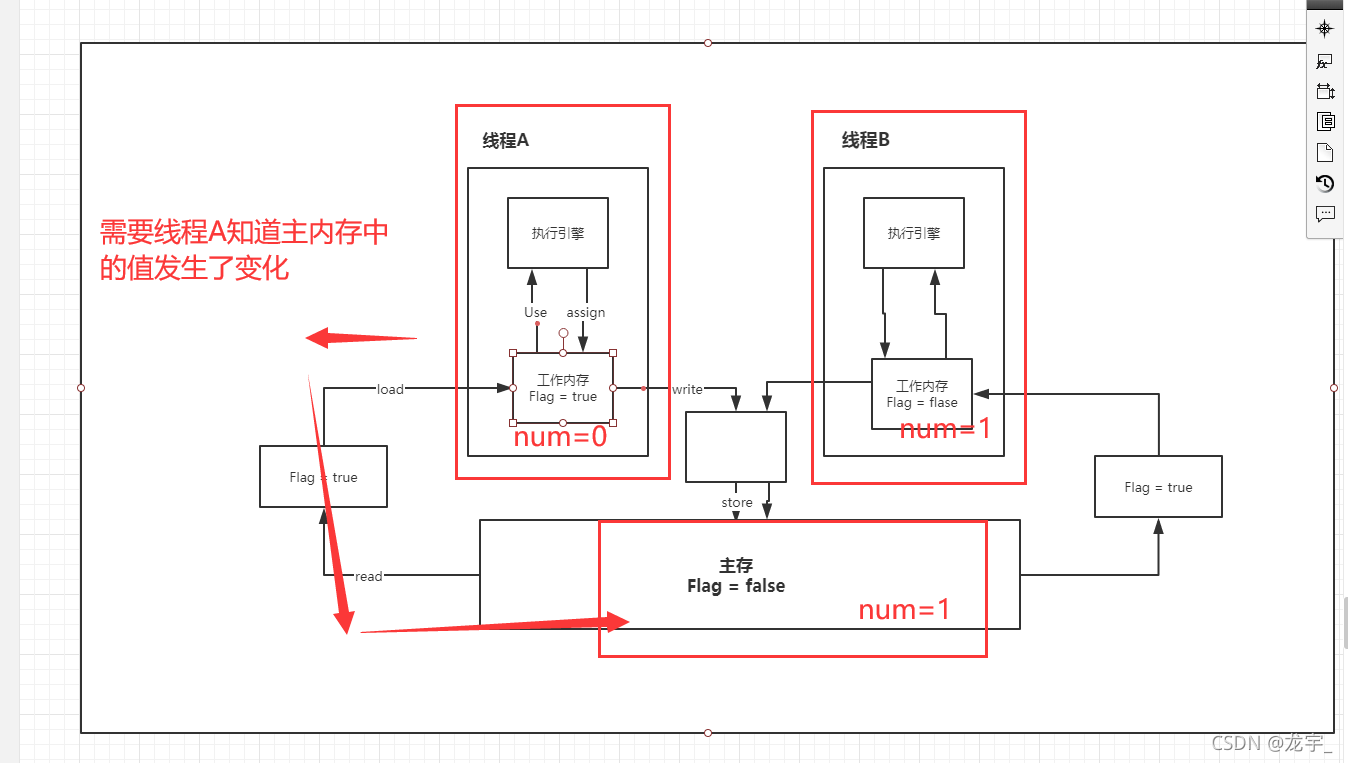
问题: 程序不知道主内存的值已经被修改过了
输出结果了,但是程序没有停
1|1717、Volatile
1|017.1、保证可见性
加上volatile
1|017.2、不保证原子性
原子性 : 不可分割
线程A在执行任务的时候,不能被打扰的,也不能被分割。要么同时成功,要么同时失败。
如果不加 lock 和 synchronized ,怎么样保证原子性
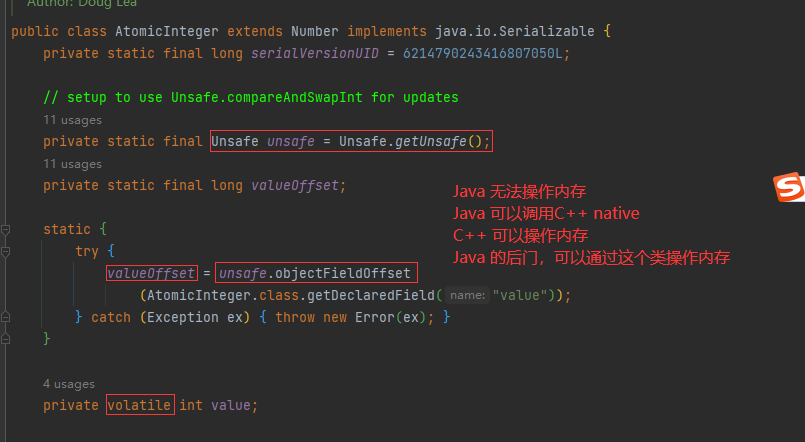
使用原子类,解决 原子性问题
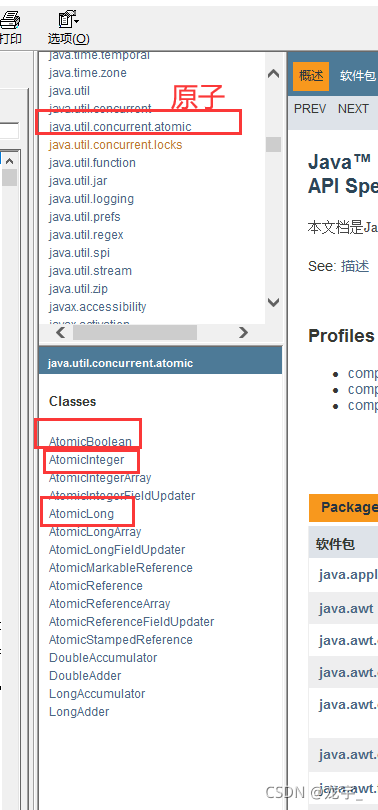
这些类的底层都直接和操作系统挂钩!在内存中修改值!Unsafe类是一个很特殊的存在!
1|017.3、指令重排
什么是 指令重排:你写的程序,计算机并不是按照你写的那样去执行的。
源代码–>编译器优化的重排–> 指令并行也可能会重排–> 内存系统也会重排—> 执行
处理器在进行指令重排的时候,考虑:数据之间的依赖性!
可能造成影响的结果: a b x y 这四个值默认都是 0;
| 线程A | 线程B |
|---|---|
| x=a | y=b |
| b=1 | a=2 |
正常的结果: x = 0;y = 0;但是可能由于指令重排
| 线程A | 线程B |
|---|---|
| b=1 | a=2 |
| x=a | y=b |
指令重排导致的诡异结果: x = 2;y = 1;
非计算机专业
volatile可以避免指令重排:
内存屏障。CPU指令。作用:
1、保证特定的操作的执行顺序!
2、可以保证某些变量的内存可见性 (利用这些特性volatile实现了可见性)
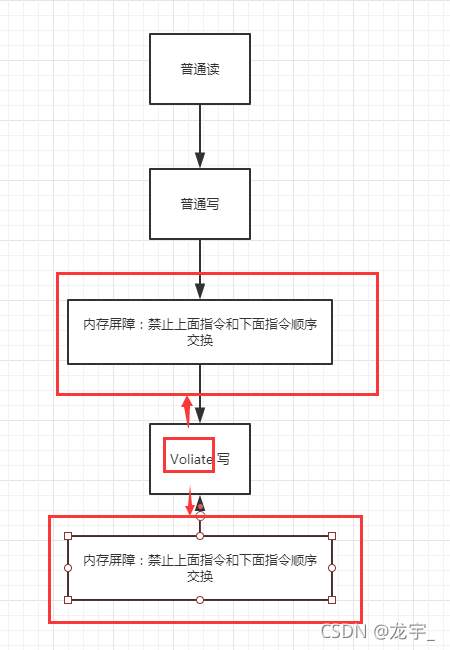
Volatile 是可以保持 可见性。不能保证原子性,由于内存屏障,可以保证避免指令重排的现象产生!
1|1818、彻底玩转单例模式
饿汉式 DCL懒汉式 ,探究!
1|0饿汉式
1|0懒汉式单例
1|0静态内部类
单例不安全,有反射
1|0枚举
查看反射的newInstance()方法,发现不能对枚举类使用
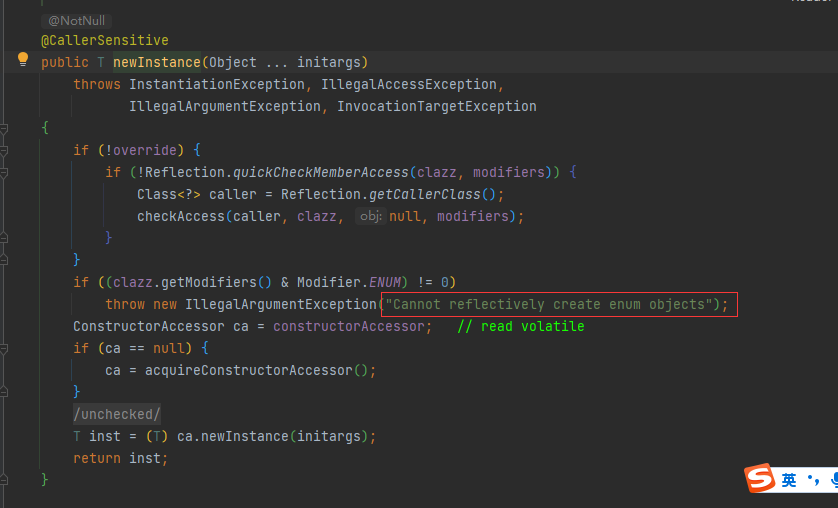
测试
反编译class文件:
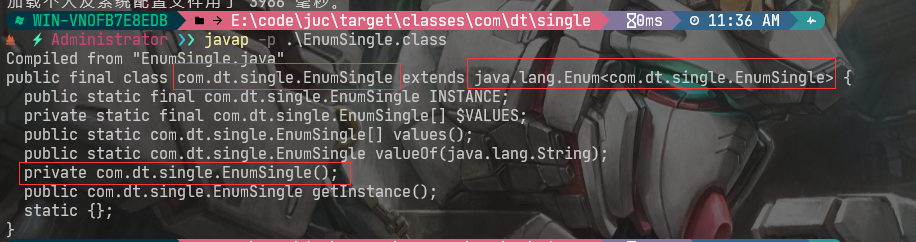
枚举类型的最终反编译源码:
1|1919、深入理解CAS
1|019.1、什么是 CAS(compare and swap)
大厂你必须要深入研究底层!有所突破! 修内功,操作系统,计算机网络原理
1|019.2、Unsafe 类
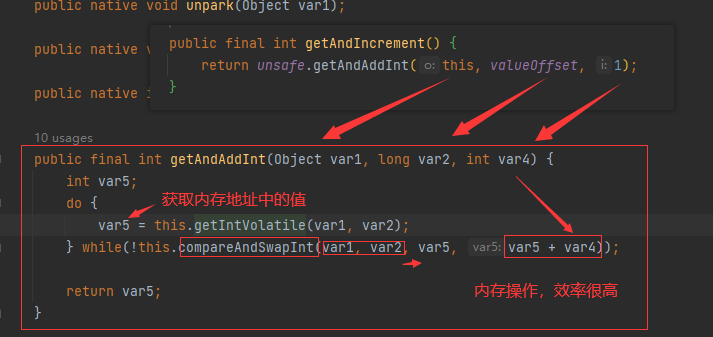
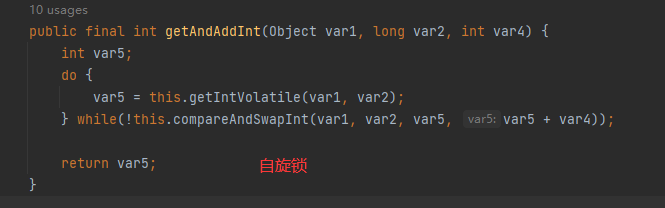
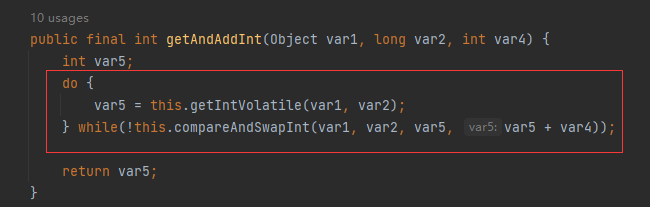
CAS : 比较当前工作内存中的值和主内存中的值,如果这个值是期望的,那么则执行操作!如果不是就一直循环!
缺点:
1、 循环会耗时
2、一次性只能保证一个共享变量的原子性
3、ABA问题
1|019.3、CAS : ABA 问题(狸猫换太子)
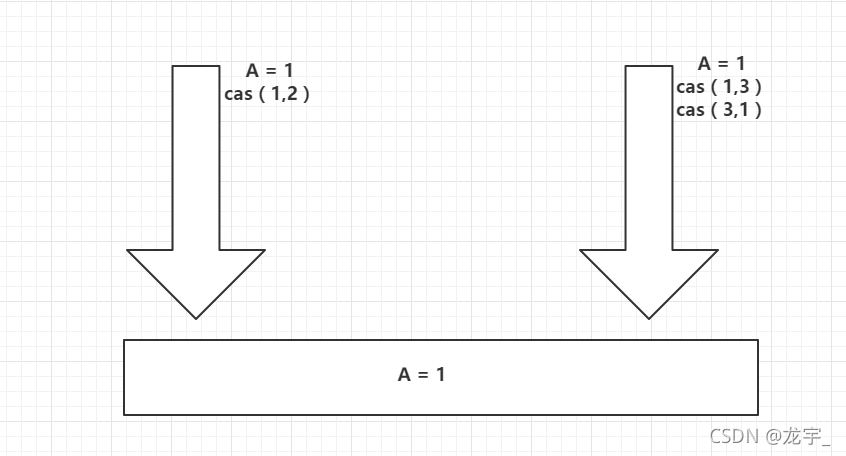
例子
1|2020、原子引用
解决ABA 问题,引入原子引用! 对应的思想:乐观锁!
带版本号 的原子操作!
注意:
Integer 使用了对象缓存机制,默认范围是 -128 ~ 127 ,推荐使用静态工厂方法 valueOf 获取对象实例,而不是 new,因为 valueOf 使用缓存,而 new 一定会创建新的对象分配新的内存空间;

1|2121、各种锁的理解
1|021.1、公平锁、非公平锁
公平锁: 非常公平, 不能够插队,必须先来后到!
非公平锁:非常不公平,可以插队 (默认都是非公平)
1|021.2、可重入锁
可重入锁(递归锁)

Synchronized版
结果:
A sms
A call
B sms
B call
lock版
1|021.3、自旋锁
spinlock
我们来自定义一个锁测试
测试
结果:
T1==> myLock
T2==> myLock
T1==> myUnlock
T2==> myUnlock
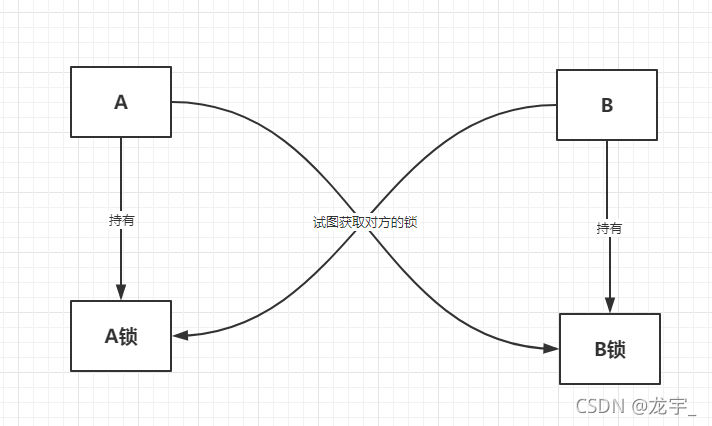
1|021.4、死锁
死锁是什么
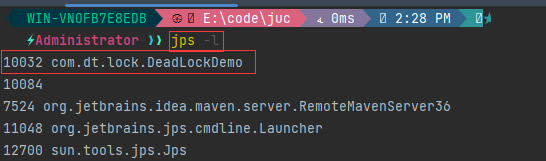
死锁测试,怎么排除死锁:
解决问题
1、使用 jps -l 定位进程号
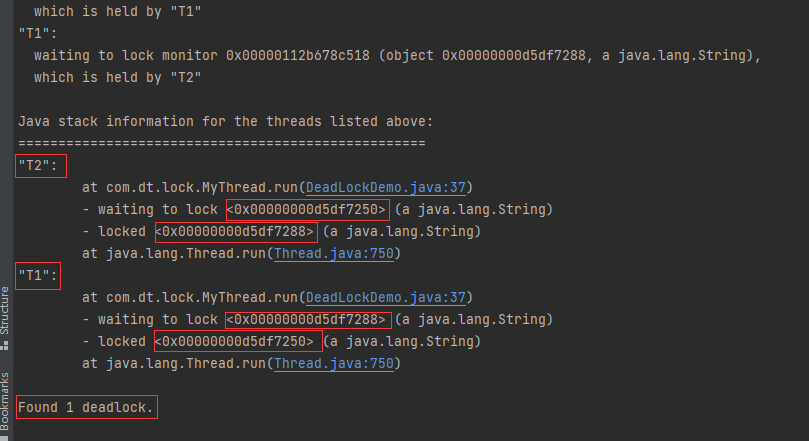
2、使用 jstack 进程号 找到死锁问题
面试,工作中! 排查问题:
1、日志 9人回答
2、堆栈 1人回答
__EOF__

本文链接:https://www.cnblogs.com/dt746294093/p/16767955.html
关于博主:评论和私信会在第一时间回复。或者直接私信我。
版权声明:本博客所有文章除特别声明外,均采用 BY-NC-SA 许可协议。转载请注明出处!
声援博主:如果您觉得文章对您有帮助,可以点击文章右下角【推荐】一下。您的鼓励是博主的最大动力!


【推荐】国内首个AI IDE,深度理解中文开发场景,立即下载体验Trae
【推荐】编程新体验,更懂你的AI,立即体验豆包MarsCode编程助手
【推荐】抖音旗下AI助手豆包,你的智能百科全书,全免费不限次数
【推荐】轻量又高性能的 SSH 工具 IShell:AI 加持,快人一步
· 【自荐】一款简洁、开源的在线白板工具 Drawnix
· 没有Manus邀请码?试试免邀请码的MGX或者开源的OpenManus吧
· 无需6万激活码!GitHub神秘组织3小时极速复刻Manus,手把手教你使用OpenManus搭建本
· C#/.NET/.NET Core优秀项目和框架2025年2月简报
· DeepSeek在M芯片Mac上本地化部署