Linux shell编程入门





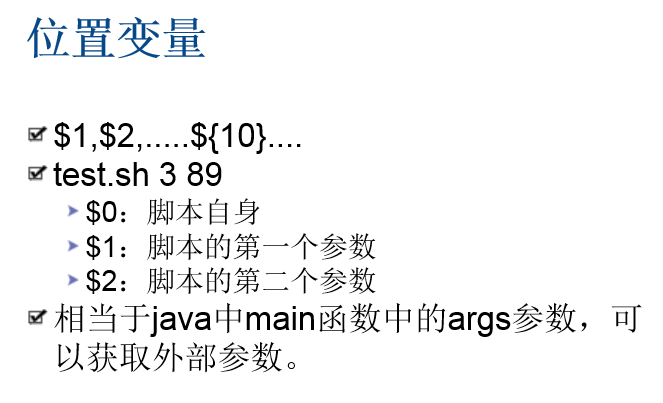


#!/bin/bash
echo "前进程号:"$$
echo "start"
sleep 10
kill $$
sleep 900000000
echo "end"

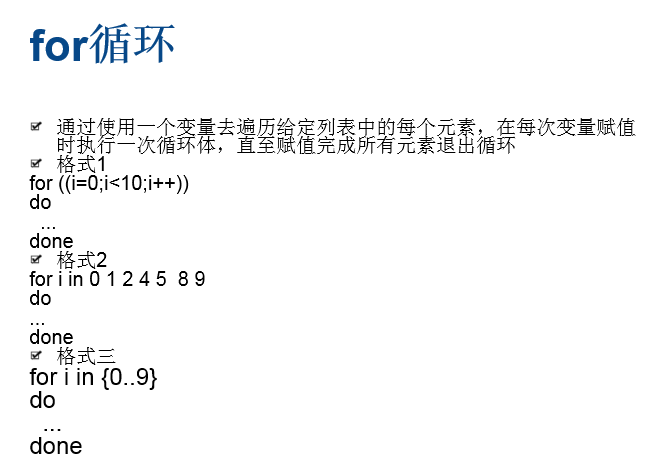

[root@weekend110 shell]# cat for.sh
#!/bin/bash
for ((i=0;i<10;i++))
do
echo $i
done
[root@weekend110 shell]# for.sh
0
1
2
3
4
5
6
7
8
9
[root@weekend110 shell]#
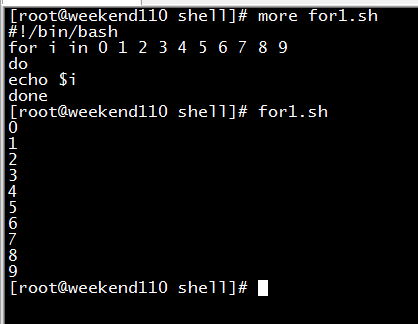
[root@weekend110 shell]# more for1.sh
#!/bin/bash
for i in 0 1 2 3 4 5 6 7 8 9
do
echo $i
done
[root@weekend110 shell]# for1.sh
0
1
2
3
4
5
6
7
8
9
[root@weekend110 shell]#
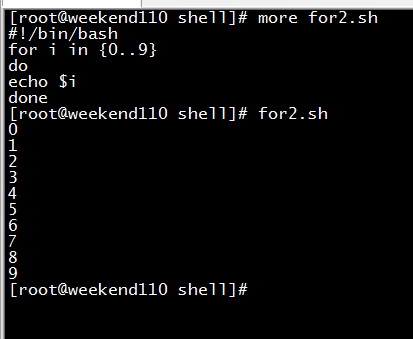
[root@weekend110 shell]# more for2.sh
#!/bin/bash
for i in {0..9}
do
echo $i
done
[root@weekend110 shell]# for2.sh
0
1
2
3
4
5
6
7
8
9
[root@weekend110 shell]#


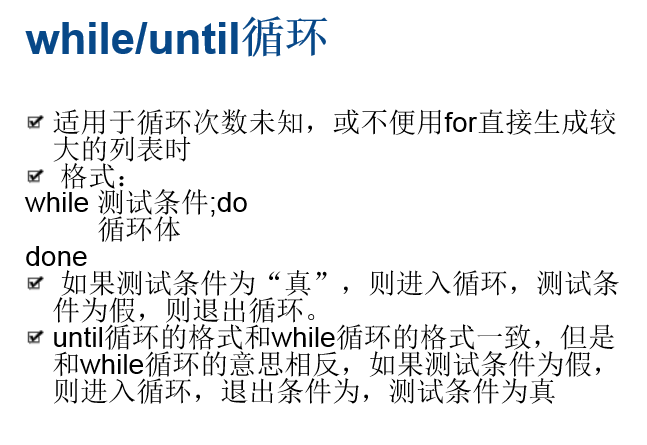

[root@weekend110 shell]# more while.sh
#!/bin/bash
while [ $1 -gt 2 ]
do
echo "true"
sleep 1
done
[root@weekend110 shell]#
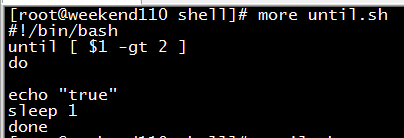
[root@weekend110 shell]# more until.sh
#!/bin/bash
until [ $1 -gt 2 ]
do
echo "true"
sleep 1
done
[root@weekend110 shell]#

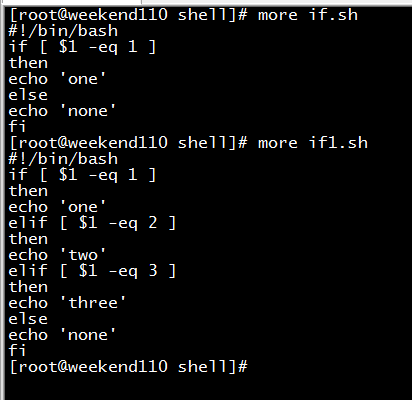
[root@weekend110 shell]# more if.sh
#!/bin/bash
if [ $1 -eq 1 ]
then
echo 'one'
else
echo 'none'
fi
[root@weekend110 shell]# more if1.sh
#!/bin/bash
if [ $1 -eq 1 ]
then
echo 'one'
elif [ $1 -eq 2 ]
then
echo 'two'
elif [ $1 -eq 3 ]
then
echo 'three'
else
echo 'none'
fi
[root@weekend110 shell]#


[root@weekend110 shell]# more case.sh
#!/bin/bash
case $1 in
1)
echo 'one'
;;
2)
echo 'two'
;;
3)
echo 'three'
;;
*)
echo 'none'
;;
esac
[root@weekend110 shell]# case.sh
none
[root@weekend110 shell]#


这里,我就在,/下新建shell目录,用来作为shell编程的入门。
[root@weekend110 /]# ls
bin data etc lib lost+found misc net proc sbin srv tmp var
boot dev home lib64 media mnt opt root selinux sys usr
[root@weekend110 /]# mkdir shell
[root@weekend110 /]# ls
bin data etc lib lost+found misc net proc sbin shell sys usr
boot dev home lib64 media mnt opt root selinux srv tmp var
[root@weekend110 /]# cd shell/
[root@weekend110 shell]# ll
total 0
[root@weekend110 shell]#

[root@weekend110 shell]# ls
[root@weekend110 shell]# vim break1.sh
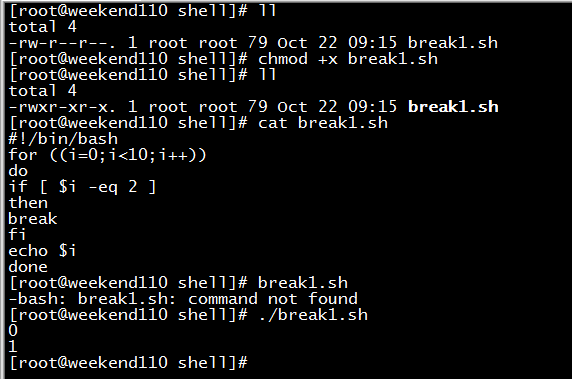
[root@weekend110 shell]# ll
total 4
-rw-r--r--. 1 root root 79 Oct 22 09:15 break1.sh
[root@weekend110 shell]# chmod +x break1.sh
[root@weekend110 shell]# ll
total 4
-rwxr-xr-x. 1 root root 79 Oct 22 09:15 break1.sh
[root@weekend110 shell]# cat break1.sh //如果变量i达到2,就跳出循环
#!/bin/bash
for ((i=0;i<10;i++))
do
if [ $i -eq 2 ]
then
break
fi
echo $i
done
[root@weekend110 shell]# break1.sh
-bash: break1.sh: command not found
[root@weekend110 shell]# ./break1.sh 因为,此刻,还没加入到环境变量
0
1
[root@weekend110 shell]#

[root@weekend110 shell]# pwd
/shell
[root@weekend110 shell]# vim /etc/profile
export PATH=$PATH:/shell/


[root@weekend110 shell]# source /etc/profile
[root@weekend110 shell]# break1.sh
0
1
[root@weekend110 shell]#
这样,就达到了。
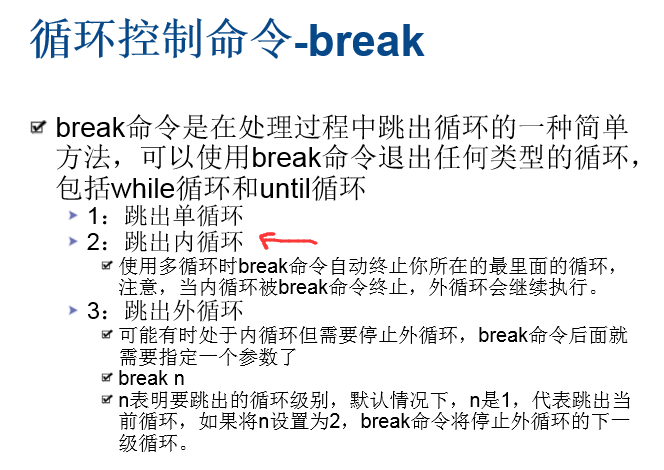
现在,写,while循环在外,for循环在内。

[root@weekend110 shell]# ls
break1.sh break2.sh
[root@weekend110 shell]# cat break2.sh
#!/bin/bash
while [ 1 -eq 1 ]
do
for ((i=0;i<10;i++))
do
if [ $i -eq 2 ]
then
break
fi
echo $i
done
echo 'yes'
sleep 1
done
[root@weekend110 shell]# break2.sh
0
1
yes
0
1
yes
0
1
yes
0
1
yes
^C
[root@weekend110 shell]#
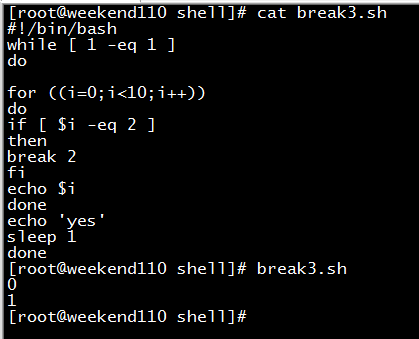
[root@weekend110 shell]# cat break3.sh
#!/bin/bash
while [ 1 -eq 1 ]
do
for ((i=0;i<10;i++))
do
if [ $i -eq 2 ]
then
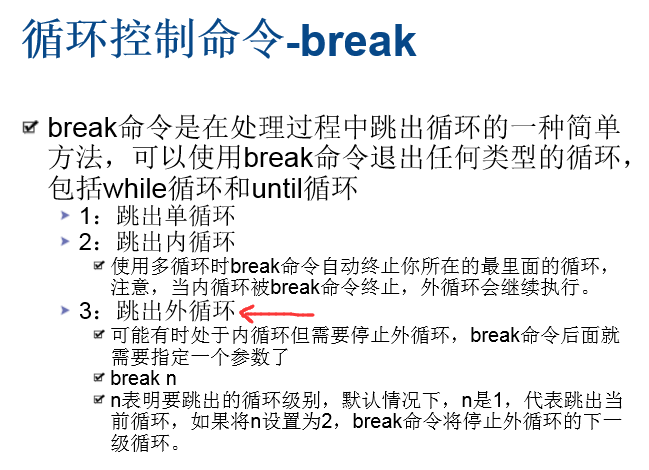
break 2 //在这里,默认是1,写个2,则说的是跳出2层循环。
fi
echo $i
done
echo 'yes'
sleep 1
done
[root@weekend110 shell]# break3.sh
0
1
[root@weekend110 shell]#
跳出单循环
for((i=0;i<10;i++))
do
echo $i
if [ $i -eq 2 ]
then
break
fi
done
跳出内循环
while [ 1 -eq 1 ]
do
echo 'yes'
sleep 1
for((i=0;i<10;i++))
do
echo $i
if [ $i -eq 2 ]
then
break
fi
done
done
跳出外循环
while [ 1 -eq 1 ]
do
echo 'yes'
sleep 1
for((i=0;i<10;i++))
do
echo $i
if [ $i -eq 2 ]
then
break 2
fi
done
done


[root@weekend110 shell]# cat continue.sh
#/bin/bash
for ((i=0;i<10;i++))
do
if [ $i -eq 2 ]
then
continue
fi
echo $i
done
[root@weekend110 shell]# continue.sh
0
1
3
4
5
6
7
8
9
[root@weekend110 shell]#

[root@weekend110 shell]# cat fun.sh
#!/bin/bash
function test(){
echo "this is a funcction"
}
[root@weekend110 shell]# fun.sh
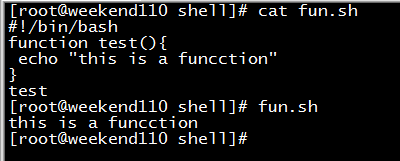
[root@weekend110 shell]# cat fun.sh
#!/bin/bash
function test(){
echo "this is a funcction"
}
test
[root@weekend110 shell]# fun.sh
this is a funcction
[root@weekend110 shell]#
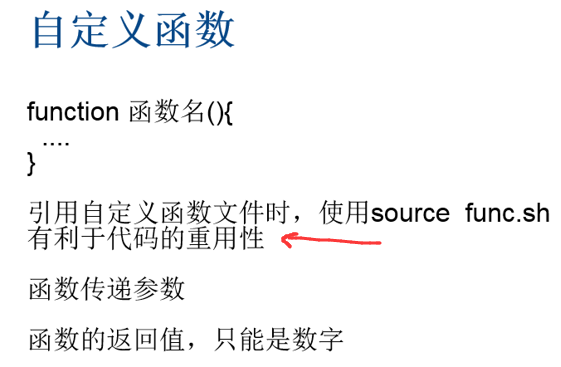
但是,一般,生产里,也不会这么去做。
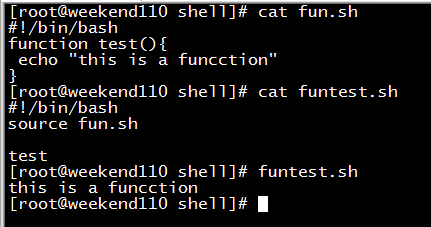
[root@weekend110 shell]# cat fun.sh
#!/bin/bash
function test(){
echo "this is a funcction"
}
[root@weekend110 shell]# cat funtest.sh
#!/bin/bash
source fun.sh
test
[root@weekend110 shell]# funtest.sh
this is a funcction
[root@weekend110 shell]#
这样的好处,是fun.sh脚本,可以重用。
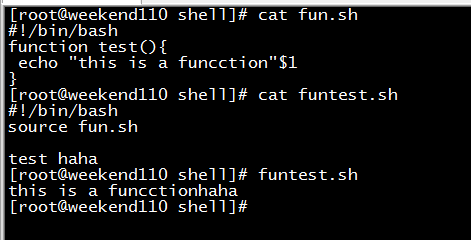
[root@weekend110 shell]# cat fun.sh
#!/bin/bash
function test(){
echo "this is a funcction"$1
}
[root@weekend110 shell]# cat funtest.sh
#!/bin/bash
source fun.sh
test haha
[root@weekend110 shell]# funtest.sh
this is a funcctionhaha
[root@weekend110 shell]#
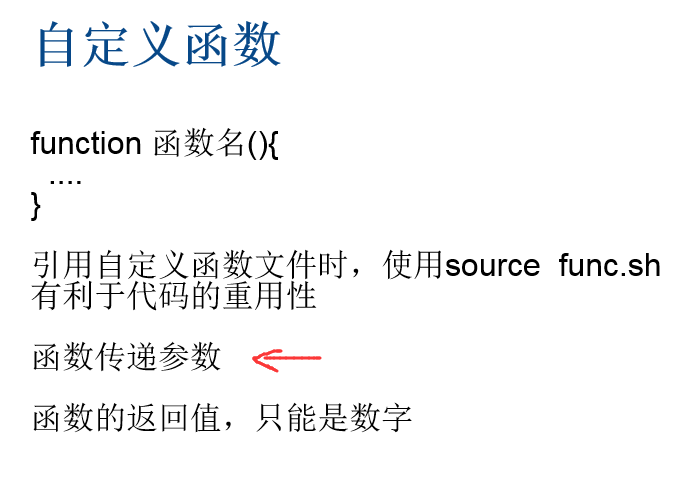
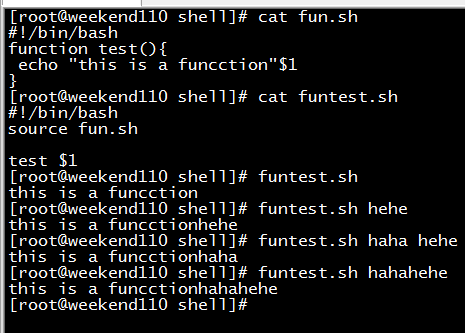
[root@weekend110 shell]# cat fun.sh
#!/bin/bash
function test(){
echo "this is a funcction"$1
}
[root@weekend110 shell]# cat funtest.sh
#!/bin/bash
source fun.sh
test $1
[root@weekend110 shell]# funtest.sh
this is a funcction
[root@weekend110 shell]# funtest.sh hehe
this is a funcctionhehe
[root@weekend110 shell]# funtest.sh haha hehe
this is a funcctionhaha
[root@weekend110 shell]# funtest.sh hahahehe
this is a funcctionhahahehe
[root@weekend110 shell]#
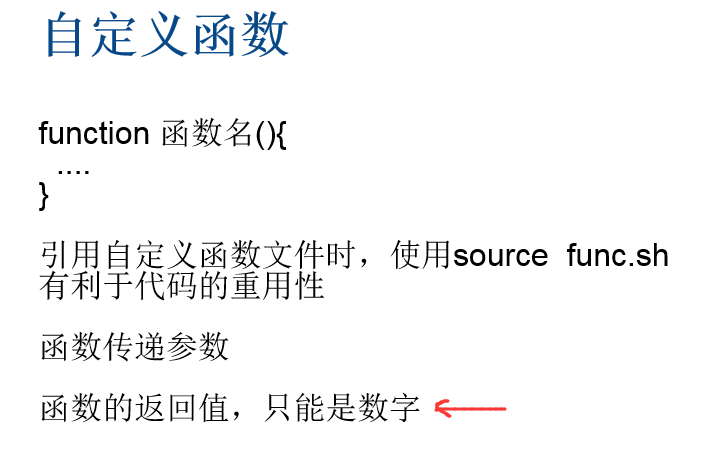

[root@weekend110 shell]# cat fun.sh
#!/bin/bash
function test(){
echo "this is a funcction"$1
return 20
}
[root@weekend110 shell]# cat funtest.sh
#!/bin/bash
source fun.sh
test $1
[root@weekend110 shell]# funtest.sh haha
this is a funcctionhaha
[root@weekend110 shell]# echo $?
20
[root@weekend110 shell]#
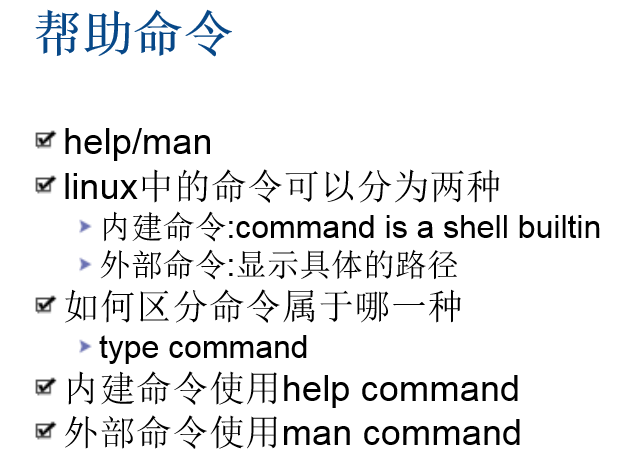

[root@weekend110 shell]# type cd
cd is a shell builtin
[root@weekend110 shell]# type date
date is hashed (/bin/date)
[root@weekend110 shell]#
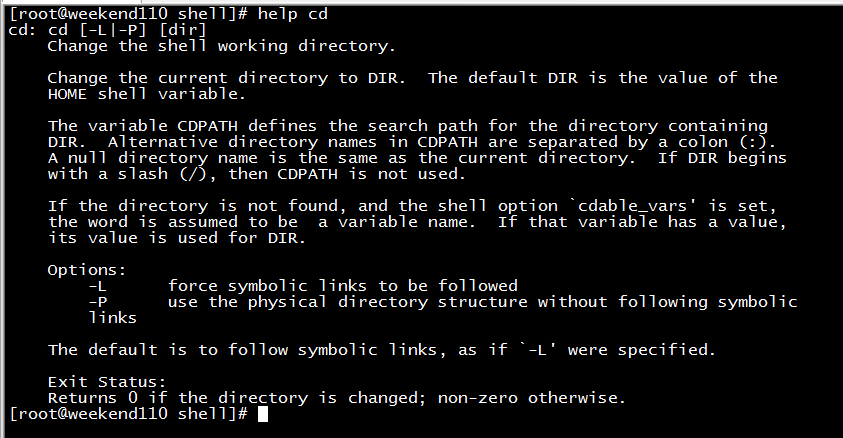
[root@weekend110 shell]# help cd
cd: cd [-L|-P] [dir]
Change the shell working directory.
Change the current directory to DIR. The default DIR is the value of the
HOME shell variable.
The variable CDPATH defines the search path for the directory containing
DIR. Alternative directory names in CDPATH are separated by a colon (:).
A null directory name is the same as the current directory. If DIR begins
with a slash (/), then CDPATH is not used.
If the directory is not found, and the shell option `cdable_vars' is set,
the word is assumed to be a variable name. If that variable has a value,
its value is used for DIR.
Options:
-L force symbolic links to be followed
-P use the physical directory structure without following symbolic
links
The default is to follow symbolic links, as if `-L' were specified.
Exit Status:
Returns 0 if the directory is changed; non-zero otherwise.
[root@weekend110 shell]#
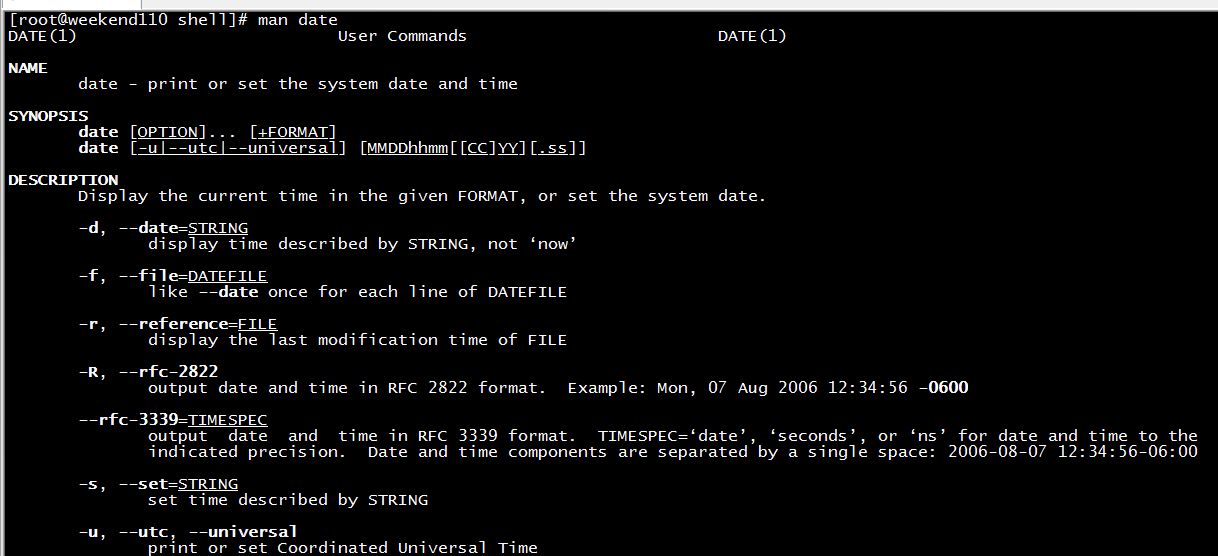
[root@weekend110 shell]# man date 按长空格键,翻页
DATE(1) User Commands DATE(1)
NAME
date - print or set the system date and time
SYNOPSIS
date [OPTION]... [+FORMAT]
date [-u|--utc|--universal] [MMDDhhmm[[CC]YY][.ss]]
DESCRIPTION
Display the current time in the given FORMAT, or set the system date.
-d, --date=STRING
display time described by STRING, not ‘now’
-f, --file=DATEFILE
like --date once for each line of DATEFILE
-r, --reference=FILE
display the last modification time of FILE
-R, --rfc-2822
output date and time in RFC 2822 format. Example: Mon, 07 Aug 2006 12:34:56 -0600
--rfc-3339=TIMESPEC
output date and time in RFC 3339 format. TIMESPEC=‘date’, ‘seconds’, or ‘ns’ for date and time to the
indicated precision. Date and time components are separated by a single space: 2006-08-07 12:34:56-06:00
-s, --set=STRING
set time described by STRING
-u, --utc, --universal
print or set Coordinated Universal Time
--help display this help and exit
:

[root@weekend110 shell]# type date
date is hashed (/bin/date)
[root@weekend110 shell]# man date
DATE(1) User Commands DATE(1)
NAME
date - print or set the system date and time
SYNOPSIS
date [OPTION]... [+FORMAT]
date [-u|--utc|--universal] [MMDDhhmm[[CC]YY][.ss]]
DESCRIPTION
Display the current time in the given FORMAT, or set the system date.
-d, --date=STRING
display time described by STRING, not ‘now’
-f, --file=DATEFILE
like --date once for each line of DATEFILE
-r, --reference=FILE
display the last modification time of FILE
-R, --rfc-2822
output date and time in RFC 2822 format. Example: Mon, 07 Aug 2006 12:34:56 -0600
--rfc-3339=TIMESPEC
output date and time in RFC 3339 format. TIMESPEC=‘date’, ‘seconds’, or ‘ns’ for date and time to the
indicated precision. Date and time components are separated by a single space: 2006-08-07 12:34:56-06:00
-s, --set=STRING
set time described by STRING
-u, --utc, --universal
print or set Coordinated Universal Time
--help display this help and exit
--version
output version information and exit
FORMAT controls the output. Interpreted sequences are:
%% a literal %
%a locale’s abbreviated weekday name (e.g., Sun)
%A locale’s full weekday name (e.g., Sunday)
%b locale’s abbreviated month name (e.g., Jan)
%B locale’s full month name (e.g., January)
%c locale’s date and time (e.g., Thu Mar 3 23:05:25 2005)
%C century; like %Y, except omit last two digits (e.g., 20)
%d day of month (e.g, 01)
%D date; same as %m/%d/%y
%e day of month, space padded; same as %_d
%F full date; same as %Y-%m-%d
%g last two digits of year of ISO week number (see %G)
%G year of ISO week number (see %V); normally useful only with %V
%h same as %b
%H hour (00..23)
%I hour (01..12)
%j day of year (001..366)
%k hour ( 0..23)
%l hour ( 1..12)
%m month (01..12)
%M minute (00..59)
%n a newline
%N nanoseconds (000000000..999999999)
%p locale’s equivalent of either AM or PM; blank if not known
%P like %p, but lower case
%r locale’s 12-hour clock time (e.g., 11:11:04 PM)
%R 24-hour hour and minute; same as %H:%M
%s seconds since 1970-01-01 00:00:00 UTC
%S second (00..60)
%t a tab
%T time; same as %H:%M:%S
%u day of week (1..7); 1 is Monday
%U week number of year, with Sunday as first day of week (00..53)
%V ISO week number, with Monday as first day of week (01..53)
%w day of week (0..6); 0 is Sunday
%W week number of year, with Monday as first day of week (00..53)
%x locale’s date representation (e.g., 12/31/99)
%X locale’s time representation (e.g., 23:13:48)
%y last two digits of year (00..99)
%Y year
%z +hhmm numeric timezone (e.g., -0400)
%:z +hh:mm numeric timezone (e.g., -04:00)
%::z +hh:mm:ss numeric time zone (e.g., -04:00:00)
%:::z numeric time zone with : to necessary precision (e.g., -04, +05:30)
%Z alphabetic time zone abbreviation (e.g., EDT)
By default, date pads numeric fields with zeroes. The following optional flags may follow ‘%’:
- (hyphen) do not pad the field
_ (underscore) pad with spaces
0 (zero) pad with zeros
^ use upper case if possible
# use opposite case if possible
After any flags comes an optional field width, as a decimal number; then an optional modifier, which is either E
to use the locale’s alternate representations if available, or O to use the locale’s alternate numeric symbols
if available.
DATE STRING
The --date=STRING is a mostly free format human readable date string such as "Sun, 29 Feb 2004 16:21:42 -0800"
or "2004-02-29 16:21:42" or even "next Thursday". A date string may contain items indicating calendar date,
time of day, time zone, day of week, relative time, relative date, and numbers. An empty string indicates the
beginning of the day. The date string format is more complex than is easily documented here but is fully
described in the info documentation.
ENVIRONMENT
TZ Specifies the timezone, unless overridden by command line parameters. If neither is specified, the set-
ting from /etc/localtime is used.
AUTHOR
Written by David MacKenzie.
REPORTING BUGS
Report date bugs to bug-coreutils@gnu.org
GNU coreutils home page: <http://www.gnu.org/software/coreutils/>
General help using GNU software: <http://www.gnu.org/gethelp/>
Report date translation bugs to <http://translationproject.org/team/>
COPYRIGHT
Copyright © 2010 Free Software Foundation, Inc. License GPLv3+: GNU GPL version 3 or later
<http://gnu.org/licenses/gpl.html>.
This is free software: you are free to change and redistribute it. There is NO WARRANTY, to the extent permit-
ted by law.
SEE ALSO
The full documentation for date is maintained as a Texinfo manual. If the info and date programs are properly
installed at your site, the command
info coreutils 'date invocation'
should give you access to the complete manual.
GNU coreutils 8.4 November 2013 DATE(1)
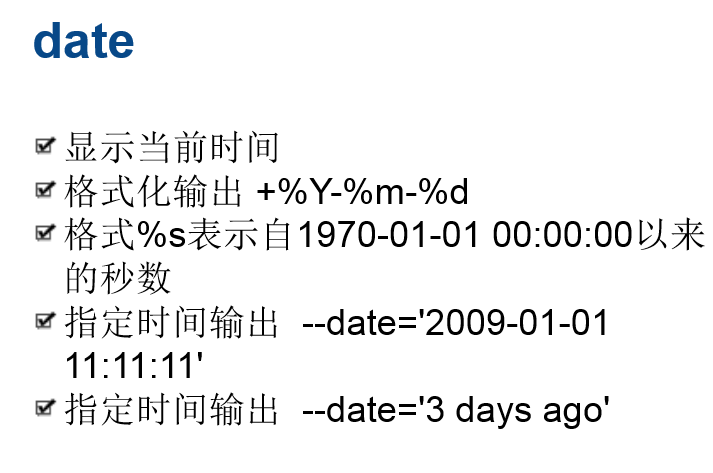
man date对应的中文手册
date命令的帮助信息
[root@localhost source]# date --help
用法:date [选项]... [+格式]
或:date [-u|--utc|--universal] [MMDDhhmm[[CC]YY][.ss]]
以给定的格式显示当前时间,或是设置系统日期。
-d,--date=字符串 显示指定字符串所描述的时间,而非当前时间
-f,--file=日期文件 类似--date,从日期文件中按行读入时间描述
-r, --reference=文件 显示文件指定文件的最后修改时间
-R, --rfc-2822 以RFC 2822格式输出日期和时间
例如:2006年8月7日,星期一 12:34:56 -0600
--rfc-3339=TIMESPEC 以RFC 3339 格式输出日期和时间。
TIMESPEC=`date',`seconds',或 `ns'
表示日期和时间的显示精度。
日期和时间单元由单个的空格分开:
2006-08-07 12:34:56-06:00
-s, --set=字符串 设置指定字符串来分开时间
-u, --utc, --universal 输出或者设置协调的通用时间
--help 显示此帮助信息并退出
--version 显示版本信息并退出
给定的格式FORMAT 控制着输出,解释序列如下:
%% 一个文字的 %
%a 当前locale 的星期名缩写(例如: 日,代表星期日)
%A 当前locale 的星期名全称 (如:星期日)
%b 当前locale 的月名缩写 (如:一,代表一月)
%B 当前locale 的月名全称 (如:一月)
%c 当前locale 的日期和时间 (如:2005年3月3日 星期四 23:05:25)
%C 世纪;比如 %Y,通常为省略当前年份的后两位数字(例如:20)
%d 按月计的日期(例如:01)
%D 按月计的日期;等于%m/%d/%y
%e 按月计的日期,添加空格,等于%_d
%F 完整日期格式,等价于 %Y-%m-%d
%g ISO-8601 格式年份的最后两位 (参见%G)
%G ISO-8601 格式年份 (参见%V),一般只和 %V 结合使用
%h 等于%b
%H 小时(00-23)
%I 小时(00-12)
%c 按年计的日期(001-366)
%k 时(0-23)
%l 时(1-12)
%m 月份(01-12)
%M 分(00-59)
%n 换行
%N 纳秒(000000000-999999999)
%p 当前locale 下的"上午"或者"下午",未知时输出为空
%P 与%p 类似,但是输出小写字母
%r 当前locale 下的 12 小时时钟时间 (如:11:11:04 下午)
%R 24 小时时间的时和分,等价于 %H:%M
%s 自UTC 时间 1970-01-01 00:00:00 以来所经过的秒数
%S 秒(00-60)
%t 输出制表符 Tab
%T 时间,等于%H:%M:%S
%u 星期,1 代表星期一
%U 一年中的第几周,以周日为每星期第一天(00-53)
%V ISO-8601 格式规范下的一年中第几周,以周一为每星期第一天(01-53)
%w 一星期中的第几日(0-6),0 代表周一
%W 一年中的第几周,以周一为每星期第一天(00-53)
%x 当前locale 下的日期描述 (如:12/31/99)
%X 当前locale 下的时间描述 (如:23:13:48)
%y 年份最后两位数位 (00-99)
%Y 年份
%z +hhmm 数字时区(例如,-0400)
%:z +hh:mm 数字时区(例如,-04:00)
%::z +hh:mm:ss 数字时区(例如,-04:00:00)
%:::z 数字时区带有必要的精度 (例如,-04,+05:30)
%Z 按字母表排序的时区缩写 (例如,EDT)
默认情况下,日期的数字区域以0 填充。
以下可选标记可以跟在"%"后:
- (连字符)不填充该域
_ (下划线)以空格填充
0 (数字0)以0 填充
^ 如果可能,使用大写字母
# 如果可能,使用相反的大小写
在任何标记之后还允许一个可选的域宽度指定,它是一个十进制数字。
作为一个可选的修饰声明,它可以是E,在可能的情况下使用本地环境关联的
表示方式;或者是O,在可能的情况下使用本地环境关联的数字符号。
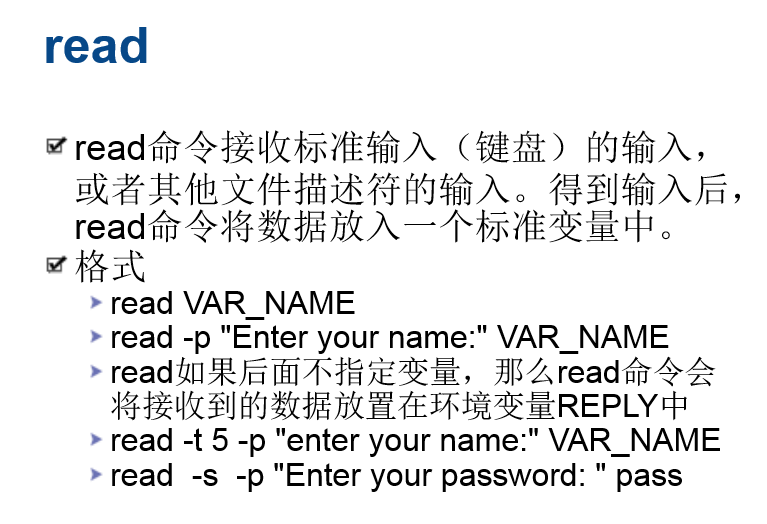

[root@weekend110 shell]# read weekend110
aaaa
[root@weekend110 shell]# echo $weekend110
aaaa
[root@weekend110 shell]# read -p "enter your name:" name
enter your name:zhouls
[root@weekend110 shell]# read -s -p "enter your password:" password
enter your password:[root@weekend110 shell]# echo $password
sss
[root@weekend110 shell]# read -p "enter your name:" name
enter your name:ss
[root@weekend110 shell]# read -t 3 -p "enter your name:" name 3秒之后,自动
enter your name:[root@weekend110 shell]#

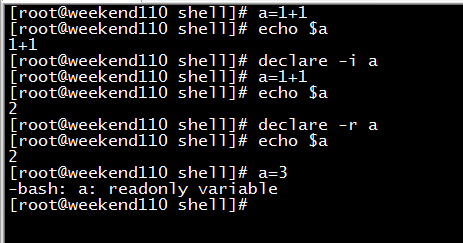
[root@weekend110 shell]# a=1+1
[root@weekend110 shell]# echo $a
1+1
[root@weekend110 shell]# declare -i a
[root@weekend110 shell]# a=1+1
[root@weekend110 shell]# echo $a
2
[root@weekend110 shell]# declare -r a
[root@weekend110 shell]# echo $a
2
[root@weekend110 shell]# a=3
-bash: a: readonly variable
[root@weekend110 shell]#
declare的数组,部分,后面更新。
除了使用echo $?获取函数返回值,在shell脚本里怎么获取?
答:还可以,a=$?
关于有几层循环就break?
答:
[root@weekend110 shell]# more break2.sh
#!/bin/bash
while [ 1 -eq 1 ]
do
for ((i=0;i<10;i++))
do
if [ $i -eq 2 ]
then
break //等价于 break 1,即退出当前for循环
fi
echo $i
done
echo 'yes'
sleep 1
done
[root@weekend110 shell]#
[root@weekend110 shell]# more break3.sh
#!/bin/bash
while [ 1 -eq 1 ]
do
for ((i=0;i<10;i++))
do
if [ $i -eq 2 ]
then
break 2 //跳出2循环,即先跳出for循环,再跳出while循环
fi
echo $i
done
echo 'yes'
sleep 1
done
[root@weekend110 shell]#
while(){
for(){
break
}
}

[root@weekend110 shell]# pstree
init─┬─NetworkManager
├─abrtd
├─acpid
├─atd
├─auditd───{auditd}
├─automount───4*[{automount}]
├─bonobo-activati───{bonobo-activat}
├─certmonger
├─console-kit-dae───63*[{console-kit-da}]
├─crond
├─cupsd
├─2*[dbus-daemon───{dbus-daemon}]
├─dbus-launch
├─devkit-power-da
├─gconfd-2
├─gdm-binary─┬─gdm-simple-slav─┬─Xorg
│ │ ├─gdm-session-wor
│ │ ├─gnome-session─┬─at-spi-registry
│ │ │ ├─gdm-simple-gree
│ │ │ ├─gnome-power-man
│ │ │ ├─metacity
│ │ │ ├─plymouth-log-vi
│ │ │ ├─polkit-gnome-au
│ │ │ └─{gnome-session}
│ │ └─{gdm-simple-sla}
│ └─{gdm-binary}
├─gnome-settings-───{gnome-settings}
├─gvfsd
├─hald─┬─hald-runner─┬─hald-addon-acpi
│ │ └─hald-addon-inpu
│ └─{hald}
├─master─┬─pickup
│ └─qmgr
├─5*[mingetty]
├─modem-manager
├─polkitd
├─pulseaudio───2*[{pulseaudio}]
├─rpc.statd
├─rpcbind
├─rsyslogd───3*[{rsyslogd}]
├─rtkit-daemon───2*[{rtkit-daemon}]
├─sshd───sshd───bash───bash───pstree
├─udevd───2*[udevd]
└─wpa_supplicant
[root@weekend110 shell]#
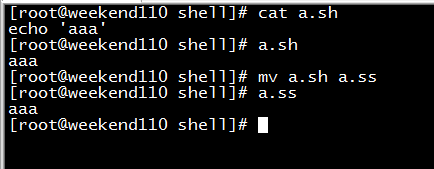
[root@weekend110 shell]# cat a.sh
echo 'aaa' //因为系统,自带了#!/bin/bash/ ,但是,生产里,都要写,这是规范
[root@weekend110 shell]# a.sh
aaa
[root@weekend110 shell]# mv a.sh a.ss
[root@weekend110 shell]# a.ss //因为,对于linux里,后缀名无关。但是,生产里,都要写,.sh结尾的后缀,这是规范
aaa
[root@weekend110 shell]#

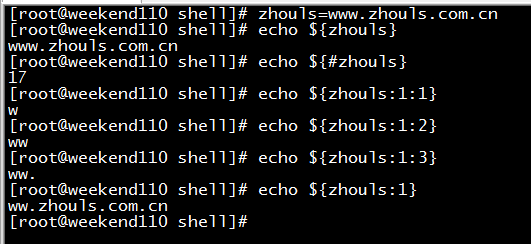
[root@weekend110 shell]# zhouls=www.zhouls.com.cn
[root@weekend110 shell]# echo ${zhouls}
www.zhouls.com.cn //脚标从0开始
[root@weekend110 shell]# echo ${#zhouls}
17
[root@weekend110 shell]# echo ${zhouls:1:1} 第一个1,是脚标,第二个1,是截取长度
w
[root@weekend110 shell]# echo ${zhouls:1:2}
ww
[root@weekend110 shell]# echo ${zhouls:1:3}
ww.
[root@weekend110 shell]# echo ${zhouls:1}
ww.zhouls.com.cn
[root@weekend110 shell]#

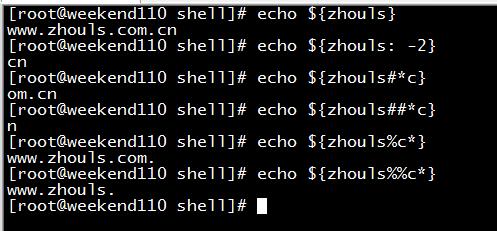
[root@weekend110 shell]# echo ${zhouls}
www.zhouls.com.cn
[root@weekend110 shell]# echo ${zhouls: -2} 从尾部来截取,-2是截取2个
cn
[root@weekend110 shell]# echo ${zhouls#*c} 自左而右,查找第一次出现c,删除首部开始到c处的所有内容
om.cn
[root@weekend110 shell]# echo ${zhouls##*c} 自左而右,查找最后一次出现c,删除首部开始到c处的所有内容
n
[root@weekend110 shell]# echo ${zhouls%c*} 自右而左,查找第一次出现c,删除c处到尾部的所有内容
www.zhouls.com.
[root@weekend110 shell]# echo ${zhouls%%c*} 自右而左,查找最后一次出现c,删除c处到尾部的所有内容
www.zhouls.
[root@weekend110 shell]#


[root@weekend110 shell]# chouls=www.chouls.com.cn
[root@weekend110 shell]# echo ${chouls}
www.chouls.com.cn
[root@weekend110 shell]# echo ${chouls/c/a} 替换第一次出现,用c替换成a
www.ahouls.com.cn
[root@weekend110 shell]# echo ${chouls//c/a} 替换所有的出现,用c替换成a
www.ahouls.aom.an
[root@weekend110 shell]# echo ${chouls/#c/a} 如果行首没有c,则不替换
www.chouls.com.cn
[root@weekend110 shell]# echo ${chouls/#w/a} 行首有w,用w替换成a
aww.chouls.com.cn
[root@weekend110 shell]# echo ${chouls/#wc/aa} 行首没有wc
www.chouls.com.cn
[root@weekend110 shell]# echo ${chouls/%wc/aa} 行尾没有wc
www.chouls.com.cn
[root@weekend110 shell]# echo ${chouls/%cn/aa} 行尾右cn,用cn替换成aa
www.chouls.com.aa
[root@weekend110 shell]#


[root@weekend110 shell]# chouls=www.chouls.com.cn
[root@weekend110 shell]# echo ${chouls/c} 删除第一次的出现,匹配的c
www.houls.com.cn
[root@weekend110 shell]# echo ${chouls//c} 删除所有的出现,匹配的c
www.houls.om.n
[root@weekend110 shell]# echo ${chouls/#c} 删除行首匹配的c
www.chouls.com.cn
[root@weekend110 shell]# echo ${chouls/#www} 删除行首匹配的www
.chouls.com.cn
[root@weekend110 shell]# echo ${chouls/%www} 删除行尾匹配的www
www.chouls.com.cn
[root@weekend110 shell]# echo ${chouls/%cn} 删除行尾匹配的cn
www.chouls.com.
[root@weekend110 shell]# echo ${chouls/[x-y]}
www.chouls.com.cn
[root@weekend110 shell]# echo ${chouls/[a-x]}
ww.chouls.com.cn
[root@weekend110 shell]# echo ${chouls//[a-x]}
...
[root@weekend110 shell]#


[root@weekend110 shell]# echo ${chouls}
www.chouls.com.cn
[root@weekend110 shell]# echo ${chouls^^} 小写,转大写
WWW.CHOULS.COM.CN
[root@weekend110 shell]# CHOULS=WWW.CHOULS.COM.CN
[root@weekend110 shell]# echo ${chouls,,} 大写,转小写
www.chouls.com.cn
[root@weekend110 shell]#

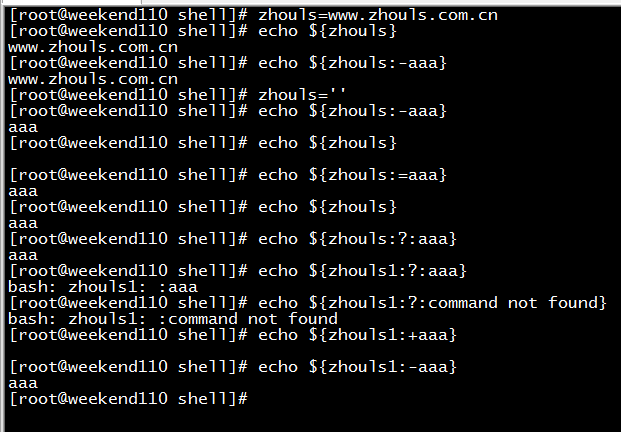
[root@weekend110 shell]# zhouls=www.zhouls.com.cn
[root@weekend110 shell]# echo ${zhouls}
www.zhouls.com.cn
[root@weekend110 shell]# echo ${zhouls:-aaa}
www.zhouls.com.cn
[root@weekend110 shell]# zhouls=''
[root@weekend110 shell]# echo ${zhouls:-aaa} zhouls的值为空或不存在,则返回aaa,此时,zhouls的值依然是空或不存在
aaa
[root@weekend110 shell]# echo ${zhouls}
[root@weekend110 shell]# echo ${zhouls:=aaa} zhouls的值为空或不存在,则返回aaa,此时,zhouls的值变成aaa
aaa
[root@weekend110 shell]# echo ${zhouls}
aaa
[root@weekend110 shell]# echo ${zhouls:?:aaa} zhouls的值为空或不存在,把aaa当成错误信息返回
aaa
[root@weekend110 shell]# echo ${zhouls1:?:aaa} zhouls1的值为空或不存在,把aaa当成错误信息返回
bash: zhouls1: :aaa
[root@weekend110 shell]# echo ${zhouls1:?:command not found} houls1的值为空或不存在,把command not found当成错误信息返回
bash: zhouls1: :command not found
[root@weekend110 shell]# echo ${zhouls1:+aaa}
[root@weekend110 shell]# echo ${zhouls1:-aaa}
aaa
[root@weekend110 shell]#
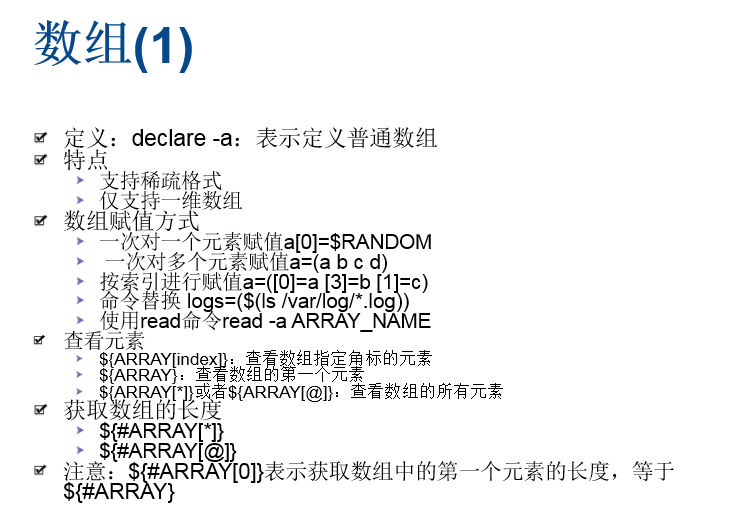

稀疏格式,即,可以为空。
仅,支持一维数组。
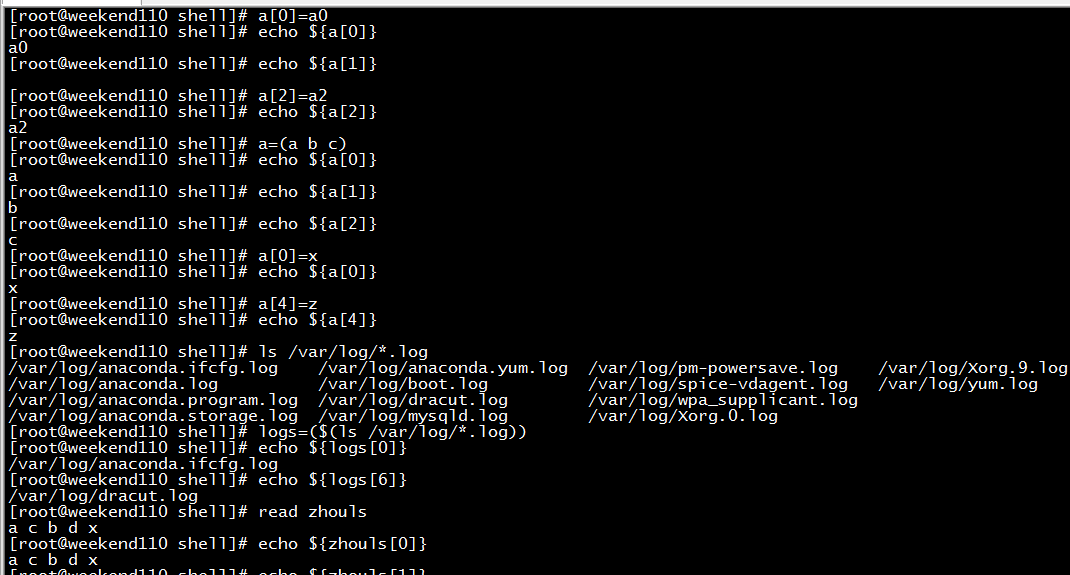
[root@weekend110 shell]# a[0]=a0
[root@weekend110 shell]# echo ${a[0]} 一次对一个元素赋值
a0
[root@weekend110 shell]# echo ${a[1]}
[root@weekend110 shell]# a[2]=a2
[root@weekend110 shell]# echo ${a[2]}
a2
[root@weekend110 shell]# a=(a b c) 一次对多个元素赋值
[root@weekend110 shell]# echo ${a[0]}
a
[root@weekend110 shell]# echo ${a[1]}
b
[root@weekend110 shell]# echo ${a[2]}
c
[root@weekend110 shell]# a[0]=x
[root@weekend110 shell]# echo ${a[0]}
x
[root@weekend110 shell]# a[4]=z
[root@weekend110 shell]# echo ${a[4]}
z
[root@weekend110 shell]# ls /var/log/*.log
/var/log/anaconda.ifcfg.log /var/log/anaconda.yum.log /var/log/pm-powersave.log /var/log/Xorg.9.log
/var/log/anaconda.log /var/log/boot.log /var/log/spice-vdagent.log /var/log/yum.log
/var/log/anaconda.program.log /var/log/dracut.log /var/log/wpa_supplicant.log
/var/log/anaconda.storage.log /var/log/mysqld.log /var/log/Xorg.0.log
[root@weekend110 shell]# logs=($(ls /var/log/*.log)) 命令替换
[root@weekend110 shell]# echo ${logs[0]}
/var/log/anaconda.ifcfg.log
[root@weekend110 shell]# echo ${logs[6]}
/var/log/dracut.log
[root@weekend110 shell]# read zhouls
a c b d x
[root@weekend110 shell]# echo ${zhouls[0]}
a c b d x
[root@weekend110 shell]# echo ${zhouls[1]}
[root@weekend110 shell]# read -a zhouls
a b c d x
[root@weekend110 shell]# echo ${zhouls[0]}
a
[root@weekend110 shell]# echo ${zhouls[1]}
b
[root@weekend110 shell]# echo ${zhouls}
a
[root@weekend110 shell]# echo ${zhouls[*]} 查看数组的所有元素
a b c d x
[root@weekend110 shell]# echo ${zhouls[@]} 查看数组的所有元素
a b c d x
[root@weekend110 shell]# echo ${#zhouls[*]} 获取数组的长度
5
[root@weekend110 shell]# echo ${#zhouls[@]} 获取数组的长度
5
[root@weekend110 shell]# echo ${#zhouls[0]} 获取数组元素的长度
1
[root@weekend110 shell]# echo ${#zhouls[1]}
1
[root@weekend110 shell]# echo ${#zhouls[20]}
0
[root@weekend110 shell]# echo ${#logs[0]}
27
[root@weekend110 shell]# echo ${#logs[*]}
14
[root@weekend110 shell]#


[root@weekend110 shell]# echo ${#zhouls[@]:0:2} 0是偏移脚标,2是取出长度
5
[root@weekend110 shell]# echo ${zhouls[@]:0:2}
a b
[root@weekend110 shell]# echo ${zhouls[@]:0:4}
a b c d
[root@weekend110 shell]# echo ${zhouls[@]:1:2}
b c
[root@weekend110 shell]# echo ${zhouls[@]:1}
b c d x
[root@weekend110 shell]# echo ${zhouls[@]}
a b c d x
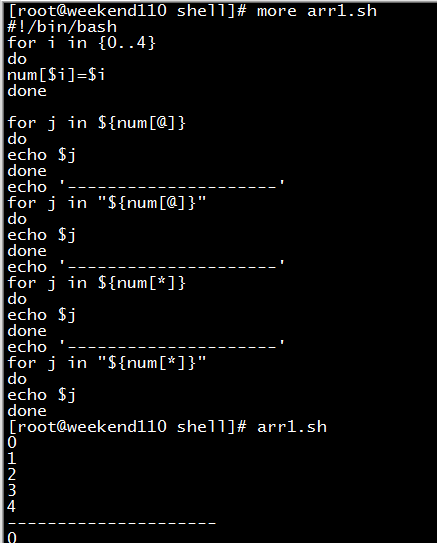
[root@weekend110 shell]# more arr1.sh
#!/bin/bash
for i in {0..4}
do
num[$i]=$i
done
for j in ${num[@]}
do
echo $j
done
echo '---------------------'
for j in "${num[@]}" 建议用这
do
echo $j
done
echo '---------------------'
for j in ${num[*]}
do
echo $j
done
echo '---------------------'
for j in "${num[*]}" 认为是一个元素去了
do
echo $j
done
[root@weekend110 shell]# arr1.sh
0
1
2
3
4
---------------------
0
1
2
3
4
---------------------
0
1
2
3
4
---------------------
0 1 2 3 4
[root@weekend110 shell]#
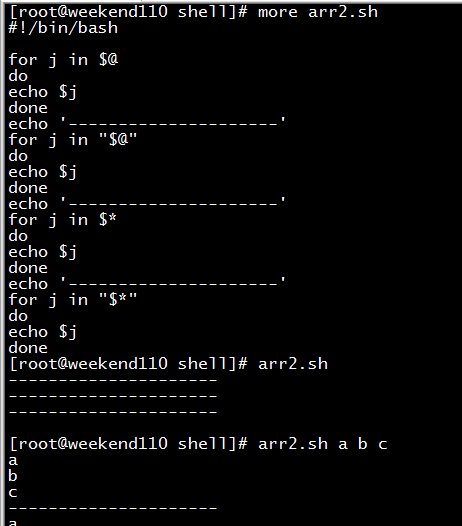
[root@weekend110 shell]# more arr2.sh
#!/bin/bash
for j in $@
do
echo $j
done
echo '---------------------'
for j in "$@"
do
echo $j
done
echo '---------------------'
for j in $*
do
echo $j
done
echo '---------------------'
for j in "$*"
do
echo $j
done
[root@weekend110 shell]# arr2.sh
---------------------
---------------------
---------------------
[root@weekend110 shell]# arr2.sh a b c
a
b
c
---------------------
a
b
c
---------------------
a
b
c
---------------------
a b c
[root@weekend110 shell]#
[root@weekend110 shell]# more sleep.sh
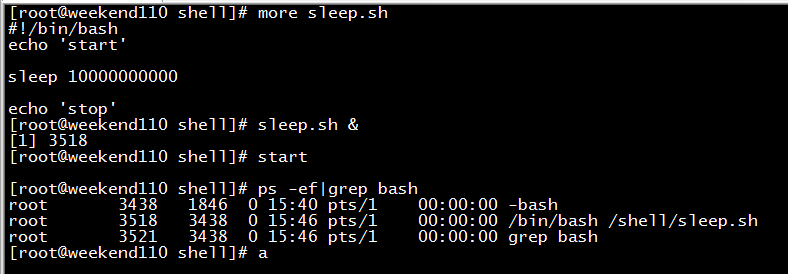
#!/bin/bash
echo 'start'
sleep 10000000000
echo 'stop'
[root@weekend110 shell]# sleep.sh &
[1] 3518
[root@weekend110 shell]# start
[root@weekend110 shell]# ps -ef|grep bash
root 3438 1846 0 15:40 pts/1 00:00:00 -bash
root 3518 3438 0 15:46 pts/1 00:00:00 /bin/bash /shell/sleep.sh
root 3521 3438 0 15:46 pts/1 00:00:00 grep bash
[root@weekend110 shell]#

[root@weekend110 shell]# ps -ef|grep bash
root 3518 1 0 15:46 ? 00:00:00 /bin/bash /shell/sleep.sh
root 3594 3590 0 15:50 pts/2 00:00:00 -bash
root 3621 3594 0 15:52 pts/2 00:00:00 grep bash
[root@weekend110 shell]# nohup sleep.sh &
[1] 3622
[root@weekend110 shell]# nohup: ignoring input and appending output to `nohup.out'
[root@weekend110 shell]#

[root@weekend110 shell]# ps -ef|grep bash
root 3622 1 0 15:52 ? 00:00:00 /bin/bash /shell//sleep.sh
root 3630 3625 0 15:53 pts/2 00:00:00 -bash
root 3655 3630 0 15:53 pts/2 00:00:00 grep bash
[root@weekend110 shell]# pwd
/shell
[root@weekend110 shell]# ll
total 48
-rwxr-xr-x. 1 root root 280 Oct 22 15:26 arr1.sh
-rwxr-xr-x. 1 root root 216 Oct 22 15:32 arr2.sh
-rwxr-xr-x. 1 root root 79 Oct 22 09:15 break1.sh
-rwxr-xr-x. 1 root root 125 Oct 22 09:40 break2.sh
-rwxr-xr-x. 1 root root 127 Oct 22 09:43 break3.sh
-rwxr-xr-x. 1 root root 81 Oct 22 09:51 continue.sh
-rwxr-xr-x. 1 root root 72 Oct 22 10:05 fun.sh
-rwxr-xr-x. 1 root root 35 Oct 22 10:03 funtest.sh
-rw-------. 1 root root 6 Oct 22 15:52 nohup.out
-rwxr-xr-x. 1 root root 57 Oct 22 15:35 sleep.sh
-rw-r--r--. 1 root root 5561 Oct 22 15:43 zookeeper.out
[root@weekend110 shell]# more nohup.out
start
[root@weekend110 shell]#
在这里,抛砖引玉。

[root@weekend110 shell]# jps
3704 Jps
[root@weekend110 shell]# /home/hadoop/app/zookeeper-3.4.6/bin/zkServer.sh start
JMX enabled by default
Using config: /home/hadoop/app/zookeeper-3.4.6/bin/../conf/zoo.cfg
Starting zookeeper ... STARTED
[root@weekend110 shell]# jps
3735 Jps
3722 QuorumPeerMain
[root@weekend110 shell]#
可以,参考我的博客
1 storm基本概念 + storm编程规范及demo编写
在这里,为什么像这的第三方,为什么不需加nohup呢?那是因为,它们在开发时,源码、内核和脚本都弄好了。
自己写脚本,需要加nohup。
问:使用nohup启动的java进程,可以让java日志不打入到nohup.out中,而打到自己制定的日志文件中么?
答:不可以,必须是在nohup.out。在shell里面,写,是可以打人到自己制定的日志文件中。

标准输入、标准输出、标准错误输出
标准输入
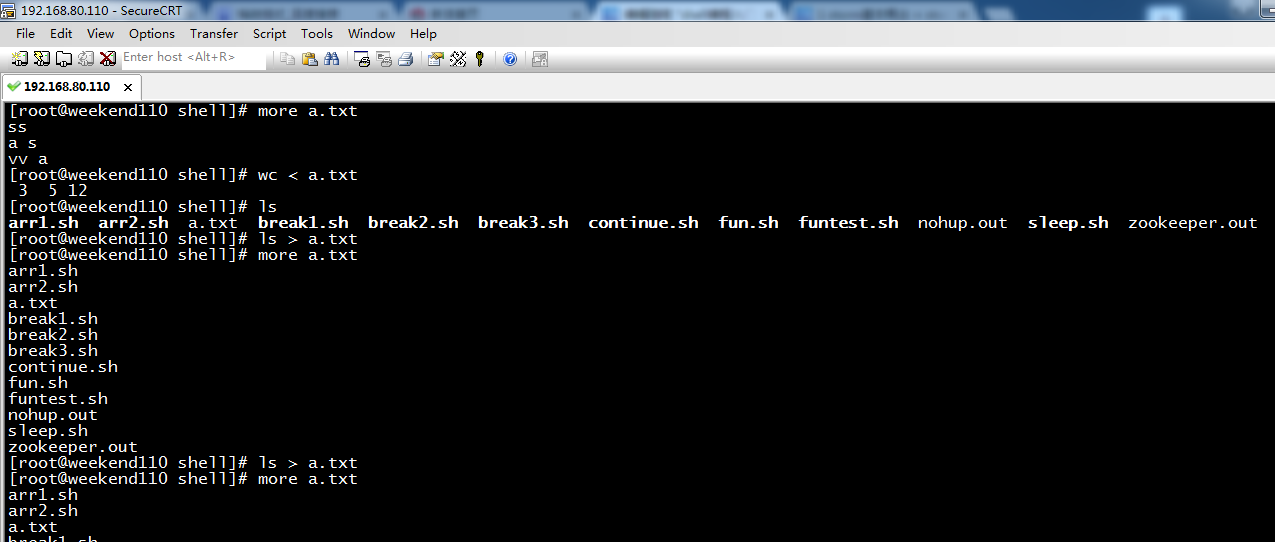
[root@weekend110 shell]# more a.txt
ss
a s
vv a
[root@weekend110 shell]# wc < a.txt 把a.txt当做标准输入,传给wc
3 5 12 3行,5个单词,12个字节数
标准输出
[root@weekend110 shell]# ls
arr1.sh arr2.sh a.txt break1.sh break2.sh break3.sh continue.sh fun.sh funtest.sh nohup.out sleep.sh zookeeper.out
[root@weekend110 shell]# ls > a.txt 把ls当做标准输出,传给a.txt
[root@weekend110 shell]# more a.txt
arr1.sh
arr2.sh
a.txt
break1.sh
break2.sh
break3.sh
continue.sh
fun.sh
funtest.sh
nohup.out
sleep.sh
zookeeper.out
[root@weekend110 shell]# ls > a.txt 覆盖
[root@weekend110 shell]# more a.txt
arr1.sh
arr2.sh
a.txt
break1.sh
break2.sh
break3.sh
continue.sh
fun.sh
funtest.sh
nohup.out
sleep.sh
zookeeper.out
[root@weekend110 shell]# ls 1> a.txt 等价于 ls > a.txt
[root@weekend110 shell]# more a.txt
arr1.sh
arr2.sh
a.txt
break1.sh
break2.sh
break3.sh
continue.sh
fun.sh
funtest.sh
nohup.out
sleep.sh
zookeeper.out
[root@weekend110 shell]# ls >> a.txt 追加
[root@weekend110 shell]# more a.txt
arr1.sh
arr2.sh
a.txt
break1.sh
break2.sh
break3.sh
continue.sh
fun.sh
funtest.sh
nohup.out
sleep.sh
zookeeper.out
arr1.sh
arr2.sh
a.txt
break1.sh
break2.sh
break3.sh
continue.sh
fun.sh
funtest.sh
nohup.out
sleep.sh
zookeeper.out
[root@weekend110 shell]# lkkkk 1> a.txt lkkkk是错误命令, 标准输出
-bash: lkkkk: command not found
[root@weekend110 shell]# lkkkk 2> a.txt 标准错误输出
[root@weekend110 shell]# more a.txt
-bash: lkkkk: command not found
[root@weekend110 shell]# lkkkk 2>> a.txt 追加
[root@weekend110 shell]# more a.txt
-bash: lkkkk: command not found
-bash: lkkkk: command not found
[root@weekend110 shell]# ls 2>&1 > a.txt
[root@weekend110 shell]# more a.txt
arr1.sh
arr2.sh
a.txt
break1.sh
break2.sh
break3.sh
continue.sh
fun.sh
funtest.sh
nohup.out
sleep.sh
zookeeper.out
[root@weekend110 shell]# lkkkk 2>&1 >a.txt
-bash: lkkkk: command not found
[root@weekend110 shell]# lkkkk >a.txt 2>&1
[root@weekend110 shell]# more a.txt
-bash: lkkkk: command not found
[root@weekend110 shell]# lkkkk >>a.txt 2>&1
[root@weekend110 shell]# more a.txt
-bash: lkkkk: command not found
-bash: lkkkk: command not found
[root@weekend110 shell]# ls >>a.txt 2>&1
[root@weekend110 shell]# more a.txt
-bash: lkkkk: command not found
-bash: lkkkk: command not found
arr1.sh
arr2.sh
a.txt
break1.sh
break2.sh
break3.sh
continue.sh
fun.sh
funtest.sh
nohup.out
sleep.sh
zookeeper.out
[root@weekend110 shell]#
[root@weekend110 shell]# ls >/dev/null 把输出信息定向到无底洞,即一般是把一些无用的信息,放到无底洞里。
[root@weekend110 shell]# ls >/dev/null 2>&1
[root@weekend110 shell]# lkkkk /dev/null 2>&1
-bash: lkkkk: command not found
[root@weekend110 shell]#
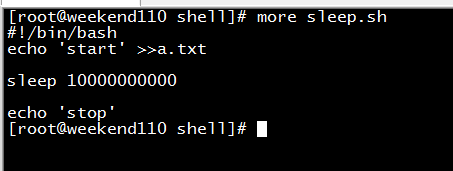
[root@weekend110 shell]# more sleep.sh
#!/bin/bash
echo 'start' >>a.txt 这样的好处,犹如在大数据里的日志文件一样,便于开发人员,随时查看日志。就是采用这个原理
sleep 10000000000
echo 'stop'
[root@weekend110 shell]#

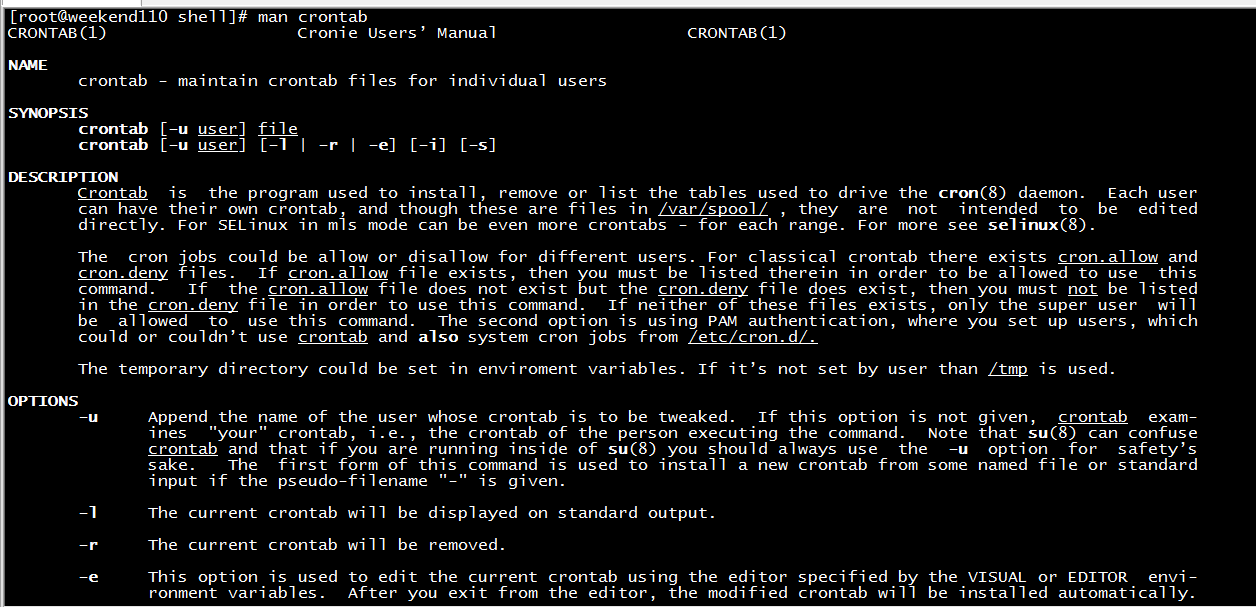
[root@weekend110 shell]# man crontab
CRONTAB(1) Cronie Users’ Manual CRONTAB(1)
NAME
crontab - maintain crontab files for individual users
SYNOPSIS
crontab [-u user] file
crontab [-u user] [-l | -r | -e] [-i] [-s]
DESCRIPTION
Crontab is the program used to install, remove or list the tables used to drive the cron(8) daemon. Each user
can have their own crontab, and though these are files in /var/spool/ , they are not intended to be edited
directly. For SELinux in mls mode can be even more crontabs - for each range. For more see selinux(8).
The cron jobs could be allow or disallow for different users. For classical crontab there exists cron.allow and
cron.deny files. If cron.allow file exists, then you must be listed therein in order to be allowed to use this
command. If the cron.allow file does not exist but the cron.deny file does exist, then you must not be listed
in the cron.deny file in order to use this command. If neither of these files exists, only the super user will
be allowed to use this command. The second option is using PAM authentication, where you set up users, which
could or couldn’t use crontab and also system cron jobs from /etc/cron.d/.
The temporary directory could be set in enviroment variables. If it’s not set by user than /tmp is used.
OPTIONS
-u Append the name of the user whose crontab is to be tweaked. If this option is not given, crontab exam-
ines "your" crontab, i.e., the crontab of the person executing the command. Note that su(8) can confuse
crontab and that if you are running inside of su(8) you should always use the -u option for safety’s
sake. The first form of this command is used to install a new crontab from some named file or standard
input if the pseudo-filename "-" is given.
-l The current crontab will be displayed on standard output.
-r The current crontab will be removed.
-e This option is used to edit the current crontab using the editor specified by the VISUAL or EDITOR envi-
ronment variables. After you exit from the editor, the modified crontab will be installed automatically.
-i This option modifies the -r option to prompt the user for a ’y/Y’ response before actually removing the
crontab.
-s It will append the current SELinux security context string as an MLS_LEVEL setting to the crontab file
before editing / replacement occurs - see the documentation of MLS_LEVEL in crontab(5).
SEE ALSO
crontab(5),cron(8)
FILES
/etc/cron.allow
/etc/cron.deny
STANDARDS
The crontab command conforms to IEEE Std1003.2-1992 (‘‘POSIX’’). This new command syntax differs from previous
versions of Vixie Cron, as well as from the classic SVR3 syntax.
DIAGNOSTICS
A fairly informative usage message appears if you run it with a bad command line.
AUTHOR
Paul Vixie <vixie@isc.org>
Marcela Mašláňová 20 July 2009 CRONTAB(1)
crontab对应的中文手册:
基本格式 :
* * * * * command
分 时 日 月 周 命令
第1列表示分钟1~59 每分钟用*或者 */1表示
第2列表示小时1~23(0表示0点)
第3列表示日期1~31
第4列表示月份1~12
第5列标识号星期0~6(0表示星期天)
第6列要运行的命令
crontab文件的一些例子:
30 21 * * * /usr/local/etc/rc.d/lighttpd restart
上面的例子表示每晚的21:30重启apache。
45 4 1,10,22 * * /usr/local/etc/rc.d/lighttpd restart
上面的例子表示每月1、10、22日的4 : 45重启apache。
10 1 * * 6,0 /usr/local/etc/rc.d/lighttpd restart
上面的例子表示每周六、周日的1 : 10重启apache。
0,30 18-23 * * * /usr/local/etc/rc.d/lighttpd restart
上面的例子表示在每天18 : 00至23 : 00之间每隔30分钟重启apache。
0 23 * * 6 /usr/local/etc/rc.d/lighttpd restart
上面的例子表示每星期六的11 : 00 pm重启apache。
* */1 * * * /usr/local/etc/rc.d/lighttpd restart
每一小时重启apache
* 23-7/1 * * * /usr/local/etc/rc.d/lighttpd restart
晚上11点到早上7点之间,每隔一小时重启apache
0 11 4 * mon-wed /usr/local/etc/rc.d/lighttpd restart
每月的4号与每周一到周三的11点重启apache
0 4 1 jan * /usr/local/etc/rc.d/lighttpd restart
一月一号的4点重启apache
名称 : crontab
使用权限 : 所有使用者
使用方式 :
crontab file [-u user]-用指定的文件替代目前的crontab。
crontab-[-u user]-用标准输入替代目前的crontab.
crontab-1[user]-列出用户目前的crontab.
crontab-e[user]-编辑用户目前的crontab.
crontab-d[user]-删除用户目前的crontab.
crontab-c dir- 指定crontab的目录。
crontab文件的格式:M H D m d cmd.
M: 分钟(0-59)。
H:小时(0-23)。
D:天(1-31)。
m: 月(1-12)。
d: 一星期内的天(0~6,0为星期天)。
cmd要运行的程序,程序被送入sh执行,这个shell只有USER,HOME,SHELL这三个环境变量
说明 :
crontab 是用来让使用者在固定时间或固定间隔执行程序之用,换句话说,也就是类似使用者的时程表。-u user 是指设定指定
user 的时程表,这个前提是你必须要有其权限(比如说是 root)才能够指定他人的时程表。如果不使用 -u user 的话,就是表示设
定自己的时程表。
参数 :
crontab -e : 执行文字编辑器来设定时程表,内定的文字编辑器是 VI,如果你想用别的文字编辑器,则请先设定 VISUAL 环境变数
来指定使用那个文字编辑器(比如说 setenv VISUAL joe)
crontab -r : 删除目前的时程表
crontab -l : 列出目前的时程表
crontab file [-u user]-用指定的文件替代目前的crontab。
时程表的格式如下 :
f1 f2 f3 f4 f5 program
其中 f1 是表示分钟,f2 表示小时,f3 表示一个月份中的第几日,f4 表示月份,f5 表示一个星期中的第几天。program 表示要执
行的程序。
当 f1 为 * 时表示每分钟都要执行 program,f2 为 * 时表示每小时都要执行程序,其馀类推
当 f1 为 a-b 时表示从第 a 分钟到第 b 分钟这段时间内要执行,f2 为 a-b 时表示从第 a 到第 b 小时都要执行,其馀类推
当 f1 为 */n 时表示每 n 分钟个时间间隔执行一次,f2 为 */n 表示每 n 小时个时间间隔执行一次,其馀类推
当 f1 为 a, b, c,... 时表示第 a, b, c,... 分钟要执行,f2 为 a, b, c,... 时表示第 a, b, c...个小时要执行,其馀类推
使用者也可以将所有的设定先存放在档案 file 中,用 crontab file 的方式来设定时程表。
例子 :
#每天早上7点执行一次 /bin/ls :
0 7 * * * /bin/ls
在 12 月内, 每天的早上 6 点到 12 点中,每隔3个小时执行一次 /usr/bin/backup :
0 6-12/3 * 12 * /usr/bin/backup
周一到周五每天下午 5:00 寄一封信给 alex@domain.name :
0 17 * * 1-5 mail -s "hi" alex@domain.name < /tmp/maildata
每月每天的午夜 0 点 20 分, 2 点 20 分, 4 点 20 分....执行 echo "haha"
20 0-23/2 * * * echo "haha"
注意 :
当程序在你所指定的时间执行后,系统会寄一封信给你,显示该程序执行的内容,若是你不希望收到这样的信,请在每一行空一格之
后加上 > /dev/null 2>&1 即可
例子2 :
#每天早上6点10分
10 6 * * * date
#每两个小时
0 */2 * * * date
#晚上11点到早上8点之间每两个小时,早上8点
0 23-7/2,8 * * * date
#每个月的4号和每个礼拜的礼拜一到礼拜三的早上11点
0 11 4 * mon-wed date
#1月份日早上4点
0 4 1 jan * date
范例
$crontab -l 列出用户目前的crontab.
参考: http://www.cnblogs.com/cocowool/archive/2009/04/22/1441291.html

[root@weekend110 ~]# service crond status
crond (pid 1624) is running...
[root@weekend110 ~]# crontab -e
no crontab for root - using an empty one
#* * * * * /usr/sbin/ntpdate time.nist.gov
* * * * * echo 'date'

[root@weekend110 ~]# crontab -l 查看使用
#* * * * * /usr/sbin/ntpdate time.nist.gov
* * * * * echo 'date'
[root@weekend110 ~]#

[root@weekend110 ~]# service rsyslog status
rsyslogd (pid 1244) is running...
[root@weekend110 ~]# tail -f /var/log/cron
Oct 22 20:21:44 weekend110 crontab[1891]: (root) END EDIT (root)
Oct 22 20:22:02 weekend110 CROND[1915]: (root) CMD (echo 'date')
Oct 22 20:22:25 weekend110 crontab[1923]: (root) LIST (root)
Oct 22 20:22:37 weekend110 crontab[1925]: (root) BEGIN EDIT (root)
Oct 22 20:22:41 weekend110 crontab[1925]: (root) REPLACE (root)
Oct 22 20:22:41 weekend110 crontab[1925]: (root) END EDIT (root)
Oct 22 20:22:43 weekend110 crontab[1929]: (root) LIST (root)
Oct 22 20:23:01 weekend110 crond[1624]: (root) RELOAD (/var/spool/cron/root)
Oct 22 20:23:02 weekend110 CROND[1933]: (root) CMD (echo 'date')
Oct 22 20:24:01 weekend110 CROND[1949]: (root) CMD (echo 'date')
^C
You have new mail in /var/spool/mail/root
[root@weekend110 ~]# tail -f /var/spool/mail/root
X-Cron-Env: <SHELL=/bin/sh>
X-Cron-Env: <HOME=/root>
X-Cron-Env: <PATH=/usr/bin:/bin>
X-Cron-Env: <LOGNAME=root>
X-Cron-Env: <USER=root>
Message-Id: <20161022122502.14D1C41D08@weekend110.localdomain>
Date: Sat, 22 Oct 2016 20:25:02 +0800 (CST)
date
^C
You have mail in /var/spool/mail/root
[root@weekend110 ~]# service crond status
crond (pid 1624) is running...
[root@weekend110 ~]#
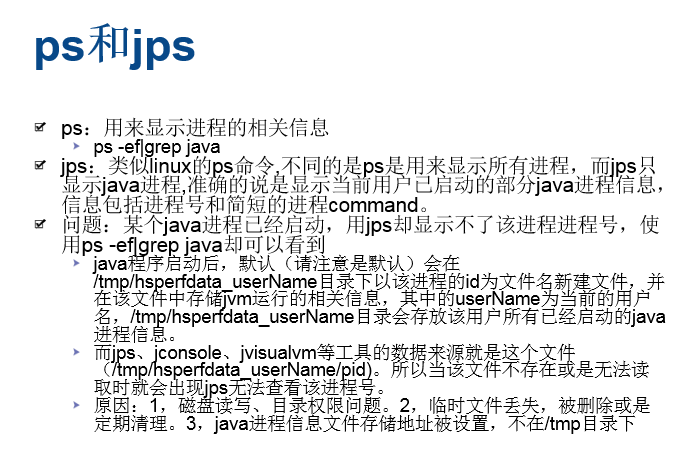
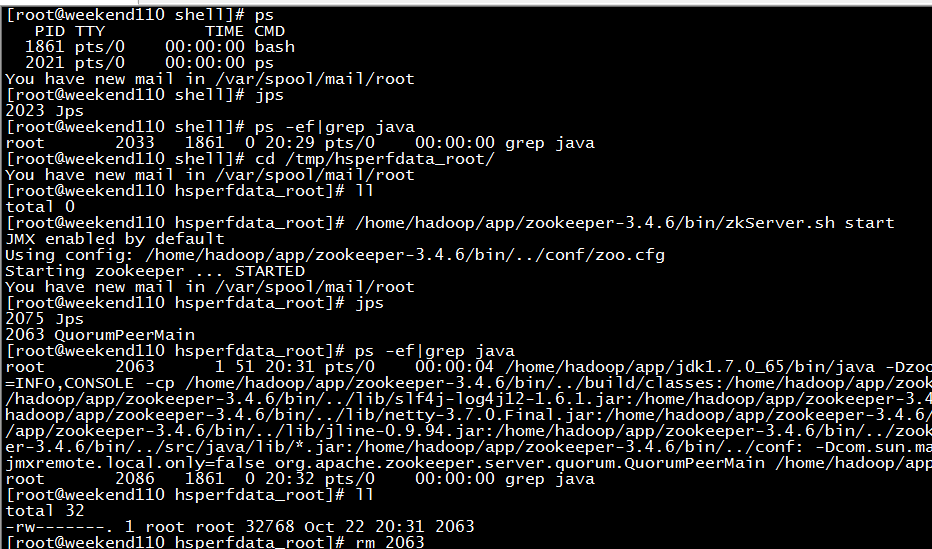
[root@weekend110 shell]# ps
PID TTY TIME CMD
1861 pts/0 00:00:00 bash
2021 pts/0 00:00:00 ps
You have new mail in /var/spool/mail/root
[root@weekend110 shell]# jps
2023 Jps
[root@weekend110 shell]# ps -ef|grep java
root 2033 1861 0 20:29 pts/0 00:00:00 grep java
[root@weekend110 shell]# cd /tmp/hsperfdata_root/
You have new mail in /var/spool/mail/root
[root@weekend110 hsperfdata_root]# ll
total 0
[root@weekend110 hsperfdata_root]# /home/hadoop/app/zookeeper-3.4.6/bin/zkServer.sh start
JMX enabled by default
Using config: /home/hadoop/app/zookeeper-3.4.6/bin/../conf/zoo.cfg
Starting zookeeper ... STARTED
You have new mail in /var/spool/mail/root
[root@weekend110 hsperfdata_root]# jps
2075 Jps
2063 QuorumPeerMain
[root@weekend110 hsperfdata_root]# ps -ef|grep java
root 2063 1 51 20:31 pts/0 00:00:04 /home/hadoop/app/jdk1.7.0_65/bin/java -Dzookeeper.log.dir=. -Dzookeeper.root.logger=INFO,CONSOLE -cp /home/hadoop/app/zookeeper-3.4.6/bin/../build/classes:/home/hadoop/app/zookeeper-3.4.6/bin/../build/lib/*.jar:/home/hadoop/app/zookeeper-3.4.6/bin/../lib/slf4j-log4j12-1.6.1.jar:/home/hadoop/app/zookeeper-3.4.6/bin/../lib/slf4j-api-1.6.1.jar:/home/hadoop/app/zookeeper-3.4.6/bin/../lib/netty-3.7.0.Final.jar:/home/hadoop/app/zookeeper-3.4.6/bin/../lib/log4j-1.2.16.jar:/home/hadoop/app/zookeeper-3.4.6/bin/../lib/jline-0.9.94.jar:/home/hadoop/app/zookeeper-3.4.6/bin/../zookeeper-3.4.6.jar:/home/hadoop/app/zookeeper-3.4.6/bin/../src/java/lib/*.jar:/home/hadoop/app/zookeeper-3.4.6/bin/../conf: -Dcom.sun.management.jmxremote -Dcom.sun.management.jmxremote.local.only=false org.apache.zookeeper.server.quorum.QuorumPeerMain /home/hadoop/app/zookeeper-3.4.6/bin/../conf/zoo.cfg
root 2086 1861 0 20:32 pts/0 00:00:00 grep java
[root@weekend110 hsperfdata_root]# ll
total 32
-rw-------. 1 root root 32768 Oct 22 20:31 2063
[root@weekend110 hsperfdata_root]# rm 2063
rm: remove regular file `2063'? y
[root@weekend110 hsperfdata_root]# ll
total 0
[root@weekend110 hsperfdata_root]# jps
2100 Jps

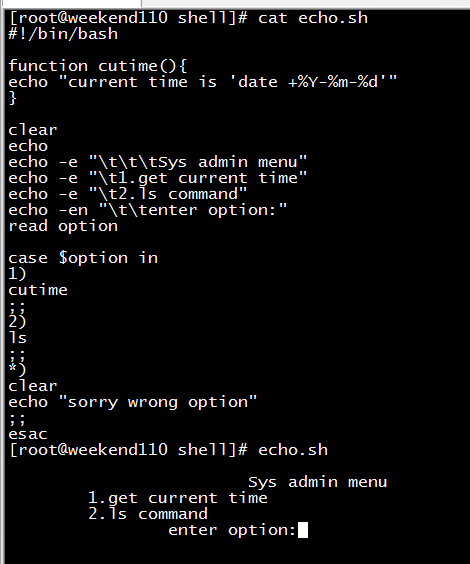
[root@weekend110 shell]# cat echo.sh
#!/bin/bash
function cutime(){
echo "current time is 'date +%Y-%m-%d'"
}
clear
echo
echo -e "\t\t\tSys admin menu"
echo -e "\t1.get current time"
echo -e "\t2.ls command"
echo -en "\t\tenter option:"
read option
case $option in
1)
cutime
;;
2)
ls
;;
*)
clear
echo "sorry wrong option"
;;
esac
[root@weekend110 shell]# echo.sh
Sys admin menu
1.get current time
2.ls command
enter option:

[root@weekend110 shell]# echo.sh
Sys admin menu
1.get current time
2.ls command
enter option:1
current time is 'date +%Y-%m-%d'
[root@weekend110 shell]# echo.sh
Sys admin menu
1.get current time
2.ls command
enter option:2
arr1.sh a.txt break2.sh continue.sh fun.sh nohup.out zookeeper.out
arr2.sh break1.sh break3.sh echo.sh funtest.sh sleep.sh
[root@weekend110 shell]#


 浙公网安备 33010602011771号