

Spring Cloud Gateway--网关路由
先简单实现Spring Cloud Gateway的路由功能,感觉一下
1.创建Spring Boot 应用spring-cloud-gateway,添加起步依赖spring-cloud-starter-gateway


<?xml version="1.0" encoding="UTF-8"?>
<project xmlns="http://maven.apache.org/POM/4.0.0" xmlns:xsi="http://www.w3.org/2001/XMLSchema-instance"
    xsi:schemaLocation="http://maven.apache.org/POM/4.0.0 https://maven.apache.org/xsd/maven-4.0.0.xsd">
    <modelVersion>4.0.0</modelVersion>
    <parent>
        <groupId>org.springframework.boot</groupId>
        <artifactId>spring-boot-starter-parent</artifactId>
        <version>2.3.6.RELEASE</version>
        <relativePath/> <!-- lookup parent from repository -->
    </parent>
    <groupId>com.example</groupId>
    <artifactId>spring-cloud-gateway</artifactId>
    <version>0.0.1-SNAPSHOT</version>
    <name>spring-cloud-gateway</name>
    <description>Demo project for Spring Boot</description>

    <properties>
        <java.version>1.8</java.version>
        <spring-cloud.version>Hoxton.SR9</spring-cloud.version>
    </properties>

    <dependencies>
        <dependency>
            <groupId>org.springframework.cloud</groupId>
            <artifactId>spring-cloud-starter-gateway</artifactId>
        </dependency>

        <dependency>
            <groupId>org.springframework.boot</groupId>
            <artifactId>spring-boot-starter-test</artifactId>
            <scope>test</scope>
            <exclusions>
                <exclusion>
                    <groupId>org.junit.vintage</groupId>
                    <artifactId>junit-vintage-engine</artifactId>
                </exclusion>
            </exclusions>
        </dependency>
    </dependencies>

    <dependencyManagement>
        <dependencies>
            <dependency>
                <groupId>org.springframework.cloud</groupId>
                <artifactId>spring-cloud-dependencies</artifactId>
                <version>${spring-cloud.version}</version>
                <type>pom</type>
                <scope>import</scope>
            </dependency>
        </dependencies>
    </dependencyManagement>

    <build>
        <plugins>
            <plugin>
                <groupId>org.springframework.boot</groupId>
                <artifactId>spring-boot-maven-plugin</artifactId>
            </plugin>
        </plugins>
    </build>

</project>
2.在application.yml文件中配置网关路由规则
server:
  port: 8080
spring:
  cloud:
    gateway:
      routes:
      - id: neo_route
        uri: https://www.cnblogs.com
        predicates:
        - Path=/dreamstar99
3.启动spring-cloud-gateway应用,访问http://localhost:8080/dreamstar99。理论上会跳转到 https://www.cnblogs.com/dreamstar99。 也可能会可能会报错如下,如果没有,请忽略……
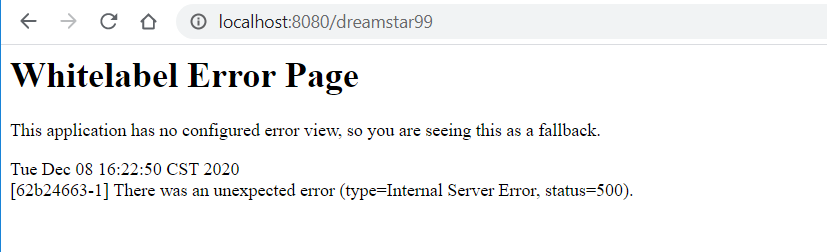
查看log发现报错如下:

报错原因:在C:/WINDOWS/system32/drivers/etc/hosts文件里面主机名和本地循环地址没有匹配到。host 是一个没有扩展名的系统文件,可以用记事本等工具打开,其作用就是将一些常用的网址域名与其对应的IP地址建立一个关联“数据库”,当用户在浏览器中输入一个需要登录的网址时,系统会首先自动从Hosts文件中寻找对应的IP地址,一旦找到,系统会立即打开对应网页,如果没有找到,则系统再会将网址提交 DNS域名解析服务器进行IP地址的解析。
解决办法: 1.需要在hosts文件中添加上该域名的解析ip地址。2.如果我们没有权限修改hosts文件,或者不想修改,那么可以在本地再启动一个微服务,然后把spring-cloud-gateway的/discoveryClient 路由到本地的这个微服务。这里我们采用方法2。
4.修改application.yml文件中配置路由规则,路由到本地的另外一个启动的微服务。这里的微服务我借用Spring Cloud Eureka 服务治理--服务发现与消费里的eureka-client微服务
server:
  port: 8080
spring:
  cloud:
    gateway:
      routes:
      - id: neo_route
        uri: http://localhost:2001/
        predicates:
        - Path=/discoveryClient
5.启动微服务spring-cloud-gateway 和 eureka-client。再次访问http://localhost:8080/discoveryClient。发现和直接访问http://localhost:2001/discoveryClient是一样的效果。说明spring-cloud-gateway实现了服务路由功能。
这一篇的重点被hosts文件带跑了,这是使用spring-cloud-gateway时遇到的第一个拦路虎,但是却spring cloud gateway本身无关。所以这篇就到这儿结束,主要点就是网关路由时 被路由到的网站ip地址要在网关微服务所运行的机器hosts文件中配置。下一篇再从头写spring cloud gateway本身。
