二分类问题续 - 【老鱼学tensorflow2】
前面我们针对电影评论编写了二分类问题的解决方案。
这里对前面的这个方案进行一些改进。
分批训练
model.fit(x_train, y_train, epochs=20, batch_size=512)
这里在训练时增加了一个参数batch_size,使用 512 个样本组成的小批量,将模型训练 20 个轮次。
这个参数可以看成是在训练时不一次性在全部的训练集上进行,而是针对其中的512个题目分批次进行训练。有点类似做512道题目进行训练,然后看结果进行调整,而不是一次性做好25000道题目然后再对答案看哪里有问题。
这样的结果是训练的速度有很明显的提高,原先在我的机器上训练一个轮次要6秒,增加了这个批次参数后,训练一个轮次只要1秒。
数据集再分类
首先我们对数据集进行一下再分类。
前面我们使用了训练集和测试集。
训练集是用来训练数据的,有点类似学习中的练习题;
测试集有点类似考试题。
一般来讲测试集对我们是未知的,我们不知道要考什么试题。
为了能够在练习时我们也能知道当前的学习状况,因此我们会把练习题分出一部分来当做单元测试,这样我们不必等到未知的考题中来了解自己的学习状况。
这里的单元测试题就是验证集。
代码实现为:
# 分解验证集
x_val = x_train[:10000]
y_val = y_train[:10000]

x_train = x_train[10000:]
y_train = y_train[10000:]

#编译模型
model.compile(optimizer=keras.optimizers.RMSprop(), loss=keras.losses.binary_crossentropy, metrics=[keras.metrics.binary_accuracy])
#训练模型
model.fit(x_train, y_train, epochs=20, batch_size=512, validation_data=(x_val, y_val))
绘制训练图形
在训练过程中控制台中会打印出如下的信息:
Train on 15000 samples, validate on 10000 samples
Epoch 1/20
15000/15000 [==============================] - 5s 317us/sample - loss: 0.5072 - binary_accuracy: 0.7900 - val_loss: 0.3850 - val_binary_accuracy: 0.8713
Epoch 2/20
15000/15000 [==============================] - 1s 66us/sample - loss: 0.3022 - binary_accuracy: 0.9020 - val_loss: 0.3317 - val_binary_accuracy: 0.8628
Epoch 3/20
15000/15000 [==============================] - 1s 52us/sample - loss: 0.2223 - binary_accuracy: 0.9283 - val_loss: 0.2890 - val_binary_accuracy: 0.8851
Epoch 4/20
15000/15000 [==============================] - 1s 52us/sample - loss: 0.1773 - binary_accuracy: 0.9424 - val_loss: 0.3087 - val_binary_accuracy: 0.8766
Epoch 5/20
15000/15000 [==============================] - 1s 53us/sample - loss: 0.1422 - binary_accuracy: 0.9546 - val_loss: 0.2819 - val_binary_accuracy: 0.8882
Epoch 6/20
15000/15000 [==============================] - 1s 57us/sample - loss: 0.1203 - binary_accuracy: 0.9635 - val_loss: 0.2935 - val_binary_accuracy: 0.8846
Epoch 7/20
15000/15000 [==============================] - 1s 57us/sample - loss: 0.0975 - binary_accuracy: 0.9709 - val_loss: 0.3163 - val_binary_accuracy: 0.8809
Epoch 8/20
15000/15000 [==============================] - 1s 53us/sample - loss: 0.0799 - binary_accuracy: 0.9778 - val_loss: 0.3383 - val_binary_accuracy: 0.8781
Epoch 9/20
15000/15000 [==============================] - 1s 52us/sample - loss: 0.0666 - binary_accuracy: 0.9814 - val_loss: 0.3579 - val_binary_accuracy: 0.8766
Epoch 10/20
15000/15000 [==============================] - 1s 56us/sample - loss: 0.0519 - binary_accuracy: 0.9879 - val_loss: 0.3926 - val_binary_accuracy: 0.8808
Epoch 11/20
15000/15000 [==============================] - 1s 57us/sample - loss: 0.0430 - binary_accuracy: 0.9899 - val_loss: 0.4163 - val_binary_accuracy: 0.8712
Epoch 12/20
15000/15000 [==============================] - 1s 58us/sample - loss: 0.0356 - binary_accuracy: 0.9921 - val_loss: 0.5044 - val_binary_accuracy: 0.8675
Epoch 13/20
15000/15000 [==============================] - 1s 54us/sample - loss: 0.0274 - binary_accuracy: 0.9943 - val_loss: 0.4995 - val_binary_accuracy: 0.8748
Epoch 14/20
15000/15000 [==============================] - 1s 53us/sample - loss: 0.0225 - binary_accuracy: 0.9957 - val_loss: 0.5040 - val_binary_accuracy: 0.8748
Epoch 15/20
15000/15000 [==============================] - 1s 53us/sample - loss: 0.0149 - binary_accuracy: 0.9984 - val_loss: 0.5316 - val_binary_accuracy: 0.8703
Epoch 16/20
15000/15000 [==============================] - 1s 52us/sample - loss: 0.0137 - binary_accuracy: 0.9984 - val_loss: 0.5672 - val_binary_accuracy: 0.8676
Epoch 17/20
15000/15000 [==============================] - 1s 51us/sample - loss: 0.0116 - binary_accuracy: 0.9985 - val_loss: 0.6013 - val_binary_accuracy: 0.8680
Epoch 18/20
15000/15000 [==============================] - 1s 52us/sample - loss: 0.0060 - binary_accuracy: 0.9998 - val_loss: 0.6460 - val_binary_accuracy: 0.8636
Epoch 19/20
15000/15000 [==============================] - 1s 51us/sample - loss: 0.0067 - binary_accuracy: 0.9993 - val_loss: 0.6791 - val_binary_accuracy: 0.8673
Epoch 20/20
15000/15000 [==============================] - 1s 53us/sample - loss: 0.0074 - binary_accuracy: 0.9987 - val_loss: 0.7243 - val_binary_accuracy: 0.8645
这里会显示出训练集和验证集对应的损失值和精度。
数值上来看不是很直观,我们可以通过图形的方式来进行查看。
在调用model.fit()函数后会有一个返回值:
history = model.fit(x_train, y_train, epochs=20, batch_size=512, validation_data=(x_val, y_val))
这个对象有一个成员 history,它是一个字典,包含训练过程中的所有数据。我们来看一下。
history = model.fit(x_train, y_train, epochs=20, batch_size=512, validation_data=(x_val, y_val))
history_map = history.history
print("history_map:", history_map)
这里的history_map其中的key为:loss,val_loss,binary_accuracy,val_binary_accuracy
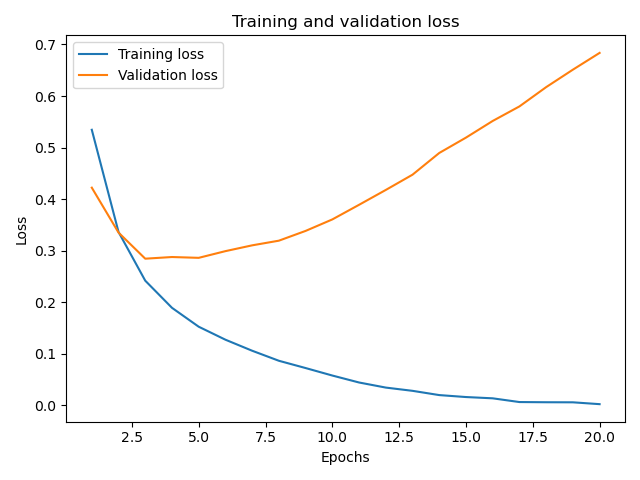
我们可以绘制一下训练集和验证集的损失值:loss,val_loss
#训练模型
history = model.fit(x_train, y_train, epochs=20, batch_size=512, validation_data=(x_val, y_val))
history_map = history.history
print("history_map:", history_map)

# 绘制训练集和验证集的损失值
loss_values = history_map['loss']
val_loss_values = history_map['val_loss']
epochs = range(1, len(loss_values) + 1)

import matplotlib.pyplot as plt
plt.plot(epochs, loss_values, label='Training loss')
plt.plot(epochs, val_loss_values, label='Validation loss')
plt.title("Training and validation loss")
plt.xlabel("Epochs")
plt.ylabel("Loss")
plt.legend()
plt.show()
运行上述代码时发生了如下的错误:
OMP: Error #15: Initializing libomp.dylib, but found libiomp5.dylib already initialized.
OMP: Hint This means that multiple copies of the OpenMP runtime have been linked into the program. That is dangerous, since it can degrade performance or cause incorrect results. The best thing to do is to ensure that only a single OpenMP runtime is linked into the process, e.g. by avoiding static linking of the OpenMP runtime in any library. As an unsafe, unsupported, undocumented workaround you can set the environment variable KMP_DUPLICATE_LIB_OK=TRUE to allow the program to continue to execute, but that may cause crashes or silently produce incorrect results. For more information, please see http://openmp.llvm.org/
需要在绘制图形前设置如下的值:
import os
os.environ['KMP_DUPLICATE_LIB_OK']='True'
这样显示的损失值图形为:

从这个图形中我们发现随着训练迭代次数的增加,训练集中的损失值在不停减小,但是对于验证集的损失值在3-4次时反而增加了。
显示训练集和验证集精度图形
# 显示训练集和验证集的精度
binary_accuracy_values = history_map['binary_accuracy']
val_binary_accuracy_values = history_map['val_binary_accuracy']

plt.clf() #清空图像
plt.plot(epochs, binary_accuracy_values, label='Training accuracy')
plt.plot(epochs, val_binary_accuracy_values, label='Validation accuracy')
plt.title("Training and validation accuracy")
plt.xlabel("Epochs")
plt.ylabel("Accuracy")
plt.legend()
plt.show()
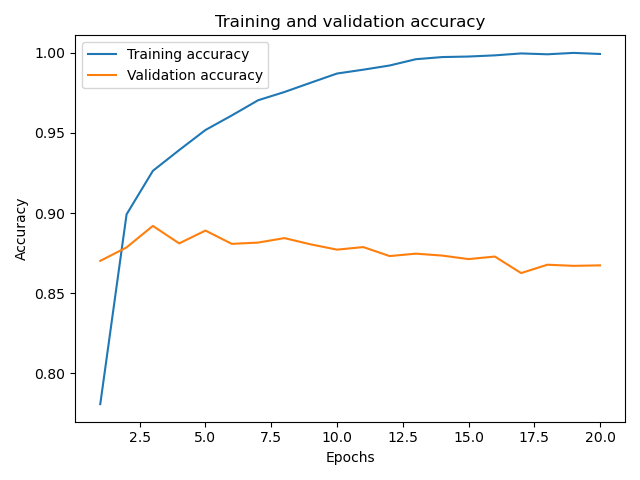
图形显示为:

可以看到随着迭代次数的增加,训练集的精度一直在提高,但是验证集的精度在迭代3-4次之后并没有一个显著的提高。
这里就可能存在一个过拟合的现象,也就是在训练集中模型有很好的表现,但在验证集和测试集中模型的结果并没有很好的表现。
在这种情况下,为了防止过拟合,我们可以在 4 轮之后停止训练。通常来说,我们可以使用许多方法来降低过拟合,我们将在后面的博文中再来介绍。
目前完整的代码为:
import tensorflow.keras as keras
(x_train, y_train), (x_test, y_test) = keras.datasets.imdb.load_data(num_words=10000)
# print("x_train:", x_train, "y_train:", y_train)

# data = keras.datasets.imdb.get_word_index()
# word_map = dict([(value, key) for (key,value) in data.items()])
# words = []
# for word_index in x_train[0]:
#     words.append(word_map[word_index])
# print(" ".join(words))

import numpy as np
def vectorize_sequence(data, words_size = 10000):
    words_vector = np.zeros((len(data), words_size))
    for row, word_index in enumerate(data):
        words_vector[row, word_index] = 1.0
    return words_vector

x_train = vectorize_sequence(x_train)
x_test = vectorize_sequence(x_test)

#构建模型
model = keras.models.Sequential()
model.add(keras.layers.Dense(16, activation=keras.activations.relu, input_shape=(10000, )))
model.add(keras.layers.Dense(16, activation=keras.activations.relu))
model.add(keras.layers.Dense(1, activation=keras.activations.sigmoid))

# 分解验证集
x_val = x_train[:10000]
y_val = y_train[:10000]

x_train = x_train[10000:]
y_train = y_train[10000:]

#编译模型
model.compile(optimizer=keras.optimizers.RMSprop(), loss=keras.losses.binary_crossentropy, metrics=[keras.metrics.binary_accuracy])
#训练模型
history = model.fit(x_train, y_train, epochs=20, batch_size=512, validation_data=(x_val, y_val))
history_map = history.history
print("history_map:", history_map)

# 绘制训练集和验证集的损失值
loss_values = history_map['loss']
val_loss_values = history_map['val_loss']
epochs = range(1, len(loss_values) + 1)

import os
os.environ['KMP_DUPLICATE_LIB_OK']='True'

import matplotlib.pyplot as plt
plt.plot(epochs, loss_values, label='Training loss')
plt.plot(epochs, val_loss_values, label='Validation loss')
plt.title("Training and validation loss")
plt.xlabel("Epochs")
plt.ylabel("Loss")
plt.legend()
plt.show()

# 显示训练集和验证集的精度
binary_accuracy_values = history_map['binary_accuracy']
val_binary_accuracy_values = history_map['val_binary_accuracy']

plt.clf() #清空图像
plt.plot(epochs, binary_accuracy_values, label='Training accuracy')
plt.plot(epochs, val_binary_accuracy_values, label='Validation accuracy')
plt.title("Training and validation accuracy")
plt.xlabel("Epochs")
plt.ylabel("Accuracy")
plt.legend()
plt.show()

# 测试
results = model.evaluate(x_test, y_test)
print(results)

# 预测
results = model.predict(x_test)
print(results)
为了调优模型,你可以尝试着增加更多的隐藏层,调整隐藏层中的单元个数,调整损失函数,调整激活函数,调整这些参数之后再来看下模型的精度的变化。
更多参考系列文章:老鱼学机器学习&深度学习目录

出处:http://www.cnblogs.com/dreampursuer/
本文版权归作者所有,欢迎转载,但未经作者同意必须保留此段声明,且在文章页面明显位置给出原文连接,否则保留追究法律责任的权利。


