NVIC中断
中断寄存器
1)ISER[8](Interrupt Set-Enable Registers):中断使能寄存器--void NVIC_Init(NVIC_InitTypeDef* NVIC_InitStruct);。其
中断使能寄存器共有8个,ISER[0]设置0~31号中断的使能,ISER[1]设置32~63号中断的使能,如此类推。以下以ISER[0]为例:


[31:0] SETENA中断设置使能位。
写:
0 =无影响
1 =使能中断。
读:
0 =中断是禁止的
1=中断已经被使能
如果要使能0号中断,就向该寄存器的0位写1,如果要使能38号中断,就向NVIC_ISER[1]的6位写1,如此类推,至于哪个中断对应哪个中断号
2)ICER[8](Interrupt Clear-Enable Registers):中断移除寄存器--void NVIC_Init(NVIC_InitTypeDef* NVIC_InitStruct);。该寄存器的作用于ISER相反。这里专门设置一个ICER来清除中断位,而不是向ISER位写0,是因为NVIC的寄存器写1有效,写0无效。
3)ISPR[8](Interrupt Set-Pending Registers):中断挂起控制寄存器--static __INLINE void NVIC_SetPendingIRQ(IRQn_Type IRQn);。通过置1可以将正在进行的中断挂起,执行同级或者更高级别的中断。写0无效。
4)ICPR[8](Interrupt Clear-Pending Registers):中断解挂控制寄存器--static __INLINE void NVIC_ClearPendingIRQ(IRQn_Type IRQn);。通过置1可以将正在挂起的中断解挂。写0无效。
5)IABR[8](Interrupt Active-Bit Registers):中断激活标志位寄存器--static __INLINE uint32_t NVIC_GetActive(IRQn_Type IRQn);。这是一个只读寄存器,可以知道当前在执行的中断是哪一个(为1),在中断执行完后硬件自动清零。
6)IP[240](Interrupt Priority Registers):中断优先级控制的寄存器--void NVIC_Init(NVIC_InitTypeDef* NVIC_InitStruct);。这是用来控制每个中断的优先级。由于STM32F10x系列一共60个可屏蔽中断,故使用IP[59]~IP[0]。其中每个IP寄存器的高4位[7:4]用来设置抢占和响应优先级(根据分组),低4位没有用到。而两个优先级各占几个位又要由上面讲到的中断优先级分组决定。
STM32F0xx 实现中断向量表重定义
在STM32F103等cortex-m3/m4内核的单片机上可以通过设置SCB->VTOR = FLASH_BASE | VECT_TAB_OFFSET;该寄存器的值来实现中断向量表的重定义。
在Coretext-M3与M4核中,在System Control Block中存在一个向量表偏移量寄存器 VTOR(
0xE000ED08),系统产生中断后,内核通过这个寄存器的值来找到中断向量表的地址,进而执行中断例程代码。当然,此寄存器的值是可以修改的,它的默认值为0。实际上在大部分的M3和M4的工程中,一般都是在
SystemInit函数中对此寄存器的值进行设置。
由于STM32F0XX采用的是M0核,它是没有这个VTOR寄存器的,那么它又是怎么找到中断向量表的地址的呢?
如何将中断向量表的寻找位置从0x0800 0000修改到0x0800 3000(假设为APP的地址)? 我们重新回顾之前的分析,可以得出有2种方法:
- 修改寄存器VTOR的值(M3/M4 使用)
- 内存重映射(M0使用)
通过将SRAM重映射到地址0x0000 0000,那么,M0系统产生中断后,CPU还是从地址0x0000 0000寻找中断入口,但是,实际上不再是寻址0x0800 0000,而是寻址0x2000 0000,这么一来,接下来我们就只需要将中断向量表整个拷贝到SRAM上,也就是0x2000 0000上,就这样,CPU就可以正常寻址中断向量表了。

/* Memory mapping of Cortex-M3 Hardware */
#define SCS_BASE            (0xE000E000)                              /*!< System Control Space Base Address */
#define ITM_BASE            (0xE0000000)                              /*!< ITM Base Address                  */
#define CoreDebug_BASE      (0xE000EDF0)                              /*!< Core Debug Base Address           */
#define SysTick_BASE        (SCS_BASE +  0x0010)                      /*!< SysTick Base Address              */
#define NVIC_BASE           (SCS_BASE +  0x0100)                      /*!< NVIC Base Address                 */
#define SCB_BASE            (SCS_BASE +  0x0D00)                      /*!< System Control Block Base Address */

#define InterruptType       ((InterruptType_Type *) SCS_BASE)         /*!< Interrupt Type Register           */
#define SCB                 ((SCB_Type *)           SCB_BASE)         /*!< SCB configuration struct          */
#define SysTick             ((SysTick_Type *)       SysTick_BASE)     /*!< SysTick configuration struct      */
#define NVIC                ((NVIC_Type *)          NVIC_BASE)        /*!< NVIC configuration struct         */
#define ITM                 ((ITM_Type *)           ITM_BASE)         /*!< ITM configuration struct          */
#define CoreDebug           ((CoreDebug_Type *)     CoreDebug_BASE)   /*!< Core Debug configuration struct   *
1. 中断分组
分组函数:void NVIC_PriorityGroupConfig(uint32_t NVIC_PriorityGroup);
假设,要使中断分组为2
NVIC_PriorityGroupConfig(NVIC_PriorityGroup_2);
#define AIRCR_VECTKEY_MASK    ((uint32_t)0x05FA0000)
#define NVIC_PriorityGroup_2         ((uint32_t)0x500) /*!< 2 bits for pre-emption priority
/**
  * @brief  Configures the priority grouping: pre-emption priority and subpriority.
  * @param  NVIC_PriorityGroup: specifies the priority grouping bits length.
  *   This parameter can be one of the following values:
  *     @arg NVIC_PriorityGroup_0: 0 bits for pre-emption priority
  *                                4 bits for subpriority
  *     @arg NVIC_PriorityGroup_1: 1 bits for pre-emption priority
  *                                3 bits for subpriority
  *     @arg NVIC_PriorityGroup_2: 2 bits for pre-emption priority
  *                                2 bits for subpriority
  *     @arg NVIC_PriorityGroup_3: 3 bits for pre-emption priority
  *                                1 bits for subpriority
  *     @arg NVIC_PriorityGroup_4: 4 bits for pre-emption priority
  *                                0 bits for subpriority
  * @retval None
  */
void NVIC_PriorityGroupConfig(uint32_t NVIC_PriorityGroup)
{
  /* Check the parameters */
  assert_param(IS_NVIC_PRIORITY_GROUP(NVIC_PriorityGroup));

  /* Set the PRIGROUP[10:8] bits according to NVIC_PriorityGroup value */
  SCB->AIRCR = AIRCR_VECTKEY_MASK | NVIC_PriorityGroup;
}
分组配置是在寄存器SCB->AIRCR中配置,具体的分配关系如下所示:
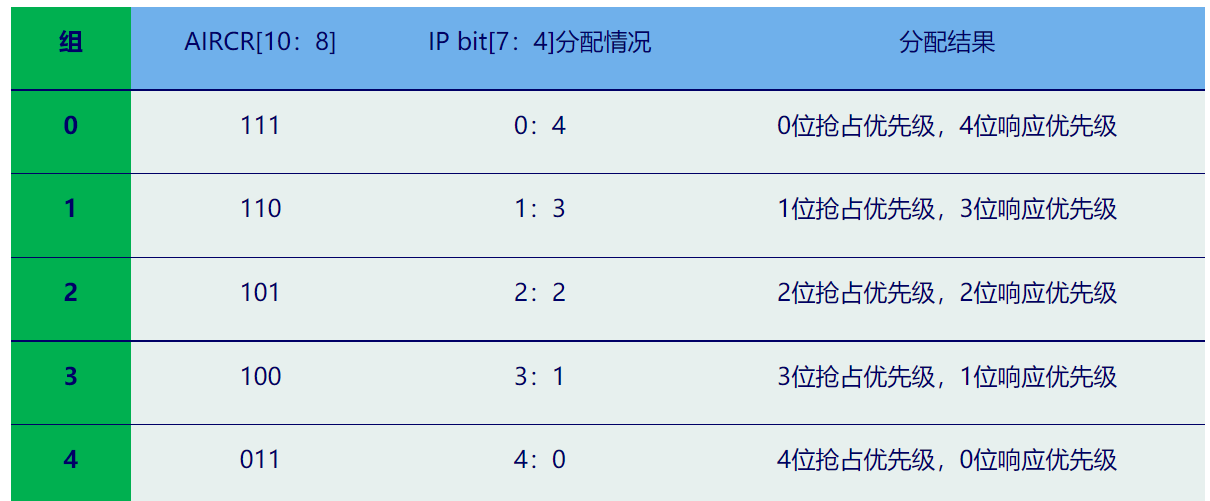
STM32有16个级别(4-bit)优先级可使用:
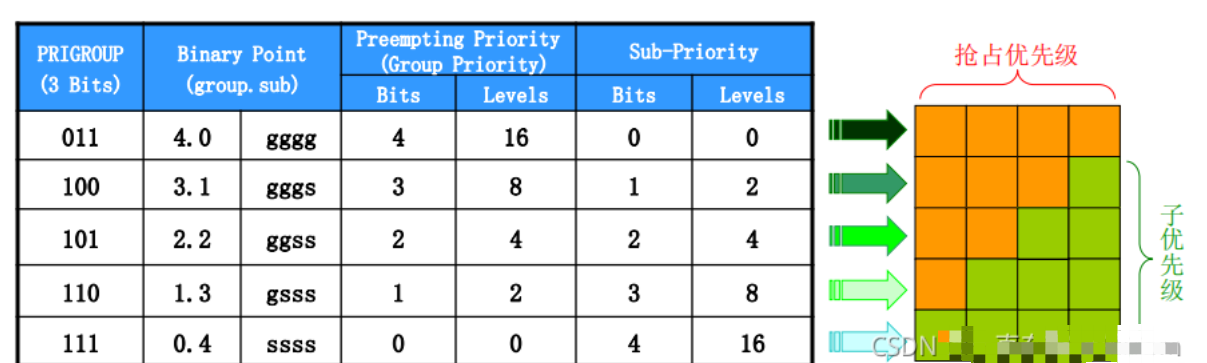
其中AIRCR寄存器来确定是用哪种分组,IP寄存器是相对应于那种分组抢占优先级和响应优先级的分配比例。例如组设置成3,那么此时所有的60个中断优先寄存器高4位中的最高3位是抢占优先级,低1位为响应优先级。CM3中定义了8个Bit用于设置中断源的优先级,而STM32只选用其中的4个Bit。
抢占优先级的级别高于响应优先级,而数值越小所代表的的优先级越高。
介绍一下抢占优先级、响应优先级的区别:
1)高优先级的抢占优先级是可以打断正在进行的低抢占优先级中断的;
2)抢占优先级相同的中断,高响应优先级不可以打断低响应优先级的中断;
3)抢占优先级相同的中断,当两个中断同时发生的情况下,哪个响应优先级高,哪个先执行;
4)如果两个中断的抢占优先级和响应优先级都是一样的话,则看哪个中断先发生就先执行;
除此之外有两点需要注意:
1)打断的情况只会与抢占优先级有关, 和响应优先级无关!
2)一般情况下,系统代码执行过程中,只设置一次中断优先级分组,比如分组2,设置好分组之后一般不会再改变分组。随意改变分组会导致中断管理混乱,程序出现意想不到的执行结果。
优先级举例说明:假定设置中断优先级组为2,然后设置中断3(RTC中断)的抢占优先级为2,响应优先级为1。中断6(外部中断0)的抢占优先级为3,响应优先级为0。中断7(外部中断1)的抢占优先级为2,响应优先级为0。那么这3个中断的优先级顺序为:中断7>中断3>中断6
2.设置中断的优先级别(抢占优先级和子优先级)
中断初始化函数:void NVIC_Init(NVIC_InitTypeDef* NVIC_InitStruct)
假设,要设置串口1的中断,同时设置抢占优先级为1,子优先级为2

NVIC_InitTypeDef NVIC_InitStructure;
NVIC_InitStructure.NVIC_IRQChannel = USART1_IRQn;//串口 1 中断
NVIC_InitStructure.NVIC_IRQChannelPreemptionPriority=1 ;// 抢占优先级为 1
NVIC_InitStructure.NVIC_IRQChannelSubPriority = 2;// 子优先级位 2
NVIC_InitStructure.NVIC_IRQChannelCmd = ENABLE; //IRQ 通道使能
NVIC_Init(&NVIC_InitStructure);  //根据上面指定的参数初始化 NVIC 寄存器
NVIC_Type为:
/** @addtogroup CMSIS_CM3_NVIC CMSIS CM3 NVIC
  memory mapped structure for Nested Vectored Interrupt Controller (NVIC)
  @{
 */
typedef struct
{
  __IO uint32_t ISER[8];                      /*!< Offset: 0x000  Interrupt Set Enable Register           */
       uint32_t RESERVED0[24];
  __IO uint32_t ICER[8];                      /*!< Offset: 0x080  Interrupt Clear Enable Register         */
       uint32_t RSERVED1[24];
  __IO uint32_t ISPR[8];                      /*!< Offset: 0x100  Interrupt Set Pending Register          */
       uint32_t RESERVED2[24];
  __IO uint32_t ICPR[8];                      /*!< Offset: 0x180  Interrupt Clear Pending Register        */
       uint32_t RESERVED3[24];
  __IO uint32_t IABR[8];                      /*!< Offset: 0x200  Interrupt Active bit Register           */
       uint32_t RESERVED4[56];
  __IO uint8_t  IP[240];                      /*!< Offset: 0x300  Interrupt Priority Register (8Bit wide) */
       uint32_t RESERVED5[644];
  __O  uint32_t STIR;                         /*!< Offset: 0xE00  Software Trigger Interrupt Register     */
}  NVIC_Type;
/*@}*/ /* end of group CMSIS_CM3_NVIC */
NVIC基址
#define SCS_BASE            (0xE000E000)                              /*!< System Control Space Base Address */
#define NVIC_BASE           (SCS_BASE +  0x0100)                      /*!< NVIC Base Address                 */
#define SCB_BASE            (SCS_BASE +  0x0D00)                      /*!< System Control Block Base Address */


#define NVIC                ((NVIC_Type *)          NVIC_BASE)        /*!< NVIC configuration struct         */
NVIC_Init()这个函数:
/**
  * @brief  Initializes the NVIC peripheral according to the specified
  *         parameters in the NVIC_InitStruct.
  * @param  NVIC_InitStruct: pointer to a NVIC_InitTypeDef structure that contains
  *         the configuration information for the specified NVIC peripheral.
  * @retval None
  */
void NVIC_Init(NVIC_InitTypeDef* NVIC_InitStruct)
{
  uint32_t tmppriority = 0x00, tmppre = 0x00, tmpsub = 0x0F;

  /* Check the parameters */
  assert_param(IS_FUNCTIONAL_STATE(NVIC_InitStruct->NVIC_IRQChannelCmd));
  assert_param(IS_NVIC_PREEMPTION_PRIORITY(NVIC_InitStruct->NVIC_IRQChannelPreemptionPriority));
  assert_param(IS_NVIC_SUB_PRIORITY(NVIC_InitStruct->NVIC_IRQChannelSubPriority));

  if (NVIC_InitStruct->NVIC_IRQChannelCmd != DISABLE)
  {
    /* Compute the Corresponding IRQ Priority --------------------------------*/
    tmppriority = (0x700 - ((SCB->AIRCR) & (uint32_t)0x700))>> 0x08;
    tmppre = (0x4 - tmppriority);
    tmpsub = tmpsub >> tmppriority;

    tmppriority = (uint32_t)NVIC_InitStruct->NVIC_IRQChannelPreemptionPriority << tmppre;
    tmppriority |=  NVIC_InitStruct->NVIC_IRQChannelSubPriority & tmpsub;
    tmppriority = tmppriority << 0x04;

    NVIC->IP[NVIC_InitStruct->NVIC_IRQChannel] = tmppriority;

    /* Enable the Selected IRQ Channels --------------------------------------*/
    NVIC->ISER[NVIC_InitStruct->NVIC_IRQChannel >> 0x05] =
      (uint32_t)0x01 << (NVIC_InitStruct->NVIC_IRQChannel & (uint8_t)0x1F);
  }
  else
  {
    /* Disable the Selected IRQ Channels -------------------------------------*/
    NVIC->ICER[NVIC_InitStruct->NVIC_IRQChannel >> 0x05] =
      (uint32_t)0x01 << (NVIC_InitStruct->NVIC_IRQChannel & (uint8_t)0x1F);
  }
}
可以看到,它会去设置几个寄存器:NVIC的IP,ISER,ICER等等,
STM32 学习:IAP 简单的IAP例子
stm32中关于NVIC_SetVectorTable函数使用的疑惑与理解


 浙公网安备 33010602011771号