Network Policy Enforcement
Network Policy Enforcement
While network policy designs are out of scope for this reference architecture, it is a core feature of Calico and thus is mentioned here to provide initial guidance.
Calico enforces 3 types of policies:
- NetworkPolicy: Kubernetes API: Namespace scoped
- NetworkPolicy: Calico CRD: Namespace scoped
- GlobalNetworkPolicy: Calico CRD: Cluster scoped
The Calico CRDs are more capable than the Kubernetes API, however the Kubernetes API policies are portable, should migration to another CNI-plugin happen in the future. Many organizations want to enforce default policy to every namespace. Normally, administrators need to ensure default policy rules are deployed to every namespace. This can be challenging over time as changes to the default policy rules require changes to every namespace. Calico’s GlobalNetworkPolicy enables creating cluster-wide policies that impact every workload based on label selectors. Cluster-wide policy set in GlobalNetworkPolicy can be overwritten by NetworkPolicy (namespace scoped) from both the Kubernetes API and Calico CRD. The example below enforces a global default deny-all policy:
# This GlobalNetworkPolicy uses Calico's CRD
# (https://docs.projectcalico.org/v3.5/reference/calicoctl/resources/globalnetworkpolicy)
apiVersion: projectcalico.org/v3
kind: GlobalNetworkPolicy
metadata:
  name: global-deny-all
spec:
  # order controls the precedence. Calico applies the policy with the lowest value first.
  # Kubernetes NetworkPolicy does not support order. They are automatically converted to an order
  # value of 1000 by Calico. Setting this value to 2000, provides flexibility for 999 additional
  # GlobalNetworkPolicies to be added and ensures Kubernetes namespace-scoped policies always take
  # precedence.
  order: 2000
  types:
    - Ingress
    - Egress

  # egress network rules
  egress:
    # Allow all egress traffic from kube-system.
    - action: Allow
      destination: {}
      source:
        namespaceSelector: name == 'kube-system'

    # Allow egress DNS traffic to any destination.
    - action: Allow
      protocol: UDP
      destination:
        nets:
          - 0.0.0.0/0
        ports:
          - 53

  # ingress network rules
  ingress:
    # Allow all ingress traffic for the kube-system namespace.
    - action: Allow
      destination:
        namespaceSelector: name == 'kube-system'
      source: {}
The policy above denies all pod network traffic by default, except for workloads in kube-system and DNS communications (UDP:53). With this in place, a namespace could open up ingress traffic to port 80 for any workload in it, by adding the following NetworkPolicy:
apiVersion: networking.k8s.io/v1
kind: NetworkPolicy
metadata:
  name: team-netpol
  namespace: org-1
spec:
  podSelector: {}
  policyTypes:
    - Ingress
    - Egress
  ingress:
    # allow all inbound traffic on port 80
    - from:
      ports:
        - protocol: TCP
          port: 80
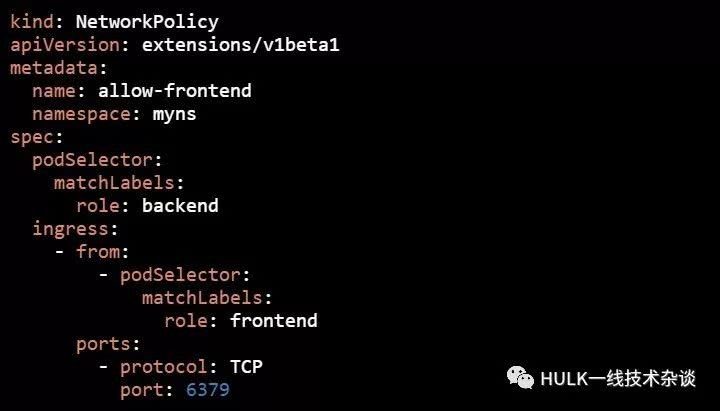
指定pod标签访问
我们要对namespace为myns,带有"role: backend"标签的所有pod进行访问控制:只允许标签为"role: frontend"的Pod,并且TCP端口为6379的数据流入,其他流量都不允许。
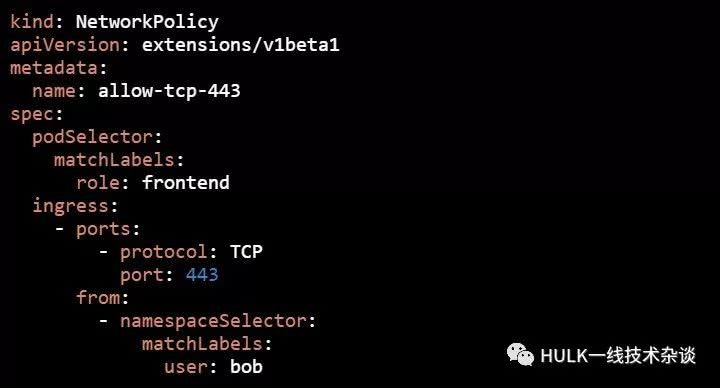
指定namespaces标签访问
我们要对标签为"role: frontend"的所有Pod进行访问控制:只允许namespace标签为"user: bob"的各Pod,并且TCP端口为443的数据流入,其他流量都不允许。
1. Reject All
apiVersion: networking.k8s.io/v1
kind: NetworkPolicy
metadata:
  name: deny-all-egress
  namespace: cs1
  #Apply to cs1 namespace, do not write namespace to default
spec:
  podSelector: {}
  ingress:
  egress:
  #Define the outbound rule. No policy is written here to deny it all.
  policyTypes:
  - Egress
  - Ingress
  #If you have Egress, you will define an outbound rule. If you do not write Egress, you will have the default pass. Ingress is inbound in the same way
  #It's recommended that you write both and use "podSelector:" to control passage
2. Allow All
apiVersion: networking.k8s.io/v1
kind: NetworkPolicy
metadata:
  name: allow-all-egress
  namespace: cs1
spec:
  podSelector: {}
  ingress:
  - {}
  #This means that all traffic is allowed in the "ingress" direction
  egress:
  - {}
  #This means that all traffic is allowed in the "egress" direction
  policyTypes:
  - Egress
  - Ingress
This network policy only works with namespaces and the host is still accessible
3. Scope of action
apiVersion: networking.k8s.io/v1
kind: NetworkPolicy
metadata:
  name:  deny-all
  namespace: default
  #Act only on default namespace
spec:
  podSelector:
  #Match the pod range if it matches all the POD inputs'{}'for that namespace
    matchLabels:
      access: "true"
      #Label with access=true in matching POD
  policyTypes:
  - Ingress
  - Egress
  ingress:
  egress:
4. Restrict IP Policy

#IP for each cs container shown above
apiVersion: networking.k8s.io/v1
kind: NetworkPolicy
metadata:
  name:  deny-all
spec:
  podSelector: {}
  policyTypes:
  - Egress
  - Ingress
  ingress:
  egress:
    - to:
    #Note: egress uses to, ingress uses from
      - ipBlock:
          cidr: 192.168.0.0/16
          #Release 192.168.0.0/16 Network
          except:
          - 192.168.94.134/32
          #But do not include this ip
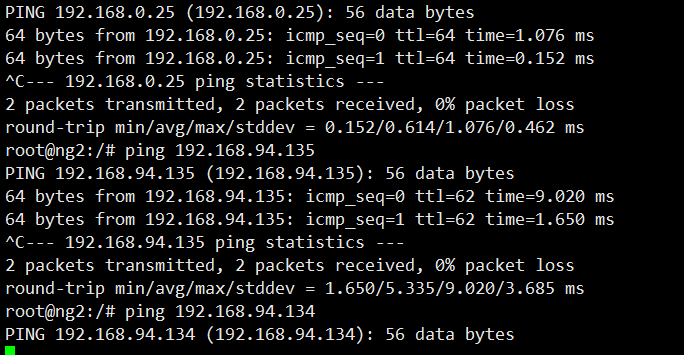
Exc entering pod can see ping192.168.94.134 This IP is not available
5. Namespace label restrictions
apiVersion: networking.k8s.io/v1
kind: NetworkPolicy
metadata:
  name: namespace-allow
  namespace: default
spec:
  policyTypes: ["Ingress"]
  podSelector: {}
  ingress:
   - from:
     - namespaceSelector:
        matchLabels:
          name: cs1
                    #Indicates that only namespaces typed "name=cs1" are allowed to enter
6. Multiple conditions are satisfied based on namespace label restrictions
apiVersion: networking.k8s.io/v1
kind: NetworkPolicy
metadata:
  name: namespace-allow
  namespace: default
spec:
  policyTypes: ["Ingress","Egress"]
  podSelector: {}
  ingress:
  - from:
    - namespaceSelector:
        matchExpressions:
        - key: name
          operator: In
          values: ["cs1","cs2"]
          #The default namespace ingress can be communicated within brackets
                    #Indicates that the namespace has the label name=cs1,name=cs2 to communicate with the default namespace
7 based on pod label
apiVersion: networking.k8s.io/v1
kind: NetworkPolicy
metadata:
  name: namespace-allow
  namespace: default
spec:
  policyTypes: ["Ingress"]
  podSelector: {}
  ingress:
  - from:
    - podSelector:
        matchLabels:
          access: "true"
   #Allow pod notes to have access=true traffic
In addition to the finite number of selectors united by some label, you can define broader rules such as “Allow/Deny everything/to all” in different variations. For this, the following expressions are used:
podSelector: {}
  ingress: []
  policyTypes:
  - Ingress
In the above example, all pods of an environment are blocked from incoming traffic. You can achieve the opposite behavior with this expression:
podSelector: {}
  ingress:
  - {}
  policyTypes:
  - Ingress
And here is the same expression for denying outgoing traffic:
podSelector: {}
  policyTypes:
  - Egress
To allow it, use:
podSelector: {}
  egress:
  - {}
  policyTypes:
  - Egress
Using Calico
In the general case of plain vanilla Kubernetes, installing the CNI boils down to applying (kubectl apply -f) the calico.yaml manifest downloaded from the official site of the project.
Usually, the most recent version of the plugin is compatible with at least 2–3 latest versions of Kubernetes. Its reliable operation in older versions isn’t tested and is not guaranteed. According to developers, Calico supports Linux kernels starting with 3.10 running under CentOS 7, Ubuntu 16, or Debian 8 with iptables/IPVS as a basis.
Isolation inside the environment
For general understating, let’s consider an elemental case to see how Calico network policies differ from regular ones and how the approach to composing rules improves their readability and configuration flexibility.
We have two web applications in the cluster, Node.js-based and PHP-based. One of them uses a Redis database. To prevent access to Redis from PHP while preserving connectivity with Node.js, you can apply the following policy:
kind: NetworkPolicy
apiVersion: networking.k8s.io/v1
metadata:
  name: allow-redis-nodejs
spec:
  podSelector:
    matchLabels:
      service: redis
  ingress:
  - from:
    - podSelector:
        matchLabels:
          service: nodejs
    ports:
    - protocol: TCP
      port: 6379
Essentially, we allowed incoming traffic from Node.js to the Redis port. We did not block the rest of the traffic explicitly. However, once we define the NetworkPolicy, all the selectors mentioned in it become isolated (unless we specify otherwise). At the same time, isolation rules do not apply to objects which are not covered by the selector.
In our example, we use out-the-box Kubernetes apiVersion, but you can use the same resource from Calico. The syntax is more detailed there, so you need to rewrite the rule for the above case in the following form:
apiVersion: crd.projectcalico.org/v1
kind: NetworkPolicy
metadata:
  name: allow-redis-nodejs
spec:
  selector: service == 'redis'
  ingress:
  - action: Allow
    protocol: TCP
    source:
      selector: service == 'nodejs'
    destination:
      ports:
      - 6379
The above expressions for allowing or denying all traffic via the regular NetworkPolicy API contain constructions with curly/square brackets, challenging for perceiving and remembering. In the case of Calico, you can easily alter the logic of a firewall rule to the opposite by replacing action: Allow with action: Deny.
Isolation through environments
Now, suppose that an application generates business metrics for collecting them in Prometheus and further analysis with Grafana. Metrics might include some sensitive data that is unprotected and is available for all to see by default. Let’s protect that data:
Usually, Prometheus runs in a separate service environment. In our example, we have the following namespace:
apiVersion: v1
kind: Namespace
metadata:
  labels:
    module: prometheus
  name: kube-prometheus
The metadata.labels field plays an important role here. As mentioned above, namespaceSelector (as well as podSelector) works with labels. Therefore, you have to add a new label (or use the existing one) to enable collecting metrics from all pods on a particular port, and then apply a configuration like that:
apiVersion: networking.k8s.io/v1
kind: NetworkPolicy
metadata:
  name: allow-metrics-prom
spec:
  podSelector: {}
  ingress:
  - from:
    - namespaceSelector:
        matchLabels:
          module: prometheus
    ports:
    - protocol: TCP
      port: 9100
And in the case of Calico policies, the syntax would be as it follows:
apiVersion: crd.projectcalico.org/v1
kind: NetworkPolicy
metadata:
  name: allow-metrics-prom
spec:
  ingress:
  - action: Allow
    protocol: TCP
    source:
      namespaceSelector: module == 'prometheus'
    destination:
      ports:
      - 9100
Basically, by adding this kind of policy customized to specific needs, you can protect yourself against malicious or accidental interference in the operation of applications in the cluster.
Calico developers adhere to the Default Deny principle, meaning that all traffic is denied by default unless explicitly allowed. They articulate their position in the official documentation (others follow a similar approach, as is evident in the already mentioned article).
Using Calico’s extended set of objects
I want to remind you that the extended Calico API allows you to control the accessibility of nodes and not just pods. In the following example, we will block the passing of ICMP requests in the cluster (e.g., pings from a pod to a node or vice versa; pings between pods) using GlobalNetworkPolicy:
apiVersion: crd.projectcalico.org/v1
kind: GlobalNetworkPolicy
metadata:
  name: block-icmp
spec:
  order: 200
  selector: all()
  types:
  - Ingress
  - Egress
  ingress:
  - action: Deny
    protocol: ICMP
  egress:
  - action: Deny
    protocol: ICMP
In the above case, the cluster nodes are still able to reach each other over ICMP. You can solve that problem by applying GlobalNetworkPolicy to the HostEndpoint resource:
apiVersion: crd.projectcalico.org/v1
kind: GlobalNetworkPolicy
metadata:
  name: deny-icmp-kube-02
spec:
  selector: "role == 'k8s-node'"
  order: 0
  ingress:
  - action: Allow
    protocol: ICMP
  egress:
  - action: Allow
    protocol: ICMP
---
apiVersion: crd.projectcalico.org/v1
kind: HostEndpoint
metadata:
  name: kube-02-eth0
  labels:
    role: k8s-node
spec:
  interfaceName: eth0
  node: kube-02
  expectedIPs: ["192.168.2.2"]
The case with VPN
Finally, here is another real-life example from our (Flant) experience of using Calico features in the case of out-of-the-cluster interaction when the standard policy set is not enough. Clients use a VPN tunnel to access a web application. We exercise strict controls over that access and limit the list of authorized services:

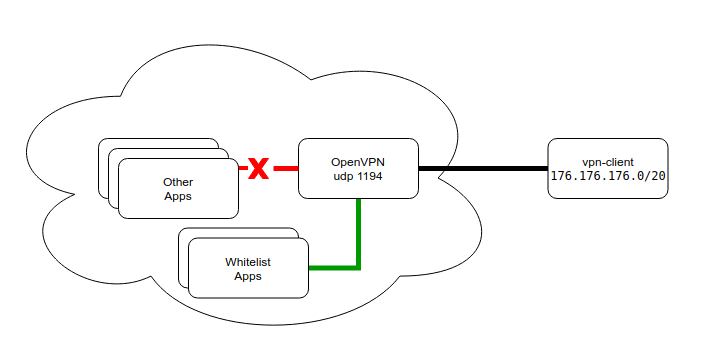
Clients connect to a VPN at the standard UDP port (1194). After successful connection, they receive routes to cluster subnets of pods and services. Subnets are fully pushed to ensure the operation of services in the case of restarts and address changes.
The port in the configuration is the standard one, which brings some intricacies to the process of configuring an application and deploying it to the Kubernetes cluster. For example, in AWS, the UDP LoadBalancer was introduced only at the end of last year in a limited set of regions. At the same time, you cannot use NodePort because it is forwarded to all cluster nodes and unable to scale the number of server instances for improving fault tolerance. Also, you would have to alter the default port range.
We have analyzed all possible solutions and settled on the following one:
- VPN pods are scheduled to the node in the
hostNetworkmode (i.e., on actual IP addresses). - The service is exposed outside through the ClusterIP. Then, we configure a port on the node that is accessible from the outer world… but with some reservations (such as the presence of a real IP address).
- Identifying the node where the pod has been started is beyond the scope of this article. For example, you can explicitly attach a service to a node or to implement a basic sidecar service that will be tracking the current IP address of the VPN service and making adjustments to clients’ DNS records — the specific implementation depends on your imagination and needs.
From the routing standpoint, we can unambiguously identify the client behind the VPN by its IP address issued by the VPN server. Below is a basic example of limiting access to services for such a client (the case with Redis):
apiVersion: crd.projectcalico.org/v1
kind: HostEndpoint
metadata:
  name: vpnclient-eth0
  labels:
    role: vpnclient
    environment: production
spec:
  interfaceName: "*"
  node: kube-02
  expectedIPs: ["172.176.176.2"]
---
apiVersion: crd.projectcalico.org/v1
kind: GlobalNetworkPolicy
metadata:
  name: vpn-rules
spec:
  selector: "role == 'vpnclient'"
  order: 0
  applyOnForward: true
  preDNAT: true
  ingress:
  - action: Deny
    protocol: TCP
    destination:
      ports: [6379]
  - action: Allow
    protocol: UDP
    destination:
      ports: [53, 67]
Here, we prohibit connections to the port 6379 while preserving operability of the DNS service (functionality of which often suffers when defining the rules). As I previously mentioned, once a selector appears, a restrictive policy is applied to it by default (unless specified otherwise).
Network policies
Network policies are Kubernetes resources that control the traffic between pods and/or network endpoints. They uses labels to select pods and specify the traffic that is directed toward those pods using rules. Most CNI plugins support the implementation of network policies, however, if they don’t and we create a NetworkPolicy, then that resource will be ignored.
The most popular CNI plugins with network policy support are:
- Weave
- Calico
- Cilium
- Kube-router
- Romana
Now let’s examine network policies in greater detail. In Kubernetes, pods are capable of communicating with each other and will accept traffic from any source, by default. With NetworkPolicy we can add traffic restrictions to any number of selected pods, while other pods in the namespace (those that go unselected) will continue to accept traffic from anywhere. The NetworkPolicy resource has mandatory fields such as apiVersion, kind, metadata and spec. Its spec field contains all those settings which define network restrictions within a given namespace:
podSelectorselects a group of pods for which the policy appliespolicyTypesdefines the type of traffic to be restricted (inbound, outbound, both)ingressincludes inbound traffic whitelist rulesegressincludes outbound traffic whitelist rules
In order to go into further detail, let’s analyze three basic network policies
Deny all traffic in the default namespace
To use the default deny policy, you must create a policy which isolates all the pods in a selected namespace.
 1apiVersion: networking.k8s.io/v1
 2kind: NetworkPolicy
 3metadata:
 4  name: deny-all
 5  namespace: default
 6spec:
 7  podSelector: {}
 8  policyTypes:
 9  - Ingress
10  - Egress
Since this resource defines both policyTypes (ingress and egress), but doesn’t define any whitelist rules, it blocks all the pods in the default namespace from communicating with each other.
Note that allowing pods to communicate is straightforward, since we haven’t defined a default
NetworkPolicy.
We can also define an allow all policy which overrides the previous deny all policy.
Allow all traffic in the default namespace
 1apiVersion: networking.k8s.io/v1
 2kind: NetworkPolicy
 3metadata:
 4  name: allow-all
 5  namespace: default
 6spec:
 7  podSelector: {}
 8  policyTypes:
 9  - Ingress
10  - Egress
11  ingress: {}
12  egress: {}
As this resource defines both ingress and egress whitelist rules for all traffic, the pods in the default namespace can now communicate with each other.
Simple namespace isolation
 1apiVersion: networking.k8s.io/v1
 2kind: NetworkPolicy
 3metadata:
 4  name: isolate-namespace
 5  namespace: default
 6spec:
 7  podSelector: {}
 8  policyTypes:
 9  - Ingress
10  - Egress
11  ingress:
12  - from:
13    - namespaceSelector:
14        matchLabels:
15          nsname: default
16  egress:
17  - to:
18    - namespaceSelector:
19        matchLabels:
20          nsname: default
In this case, the pods within the default namespace are isolated and they can communicate only with pods in the namespace which are labeled nsname=default.
kubectl label ns default nsname=defaultSo pods in the default namespace with the label nsname=default can also communicate with each other.
Now that we’ve got a handle on what network policies are, and on some of the basics of how they work, let’s take an even closer look.
Anatomy of a network policy
First, there are couple of mandatory fields, such as:
1apiVersion: networking.k8s.io/v1
2kind: NetworkPolicy
3metadata:
4  name: db-connection
5  namespace: default
Keeping that in mind, let’s isolate some pods. We’re going to isolate pods which have the label role=db:
 6spec:
 7  podSelector:
 8    matchLabels:
 9      role: db
10  policyTypes:
11  - Ingress
12  - Egress
Now that we have an understanding of how to isolate pods, we’ll add some ingress rules.
Here’s how to add an ingress rule that allows connections to any pod labeled role=db in default namespace:
- to demonstrate how this works, we’ll be allowing all connections from ipblock
172.17.0.0/16except ipblock172.17.1.0/24
13  ingress:
14  - from:
15    - ipBlock:
16        cidr: 172.17.0.0/16
17        except:
18 - 172.17.1.0/24- and from any pod in the namespace which has the label
nsname=allowedns
19    - namespaceSelector:
20        matchLabels:
21 nsname: allowedns- now, from any pod in
defaultwith the labelrole=frontend
22    - podSelector:
23        matchLabels:
24 role: frontend- and on TCP port
3306
25    ports:
26    - protocol: TCP
27      port: 3360
Since we’ve had an opportunity to explore and digest ingress rules, let’s move on to those that govern egress.
You can add egress rules to allow connections from any pod labeled role=db in namespace default: so let’s follow a roughly parallel route of exploration to that above, adding more and more rules.
- to ipblock
10.0.0.0/24
28  egress:
29  - to:
30    - ipBlock:
31 cidr: 10.0.0.0/24- on TCP port
8000
32    ports:
33    - protocol: TCP
34      port: 8000
OK, now that we have a good understanding of how network policies work, let’s try putting them into action.
Demo time
1. Start a Kubernetes cluster on your laptop
The easiest way to test network policies is to start a single or multi node CNCF certified K8s cluster in Vagran, using the Banzai Cloud’s PKE - default installation uses the Weave network plugin, so supports NetworkPolicy out-of-the-box.
If you plan to use Minikube with its default settings, the NetworkPolicy resources will have no effect due to the absence of a network plugin and you’ll have to start it with --network-plugin=cni.
minikube start --network-plugin=cni --memory=4096Once that’s accomplished, you have to install the correct Cilium DaemonSet.
kubectl create -f https://raw.githubusercontent.com/cilium/cilium/HEAD/examples/kubernetes/1.14/cilium-minikube.yamlThat’s it. Now you should have a NetworkPolicy resource in Minikube.
2. Deploy some test pods
kubectl run --generator=run-pod/v1 busybox1 --image=busybox -- sleep 3600
kubectl run --generator=run-pod/v1 busybox2 --image=busybox -- sleep 3600
kubectl get po -o wide
NAME READY STATUS RESTARTS AGE IP NODE NOMINATED NODE READINESS GATES
busybox1 1/1 Running 0 25m 10.1.235.88 minikube <none> <none>
busybox2 1/1 Running 0 25m 10.1.14.240 minikube <none> <none>3. Create a deny-all policy
cat << EOF > deny-all.yaml
apiVersion: networking.k8s.io/v1
kind: NetworkPolicy
metadata:
  name: deny-all
  namespace: default
spec:
  podSelector: {}
  policyTypes:
  - Ingress
  - Egress
EOF
kubectl create -f deny-all.yaml
kubectl exec -ti busybox2 -- ping -c3 10.1.235.88
PING 10.1.235.88 (10.1.235.88): 56 data bytes
--- 10.1.235.88 ping statistics ---
3 packets transmitted, 0 packets received, 100% packet loss
command terminated with exit code 1As you can see, you can no longer ping the nodes in the cluster.
4. Create an allow-out-to-in policy, and add labels to pods
cat << EOF > allow-out-to-in.yaml
apiVersion: networking.k8s.io/v1
kind: NetworkPolicy
metadata:
  name: allow-out-to-in
  namespace: default
spec:
  podSelector: {}
  ingress:
  - from:
    - podSelector:
        matchLabels:
          test: out
  egress:
  - to:
    - podSelector:
        matchLabels:
          test: in
  policyTypes:
  - Ingress
  - Egress
EOF
To isolate all pods in namespace default:
- allow traffic from pods in namespace
defaultwith the labeltest=out - allow traffic to pods in namespace
defaultwith the labeltest=in
Now let’s deploy our NetworkPolicy and add some labels to our pods:
kubectl crate -f allow-out-to-in.yaml
kubectl label pod busybox1 test=in
kubectl label pod busybox2 test=out
kubectl exec -ti busybox2 -- ping -c3  10.1.235.88
PING 10.1.235.88 (10.1.235.88): 56 data bytes
64 bytes from 10.1.235.88: seq=0 ttl=63 time=0.128 ms
64 bytes from 10.1.235.88: seq=1 ttl=63 time=0.254 ms
64 bytes from 10.1.235.88: seq=2 ttl=63 time=0.204 ms

--- 10.1.235.88 ping statistics ---
3 packets transmitted, 3 packets received, 0% packet loss
round-trip min/avg/max = 0.128/0.195/0.254 ms
We can now ping from the pod labeled test=out to the pod labeled test=in. Now let’s refocus our attention on an example we’d be more likely to encounter in the real world.
A more realistic example
In this example we’ll have one db, one backend and one frontend service. The database will accept connections from the backend, the backend will accept connections from the frontend, and the frontend from any pod in the staging namespace. All our services will accept connections from the admin namespace.

To clean our network policies in namespace default, and create two namespaces:
kubectl delete networkpolicy --all
kubectl create ns staging
kubectl create -f - << EOF
apiVersion: v1
kind: Namespace
metadata:
  name: admin
  labels:
    role: admin
EOF
Create pods and services
kubectl create -f - << EOF
apiVersion: v1
kind: Pod
metadata:
  name: frontend
  namespace: staging
  labels:
    role: frontend
spec:
  containers:
  - name: nginx
    image: nginx
    ports:
    - name: http
      containerPort: 80
      protocol: TCP
---
apiVersion: v1
kind: Service
metadata:
  name: frontend
  namespace: staging
  labels:
    role: frontend
spec:
  selector:
    role: frontend
  ports:
  - protocol: TCP
    port: 80
    targetPort: http
---
apiVersion: v1
kind: Pod
metadata:
  name: backend
  namespace: staging
  labels:
    role: backend
spec:
  containers:
  - name: nginx
    image: nginx
    ports:
    - name: http
      containerPort: 80
      protocol: TCP
---
apiVersion: v1
kind: Service
metadata:
  name: backend
  namespace: staging
  labels:
    role: backend
spec:
  selector:
    role: backend
  ports:
  - protocol: TCP
    port: 80
    targetPort: http
---
apiVersion: v1
kind: Pod
metadata:
  name: db
  namespace: staging
  labels:
    role: db
spec:
  containers:
  - name: postgres
    image: postgres
    ports:
    - name: postgres
      containerPort: 5432
      protocol: TCP
---
apiVersion: v1
kind: Service
metadata:
  name: db
  namespace: staging
  labels:
    role: db
spec:
  selector:
    role: db
  ports:
  - protocol: TCP
    port: 5432
    targetPort: postgres
EOF
Let’s create out network policies:
kubectl create -f - << EOF
apiVersion: networking.k8s.io/v1
kind: NetworkPolicy
metadata:
  name: staging.db
  namespace: staging
spec:
  podSelector:
    matchLabels:
      role: db
  ingress:
  - from:
    - podSelector:
        matchLabels:
          role: backend
    - namespaceSelector:
        matchLabels:
          role: admin
    ports:
    - protocol: TCP
      port: 5432
  policyTypes:
  - Ingress
---
apiVersion: networking.k8s.io/v1
kind: NetworkPolicy
metadata:
  name: staging.backend
  namespace: staging
spec:
  podSelector:
    matchLabels:
      role: backend
  ingress:
  - from:
    - podSelector:
        matchLabels:
          role: frontend
    - namespaceSelector:
        matchLabels:
          role: admin
    ports:
    - protocol: TCP
      port: 80
  policyTypes:
  - Ingress
---
apiVersion: networking.k8s.io/v1
kind: NetworkPolicy
metadata:
  name: staging.frontend
  namespace: staging
spec:
  podSelector:
    matchLabels:
      role: frontend
  ingress:
  - from:
    - podSelector: {}
    - namespaceSelector:
        matchLabels:
          role: admin
    ports:
    - protocol: TCP
      port: 80
  policyTypes:
  - Ingress
EOF
Let’s check the frontend and backend services from the staging namespace.
kubectl run --namespace=staging --generator=run-pod/v1 curl --image=pstauffer/curl -- sleep 3600
kubectl exec -ti curl -n staging -- curl frontend.staging.svc.cluster.local:80
...
<title>Welcome to nginx!</title>
...
kubectl exec -ti curl -n staging -- curl backend.staging.svc.cluster.local:80 --max-time 5
curl: (28) Connection timed out after 5001 milliseconds
command terminated with exit code 28
The frontend service is reachable from any pod in the staging namespace but the backend service is not.
Now let’s check the backend service from the admin namespace.
kubectl run --namespace=admin --generator=run-pod/v1 curl --image=pstauffer/curl -- sleep 3600
kubectl exec -ti curl -n admin -- curl backend.staging.svc.cluster.local:80
...
<title>Welcome to nginx!</title>
...
As you can see the backend service is reachable from the admin namespace.
Check the db service from the admin namespace.
kubectl run --namespace=admin --generator=run-pod/v1 pclient --image=jbergknoff/postgresql-client -- -h db.staging.svc.cluster.local -U postgres -p 5432 -d postgres -c "\l"
kubectl logs pclient -n admin
                                 List of databases
   Name    |  Owner   | Encoding |  Collate   |   Ctype    |   Access privileges
-----------+----------+----------+------------+------------+-----------------------
 postgres  | postgres | UTF8     | en_US.utf8 | en_US.utf8 |
 template0 | postgres | UTF8     | en_US.utf8 | en_US.utf8 | =c/postgres          +
           |          |          |            |            | postgres=CTc/postgres
 template1 | postgres | UTF8     | en_US.utf8 | en_US.utf8 | =c/postgres          +
           |          |          |            |            | postgres=CTc/postgres
(3 rows)
You may be wondering, how does this simple example work when running Kubernetes in the cloud?
Network policies and provider managed K8s (including our own PKE)
Amazon EKS
We’ll try one of the exercises above on EKS. If you’d like to deploy an EKS cluster, the easiest way to do it is by using Pipeline.
To deploy our test pods:
kubectl run --generator=run-pod/v1 busybox1 --image=busybox -- sleep 3600
kubectl run --generator=run-pod/v1 busybox2 --image=busybox -- sleep 3600
Check the IP addresses:
kubectl get po -o wide
NAME       READY   STATUS    RESTARTS   AGE   IP               NODE                                           NOMINATED NODE
busybox1   1/1     Running   0          17m   192.168.76.157   ip-192-168-65-145.us-east-2.compute.internal   <none>
busybox2   1/1     Running   0          16m   192.168.64.133   ip-192-168-65-207.us-east-2.compute.internal   <none>
Deploy your deny-all policy and run a test:
kubectl create -f deny-all.yaml
kubectl exec -ti busybox2 -- ping -c3 192.168.76.157
PING 192.168.76.157 (192.168.76.157): 56 data bytes
64 bytes from 192.168.76.157: seq=0 ttl=253 time=0.341 ms
64 bytes from 192.168.76.157: seq=1 ttl=253 time=0.308 ms
64 bytes from 192.168.76.157: seq=2 ttl=253 time=0.354 ms

--- 192.168.76.157 ping statistics ---
3 packets transmitted, 3 packets received, 0% packet loss
round-trip min/avg/max = 0.308/0.334/0.354 ms
As you can see, EKS doesn’t support NetworkPolicy by default. Thus, we will have to deploy a Calico DaemonSet:
kubectl apply -f https://raw.githubusercontent.com/aws/amazon-vpc-cni-k8s/master/config/v1.4/calico.yamlLet’s take a look:
kubectl get daemonset calico-node --namespace kube-system
NAME          DESIRED   CURRENT   READY   UP-TO-DATE   AVAILABLE   NODE SELECTOR                 AGE
calico-node   2         2         2       2            2           beta.kubernetes.io/os=linux   19m
Now let’s give it another try:
kubectl exec -ti busybox1 -- ping -c3 192.168.76.157
PING 192.168.76.157 (192.168.76.157): 56 data bytes

--- 192.168.64.157 ping statistics ---
3 packets transmitted, 0 packets received, 100% packet loss
command terminated with exit code 1
This time our deny-all policy funcitons properly.
Let’s try our allow-out-to-in policy:
kubectl label pod busybox1 test=in
kubectl label pod busybox2 test=out
kubectl apply -f allow-from-out-to-in.yaml
kubectl exec -ti busybox2 -- ping -c3 192.168.76.157
PING 192.168.76.157 (192.168.76.157): 56 data bytes
64 bytes from 192.168.76.157: seq=0 ttl=253 time=0.327 ms
64 bytes from 192.168.76.157: seq=1 ttl=253 time=0.353 ms
64 bytes from 192.168.76.157: seq=2 ttl=253 time=0.264 ms

--- 192.168.76.157 ping statistics ---
3 packets transmitted, 3 packets received, 0% packet loss
round-trip min/avg/max = 0.264/0.314/0.353 ms
It works fine as well.
Google GKE
We can do something similar on GKE. Again, the easiest way to proceed is by using Pipeline.
First, deploy some test pods and create a deny-all policy:
kubectl run --generator=run-pod/v1 busybox1 --image=busybox -- sleep 3600
kubectl run --generator=run-pod/v1 busybox2 --image=busybox -- sleep 3600
kubectl create -f deny-all.yaml
Then check our pods’ IP addresses:
kubectl get po  -o wide
NAME       READY   STATUS    RESTARTS   AGE   IP          NODE                                           NOMINATED NODE
busybox1   1/1     Running   0          16m   10.48.2.3   gke-gkenetworkpolicytest-pool1-be61d694-b955   <none>
busybox2   1/1     Running   0          26m   10.48.0.9   gke-gkenetworkpolicytest-pool2-ae162894-996p   <none>
kubectl exec -ti busybox1 -- ping -c3  10.48.0.9
PING 10.48.0.9 (10.48.0.9): 56 data bytes
64 bytes from 10.48.0.9: seq=0 ttl=62 time=1.498 ms
64 bytes from 10.48.0.9: seq=1 ttl=62 time=0.308 ms
64 bytes from 10.48.0.9: seq=2 ttl=62 time=0.272 ms

--- 10.48.0.9 ping statistics ---
3 packets transmitted, 3 packets received, 0% packet loss
round-trip min/avg/max = 0.272/0.692/1.498 ms
As you can see, the deny-all policy has had no effect. Why? When using Google GKE we have to create a cluster with the --enable-network-policy flag:
gcloud container clusters create networkpolicytest --enable-network-policy
NAME               LOCATION    MASTER_VERSION  MASTER_IP       MACHINE_TYPE   NODE_VERSION  NUM_NODES  STATUS
networkpolicytest  us-east1-b  1.12.8-gke.6    104.196.128.76  n1-standard-1  1.12.8-gke.6  3          RUNNING
Getting cluster credentials:
gcloud container clusters get-credentials networkpolicytest --zone us-east1 --project <project-name>
What’s changed?
kubectl get daemonset calico-node --namespace kube-system
NAME          DESIRED   CURRENT   READY   UP-TO-DATE   AVAILABLE   NODE SELECTOR                     AGE
calico-node   3         3         3       3            3           projectcalico.org/ds-ready=true   3m58s
Well, now we’ve enabled the network policy.
kubectl run --generator=run-pod/v1 busybox1 --image=busybox -- sleep 3600
kubectl run --generator=run-pod/v1 busybox2 --image=busybox -- sleep 3600
kubectl create -f deny-all.yaml
kubectl exec -ti busybox2 -- ping -c3  10.4.2.3
PING 10.4.2.3 (10.4.2.3): 56 data bytes

--- 10.4.2.3 ping statistics ---
3 packets transmitted, 0 packets received, 100% packet loss
command terminated with exit code 1
And the deny-all policy is working.
Banzai Cloud PKE on AWS
As mentioned, we have our own CNCF certified Kubernetes distribution, PKE. When starting PKE on Vagrant (as suggested at the beginning of this post) or launching it on one of our supported cloud providers, it’s possible to jump straight to the deploying of pods. You can install PKE on AWS, automated by Pipeline.
kubectl run --generator=run-pod/v1 busybox1 --image=busybox -- sleep 3600
kubectl run --generator=run-pod/v1 busybox2 --image=busybox -- sleep 3600
kubectl create -f deny-all.yaml
kubectl exec -ti busybox2 -- ping -c3  10.20.160.2
PING 10.4.2.3 (10.4.2.3): 56 data bytes

--- 10.4.2.3 ping statistics ---
3 packets transmitted, 0 packets received, 100% packet loss
command terminated with exit code 1
Why does it work on PKE out-of-the-box?
kubectl get daemonset weave-net -n kube-system
NAME        DESIRED   CURRENT   READY   UP-TO-DATE   AVAILABLE   NODE SELECTOR   AGE
weave-net   4         4         4       4            4           <none>          44m
PKE uses Weave’s network plugin (this is by default, but PKE supports Calico as well), and thus supports NetwportPolicy out-of-the-box.


 浙公网安备 33010602011771号