【firecracker】系统启动与epoll事件循环
吴斌的博客 » 【firecracker】系统启动与epoll事件循环
在分析完firecracker虚拟机中各个子系统的运行时原理和初始化流程后,最后我们整体分析一下firecracker的系统启动过程,并重点分析IO线程(fc_vmm)所采用的epoll事件循环框架。
回顾首文中介绍的firecracker进程的线程模型,下图展示了线程间的事件通知关系:
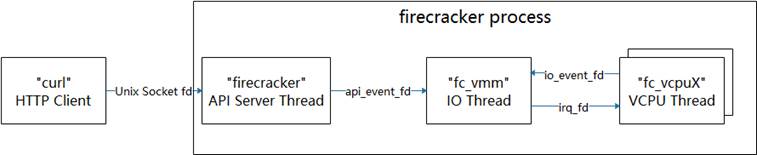
firecracker进程的主线程在启动完成后会成为API Server Thread,它通过进程间socket句柄与外部HTTP Client进行通信,接收外部程序发送的配置或控制命令(回顾一下使用方法);API Server Thread收到外部命令后通过api_event_fd向IO Thread发送请求,由IO Thread完成实际的处理动作;当虚拟机正常启动后,IO Thread主要通过io_event_fd接受来自虚拟CPU的IO请求,并在完成IO请求后通过irq_fd通知CPU处理结果。
接下来,我们从main函数开始,逐步分析一下系统的启动过程。
firecracker/src/main.rs:

fn main() {
    …
    let shared_info = Arc::new(RwLock::new(InstanceInfo {      // InstanceInfo对象是主线程和fc_vmm线程之间的共享对象
                                                               //     Arc是Rust标准库提供的原子引用类型,跟踪多个线程对相同
                                                               //     对象的引用计数;RwLock是Rust标准库提供的读写锁
        state: InstanceState::Uninitialized,
        id: instance_id,
        vmm_version: crate_version!().to_string(),
    }));
    let mmds_info = MMDS.clone();
    let (to_vmm, from_api) = channel();                        // 该channel对象用于在主线程和fc_vmm线程之间传递对象
                                                               //     to_vmm为发送端对象,在主线程中使用;from_api为接收
                                                               //     端,在fc_vmm线程中使用
    let server =
        ApiServer::new(mmds_info, shared_info.clone(), to_vmm) // 创建一个ApiServer对象,用于接收外部程序的HTTP请求
        .expect("Cannot create API server");

    let api_event_fd = server                                  // 申请一个event_fd,用于主线程和fc_vmm线程之间的事件通知
        .get_event_fd_clone()
        .expect("Cannot clone API eventFD.");

    let _vmm_thread_handle =
        vmm::start_vmm_thread(                                 // 正式拉起fc_vmm线程,下文将进一步分析
            shared_info,
            api_event_fd,
            from_api,
            seccomp_level);

    match server.bind_and_run(                                 // 主线程开始作为API Server线程,监听socket请求
        bind_path, start_time_us,
        start_time_cpu_us, seccomp_level) {
        …
    }
}


firecracker/vmm/src/lib.rs:

pub fn start_vmm_thread(
    api_shared_info: Arc<RwLock<InstanceInfo>>,
    api_event_fd: EventFd,
    from_api: Receiver<Box<VmmAction>>,
    seccomp_level: u32,
    ) -> thread::JoinHandle<()> {
    thread::Builder::new()
        .name("fc_vmm".to_string())                                                           // 将新线程取名为fc_vmm
        .spawn(move || {                                                                      // 创建新线程,参数为新线程入口函数(闭包)
            let mut vmm = Vmm::new(api_shared_info, api_event_fd, from_api, seccomp_level)    // 新线程首先创建全局Vmm对象
                .expect("Cannot create VMM");
            match vmm.run_control() {                                                         // 进入epoll事件循环
                …
            }
        })
        .expect("VMM thread spawn failed.")
}

struct Vmm {                                            // Vmm全局对象
    kvm: KvmContext,                                    // KVM操作上下文

    vm_config: VmConfig,                                // 虚拟机配置,如CPU数、内存大小等
    shared_info: Arc<RwLock<InstanceInfo>>,             // API Server线程与fc_vmm线程共享对象

    // Guest VM core resources.
    guest_memory: Option<GuestMemory>,                  // 虚拟机内存对象
    kernel_config: Option<KernelConfig>,                // 内核配置,如启动命令行参数
    vcpus_handles: Vec<thread::JoinHandle<()>>,         // vCPU线程返回句柄数组
    exit_evt: Option<EpollEvent<EventFd>>,              // 虚拟机退出事件eventfd
    vm: Vm,                                             // 虚拟机对象

    // Guest VM devices.
    mmio_device_manager: Option<MMIODeviceManager>,     // mmio总线管理器
    legacy_device_manager: LegacyDeviceManager,         // legacy总线管理器

    // Device configurations.
    block_device_configs: BlockDeviceConfigs,           // 后端存储块设备配置,供virtio-blk使用
    network_interface_configs: NetworkInterfaceConfigs, // 后端网络接口配置,供virtio-net使用
    …

    epoll_context: EpollContext,                        // epoll事件循环上下文

    // API resources.
    api_event: EpollEvent<EventFd>,                     // 接收API Server线程通知的eventfd
    from_api: Receiver<Box<VmmAction>>,                 // channel接收方,可接收来向API Server线程对象
    …
}

impl Vmm {
    fn new(
        api_shared_info: Arc<RwLock<InstanceInfo>>,
        api_event_fd: EventFd,
        from_api: Receiver<Box<VmmAction>>,
        seccomp_level: u32,
    ) -> Result<Self> {
        let mut epoll_context = EpollContext::new()?;                  // 初始化epoll上下文
        let api_event = epoll_context
            .add_event(api_event_fd, EpollDispatch::VmmActionRequest)  // 将api_event_fd添加到epoll上下,可监听该句柄
            .expect("Cannot add API eventfd to epoll.");

        let block_device_configs = BlockDeviceConfigs::new();          // 初始化存储配置对象
        let kvm = KvmContext::new()?;                                  // 创建KVM上下文
        let vm = Vm::new(kvm.fd()).map_err(Error::Vm)?;                // 创建虚拟机对象

        Ok(Vmm {
            kvm,
            vm_config: VmConfig::default(),
            shared_info: api_shared_info,
            guest_memory: None,
            kernel_config: None,
            vcpus_handles: vec![],
            exit_evt: None,
            vm,
            mmio_device_manager: None,
            legacy_device_manager: LegacyDeviceManager::new().map_err(Error::CreateLegacyDevice)?,
            block_device_configs,
            network_interface_configs: NetworkInterfaceConfigs::new(),
            …
            epoll_context,
            api_event,
            from_api,
            …
        })
    }

    fn run_control(&mut self) -> Result<()> {                                                       // 事件循环框架
        const EPOLL_EVENTS_LEN: usize = 100;

        let mut events = vec![epoll::Event::new(epoll::Events::empty(), 0); EPOLL_EVENTS_LEN];      // 创建一个events数组,用于接收事件

        let epoll_raw_fd = self.epoll_context.epoll_raw_fd;

        'poll: loop {                                                                               // 循环入口
            let num_events = epoll::wait(epoll_raw_fd, -1, &mut events[..]).map_err(Error::Poll)?;  // 通过epoll获知已经发生的事件

            for event in events.iter().take(num_events) {                                           // 针对已经发生的事件依次进行处理
                let dispatch_idx = event.data as usize;                                             // 获知事件dispatch_idx,注册事件时传入
                let evset = match epoll::Events::from_bits(event.events) {                          // 获知具体事件,如POLLIN
                    …
            };

            if let Some(dispatch_type) = self.epoll_context.dispatch_table[dispatch_idx] {          // 根据disptach_idx找到事件类型,注册时填入
                match dispatch_type {
                    EpollDispatch::Exit => {                                                        // 第一类别,退出;VCPU线程退出时产生
                        …
                    }
                    EpollDispatch::Stdin => {                                                       // 第二类型,标准输入;使能串口使注册,接
                                                                                                    // 收标准输入并作为虚拟机串口的输入
                        …
                    }
                    EpollDispatch::DeviceHandler(device_idx, device_token) => {                     // 第三类型,virtio设备IO处理;VCPU通过io_event_fd产生
                        match self
                            .epoll_context
                            .get_device_handler_by_handler_id(device_idx)                            // 首次处理时通过channel获取EpollHandler对象,回顾virtio
                        {                                                                            // 设备的activate流程
                            Ok(handler) => match handler.handle_event(device_token, evset) {         // 调用EpollHandler对象的handle_event函数
                                …
                            },
                            …
                        }
                    }
                    EpollDispatch::VmmActionRequest => {                                             // 第四类型,管理动作;来作API Server线程
                        self.api_event.fd.read().map_err(Error::EventFd)?;
                        self.run_vmm_action().unwrap_or_else(|_| {                                   // 调用run_vmm_action
                            …
                        });
                    }
                    …
                }
            }
        }
    }
}
firecracker启动初期,fc_vmm线程仅对api_event_fd进行监听,即仅能对第四类型事件进行处理。回顾首篇对firecracker使用流程的介绍,我们通过curl工具对firecracker进行kernel、rootfs和虚拟机的配置后,最后通过InstanceStart命令启动虚拟机。这里的配置和启动命令最后都交由fc_vmm的run_vmm_action函数进行处理:
    fn run_vmm_action(&mut self) -> Result<()> {
        let request = match self.from_api.try_recv() {                                    // 从API Server线程接收用户请求
            …
        };

        match request {                                                                    // 根据用户请求类别分别进行处理
            VmmAction::ConfigureBootSource(boot_source_body, sender) => {                  // 内核启动参数配置
                Vmm::send_response(
                    self.configure_boot_source(
                        boot_source_body.kernel_image_path,
                        boot_source_body.boot_args,
                    ),
                    sender,
                );

            }
            …
            VmmAction::InsertBlockDevice(block_device_config, sender) => {                 // 配置存储块设备
                Vmm::send_response(self.insert_block_device(block_device_config), sender);
            }
            VmmAction::InsertNetworkDevice(netif_body, sender) => {                        // 配置网络接口设备
                Vmm::send_response(self.insert_net_device(netif_body), sender);
            }
            …
            VmmAction::StartMicroVm(sender) => {                                           // 配置完成后,启动一个虚拟机
                Vmm::send_response(self.start_microvm(), sender);
            }
            VmmAction::SetVmConfiguration(machine_config_body, sender) => {                // 配置虚拟机CPU和内存等
                Vmm::send_response(self.set_vm_configuration(machine_config_body), sender);
            }
            …
        };
       Ok(())
    }
最后,我们来看一下firecracker虚拟机的启动过程,对各个子系统初始化进行一些串联:
    fn start_microvm(&mut self) -> std::result::Result<VmmData, VmmActionError> {
        …
        self.shared_info
            .write()                                               // 对共享对象加写锁
            .expect("Failed to start microVM because shared info couldn't be written due to poisoned lock")
            .state = InstanceState::Starting;                      // 将虚拟机状态设为Starting,完成后自动解锁(Rust语言特性)

        self.init_guest_memory()?;                                 // 虚拟内存初始化,参考CPU与内存部分

        let vcpus;

        #[cfg(target_arch = "x86_64")]
        {
            self.setup_interrupt_controller()?;                   // 中断控制器初始化,参考时钟与中断部分
            self.attach_virtio_devices()?;                        // 添加virito-blk/net,内部将调用register_virtio_device,参考virtio设备部分
            self.attach_legacy_devices()?;                        // legacy设备初始化,参考legacy设备部分

            let entry_addr = self.load_kernel()?;                 // 加载ELF内核到entry_addr
            vcpus = self.create_vcpus(entry_addr, request_ts)?;   // 创建VCPU,参考CPU与内存部分
        }
        …
        self.configure_system()?;                                 // 配置系统,主要是生成mptable和引导数据头部

        self.register_events()?;                                  // 向epoll事件循环注册退出事件和标准输入事件

        self.start_vcpus(vcpus)?;                                 // 启动虚拟CPU,参考CPU与内存部分

        self.shared_info
            .write()                                              // 重新对共享对象加写锁
            .expect("Failed to start microVM because shared info couldn't be written due to poisoned lock")
            .state = InstanceState::Running;                      // 将虚拟机状态设为Running,代表虚拟机已正常运行!!!
        …
        Ok(VmmData::Empty)
    }
とは言え少し前提知識を
firecrackerは、KVMを使ってVMを作成します。VMMにつき1つのゲストOSだけを持つタイプのVMMのようです。つまり、複数のゲストを立ち上げる場合には、個別にVMMごと起動する、という方式です。Noahを思い出しました。聞いててよかったTuring Complete FM。
ただし、firecrackerのバイナリには、リソースを隔離するための仕組みはないようです。jailerがcgroupsなどを使って、リソース隔離する責務を負っています。そのため、firecracker単体でも起動はできますが、基本は、jailerで隔離した状態でfirecrackerを立ち上げる、というのが想定する使い方のようです。
1つのインスタンスは、3つのスレッドから構成されます。API Server, VMM, vCPU, です。CPUの設定を複数個にすれば、vCPUのスレッドを複数個持つことができます。
ということで、API ServerがHTTPリクエストとしてVMMの制御コマンドを受け付けて、VMMがKVMを制御し、KVMから上がってきたイベントをVMMのハンドラが処理する、という流れで作られていそうです。
ちらっと覗いたとき、deviceは、ネットワークデバイス、ブロックデバイス、シリアル、くらいしかなかったです。
ソースコードは、起動周りを見て、HTTPリクエスト待ちっぽいところにたどり着いたら、リクエストハンドラ実装を見ていく、という方針でソースコードリーディングを進めています。
Cargo.toml
まずは、Cargoの設定ファイルから見てみましょう。
[build]
target = "x86_64-unknown-linux-musl"
musl使ってますね。C言語ライブラリに依存しないバイナリにしているようです。ライブラリとの依存を持ちたくないでしょうし、妥当な感じですね。
Cargo.tomlは思ったより見るものなかったです。panic strategyがabortなことくらいでしょうか。
[profile.release]
lto = true
panic = "abort"
src
では、さっそくsrcから見ていきましょう。
jailerもいますね。
$ tree src/
src/
├── bin
│   └── jailer.rs
└── main.rs
logger
main.rsに移ります。まずは、ロガーの初期化をしています。
fn main() {
    LOGGER
        .init(&"", None, None)
        .expect("Failed to register logger");
...
LOGGERは、logger crateでlazy_staticを使って、定義しています。典型的なグローバルオブジェクトの初期化っぽいです。
ロガーは、複数スレッドからアクセスされるため、排他制御を行うのも当然ですね。
lazy_static! {
    static ref _LOGGER_INNER: Logger = Logger::new();
}

lazy_static! {
    /// Static instance used for handling human-readable logs.
    ///
    pub static ref LOGGER: &'static Logger = {
        set_logger(_LOGGER_INNER.deref()).unwrap();
        _LOGGER_INNER.deref()
    };
}
set_loggerはlog crateの関数です。
pub fn set_logger(logger: &'static Log) -> Result<(), SetLoggerError> {
    set_logger_inner(|| logger)
}

fn set_logger_inner<F>(make_logger: F) -> Result<(), SetLoggerError>
where
    F: FnOnce() -> &'static Log,
{
    unsafe {
        match STATE.compare_and_swap(UNINITIALIZED, INITIALIZING, Ordering::SeqCst) {
            UNINITIALIZED => {
                // make_logger()はloggerのオブジェクトが返るだけ。`|| logger`
                LOGGER = make_logger();
                STATE.store(INITIALIZED, Ordering::SeqCst);
                Ok(())
            }
            INITIALIZING => {
                while STATE.load(Ordering::SeqCst) == INITIALIZING {}
                Err(SetLoggerError(()))
            }
            _ => Err(SetLoggerError(())),
        }
    }
}
set_logger_innerでは、正常ケースにおいて(UNINITIALIZEDのアーム)、compare_and_swapを使って、アトミックにLOGGERの状態を初期化済みに変更します。
LOGGERのオブジェクトを作った後、initで初期化しています。この時の引数は、instance id, log_pipe, metrics_pipeです。
fn main() {
    LOGGER
        .init(&"", None, None)
        .expect("Failed to register logger");
instance idは置いておいて、2つのpipeはログをどこに出力するか、を切り替えるのに利用します。Noneの場合は、stdout/stderrに出力されます。Someでファイルパスを渡すと、そのファイルにログを残すようにします。
これは後ほど、テストで出るため、覚えておきましょう!
次に、SIGSYSのsignal handlerを登録しています。中身を追ってみると、本当にSIGSYSのhandlerを登録しているだけでした。
    // If the signal handler can't be set, it's OK to panic.
    seccomp::setup_sigsys_handler().expect("Failed to register signal handler");
panic hook
次は、panic発生時のフックを登録しています。abortで死ぬ前に、panic発生時のbacktraceがログに残るようになっています。
    // Start firecracker by setting up a panic hook, which will be called before
    // terminating as we're building with panic = "abort".
    // It's worth noting that the abort is caused by sending a SIG_ABORT signal to the process.
    panic::set_hook(Box::new(move |info| {
        // We're currently using the closure parameter, which is a &PanicInfo, for printing the
        // origin of the panic, including the payload passed to panic! and the source code location
        // from which the panic originated.
        error!("Panic occurred: {:?}", info);
        METRICS.vmm.panic_count.inc();

        let bt = Backtrace::new();
        error!("{:?}", bt);

        // Log the metrics before aborting.
        if let Err(e) = LOGGER.log_metrics() {
            error!("Failed to log metrics on abort. {}:?", e);
        }
    }));
このあたりはベアメタルプログラミングで良く書くのでおなじみですね。
panic発生時に渡されるPanicInfoは、プログラムの何行目でpanicになったか、といった情報を含んでいます。backtrace crateのBacktraceインスタンスを作ると、debug出力でbacktraceが取れるみたいです。
この機能に関しては、同ファイル内にユニットテストが書かれています。
まずは、ヘルパー関数です。
#[cfg(test)]
mod tests {
...
    // テストのヘルパー関数
    // log_pathのファイルに、expectationsの文字列3つが含まれているかどうかをテストする
    fn validate_backtrace(
        log_path: &str,
        expectations: &[(&'static str, &'static str, &'static str)],
    ) {
        let f = File::open(log_path).unwrap();
        let reader = BufReader::new(f);
        let mut pass = false;
        let mut expectation_iter = expectations.iter();
        let mut expected_words = expectation_iter.next().unwrap();

        for ln_res in reader.lines() {
            let line = ln_res.unwrap();
            if !(line.contains(expected_words.0)
                && line.contains(expected_words.1)
                && line.contains(expected_words.2))
            {
                continue;
            }
            if let Some(w) = expectation_iter.next() {
                expected_words = w;
                continue;
            }
            pass = true;
            break;
        }
        assert!(pass);
    }
続いて、main関数のテストです。ここでは、panicが発生したときに、backtraceが出力されることをテストしています。
    #[test]
    fn test_main() {
        const FIRECRACKER_INIT_TIMEOUT_MILLIS: u64 = 100;

        // There is no reason to run this test if the default socket path exists.
        assert!(!Path::new(DEFAULT_API_SOCK_PATH).exists());

         // ログを保存するための一時ファイルを作成します。
        let log_file_temp =
            NamedTempFile::new().expect("Failed to create temporary output logging file.");
        let metrics_file_temp =
            NamedTempFile::new().expect("Failed to create temporary metrics logging file.");
        let log_file = String::from(log_file_temp.path().to_path_buf().to_str().unwrap());

        // Start Firecracker in a separate thread
        thread::spawn(|| {
            main();
        });

        // Wait around for a bit, so Firecracker has time to initialize and create the
        // API socket.
        thread::sleep(Duration::from_millis(FIRECRACKER_INIT_TIMEOUT_MILLIS));

        // If Firecracker hasn't finished initializing yet, something is really wrong!
        assert!(Path::new(DEFAULT_API_SOCK_PATH).exists());

        // init()のpipeにSomeを与えているので、指定したログファイルにログを出力します。
        LOGGER
            .init(
                "TEST-ID",
                Some(log_file_temp.path().to_str().unwrap().to_string()),
                Some(metrics_file_temp.path().to_str().unwrap().to_string()),
            ).expect("Could not initialize logger.");

        // panicを起こします。panic発生時、main関数で設定したhook関数が呼ばれ、backtraceがログに出力されます。
        let _ = panic::catch_unwind(|| {
            panic!("Oh, noes!");
        });

        // 期待するbacktraceがログファイルに出力されていることをテストします。
        validate_backtrace(
            log_file.as_str(),
            &[
                // Lines containing these words should have appeared in the log, in this order
                ("ERROR", "main.rs", "Panic occurred"),
                ("ERROR", "main.rs", "stack backtrace:"),
                ("0:", "0x", "backtrace::"),
            ],
        );

        // Clean up
        fs::remove_file(DEFAULT_API_SOCK_PATH).expect("failure in removing socket file");
    }
先ほどのmain関数の中で、panic発生時のhookを仕掛けていました。hook関数の中ではbacktraceをログ出力しており、その機能が想定通り動作していることをテストしています。
コマンドラインオプションの処理
コマンドライン引数の処理をしています。特に面白みはないので、飛ばします。
    let cmd_arguments = App::new("firecracker")
        .version(crate_version!())
        .author(crate_authors!())
        .about("Launch a microvm.")
        .arg(
            Arg::with_name("api_sock")
                .long("api-sock")
                .help("Path to unix domain socket used by the API")
                .default_value(DEFAULT_API_SOCK_PATH)
                .takes_value(true),
        ).arg(
            Arg::with_name("context")
                .long("context")
                .help("Additional parameters sent to Firecracker.")
                .takes_value(true),
        ).get_matches();
...
API Serverオブジェクト作成
ここから、API ServerとVMMを作る準備が始まります。まずは、共有リソースを作って、API Serverを作っています。
    let shared_info = Arc::new(RwLock::new(InstanceInfo {
        state: InstanceState::Uninitialized,
        id: instance_id,
    }));
    let mmds_info = MMDS.clone();
    let (to_vmm, from_api) = channel();
    let server = ApiServer::new(mmds_info, shared_info.clone(), to_vmm).unwrap();
shared_infoは、API ServerとVMMとの間で共有される情報のようです。
MMDSは、microVM metadata serviceだそうです。今のところ、意味するところはよくわかりません。追々判明するでしょう。
channelで非同期のSenderとReceiverを作成しています。API ServerとVMMを繋ぐチャネルですね。
ここまでで作成した、VMMとの情報共有リソースを渡して、ApiServerを初期化しています。
VMMオブジェクト作成
次は、VMMです。API Serverからイベントを受ける取るために使うであろうファイルディスクリプタと、jailerで起動している場合に受け取れるらしいKVMのファイルディスクリプタを取得しています。
    let api_event_fd = server
        .get_event_fd_clone()
        .expect("Cannot clone API eventFD.");

    let kvm_fd = if is_jailed {
        Some(jailer::KVM_FD)
    } else {
        None
    };

    let _vmm_thread_handle =
        vmm::start_vmm_thread(shared_info, api_event_fd, from_api, seccomp_level, kvm_fd);
vmm/src/lib.rsでは、Vmmのオブジェクトを作成して、threadを生成します。
pub fn start_vmm_thread(
...
) -> thread::JoinHandle<()> {
    thread::Builder::new()
        .name("fc_vmm".to_string())
        .spawn(move || {
            // If this fails, consider it fatal. Use expect().
            let mut vmm = Vmm::new(
...
            ).expect("Cannot create VMM.");
            match vmm.run_control() {
                Ok(()) => vmm.stop(0),
                Err(_) => vmm.stop(1),
            }
        }).expect("VMM thread spawn failed.")
}
Vmmは巨大な構造体です。Vmm::new()では、この巨大な構造体を初期化する処理を行います。その中には、VMの作成も含まれています。
struct Vmm {
    kvm: KvmContext,

    vm_config: VmConfig,
    shared_info: Arc<RwLock<InstanceInfo>>,

    // guest VM core resources
    guest_memory: Option<GuestMemory>,
    kernel_config: Option<KernelConfig>,
    kill_signaled: Option<Arc<AtomicBool>>,
    vcpu_handles: Option<Vec<thread::JoinHandle<()>>>,
    exit_evt: Option<EpollEvent<EventFd>>,
    vm: Vm,

    // guest VM devices
    mmio_device_manager: Option<MMIODeviceManager>,
    legacy_device_manager: LegacyDeviceManager,
    drive_handler_id_map: HashMap<String, usize>,

    // If there is a Root Block Device, this should be added as the first element of the list
    // This is necessary because we want the root to always be mounted on /dev/vda
    block_device_configs: BlockDeviceConfigs,
    network_interface_configs: NetworkInterfaceConfigs,
    #[cfg(feature = "vsock")]
    vsock_device_configs: VsockDeviceConfigs,

    epoll_context: EpollContext,

    // api resources
    api_event: EpollEvent<EventFd>,
    from_api: Receiver<Box<VmmAction>>,

    write_metrics_event: EpollEvent<TimerFd>,

    // The level of seccomp filtering used. Seccomp filters are loaded before executing guest code.
    // See `seccomp::SeccompLevel` for more information about seccomp levels.
    seccomp_level: u32,
}
Vmmの初期化に必要な要素を準備しています。まずは、epollでファイルディスクリプタのイベント監視を追加しています。
impl Vmm {
    fn new(
        api_shared_info: Arc<RwLock<InstanceInfo>>,
        api_event_fd: EventFd,
        from_api: Receiver<Box<VmmAction>>,
        seccomp_level: u32,
        kvm_fd: Option<RawFd>,
    ) -> Result<Self> {
        // epollでイベント発生を監視する
        let mut epoll_context = EpollContext::new()?;
        // If this fails, it's fatal; using expect() to crash.
        let api_event = epoll_context
            .add_event(api_event_fd, EpollDispatch::VmmActionRequest)
            .expect("Cannot add API eventfd to epoll.");

        let write_metrics_event = epoll_context
            .add_event(
                // non-blocking & close on exec
                TimerFd::new_custom(ClockId::Monotonic, true, true).map_err(Error::TimerFd)?,
                EpollDispatch::WriteMetrics,
            ).expect("Cannot add write metrics TimerFd to epoll.");
api_event_fdは、API Serverからのイベント通知のためのファイルディスクリプタです。監視するイベントは、EpollDispatch::VmmActionRequestとあるので、API ServerからVMMへコマンドが送られるのだと推測できます。
main関数内で、API Serverのオブジェクトからファイルディスクリプタをcloneしていました。
rust:src/main.rs main
let api_event_fd = server
.get_event_fd_clone()
.expect("Cannot clone API eventFD.");
次にVMインスタンスを生成します。kvm_fdはjailerで隔離されていない場合、/dev/kvmになります。
        let block_device_configs = BlockDeviceConfigs::new();
        let kvm = KvmContext::new(kvm_fd)?;
        let vm = Vm::new(kvm.fd()).map_err(Error::Vm)?;
Vm::new()では、kvmのVMインスタンス作成をKVMに依頼します。とりあえず、ゲストOSのメモリはNoneで作成しています。
impl Vm {
    /// Constructs a new `Vm` using the given `Kvm` instance.
    pub fn new(kvm: &Kvm) -> Result<Self> {
        //create fd for interacting with kvm-vm specific functions
        let vm_fd = kvm.create_vm().map_err(Error::VmFd)?;

        Ok(Vm {
            fd: vm_fd,
            guest_mem: None,
        })
    }
Kvm.create_vm()を見ていきます。
pub struct Kvm {
    kvm: File,
}

impl Kvm {
...
    /// Creates a VM fd using the KVM fd (KVM_CREATE_VM).
    /// A call to this function will also initialize the supported cpuid (KVM_GET_SUPPORTED_CPUID)
    /// and the size of the vcpu mmap area (KVM_GET_VCPU_MMAP_SIZE).
    pub fn create_vm(&self) -> Result<VmFd> {
        // Safe because we know kvm is a real kvm fd as this module is the only one that can make
        // Kvm objects.
        let ret = unsafe { ioctl(&self.kvm, KVM_CREATE_VM()) };
        if ret >= 0 {
            // Safe because we verify the value of ret and we are the owners of the fd.
            let vm_file = unsafe { File::from_raw_fd(ret) };
            let run_mmap_size = self.get_vcpu_mmap_size()?;
            let kvm_cpuid: CpuId = self.get_supported_cpuid(MAX_KVM_CPUID_ENTRIES)?;
            Ok(VmFd {
                vm: vm_file,
                supported_cpuid: kvm_cpuid,
                run_size: run_mmap_size,
            })
        } else {
            errno_result()
        }
    }
注目するのはlet ret = unsafe { ioctl(&self.kvm, KVM_CREATE_VM()) };の部分で、普通に/dev/kvmをioctlで叩いてVMを作成しています。
作成したVMのファイルでVmFdを初期化し、関数の戻り値としています。
ここまでをまとめると、Vmm::new()では、API Serverからイベント通知を受け取れるためのデータと、/dev/kvmを叩いて生成したVMインスタンスから、Vmmオブジェクトを作成しようとしています。
最終的に、Vmmは次のように初期値を与えられて作成されます。
Vmm::new()
        Ok(Vmm {
            kvm,
            vm_config: VmConfig::default(),
            shared_info: api_shared_info,
            guest_memory: None,
            kernel_config: None,
            kill_signaled: None,
            vcpu_handles: None,
            exit_evt: None,
            vm,
            mmio_device_manager: None,
            legacy_device_manager: LegacyDeviceManager::new().map_err(Error::CreateLegacyDevice)?,
            block_device_configs,
            drive_handler_id_map: HashMap::new(),
            network_interface_configs: NetworkInterfaceConfigs::new(),
            #[cfg(feature = "vsock")]
            vsock_device_configs: VsockDeviceConfigs::new(),
            epoll_context,
            api_event,
            from_api,
            write_metrics_event,
            seccomp_level,
        })
少し拾っておくと、vm_configはデフォルト値が設定されています。デフォルト値は次の通りです。
impl Default for VmConfig {
    fn default() -> Self {
        VmConfig {
            vcpu_count: Some(1),
            mem_size_mib: Some(128),
            ht_enabled: Some(false),
            cpu_template: None,
        }
    }
}
CPU1コア、メモリサイズ128MB、(多分)hyperthreadingをdisable、がデフォルト設定になります。
もう1点、legacy_device_managerなるメンバーがいます。LegacyDeviceManagerは次のように定義されており、IOバス上のUARTとi8042(PS/2コントローラでしたっけ?)を管理しているようです。
/// The `LegacyDeviceManager` is a wrapper that is used for registering legacy devices
/// on an I/O Bus. It currently manages the uart and i8042 devices.
/// The `LegacyDeviceManger` should be initialized only by using the constructor.
pub struct LegacyDeviceManager {
    pub io_bus: devices::Bus,
    pub stdio_serial: Arc<Mutex<devices::legacy::Serial>>,
    pub i8042: Arc<Mutex<devices::legacy::I8042Device>>,

    pub com_evt_1_3: EventFd,
    pub com_evt_2_4: EventFd,
    pub stdin_handle: io::Stdin,
}
このlegacy_device_managerは、KVMでイベントが発生し、VMMに制御が戻ってきたときのハンドラで利用することが予想できます。
API Server起動
とうとう初期化大詰めです。API Serverのsocketをbindして、API Serverを起動します。jailerで隔離されている場合は、Unix domain socketのファイルディスクリプタを受け取るようです。そうでない場合、パスからUnix domain socketを取得します。
    let uds_path_or_fd = if is_jailed {
        UnixDomainSocket::Fd(jailer::LISTENER_FD)
    } else {
        UnixDomainSocket::Path(bind_path)
    };

    match server.bind_and_run(uds_path_or_fd, start_time_us, start_time_cpu_us) {
        Ok(_) => (),
        Err(Error::Io(inner)) => match inner.kind() {
            // エラー処理
        },
        Err(Error::Eventfd(inner)) => panic!(
            // エラー処理
        ),
    }
なぜ、Unix domain socketを用意しているかというと、Unix domain socketでHTTPリクエストをlistenするようです(そんなことできるの知らなかった)。
DockerでもdockerdのAPIは、Unix domain socketを介したREST APIになっているようです。
firecrackerも本来はjailerで隔離されるので、Unix domain socketで外の世界とやり取りする、のかもしれません。もう少し周りの実装を解析しないとなんとも言えないですね。
bind_and_runはエラーが発生するまで実行を続ける関数です。Coreはtokioのイベントループみたいですね。
    // TODO: does tokio_uds also support abstract domain sockets?
    pub fn bind_and_run<P: AsRef<Path>>(
...
    ) -> Result<()> {
        let mut core = Core::new().map_err(Error::Io)?;
        let handle = Rc::new(core.handle());
...
        // This runs forever, unless an error is returned somewhere within f (but nothing happens
        // for errors which might arise inside the connections we spawn from f, unless we explicitly
        // do something in their future chain). When this returns, ongoing connections will be
        // interrupted, and other futures will not complete, as the event loop stops working.
        core.run(f)
    }
tokioのCoreは、tokio::reactorで実装されているEvent loopです。
少し読んでみようかな、と下記ソースに飛びましたが、諦めてスゴスゴと帰ってきました。
impl Core {
    /// Creates a new event loop, returning any error that happened during the
    /// creation.
    // わからん!
    pub fn new() -> io::Result<Core> {
        let io = try!(mio::Poll::new());
        let future_pair = mio::Registration::new2();
        try!(io.register(&future_pair.0,
                         TOKEN_FUTURE,
                         mio::Ready::readable(),
                         mio::PollOpt::level()));
        let (tx, rx) = mpsc::unbounded();
        let channel_pair = mio::Registration::new2();
        try!(io.register(&channel_pair.0,
                         TOKEN_MESSAGES,
                         mio::Ready::readable(),
                         mio::PollOpt::level()));
        let rx_readiness = Arc::new(MySetReadiness(channel_pair.1));
        rx_readiness.notify(0);

        Ok(Core {
...
ただ、CoreがEvent loopであることがわかれば、後は、イベント発生時のハンドラを登録して、イベント待ちになるだけ、のはずです。続きを見ると、unix domain socketのlistenerを作成しています。
    pub fn bind_and_run<P: AsRef<Path>>(
...
        // `path_or_fd`はunix domain socketのパスまたはファイルディスクリプタです
        let listener = match path_or_fd {
            UnixDomainSocket::Path(path) => UnixListener::bind(path, &handle).map_err(Error::Io)?,
            UnixDomainSocket::Fd(fd) => {
                // Safe because we assume fd is a valid file descriptor number, associated with a
                // previously bound UnixListener.
                UnixListener::from_listener(
                    unsafe { std::os::unix::net::UnixListener::from_raw_fd(fd) },
                    &handle,
                ).map_err(Error::Io)?
            }
        };
次に、メトリクスに実行開始時間を出力しています。一瞬、目に馴染まない書き方されていますが、METRICSはlazy_staticで初期化されるグローバルオブジェクトで、.api_serverなどはただのpublicなフィールドです。
        if let Some(start_time) = start_time_us {
            let delta_us = (chrono::Utc::now().timestamp_nanos() / 1000) as u64 - start_time;
            METRICS
                .api_server
                .process_startup_time_us
                .add(delta_us as usize);
        }

        if let Some(cpu_start_time) = start_time_cpu_us {
            let delta_us = fc_util::now_cputime_us() - cpu_start_time;
            METRICS
                .api_server
                .process_startup_time_cpu_us
                .add(delta_us as usize);
        }
HTTPサーバには、hyperを使っています。
let http: Http<hyper::Chunk> = Http::new();
さて、次がよくわからんポイントです。ここで、fはFuture traitを実装する型です。
        let f = listener
            .incoming()
            .for_each(|(stream, _)| {
                // For the sake of clarity: when we use self.efd.clone(), the intent is to
                // clone the wrapping Rc, not the EventFd itself.
                let service = ApiServerHttpService::new(
                    self.mmds_info.clone(),
                    self.vmm_shared_info.clone(),
                    self.api_request_sender.clone(),
                    self.efd.clone(),
                );
                let connection = http.serve_connection(stream, service);
                // todo: is spawn() any better/worse than execute()?
                // We have to adjust the future item and error, to fit spawn()'s definition.
                handle.spawn(connection.map(|_| ()).map_err(|_| ()));
                Ok(())
            }).map_err(Error::Io);
listener.incoming()は、IoStream<(UnixStream, SocketAddr)>を返します。incoming()は、listener自身を消費して、IoStream<(UnixStream, SocketAddr)>を作り出すようです。
ソースコードを見てみますが、難しいですね。
tokio-uds-0.1.7/src/lib,rs
    /// Consumes this listener, returning a stream of the sockets this listener
    /// accepts.
    ///
    /// This method returns an implementation of the `Stream` trait which
    /// resolves to the sockets the are accepted on this listener.
    pub fn incoming(self) -> IoStream<(UnixStream, SocketAddr)> {
        struct Incoming {
            inner: UnixListener,
        }

        impl Stream for Incoming {
            type Item = (UnixStream, SocketAddr);
            type Error = io::Error;

            fn poll(&mut self) -> Poll<Option<Self::Item>, io::Error> {
                Ok(Some(try_nb!(self.inner.accept())).into())
            }
        }

        Incoming { inner: self }.boxed()
    }
Stream traitが、SelfからItemへの変換する機能を実装していないと辻褄が合わないですね。
えーっと、Stream traitは、futures::Streamで、Iteratorの非同期バージョン、とのことです。なので、for_each()で処理しているのですね。
IoStreamは、下のように定義されているので、`Incoming { inner: self }.boxed()‘のところで型が合っていますね。
type IoStream<T> = Box<Stream<Item = T, Error = Error> + Send>;
incoming()の謎が解けたところで、for_each()に行くと、UnixStreamをstreamとしてクロージャで受け取り、HTTP Serviceを作成して、UnixStreamとbindしてHTTPリクエストを捌いている、ということみたいですね。
            .incoming()
            .for_each(|(stream, _)| {
                // For the sake of clarity: when we use self.efd.clone(), the intent is to
                // clone the wrapping Rc, not the EventFd itself.
                let service = ApiServerHttpService::new(
                    self.mmds_info.clone(),
                    self.vmm_shared_info.clone(),
                    self.api_request_sender.clone(),
                    self.efd.clone(),
                );
                let connection = http.serve_connection(stream, service);
                // todo: is spawn() any better/worse than execute()?
                // We have to adjust the future item and error, to fit spawn()'s definition.
                handle.spawn(connection.map(|_| ()).map_err(|_| ()));
                Ok(())
            }).map_err(Error::Io);
ApiServiceHttpServiceは、来たrequestごとに作成されるサービスのようです。
// In hyper, a struct that implements the Service trait is created to handle each incoming
// request. This is the one for our ApiServer.
pub struct ApiServerHttpService {
    // MMDS info directly accessible from this API thread.
    mmds_info: Arc<Mutex<Mmds>>,
    // VMM instance info directly accessible from this API thread.
    vmm_shared_info: Arc<RwLock<InstanceInfo>>,
    // This allows sending messages to the VMM thread. It makes sense to use a Rc for the sender
    // (instead of cloning) because everything happens on a single thread, so there's no risk of
    // having races (if that was even a problem to begin with).
    api_request_sender: Rc<mpsc::Sender<Box<VmmAction>>>,
    // We write to this EventFd to let the VMM know about new messages.
    vmm_send_event: Rc<EventFd>,
}
ApiServerHttpServiceは、hyper::server::Servicetraitを実装しています。hyperでは、届いたリクエストごとにService` traitを実装したstructが生成されます。
impl hyper::server::Service for ApiServerHttpService {
    type Request = hyper::Request;
    type Response = hyper::Response;
    type Error = hyper::error::Error;
    type Future = Box<Future<Item = Self::Response, Error = Self::Error>>;
...
serve_connectionは、Futureを返すようです。hyper/src/server/mod.rsを見ると、Connectionを返しています。
    /// Bind a connection together with a Service.
    ///
    /// This returns a Future that must be polled in order for HTTP to be
    /// driven on the connection.
    pub fn serve_connection<S, I, Bd>(&self, io: I, service: S) -> Connection<I, S>
Connectionの定義を見ると、下のようになっていました。うーん、わからん…。
/// A future binding a connection with a Service.
///
/// Polling this future will drive HTTP forward.
///
/// # Note
///
/// This will currently yield an unnameable (`Opaque`) value
/// on success. The purpose of this is that nothing can be assumed about
/// the type, not even it's name. It's probable that in a later release,
/// this future yields the underlying IO object, which could be done without
/// a breaking change.
///
/// It is likely best to just map the value to `()`, for now.
#[must_use = "futures do nothing unless polled"]
pub struct Connection<I, S>
where
    S: HyperService,
    S::ResponseBody: Stream<Error=::Error>,
    <S::ResponseBody as Stream>::Item: AsRef<[u8]>,
{
...
}
ただ、コメントを見ると、It is likely best to just map the value to(), for now.とあるので、mapで()を返すクロージャを渡していることと辻褄が合います。
                let connection = http.serve_connection(stream, service);
                // todo: is spawn() any better/worse than execute()?
                // We have to adjust the future item and error, to fit spawn()'s definition.
                handle.spawn(connection.map(|_| ()).map_err(|_| ()));
おそらく、ここのconnection.map()で、ApiServerHttpServiceのcallが呼ばれる気がします。ApiServerHttpServiceのcallは次のようになっており、HTTPリクエストを処理しています。
impl hyper::server::Service for ApiServerHttpService {
...
    fn call(&self, req: Self::Request) -> Self::Future {
...
        Box::new(req.body().concat2().and_then(move |b| {
            // When this will be executed, the body is available. We start by parsing the request.
            match parse_request(method, path.as_ref(), &b) {
                Ok(parsed_req) => match parsed_req {
                    GetInstanceInfo => {
...
matchのparse_request()へ潜っていくと、VMM Actionへパースされる処理が見つかります。下のようなテストが書かれています。
    #[test]
    fn test_parse_actions_req() {
        // PUT InstanceStart
        let json = "{
                \"action_type\": \"InstanceStart\"
              }";
        let body: Chunk = Chunk::from(json);
        let path = "/foo";

        match parse_actions_req(path, Method::Put, &body) {
            Ok(pr) => {
                let (sender, receiver) = oneshot::channel();
                assert!(pr.eq(&ParsedRequest::Sync(
                    VmmAction::StartMicroVm(sender),
                    receiver
                )));
            }
            _ => assert!(false),
        }
...
hyperの使い方がわかっていなくて、少し怪しいですが、これで、Unix domain socketに届いたHTTPリクエストが、その内容に応じて、VMM threadに届きそうです。
後は、REST APIが叩かれるの待ち、というところまで読んだところで、本記事は終了です!
ここまで拙い解説に付き合って下さった方、ありがとうございました。


 浙公网安备 33010602011771号