WPF资源集以及矢量图库的使用
目前的想法是创建一个资源集合,里面包含各种自定义控件,以及各种样式,包含大量矢量图等等,以供其他库进行调用。
首先新建项目 ModbusCtrlLib (给库取的名字)

自定义控件项目会自动创建一个目录结构,其中Generic.xaml文件中可以自定义自己的样式等资源。
比如我在里面定义一个图片画刷
<ImageBrush
      x:Key="{ComponentResourceKey TypeInTargetAssembly={x:Type local:CustomResources}, ResourceId=SadTileBrush}"
      TileMode="Tile"
      ViewportUnits="Absolute" Viewport="0 0 32 32"
      ImageSource="ModbusCtrlLib;component/Resources/sadface.jpg" Opacity="0.3">
    </ImageBrush>
这里有个重要的知识点,就路径的指定:
我们看到这里的ImageSource="ModbusCtrlLib;component/Resources/sadface.jpg"ModbusCtrlLib 就是库的名字, component是个祖传的开头
表示,图片sadface.jpg在当前项目的Resources文件夹下!
那么后面我们可以通过,SadTileBrush ImageSource设置的key值访问到这个资源。
这里如果我想, 进一步的模块化资源,我得这么做,比如我想把所以的画刷放到一个资源文件,其他的资源也分门别类的放到各自单独的文件中,然后在Generic.xaml统一的引用管理。
那么我们在Generic.xaml就要用到:ResourceDictionary.MergedDictionaries,它是一个资源字典的集合。
什么是资源字典?Generic.xaml本身其实就是一个资源字典。
现在我们来新建一个资源字典,vs在当前项目添加新建项——资源字典MyBrush.xaml

我们把之前的的画刷资源放到这个新建的资源字典 MyBrush.xaml,
注意添加引用:xmlns:local="clr-namespace:ModbusCtrlLib
<ResourceDictionary xmlns="http://schemas.microsoft.com/winfx/2006/xaml/presentation"
    xmlns:x="http://schemas.microsoft.com/winfx/2006/xaml"
    xmlns:local="clr-namespace:ModbusCtrlLib"
    >

    <ImageBrush
      x:Key="{ComponentResourceKey TypeInTargetAssembly={x:Type local:CustomResources}, ResourceId=SadTileBrush}"
      TileMode="Tile"
      ViewportUnits="Absolute" Viewport="0 0 32 32"
      ImageSource="pack://application:,,,/ModbusCtrlLib;component/Resources/sadface.jpg" Opacity="0.3">
    </ImageBrush>

</ResourceDictionary>
我们对比一下前后两个ImageSource的区别
放在Generic.xaml中的画刷的ImageSource
ImageSource="ModbusCtrlLib;component/Resources/sadface.jpg" Opacity="0.3"而现在:
ImageSource="pack://application:,,,/ModbusCtrlLib;component/Resources/sadface.jpg" Opacity="0.3"前面多了一串
pack://application:,,,/pack URI 是WPF寻址的一种语法,感兴趣的可以查下,这里我就给个结论,在这总情况,如果不这么写,
WPF就找不到这个图片了!!(我试了好久才发现这个坑)
这种写法在其他情况下也不会有问题。以后就这么写了,长点而已
接下来就是在Generic.xaml中,利用MergedDictionaries整合其他的资源字典
<ResourceDictionary.MergedDictionaries>
        <ResourceDictionary Source="/ModbusCtrlLib;component/themes/MyBrush.xaml" />
        <ResourceDictionary Source="/ModbusCtrlLib;component/themes/FontAwesome.xaml" />

    </ResourceDictionary.MergedDictionaries>
这里我就整合连个资源字典,一个画刷的资源字典,一个矢量图库的资源字典。
其实,接下来的矢量图库的使用,才是我最想记录的。
矢量图库的使用:
打开网站: https://fontawesome.com/start

下载之后,我们找到这个文件

将其添加到项目之中,我习惯新建一个Resources文件夹,并将其添加其中:

在资源字典FontAwesome中(注意添加引用:xmlns:local="clr-namespace:ModbusCtrlLib),我写到:
<ResourceDictionary xmlns="http://schemas.microsoft.com/winfx/2006/xaml/presentation"
                    xmlns:x="http://schemas.microsoft.com/winfx/2006/xaml"
                    xmlns:local="clr-namespace:ModbusCtrlLib"
                    >
    <Style x:Key="{ComponentResourceKey TypeInTargetAssembly={x:Type local:CustomResources}, ResourceId=FIcon}" TargetType="TextBlock">

        <Setter Property="FontFamily" Value="pack://application:,,,/Resources/#Font Awesome 5 Free Solid"></Setter>
        <!--<Setter Property="FontFamily" Value="pack://application:,,,ModbusCtrlLib;component/Resources/#Font Awesome 5 Free Solid"></Setter>-->

        <Setter Property="TextAlignment" Value="Center"/>

        <Setter Property="HorizontalAlignment" Value="Center"/>

        <Setter Property="VerticalAlignment" Value="Center"/>

        <Setter Property="FontSize" Value="20"/>

    </Style>
</ResourceDictionary>
好了我们又看到了pack URI语法,这是为了寻找刚刚下载的字体文件fa-solid-900.ttf
但是这里要注意一下,此时ModbusCtrlLib;component是不能要的!但是在画刷资源中
这个是必须有的,原因不明!
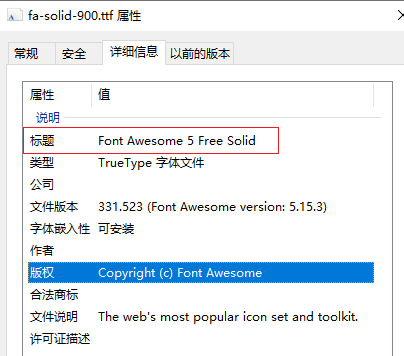
那Font Awesome 5 Free Solid这个名字是这么来的,这个名字很重要,写错图片出不来。
但是这个名字随着版本的更迭,它是会变的,对于WPF而言你必须知道这个名字(css引用貌似不需要)。
没错就是查看fa-solid-900.ttf的属性
好了,书写是注意前面还有个 #,它是在Resources目录下的,所以Resources也不要忘记了
"pack://application:,,,ModbusCtrlLib;component/Resources/#Font Awesome 5 Free Solid"接下来我要使用这个自定义控件库里的矢量图
新建一个项目,并引用项目ModbusCtrlLib,这也是我最初的目的,通过引用这个项目,我就可以使用这个项目里的所以资源,今后我就可以不停的去丰富我的这个项目!
注意引用项目,并取个名字叫mlib:
xmlns:mlib="clr-namespace:ModbusCtrlLib;assembly=ModbusCtrlLib"
<StackPanel Grid.Row="1">
<TextBlock Background="{DynamicResource {ComponentResourceKey TypeInTargetAssembly={x:Type mlib:CustomResources}, ResourceId=SadTileBrush}}" FontSize="30" Margin="3" ></TextBlock>
<TextBlock Text="" Style="{StaticResource {ComponentResourceKey TypeInTargetAssembly={x:Type mlib:CustomResources}, ResourceId=FIcon}}" FontSize="30" Margin="3" ></TextBlock>
</StackPanel>一个引用了画刷的资源,一个引用了矢量图的资源,因为是引用了其他库的资源,所以这个语法看上去有点长,我们可以简化一点!我们在自定义控件库ModbusCtrlLib中新建一个文件:CustomResources.cs
其中内容如下
using System.Windows;

namespace ModbusCtrlLib
{
    public class CustomResources
    {

        public static ComponentResourceKey FIcon
        {
            get
            {
                return new ComponentResourceKey(
                    typeof(CustomResources), "FIcon");
            }
        }
        public static ComponentResourceKey SadTileBrush
        {
            get
            {
                return new ComponentResourceKey(
                    typeof(CustomResources), "SadTileBrush");
            }
        }


    }
}
那么现在语法可以简化一下:
<StackPanel Grid.Row="1">
<TextBlock Background="{DynamicResource {x:Static mlib:CustomResources.SadTileBrush}}" />
<TextBlock Text="" Style="{StaticResource {x:Static mlib:CustomResources.FIcon}}" />
</StackPanel>效果如下:

那为什么,f35a 会对于到箭头这个图标呢?
首先看下格式(这个格式是wpf规定的):
1 以 &#x 开头
2 以分号结尾
3 中间是一串16进制数。
那么我们就要去找这个16进制数!
打开之前的下载的网站,https://fontawesome.com/start, 选择Icons

注意选择Free,收费的需要缴费才能显示出来。Free基本够用了。

数字就是图中显示的那个了!
如果,觉得搞这个格式还挺麻烦的,还有一个简单操作,就是点击图标下面的小面板
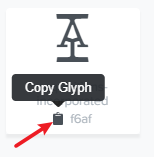
她会自动复制,然后你可以直接贴到你的代码中,看上去就是这个样子:
<TextBlock Text="" Style="{StaticResource {x:Static mlib:CustomResources.FIcon}}" FontSize="30" Margin="3" />
你也发现了它是“一坨”,也不知道是个啥。当然对应的图片是有的。
最后还有一种方式进行跨dll调用就是利用App.xaml
<Application x:Class="ModeBusTest.App"
             xmlns="http://schemas.microsoft.com/winfx/2006/xaml/presentation"
             xmlns:x="http://schemas.microsoft.com/winfx/2006/xaml"
             xmlns:local="clr-namespace:ModeBusTest"
             StartupUri="MainWindow.xaml">
    <Application.Resources>
        <ResourceDictionary>
            <ResourceDictionary.MergedDictionaries>
                <ResourceDictionary Source="pack://application:,,,/STOControlLibrary;component/Style/Colors.xaml"/>
                <!--<ResourceDictionary Source="pack://application:,,,/STOControlLibrary;component/Style/Global.xaml" />-->
                <ResourceDictionary Source="pack://application:,,,/STOControlLibrary;component/Style/Themes/FIcon.xaml" />
                <ResourceDictionary Source="pack://application:,,,/STOControlLibrary;component/Control/FButton.xaml" />

            </ResourceDictionary.MergedDictionaries>

        </ResourceDictionary>
    </Application.Resources>
</Application>
那么就可以直接这么写
Style="{StaticResource FButton_Transparency}"
好了,就这么多了,以后再补充吧~~~
作者:宋桓公
出处:http://www.cnblogs.com/douzi2/
如果您觉得阅读本文对您有帮助,请点一下“推荐”按钮,您的“推荐”将是我最大的写作动力!欢迎各位转载,但是未经作者本人同意,转载文章之后必须在文章页面明显位置给出作者和原文连接,否则保留追究法律责任的权利。

 浙公网安备 33010602011771号