CentOS7安装MySQL8.0小计
之前讲配置文件和权限的时候有很多MySQL8的知识,有同志说安装不太一样,希望发个文,我这边简单演示一下
1.环境安装
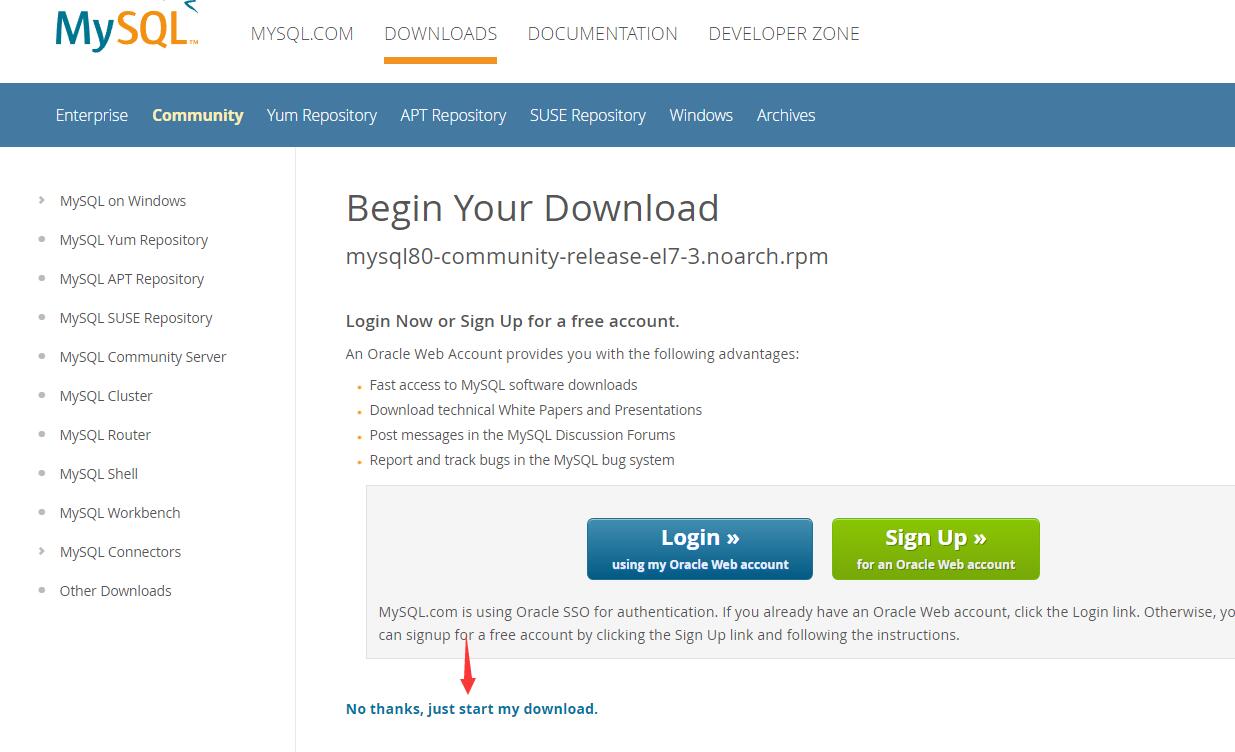
下载MySQL提供的CentOS7的yum源
过程中有不太懂的可以看我之前写的这篇文章:<http://www.cnblogs.com/dotnetcrazy/p/9887708.html>
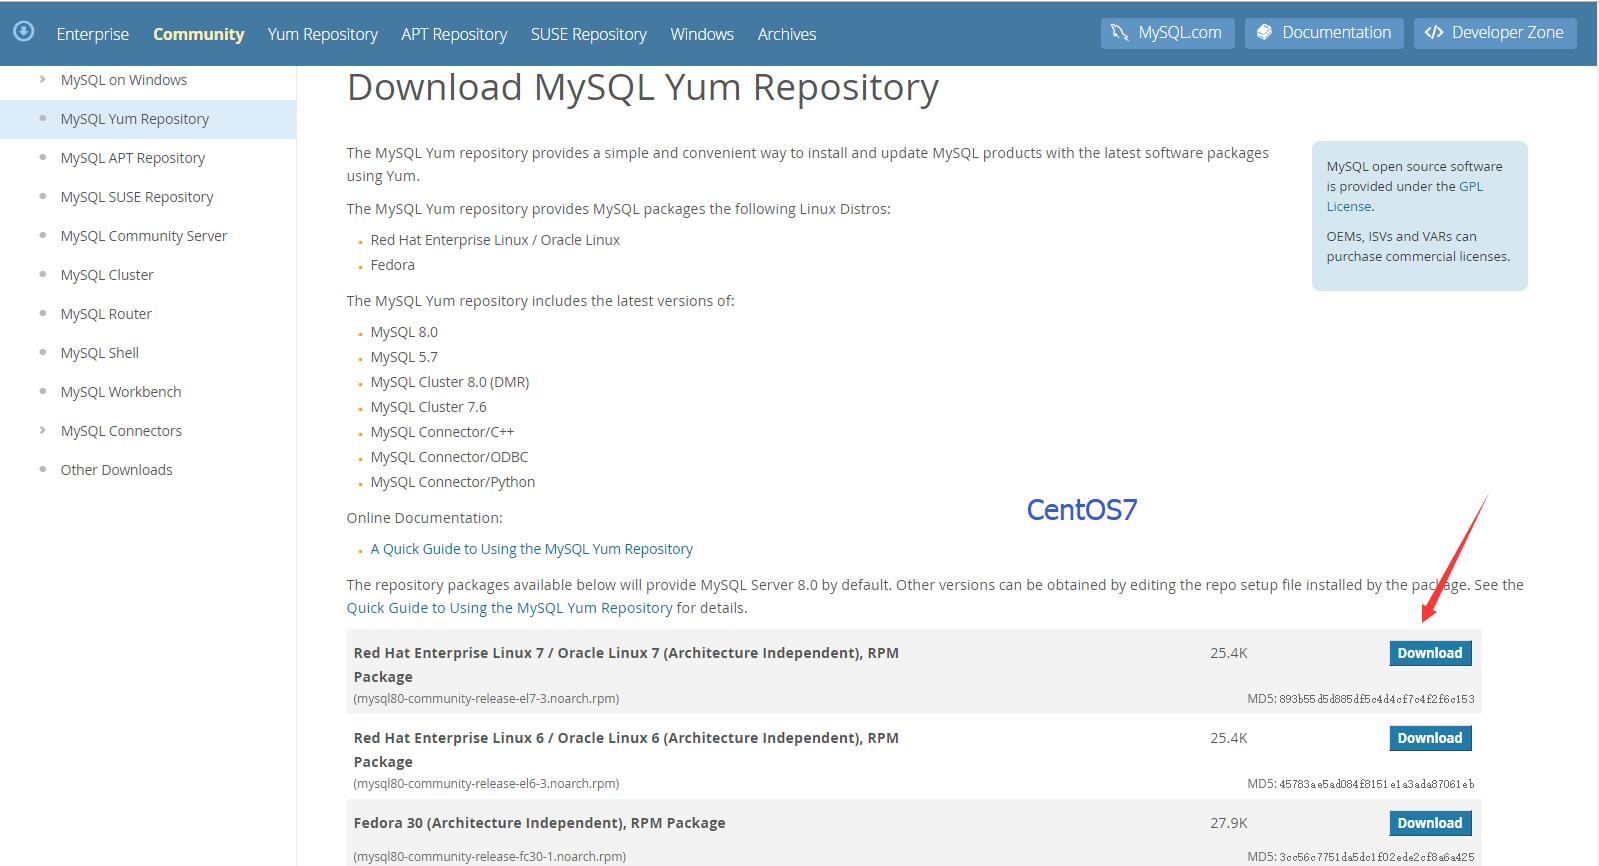
CentOS命令:curl https://repo.mysql.com//mysql80-community-release-el7-3.noarch.rpm > centos7.mysql.rpm 下载yum源(curl是系统自带的)

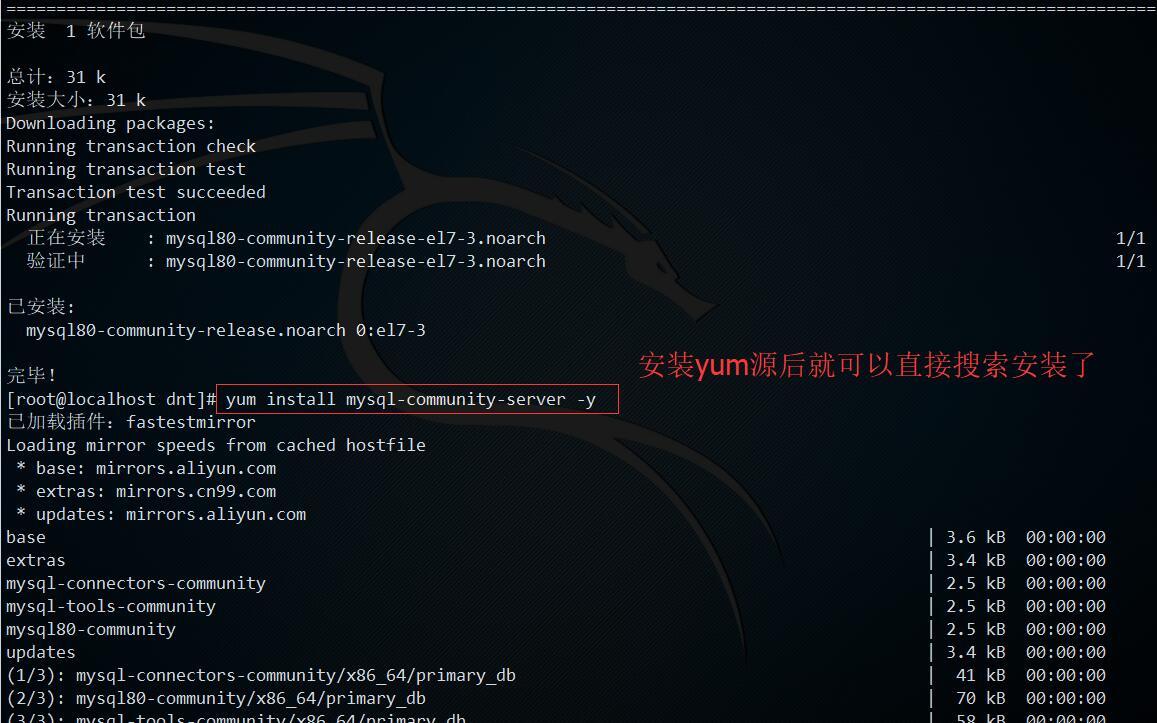
安装yum源:yum install centos7.mysql.rpm -y
安装MySQL8.0 yum install mysql-community-server -y
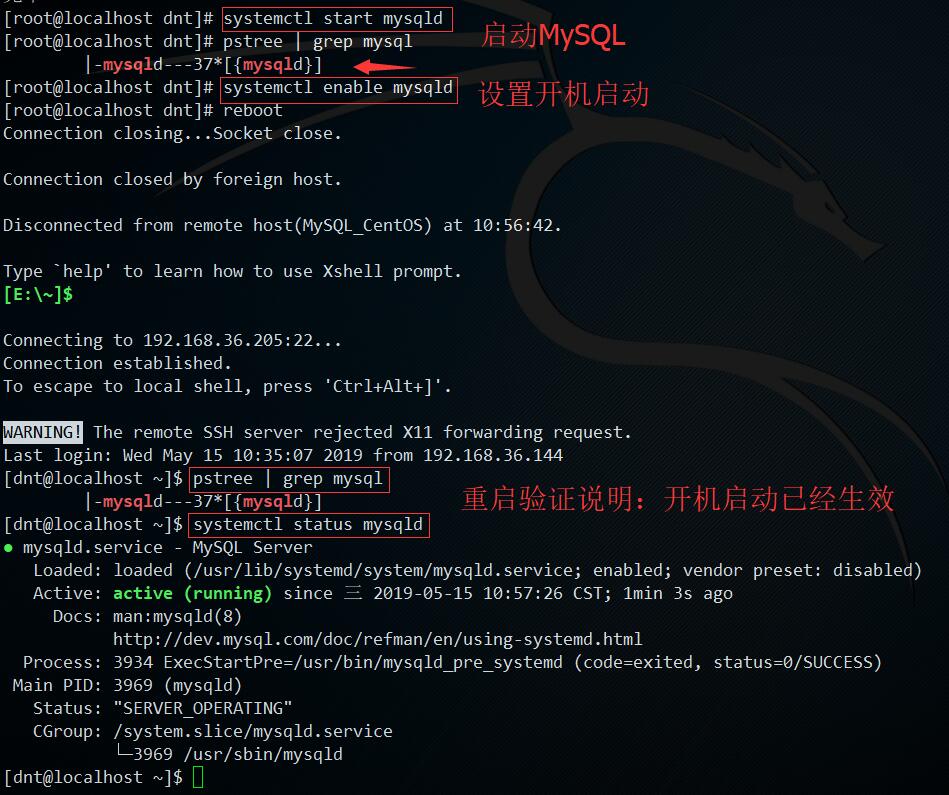
启动mysql systemctl start mysqld
设置开机启动mysql systemctl enable mysqld
2.初始化配置
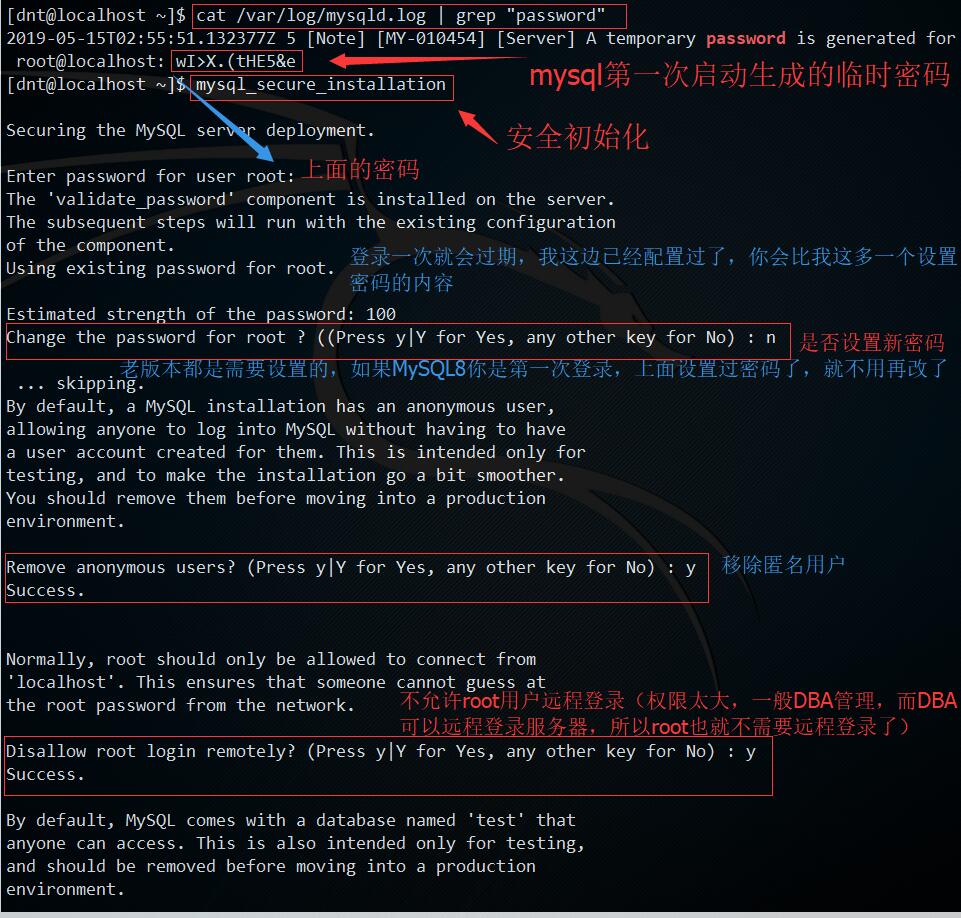
查看初始密码 cat /var/log/mysqld.log | grep "password"
安全初始化 mysql_secure_installation
3.权限设置
权限相关详细可以查看上次写的文章:聊聊数据库:SQL运维~存储引擎与权限
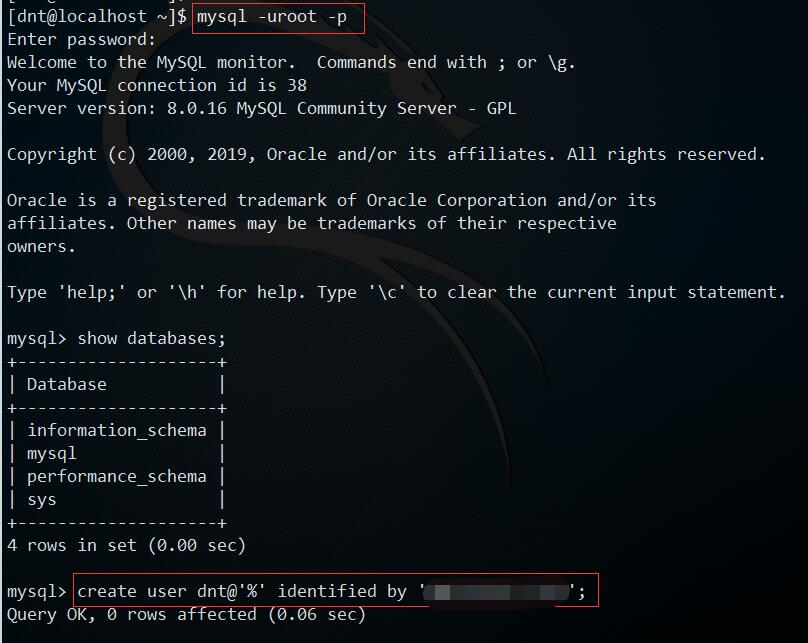
用root账号登录 mysql -uroot -p
创建用户dnt create user dnt@'%' identified by '含大小写字母+数字的密码';
查看当前有哪些用户 select user,authentication_string,host from mysql.user;
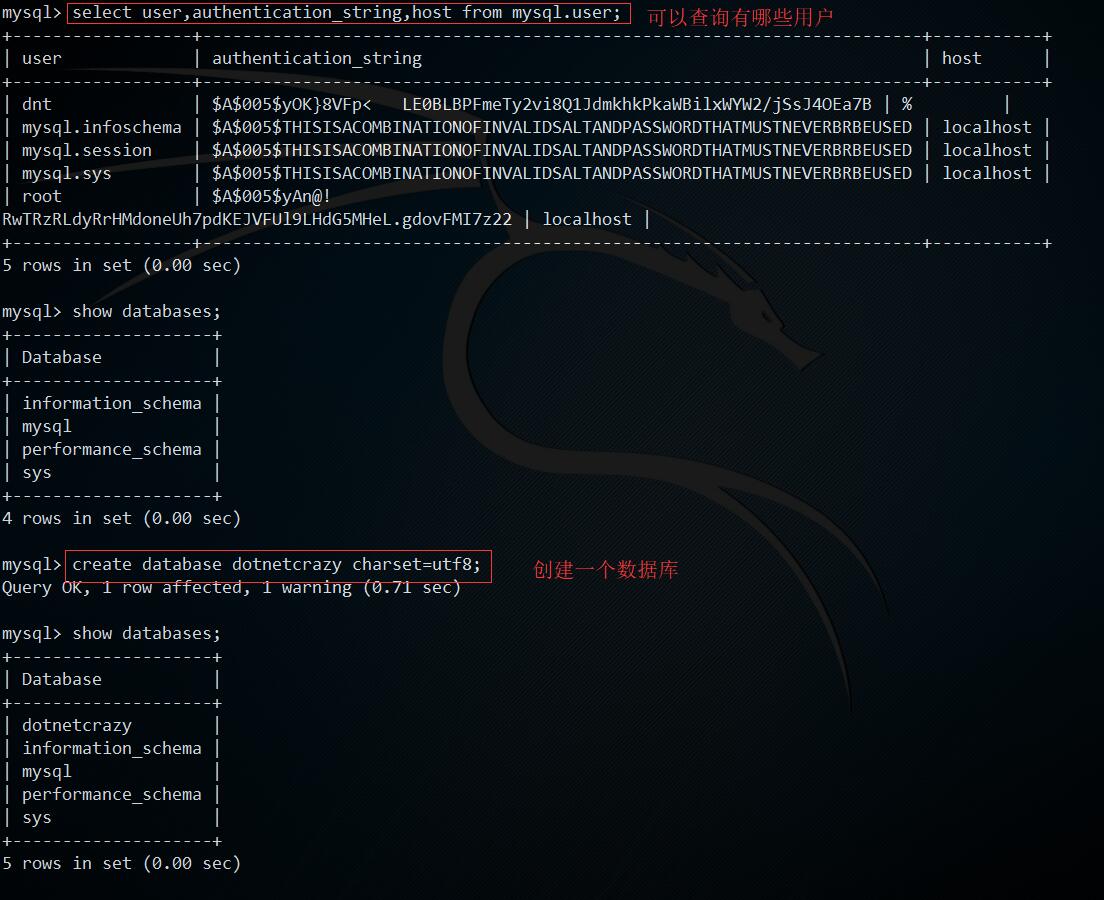
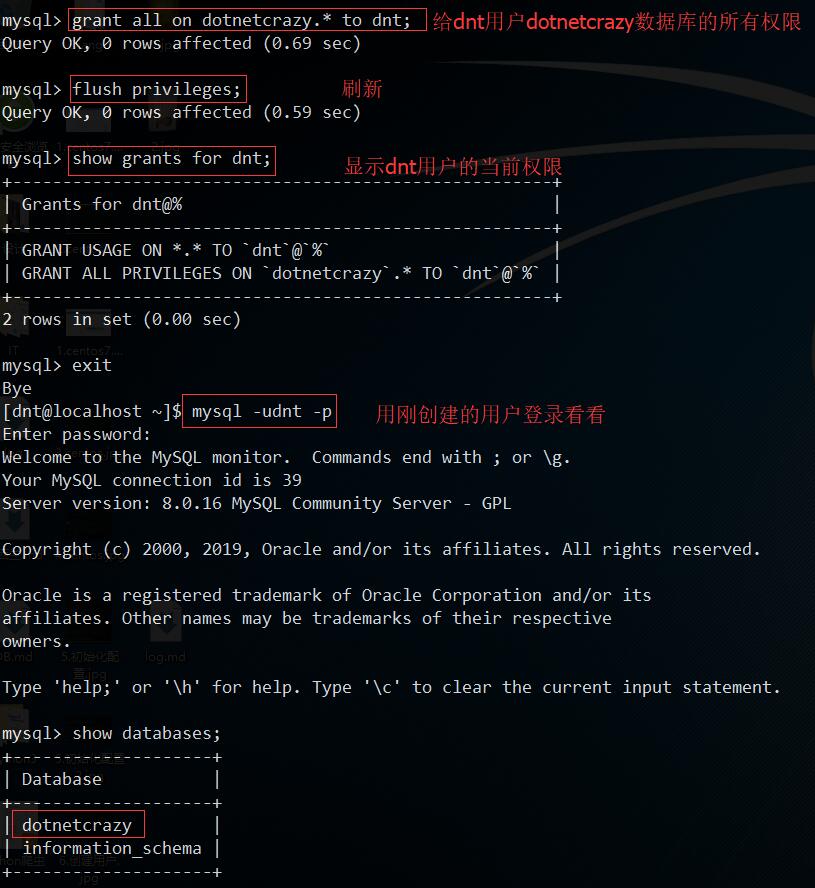
给用户dnt分配数据库dotnetcrazy的所有权限 grant all on dotnetcrazy.* to dnt;
刷新权限 flush privileges;
显示新用户有哪些权限 show grants for dnt;
4.配置相关
这块我就说下开远程的配置,其他的可以查看之前写的文章:<https://www.cnblogs.com/dotnetcrazy/p/10810798.html>
root权限去修改 /etc/my.cnf
在[mysqld]选项下新增:bind-address=0.0.0.0

开放3306端口的远程访问权限:firewall-cmd --zone=public --add-port=3306/tcp --permanent
刷新防火墙规则 firewall-cmd --reload
重启MySQL:systemctl restart mysqld

测试
Shell附录
1.安装附录
# 下载yum源(curl是系统自带的)
# curl https://repo.mysql.com//mysql80-community-release-el7-3.noarch.rpm > centos7.mysql.rpm
[root@localhost dnt] curl https://repo.mysql.com//mysql80-community-release-el7-3.noarch.rpm > centos7.mysql.rpm
  % Total    % Received % Xferd  Average Speed   Time    Time     Time  Current
                                 Dload  Upload   Total   Spent    Left  Speed
100 26024  100 26024    0     0  38150      0 --:--:-- --:--:-- --:--:-- 38158
[root@localhost dnt]# ls
centos7.mysql.rpm

# 安装MySQL的yum源
# yum install centos7.mysql.rpm -y
[root@localhost dnt] yum install centos7.mysql.rpm -y
已加载插件:fastestmirror
正在检查 centos7.mysql.rpm: mysql80-community-release-el7-3.noarch
centos7.mysql.rpm 将被安装
正在解决依赖关系
--> 正在检查事务
---> 软件包 mysql80-community-release.noarch.0.el7-3 将被 安装
--> 解决依赖关系完成

依赖关系解决

==========================================================================================================
 Package                                架构                版本                 源                           大小
==========================================================================================================
正在安装:
 mysql80-community-release              noarch              el7-3                /centos7.mysql               31 k

事务概要
==========================================================================================================
安装  1 软件包

总计:31 k
安装大小:31 k
Downloading packages:
Running transaction check
Running transaction test
Transaction test succeeded
Running transaction
  正在安装    : mysql80-community-release-el7-3.noarch                                                         1/1
  验证中      : mysql80-community-release-el7-3.noarch                                                         1/1

已安装:
  mysql80-community-release.noarch 0:el7-3

完毕!

# 安装MySQL8.0
# yum install mysql-community-server -y
[root@localhost dnt] yum install mysql-community-server -y
已加载插件:fastestmirror
Loading mirror speeds from cached hostfile
 * base: mirrors.aliyun.com
 * extras: mirrors.cn99.com
 * updates: mirrors.aliyun.com
base                                                                                        | 3.6 kB  00:00:00
extras                                                                                      | 3.4 kB  00:00:00
mysql-connectors-community                                                                  | 2.5 kB  00:00:00
mysql-tools-community                                                                       | 2.5 kB  00:00:00
mysql80-community                                                                           | 2.5 kB  00:00:00
updates                                                                                     | 3.4 kB  00:00:00
(1/3): mysql-connectors-community/x86_64/primary_db                                         |  41 kB  00:00:00
(2/3): mysql80-community/x86_64/primary_db                                                  |  70 kB  00:00:00
(3/3): mysql-tools-community/x86_64/primary_db                                              |  58 kB  00:00:00
正在解决依赖关系
--> 正在检查事务
---> 软件包 mysql-community-server.x86_64.0.8.0.16-2.el7 将被 安装
--> 正在处理依赖关系 mysql-community-common(x86-64) = 8.0.16-2.el7,它被软件包 mysql-community-server-8.0.16-2.el7.x86_64 需要
--> 正在处理依赖关系 mysql-community-client(x86-64) >= 8.0.11,它被软件包 mysql-community-server-8.0.16-2.el7.x86_64 需要
--> 正在处理依赖关系 net-tools,它被软件包 mysql-community-server-8.0.16-2.el7.x86_64 需要
--> 正在检查事务
---> 软件包 mysql-community-client.x86_64.0.8.0.16-2.el7 将被 安装
--> 正在处理依赖关系 mysql-community-libs(x86-64) >= 8.0.11,它被软件包 mysql-community-client-8.0.16-2.el7.x86_64 需要
---> 软件包 mysql-community-common.x86_64.0.8.0.16-2.el7 将被 安装
---> 软件包 net-tools.x86_64.0.2.0-0.24.20131004git.el7 将被 安装
--> 正在检查事务
---> 软件包 mariadb-libs.x86_64.1.5.5.60-1.el7_5 将被 取代
--> 正在处理依赖关系 libmysqlclient.so.18()(64bit),它被软件包 2:postfix-2.10.1-7.el7.x86_64 需要
--> 正在处理依赖关系 libmysqlclient.so.18(libmysqlclient_18)(64bit),它被软件包 2:postfix-2.10.1-7.el7.x86_64 需要
---> 软件包 mysql-community-libs.x86_64.0.8.0.16-2.el7 将被 舍弃
--> 正在检查事务
---> 软件包 mysql-community-libs-compat.x86_64.0.8.0.16-2.el7 将被 舍弃
--> 解决依赖关系完成

依赖关系解决

==========================================================================================================
 Package                            架构          版本                              源                        大小
==========================================================================================================
正在安装:
 mysql-community-libs               x86_64        8.0.16-2.el7                      mysql80-community        3.0 M
      替换  mariadb-libs.x86_64 1:5.5.60-1.el7_5
 mysql-community-libs-compat        x86_64        8.0.16-2.el7                      mysql80-community        2.1 M
      替换  mariadb-libs.x86_64 1:5.5.60-1.el7_5
 mysql-community-server             x86_64        8.0.16-2.el7                      mysql80-community        403 M
为依赖而安装:
 mysql-community-client             x86_64        8.0.16-2.el7                      mysql80-community         32 M
 mysql-community-common             x86_64        8.0.16-2.el7                      mysql80-community        575 k
 net-tools                          x86_64        2.0-0.24.20131004git.el7          base                     306 k

事务概要
==========================================================================================================
安装  3 软件包 (+3 依赖软件包)

总下载量:441 M
Downloading packages:
警告:/var/cache/yum/x86_64/7/mysql80-community/packages/mysql-community-common-8.0.16-2.el7.x86_64.rpm: 头V3 DSA/SHA1 Signature, 密钥 ID 5072e1f5: NOKEY
mysql-community-common-8.0.16-2.el7.x86_64.rpm 的公钥尚未安装
(1/6): mysql-community-common-8.0.16-2.el7.x86_64.rpm                                       | 575 kB  00:00:00
(2/6): mysql-community-libs-8.0.16-2.el7.x86_64.rpm                                         | 3.0 MB  00:00:00
(3/6): mysql-community-libs-compat-8.0.16-2.el7.x86_64.rpm                                  | 2.1 MB  00:00:00
(4/6): net-tools-2.0-0.24.20131004git.el7.x86_64.rpm                                        | 306 kB  00:00:00
(5/6): mysql-community-client-8.0.16-2.el7.x86_64.rpm                                       |  32 MB  00:00:14
(6/6): mysql-community-server-8.0.16-2.el7.x86_64.rpm                                       | 403 MB  00:01:08
-------------------------------------------------------------------------------------------------------------------
总计                                                                               6.2 MB/s | 441 MB  00:01:10
从 file:///etc/pki/rpm-gpg/RPM-GPG-KEY-mysql 检索密钥
导入 GPG key 0x5072E1F5:
 用户ID     : "MySQL Release Engineering <mysql-build@oss.oracle.com>"
 指纹       : a4a9 4068 76fc bd3c 4567 70c8 8c71 8d3b 5072 e1f5
 软件包     : mysql80-community-release-el7-3.noarch (installed)
 来自       : /etc/pki/rpm-gpg/RPM-GPG-KEY-mysql
Running transaction check
Running transaction test
Transaction test succeeded
Running transaction
  正在安装    : mysql-community-common-8.0.16-2.el7.x86_64                                                     1/7
  正在安装    : mysql-community-libs-8.0.16-2.el7.x86_64                                                       2/7
  正在安装    : mysql-community-client-8.0.16-2.el7.x86_64                                                     3/7
  正在安装    : net-tools-2.0-0.24.20131004git.el7.x86_64                                                      4/7
  正在安装    : mysql-community-server-8.0.16-2.el7.x86_64                                                     5/7
  正在安装    : mysql-community-libs-compat-8.0.16-2.el7.x86_64                                                6/7
  正在删除    : 1:mariadb-libs-5.5.60-1.el7_5.x86_64                                                           7/7
  验证中      : mysql-community-libs-8.0.16-2.el7.x86_64                                                       1/7
  验证中      : net-tools-2.0-0.24.20131004git.el7.x86_64                                                      2/7
  验证中      : mysql-community-libs-compat-8.0.16-2.el7.x86_64                                                3/7
  验证中      : mysql-community-client-8.0.16-2.el7.x86_64                                                     4/7
  验证中      : mysql-community-common-8.0.16-2.el7.x86_64                                                     5/7
  验证中      : mysql-community-server-8.0.16-2.el7.x86_64                                                     6/7
  验证中      : 1:mariadb-libs-5.5.60-1.el7_5.x86_64                                                           7/7

已安装:
  mysql-community-libs.x86_64 0:8.0.16-2.el7            mysql-community-libs-compat.x86_64 0:8.0.16-2.el7
  mysql-community-server.x86_64 0:8.0.16-2.el7

作为依赖被安装:
  mysql-community-client.x86_64 0:8.0.16-2.el7             mysql-community-common.x86_64 0:8.0.16-2.el7
  net-tools.x86_64 0:2.0-0.24.20131004git.el7

替代:
  mariadb-libs.x86_64 1:5.5.60-1.el7_5

完毕!

# 启动mysql
# systemctl start mysqld
[root@localhost dnt] systemctl start mysqld
[root@localhost dnt] pstree | grep mysql
        |-mysqld---37*[{mysqld}]

# 设置开机启动mysql
# systemctl enable mysqld
[root@localhost dnt] systemctl enable mysqld
[root@localhost dnt] reboot
Connection closing...Socket close.

Connection closed by foreign host.

Disconnected from remote host(MySQL_CentOS) at 10:56:42.

Connecting to 192.168.36.205:22...
Connection established.
To escape to local shell, press 'Ctrl+Alt+]'.

WARNING! The remote SSH server rejected X11 forwarding request.
Last login: Wed May 15 10:35:07 2019 from 192.168.36.144
[dnt@localhost ~]$ pstree | grep mysql
        |-mysqld---37*[{mysqld}]

# 查看mysql的状态
# systemctl status mysqld
[dnt@localhost ~]$ systemctl status mysqld
● mysqld.service - MySQL Server
   Loaded: loaded (/usr/lib/systemd/system/mysqld.service; enabled; vendor preset: disabled)
   Active: active (running) since 三 2019-05-15 10:57:26 CST; 1min 3s ago
     Docs: man:mysqld(8)
           http://dev.mysql.com/doc/refman/en/using-systemd.html
  Process: 3934 ExecStartPre=/usr/bin/mysqld_pre_systemd (code=exited, status=0/SUCCESS)
 Main PID: 3969 (mysqld)
   Status: "SERVER_OPERATING"
   CGroup: /system.slice/mysqld.service
           └─3969 /usr/sbin/mysqld
2.初始化配置附录
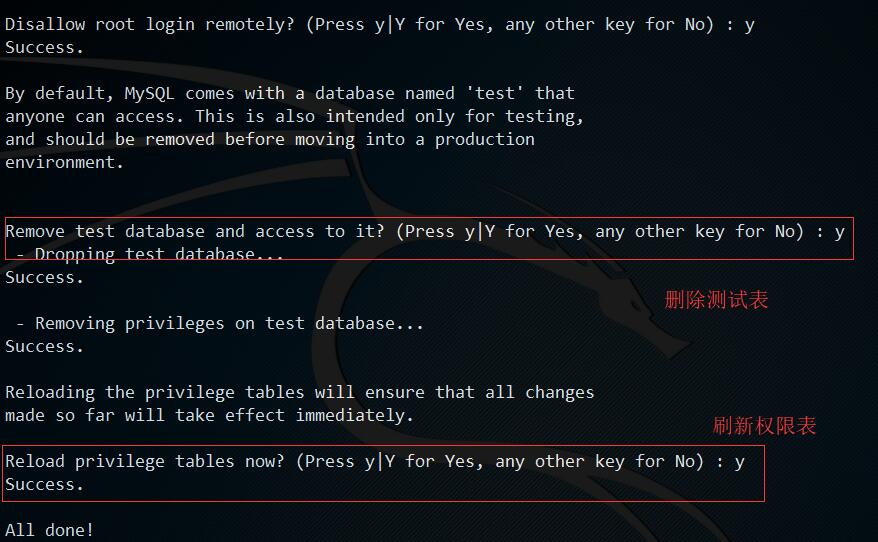
# 查看初始密码
# cat /var/log/mysqld.log | grep "password"
[dnt@localhost ~]$ cat /var/log/mysqld.log | grep "password"
2019-05-15T02:55:51.132377Z 5 [Note] [MY-010454] [Server] A temporary password is generated for root@localhost: wI>X.(tHE5&e

# 安全初始化
# mysql_secure_installation
[dnt@localhost ~]$ mysql_secure_installation

Securing the MySQL server deployment.

Enter password for user root:
The 'validate_password' component is installed on the server.
The subsequent steps will run with the existing configuration
of the component.
Using existing password for root.

Estimated strength of the password: 100
Change the password for root ? ((Press y|Y for Yes, any other key for No) : n

 ... skipping.
By default, a MySQL installation has an anonymous user,
allowing anyone to log into MySQL without having to have
a user account created for them. This is intended only for
testing, and to make the installation go a bit smoother.
You should remove them before moving into a production
environment.

Remove anonymous users? (Press y|Y for Yes, any other key for No) : y
Success.


Normally, root should only be allowed to connect from
'localhost'. This ensures that someone cannot guess at
the root password from the network.

Disallow root login remotely? (Press y|Y for Yes, any other key for No) : y
Success.

By default, MySQL comes with a database named 'test' that
anyone can access. This is also intended only for testing,
and should be removed before moving into a production
environment.


Remove test database and access to it? (Press y|Y for Yes, any other key for No) : y
 - Dropping test database...
Success.

 - Removing privileges on test database...
Success.

Reloading the privilege tables will ensure that all changes
made so far will take effect immediately.

Reload privilege tables now? (Press y|Y for Yes, any other key for No) : y
Success.

All done!
3.权限附录
# 用root账号登录
# mysql -uroot -p
[dnt@localhost ~]$ mysql -uroot -p
Enter password:
Welcome to the MySQL monitor.  Commands end with ; or \g.
Your MySQL connection id is 38
Server version: 8.0.16 MySQL Community Server - GPL

Copyright (c) 2000, 2019, Oracle and/or its affiliates. All rights reserved.

Oracle is a registered trademark of Oracle Corporation and/or its
affiliates. Other names may be trademarks of their respective
owners.

Type 'help;' or '\h' for help. Type '\c' to clear the current input statement.

# show databases;
mysql> show databases;
+--------------------+
| Database           |
+--------------------+
| information_schema |
| mysql              |
| performance_schema |
| sys                |
+--------------------+
4 rows in set (0.00 sec)

# 创建用户dnt
# create user dnt@'%' identified by '含大小写字母+数字的密码';
mysql> create user dnt@'%' identified by '含大小写字母+数字的密码';
Query OK, 0 rows affected (0.06 sec)

# 查看当前有哪些用户
# select user,authentication_string,host from mysql.user;
mysql> select user,authentication_string,host from mysql.user;
+------------------+------------------------------------------------------------------------+-----------+
| user             | authentication_string                                                  | host      |
+------------------+------------------------------------------------------------------------+-----------+
| dnt              | $A$005$yOK}8VFp<	LE0BLBPFmeTy2vi8Q1JdmkhkPkaWBilxWYW2/jSsJ4OEa7B | %         |
| mysql.infoschema | $A$005$THISISACOMBINATIONOFINVALIDSALTANDPASSWORDTHATMUSTNEVERBRBEUSED | localhost |
| mysql.session    | $A$005$THISISACOMBINATIONOFINVALIDSALTANDPASSWORDTHATMUSTNEVERBRBEUSED | localhost |
| mysql.sys        | $A$005$THISISACOMBINATIONOFINVALIDSALTANDPASSWORDTHATMUSTNEVERBRBEUSED | localhost |
| root             | $A$005$yAn@!RwTRzRLdyRrHMdoneUh7pdKEJVFUl9LHdG5MHeL.gdovFMI7z22 | localhost |
+------------------+------------------------------------------------------------------------+-----------+
5 rows in set (0.00 sec)

# 创建一个数据库
# create database dotnetcrazy charset=utf8;
mysql> create database dotnetcrazy charset=utf8;
Query OK, 1 row affected, 1 warning (0.71 sec)

mysql> show databases;
+--------------------+
| Database           |
+--------------------+
| dotnetcrazy        |
| information_schema |
| mysql              |
| performance_schema |
| sys                |
+--------------------+
5 rows in set (0.00 sec)

# 给用户dnt分配数据库dotnetcrazy的所有权限
# grant all on dotnetcrazy.* to dnt;
mysql> grant all on dotnetcrazy.* to dnt;
Query OK, 0 rows affected (0.69 sec)

# 刷新权限
# flush privileges;
mysql> flush privileges;
Query OK, 0 rows affected (0.59 sec)

# 显示新用户有哪些权限
# show grants for dnt;
mysql> show grants for dnt;
+------------------------------------------------------+
| Grants for dnt@%                                     |
+------------------------------------------------------+
| GRANT USAGE ON *.* TO `dnt`@`%`                      |
| GRANT ALL PRIVILEGES ON `dotnetcrazy`.* TO `dnt`@`%` |
+------------------------------------------------------+
2 rows in set (0.00 sec)

mysql> exit
Bye

# 用新增用户登录
# mysql -udnt -p
[dnt@localhost ~]$ mysql -udnt -p
Enter password:
Welcome to the MySQL monitor.  Commands end with ; or \g.
Your MySQL connection id is 39
Server version: 8.0.16 MySQL Community Server - GPL

Copyright (c) 2000, 2019, Oracle and/or its affiliates. All rights reserved.

Oracle is a registered trademark of Oracle Corporation and/or its
affiliates. Other names may be trademarks of their respective
owners.

Type 'help;' or '\h' for help. Type '\c' to clear the current input statement.

# show databases;
mysql> show databases;
+--------------------+
| Database           |
+--------------------+
| dotnetcrazy        |
| information_schema |
+--------------------+
2 rows in set (0.01 sec)
4.配置附录
[dnt@localhost ~]$ su
密码:
[root@localhost dnt]# ls /etc/ | grep my
my.cnf
my.cnf.d
[root@localhost dnt]# ls /etc/my.cnf.d/

# 修改配置,运行远程登录
[root@localhost dnt]# vi /etc/my.cnf
[root@localhost dnt]# cat /etc/my.cnf
[mysqld]
bind-address=0.0.0.0 # 新增内容

datadir=/var/lib/mysql
socket=/var/lib/mysql/mysql.sock

log-error=/var/log/mysqld.log
pid-file=/var/run/mysqld/mysqld.pid

# 查看一下防火墙状态
# systemctl status firewalld
[root@localhost dnt] systemctl status firewalld
● firewalld.service - firewalld - dynamic firewall daemon
   Loaded: loaded (/usr/lib/systemd/system/firewalld.service; enabled; vendor preset: enabled)
   Active: active (running) since 三 2019-05-15 17:37:49 CST; 28min ago
     Docs: man:firewalld(1)
 Main PID: 3467 (firewalld)
   CGroup: /system.slice/firewalld.service
           └─3467 /usr/bin/python -Es /usr/sbin/firewalld --nofork --nopid

5月 15 17:37:47 localhost.localdomain systemd[1]: Starting firewalld - dynamic firewall daemon...
5月 15 17:37:49 localhost.localdomain systemd[1]: Started firewalld - dynamic firewall daemon.

# 开放3306端口的远程访问权限
# firewall-cmd --zone=public --add-port=3306/tcp --permanent
[root@localhost dnt]# firewall-cmd --zone=public --add-port=3306/tcp --permanent
success

# 刷新防火墙规则
# firewall-cmd --reload
[root@localhost dnt]# firewall-cmd --reload
success

# 重启MySQL
# systemctl restart mysqld
[root@localhost dnt]# systemctl restart mysqld
作者:毒逆天
打赏:18i4JpL6g54yAPAefdtgqwRrZ43YJwAV5z

 浙公网安备 33010602011771号