TPL应用:HttpClient
一、引言
我们有时侯需要在程序里面调用Http接口、请求http资源、编写http爬虫等的时候都需要在程序里面进行Http请求。很多人习惯的WebClient、HttpWebRequest在TPL下有很多用起来不方便的地方,TPL下推荐使用HttpClient(using System.Net.Http),而且在.NET Core下已经不在支持WebClient等。
1、发送Get请求
HttpClient发出Get请求获取文本响应,如下面的代码:
// 实例化HttpClient对象
HttpClient hc = new HttpClient();
// 发送Get请求获取
string strContent =await hc.GetStringAsync("http://www.baidu.com");
2、发送Post请求
HttpClient发送Post请求使用Task<HttpResponseMessage> PostAsync(string requestUri,HttpContent content)方法,方法的第一个参数是请求的地址,第二个参数用来设置请求内容。HttpContent是抽象类,主要有下面的几个子类:
- FormUrlEncodedContent:表示用来发送表单格式的请求。
- StringContent:表示用来发送字符串请求。
- MultipartFormDataContent:Multipart发送表单请求,一般带上传文件信息。
- StreamContent:发送流内容。
二、实例
下面我们看一个使用HttpClient发送Post请求的实例。我们创建一个MVC项目,控制器里面有三个Post请求的方法,分别模拟三种不同内容的Http请求,代码如下:
using System.Web;
using System.Web.Mvc;

namespace HttpClientMVCTestDemo.Controllers
{
    public class LoginRequest
    {
        public string userName { get; set; }
        public string password { get; set; }
    }


    public class HttpClientTestController : Controller
    {
        // GET: HttpClientTest
        public ActionResult Index()
        {
            return View();
        }

        /// <summary>
        /// 发送表单请求
        /// </summary>
        /// <param name="userName"></param>
        /// <param name="password"></param>
        /// <returns></returns>
        [HttpPost]
        public string Login(string userName, string password)
        {

            if (userName == "admin" && password == "123")
            {
                return "ok";
            }
            else
            {
                return "error";
            }
        }

        /// <summary>
        /// 发送Json格式的请求
        /// </summary>
        /// <param name="data"></param>
        /// <returns></returns>
        [HttpPost]
        public string Login2(LoginRequest data)
        {
            string userName = data.userName;
            string password = data.password;
            if (userName == "admin" && password == "123")
            {
                return "ok";
            }
            else
            {
                return "error";
            }
        }

        /// <summary>
        /// 上传文件
        /// </summary>
        /// <param name="file"></param>
        /// <returns></returns>
        [HttpPost]
        public string Upload(HttpPostedFileBase file)
        {
            string userName = Request.Headers["UserName"];
            string password = Request.Headers["Password"];
            if (userName == "admin" && password == "123")
            {
                // 保存文件
                file.SaveAs(Server.MapPath("~/" + file.FileName));
                return "ok";
            }
            else
            {
                return "error";
            }
        }
    }
}
然后创建一个Winform程序,用来发送Http请求。界面上有三个按钮,分别发送三种不同内容的Http请求。
1、发送表单内容的请求
我们看下面发送表单请求的代码:
/// <summary>
/// 模拟发送表单内容的Http请求
/// </summary>
/// <param name="sender"></param>
/// <param name="e"></param>
private async void btnForm_Click(object sender, EventArgs e)
{
    // 实例化对象
    HttpClient client = new HttpClient();
    Dictionary<string, string> dic = new Dictionary<string, string>();
    dic["userName"] = "admin";
    dic["password"] = "123";
    // 参数
    FormUrlEncodedContent content = new FormUrlEncodedContent(dic);
    // 发送post请求
    HttpResponseMessage responseMsg = await client.PostAsync("http://localhost:55179/HttpClientTest/login", content);
    // 返回报文体
    // responseMsg.Content
    // 返回响应头
    // responseMsg.Headers
    // 返回响应码
    // responseMsg.StatusCode
    // 获取返回值 这里确定返回的是字符串,调用string
    string msg =await responseMsg.Content.ReadAsStringAsync();
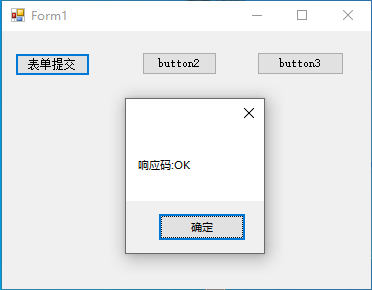
    MessageBox.Show($"响应码:{responseMsg.StatusCode.ToString()}");
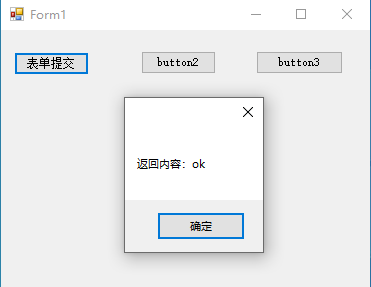
    MessageBox.Show($"返回内容:{msg}");
}
程序运行结果:

点击“确定”,查看返回内容:

2、发送json格式内容的请求
下面是发送json内容请求的代码:
/// <summary>
/// 发送json
/// </summary>
/// <param name="sender"></param>
/// <param name="e"></param>
private async void btnJson_Click(object sender, EventArgs e)
{
    // json格式的字符串
    string jsonData = "{userName:'admin',password:'123'}";
    // 实例化对象
    HttpClient client = new HttpClient();
    StringContent content = new StringContent(jsonData);
    // 设置contentType,必须要设置 设置为json格式,MVC会自动转换成Model类型
    content.Headers.ContentType = MediaTypeHeaderValue.Parse("application/json");
    // 发送post请求
    HttpResponseMessage responseMsg = await client.PostAsync("http://localhost:55179/HttpClientTest/login2", content);
    // 获取返回值
    string msg = await responseMsg.Content.ReadAsStringAsync();
    MessageBox.Show($"响应码:{responseMsg.StatusCode.ToString()}");
    MessageBox.Show($"返回内容:{msg}");
}
3、上传文件
看一下上传文件的代码:
/// <summary>
/// 上传文件
/// </summary>
/// <param name="sender"></param>
/// <param name="e"></param>
private async void btnUpload_Click(object sender, EventArgs e)
{
    // 实例化对象
    HttpClient client = new HttpClient();
    MultipartFormDataContent content = new MultipartFormDataContent();
    content.Headers.Add("UserName", "admin");
    content.Headers.Add("Password", "123");
    using (Stream stream = File.OpenRead(@"F:\数据库.txt"))
    {
        content.Add(new StreamContent(stream), "file", "test.txt");
        HttpResponseMessage responseMsg = await client.PostAsync("http://localhost:55179/HttpClientTest/Upload", content);
        // 返回值
        string msg = await responseMsg.Content.ReadAsStringAsync();
        MessageBox.Show($"响应码:{responseMsg.StatusCode.ToString()}");
        MessageBox.Show($"返回内容:{msg}");
    }
}
点击上传文件按钮以后,就能在服务器端看到我们上传的文件了。


· 10年+ .NET Coder 心语,封装的思维:从隐藏、稳定开始理解其本质意义
· .NET Core 中如何实现缓存的预热?
· 从 HTTP 原因短语缺失研究 HTTP/2 和 HTTP/3 的设计差异
· AI与.NET技术实操系列:向量存储与相似性搜索在 .NET 中的实现
· 基于Microsoft.Extensions.AI核心库实现RAG应用
· 阿里巴巴 QwQ-32B真的超越了 DeepSeek R-1吗?
· 10年+ .NET Coder 心语 ── 封装的思维:从隐藏、稳定开始理解其本质意义
· 【译】Visual Studio 中新的强大生产力特性
· 【设计模式】告别冗长if-else语句:使用策略模式优化代码结构
· 字符编码:从基础到乱码解决