Android——Handler
Handler是Android异步消息处理线程的相关概念
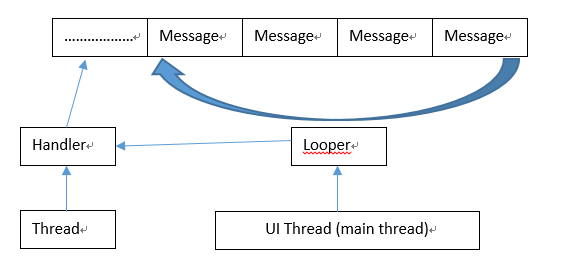
Looper负责的是一个MessageQueue,然后进入一个循环体不断从MessageQueue中读取消息,分发给对应的Handler来进行处理
下面有一个整体的图

(1) 主线程,也就是UI线程里面是不能执行耗时的操作的,因此需要新建线程来执行复杂的操作,比如从服务器获取消息,读取文件之类的工作
(2) 主线程中以及实现了一个looper,并执行了looper.prepare()和looper.loop()方法。(这也是为什么在子线程中直接新建Handler会报错的方法)
(3) 主线程会声明成员变量Handler,handler将需要处理的Message发送到消息队列中
(4) Looper从消息队列的头部拿出消息,handler的handlerMessage方法会对消息进行处理,消息处理一般在子线程中完成
1. 什么是Looper
Looper是一个轮询器,可以循环处理消息队列的信息,主要作用有两个
(1) 绑定当前的线程,保证一个线程只会有一个looper实例,同时一个looper实例也只有一个MessageQueue
(2) loop()方法,不断从MessageQueue中取消息,交给消息的target属性的dispatchMessage去处理
package android.os;

import android.os.MessageQueue;
import android.util.Printer;

public final class Looper {
    Looper() {
        throw new RuntimeException("Stub!");
    }

    public static void prepare() {
        throw new RuntimeException("Stub!");
    }

    public static void prepareMainLooper() {
        throw new RuntimeException("Stub!");
    }

    public static Looper getMainLooper() {
        throw new RuntimeException("Stub!");
    }

    public static void loop() {
        throw new RuntimeException("Stub!");
    }

    public static Looper myLooper() {
        throw new RuntimeException("Stub!");
    }

    public static MessageQueue myQueue() {
        throw new RuntimeException("Stub!");
    }

    public boolean isCurrentThread() {
        throw new RuntimeException("Stub!");
    }

    public void setMessageLogging(Printer printer) {
        throw new RuntimeException("Stub!");
    }

    public void quit() {
        throw new RuntimeException("Stub!");
    }

    public void quitSafely() {
        throw new RuntimeException("Stub!");
    }

    public Thread getThread() {
        throw new RuntimeException("Stub!");
    }

    public MessageQueue getQueue() {
        throw new RuntimeException("Stub!");
    }

    public void dump(Printer pw, String prefix) {
        throw new RuntimeException("Stub!");
    }

    public String toString() {
        throw new RuntimeException("Stub!");
    }
}
looper是一个final类型的类,不能被继承,只能使用
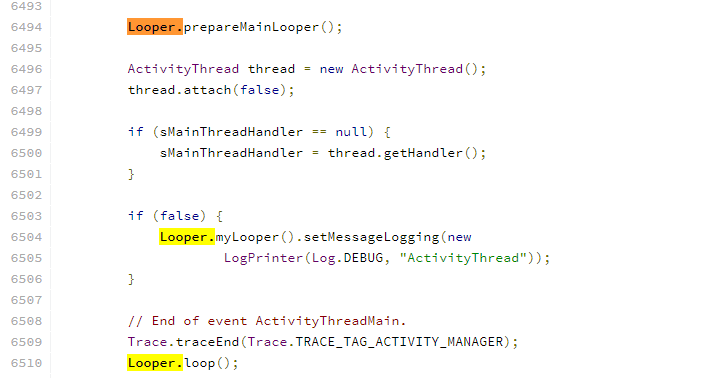
主线程中已经有一个Looper了,并且实现了prepareMainLooper()和Looper.loop()函数,如下图是ActivityThread类的源码
(https://android.googlesource.com/platform/frameworks/base/+/master/core/java/android/app/ActivityThread.java)

2. Looper创建好之后,Handler就可以创建来发送和处理消息了。
(1) 使用sendMessage和handleMessage来进行处理
    Handler handlerSent = new Handler(){
        public void handleMessage(Message msg){
            if(msg.what ==1){
                Log.d(TAG,"get the post message");
                Bundle bundle = msg.getData();
                String temp = bundle.getString("text");
                tv.append("\n"+temp);
            }
        }
    };


    @Override
    protected void onCreate(Bundle savedInstanceState) {
        super.onCreate(savedInstanceState);
        setContentView(R.layout.activity_main);
        tv = (TextView)findViewById(R.id.tv);
        send = (Button)findViewById(R.id.send);
        post = (Button)findViewById(R.id.post);

        send.setOnClickListener(new View.OnClickListener(){
            public void onClick(View v) {
                // TODO Auto-generated method stub
                Log.d(TAG, "post button");
                new Thread(new Runnable() {
                    @Override
                    public void run() {
                        Log.d(TAG, "post send a message");
                        Message msg = new Message();
                        Bundle data = new Bundle();
                        data.putString("text","post update UI");
                        msg.what = 1;
                        msg.setData(data);
                        handlerSent.sendMessage(msg);
                    }
                }).start();
            }
        });
    }
这里定义了一个button,点击button可以新启动一个线程,然后线程进行处理,并封装一个message发送到消息队列
Message长什么样哪?
public final class Message implements Parcelable {
    public static final Creator<Message> CREATOR = null;
    public int arg1;
    public int arg2;
    public Object obj;
    public Messenger replyTo;
    public int sendingUid;
    public int what;
}
这个是Message的主要成员函数,我们的例子中,主要是使用what进行标记,然后使用Bundle作为一个Object进行消息传递和处理。
(2) post方式
定义一个成员变量
private Handler handlerPost = new Handler();
然后在onCreate()中实现具体的消息传递。
        post.setOnClickListener(new View.OnClickListener(){
            public void onClick(View v){
                handlerPost.post(new Runnable() {
                    @Override
                    public void run() {
                        tv.append("\n"+"post update UI");
                    }
                });
            }
        });
其实post函数中也是调用了sendMessage的方法,只是形式更加简单而已,两种操作都是放在消息队列中进行处理的。都是主线程后面回调处理的,并不存在post在子线程中更新UI的说法。
3. 子线程中为什么不能直接创建Handler哪?
(1) 一个Handler的创建是需要获取Looper轮询器和MessageQueue消息队列的,他们是作为Handler的成员变量存在的
(2) Handler的创建必须是在调用Looper.prepare()之后才能创建的。
4. 多个handler进行消息发送,又是如何保证自己能收到消息并处理哪
    public void dispatchMessage(Message msg) {
        if (msg.callback != null) {
            handleCallback(msg);
        } else {
            if (mCallback != null) {
                if (mCallback.handleMessage(msg)) {
                    return;
                }
            }
            handleMessage(msg);
        }
    }
看一下这个分发消息的源码,其实在分发的时候是有一个标签的,就相当于handler A发送了消息,打上A的标签,looper在分发的时候,就分发给了对应的handler A。
最后,贴上整个代码,方便以后查看
import android.os.Handler;
import android.os.Message;
import android.support.v7.app.AppCompatActivity;
import android.os.Bundle;
import android.util.Log;
import android.view.View;
import android.widget.Button;
import android.widget.TextView;

public class MainActivity extends AppCompatActivity {

    private static final String TAG = "MainActivity";
    private TextView tv = null;
    private Button send = null;
    private Button post = null;

    private Handler handlerPost = new Handler();

    private Handler handlerSent = new Handler(){
        public void handleMessage(Message msg){
            if(msg.what ==1){
                Log.d(TAG,"get the post message");
                Bundle bundle = msg.getData();
                String temp = bundle.getString("text");
                tv.append("\n"+temp);
            }
        }
    };

    @Override
    protected void onCreate(Bundle savedInstanceState) {
        super.onCreate(savedInstanceState);
        setContentView(R.layout.activity_main);
        tv = (TextView)findViewById(R.id.tv);
        send = (Button)findViewById(R.id.send);
        post = (Button)findViewById(R.id.post);

        send.setOnClickListener(new View.OnClickListener(){
            public void onClick(View v) {
                // TODO Auto-generated method stub
                Log.d(TAG, "post button");
                new Thread(new Runnable() {
                    @Override
                    public void run() {
                        Log.d(TAG, "post send a message");
                        Message msg = new Message();
                        Bundle data = new Bundle();
                        data.putString("text","send message update UI");
                        msg.what = 1;
                        msg.setData(data);
                        handlerSent.sendMessage(msg);
                    }
                }).start();
            }
        });

        post.setOnClickListener(new View.OnClickListener(){
            public void onClick(View v){
                handlerPost.post(new Runnable() {
                    @Override
                    public void run() {
                        tv.append("\n"+"post update UI");
                    }
                });
            }
        });

    }
}


