任务28:房间内显示进入座位的玩家信息
如果上节,准确的实现了让玩家进入房间并且坐到正确的座位上,本节就可以向服务器拿到玩家信息,显示在对应的座位上了。
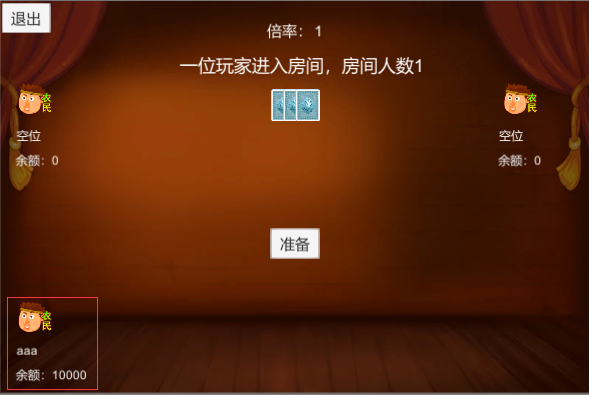
本节的效果

前端界面与脚本
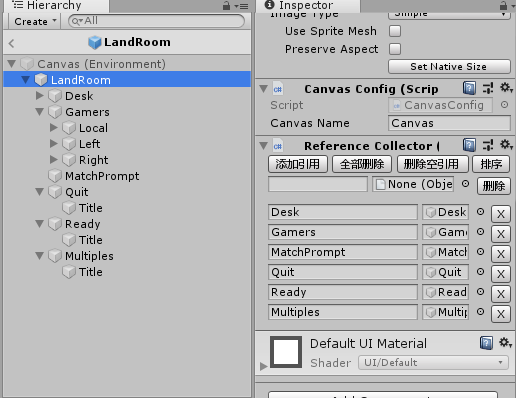
从本节可以下载新增的LandRoom界面资源,增加了在房间中玩家的Panel界面。
LandRoom的元件绑定

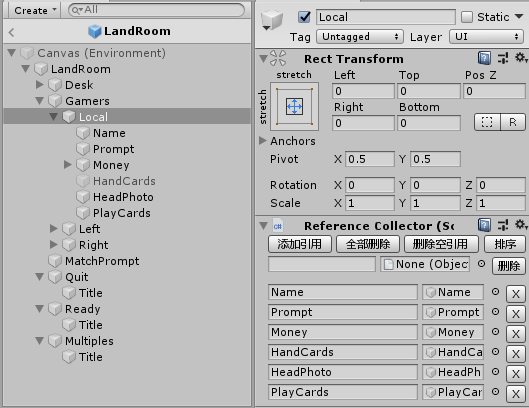
Gamers的元件绑定

具体每个玩家Panel界面绑定

注意一下啊,可能你下载界面资源到你的项目目录,用unity打开项目后,出现丢失脚本的问题,
你需要对照上面的图都一一重新挂好ReferenceCollector脚本,并挂载好界面元件。


而且需要一一把丢失脚本的元件都挂好ReferenceCollector脚本并挂载好绑定元件,再保存,不然是保存不了的。
LandRoomComponent组件添加三个座位上的玩家面板
\Assets\Model\Landlords\LandUI\LandRoom\LandRoomComponent.cs
增加玩家面板GamersPanel 属性
public readonly GameObject[] GamersPanel = new GameObject[3];
awake中增加获取GamersPanel 元件
跟上节约定的一样,0号座位是左边玩家,1号是本地当前玩家,2是右边玩家。
 //添加玩家面板
GameObject gamersPanel = rc.Get<GameObject>("Gamers");
this.GamersPanel[0] = gamersPanel.Get<GameObject>("Left");
this.GamersPanel[1] = gamersPanel.Get<GameObject>("Local");
this.GamersPanel[2] = gamersPanel.Get<GameObject>("Right");
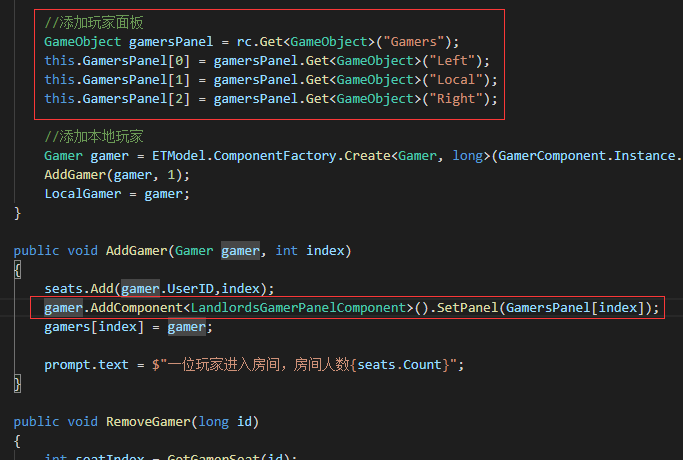
再在下面AddGamer方法中添加LandlordsGamerPanelComponent组件。
gamer.AddComponent<LandlordsGamerPanelComponent>().SetPanel(GamersPanel[index]);
下图中可以看到加在什么地方,当然没有这个图你也应该知道加在什么地方。

增加LandlordsGamerPanelComponent组件脚本
这个组件的内容都很基础,大家一看就能明白。
只有这个方法需要解释一下,当有玩家坐到座位上时,就是上面AddGamer调用了玩家Panel组件的 SetUserInfoInRoom 方法。
你需要想明白为什么这里调用 this.GetParent<Gamer>().UserID,就能拿到这个座位上的玩家的UserID。(ET中AddComponent的基本理解哦!)
        /// 设置用户信息
        private async void SetUserInfoInRoom()
        {
            G2C_GetUserInfoInRoom_Back g2C_GetUserInfo_Ack = (G2C_GetUserInfoInRoom_Back)await SessionComponent.Instance.Session.Call(new C2G_GetUserInfoInRoom_Req() { UserID = this.GetParent<Gamer>().UserID });

            if (this.Panel != null)
            {
                name.text = g2C_GetUserInfo_Ack.NickName;
                money.text = g2C_GetUserInfo_Ack.Money.ToString();
            }
        }
LandlordsGamerPanelComponent的完整代码
\Assets\Model\Landlords\Component\LandlordsGamerPanelComponent.cs
using System;
using UnityEngine;
using UnityEngine.UI;

namespace ETModel
{
    /// <summary>
    /// 玩家UI组件
    /// </summary>
    public class LandlordsGamerPanelComponent : Component
    {
        //UI面板
        public GameObject Panel;

        //玩家昵称
        public string NickName { get { return name.text; } }

        private Image headPhoto;
        private Text prompt;
        private Text name;
        private Text money;

        /// <summary>
        /// 设置面板
        /// </summary>
        /// <param name="panel"></param>
        public void SetPanel(GameObject panel)
        {
            this.Panel = panel;

            //绑定关联
            this.prompt = this.Panel.Get<GameObject>("Prompt").GetComponent<Text>();
            this.name = this.Panel.Get<GameObject>("Name").GetComponent<Text>();
            this.money = this.Panel.Get<GameObject>("Money").GetComponent<Text>();
            this.headPhoto = this.Panel.Get<GameObject>("HeadPhoto").GetComponent<Image>();

            UpdatePanel();
        }

        /// <summary>
        /// 更新面板
        /// </summary>
        public void UpdatePanel()
        {
            if (this.Panel != null)
            {
                SetUserInfoInRoom();
                //没抢地主前都显示农民头像
                headPhoto.gameObject.SetActive(true);
            }
        }

        /// <summary>
        /// 玩家准备
        /// </summary>
        public void SetReady()
        {
            prompt.text = "准备!";
        }

        /// <summary>
        /// 游戏开始
        /// </summary>
        public void GameStart()
        {
            ResetPrompt();
        }

        /// <summary>
        /// 重置提示
        /// </summary>
        public void ResetPrompt()
        {
            prompt.text = "";
        }

        /// <summary>
        /// 设置用户信息
        /// </summary>
        /// <param name="id"></param>
        private async void SetUserInfoInRoom()
        {
            G2C_GetUserInfoInRoom_Back g2C_GetUserInfo_Ack = (G2C_GetUserInfoInRoom_Back)await SessionComponent.Instance.Session.Call(new C2G_GetUserInfoInRoom_Req() { UserID = this.GetParent<Gamer>().UserID });

            if (this.Panel != null)
            {
                name.text = g2C_GetUserInfo_Ack.NickName;
                money.text = g2C_GetUserInfo_Ack.Money.ToString();
            }
        }

        /// <summary>
        /// 重置面板
        /// </summary>
        public void ResetPanel()
        {
            ResetPrompt();
            this.headPhoto.gameObject.SetActive(false);
            this.name.text = "空位";
            this.money.text = "";

            this.Panel = null;
            this.prompt = null;
            this.name = null;
            this.money = null;
            this.headPhoto = null;
        }

        public override void Dispose()
        {
            if (this.IsDisposed)
            {
                return;
            }

            base.Dispose();

            //重置玩家UI
            ResetPanel();
        }
    }
}
后端返回房间内玩家信息Handler
首先获取玩家信息,这肯定是一个C2G的请求。
然后我们回忆一下前面有A1001_GetUserInfo_Handler方法,他是在大厅界面获取本地玩家的详细信息的。来比较一下区别:
A1001_GetUserInfo_Handler
1、前端发来请求时,不需要他在消息中传来用户的UserID,因为就是本连接session对应的玩家,所以直接通过SessionUserComponent组件,获取到网关上这个玩家的user实例。
//获取玩家对象
User user = session.GetComponent<SessionUserComponent>().User;
2、需要返回单一玩家详细的信息给大厅界面显示所用。
C2G_GetUserInfoInRoom_Handler
1、需要前端请求时,在消息中传来要获取信息的用户的UserID,因为三个座位上的玩家信息都会用这同一个请求,而不只是当前本地玩家。
所以就要用UserID从数据库查询得到UserInfo实例,从而拿到需要的信息。
2、需要返回单一玩家小量信息给房间界面显示所用。
在服务端添加C2G_GetUserInfoInRoom_Handler
\Server\Hotfix\Landlords\Handler\Gate\C2G_GetUserInfoInRoom_Handler.cs
using System;
using ETModel;

namespace ETHotfix
{
    [MessageHandler(AppType.Gate)]
    public class C2G_GetUserInfoInRoom_Handler : AMRpcHandler<C2G_GetUserInfoInRoom_Req, G2C_GetUserInfoInRoom_Back>
    {
        protected override async ETTask Run(Session session, C2G_GetUserInfoInRoom_Req request, G2C_GetUserInfoInRoom_Back response, Action reply)
        {
            try
            {
                //验证Session
                if (!GateHelper.SignSession(session))
                {
                    response.Error = ErrorCode.ERR_SignError;
                    //Log.Debug("登陆错误");
                    reply();
                    return;
                }

                //查询用户信息
                //需要给Gate服务器添加数据库代理组件
                DBProxyComponent dbProxyComponent = Game.Scene.GetComponent<DBProxyComponent>();
                UserInfo userInfo = await dbProxyComponent.Query<UserInfo>(request.UserID);
                //Log.Debug("玩家信息:" + JsonHelper.ToJson(userInfo));

                response.NickName = userInfo.UserName;
                response.Money = userInfo.Money;

                reply();

                await ETTask.CompletedTask;
            }
            catch (Exception e)
            {
                ReplyError(response, e, reply);
            }
        }
    }
}
C2G_GetUserInfoInRoom_Req请求需要的消息指令与消息体
\Proto\OuterMessage.proto
//获取房间内玩家信息请求
message C2G_GetUserInfoInRoom_Req // IRequest
{
    int32 RpcId = 90;
    int64 UserID = 1;
}
//获取房间内玩家信息返回
message G2C_GetUserInfoInRoom_Back // IResponse
{
    int32 RpcId = 90;
    int32 Error = 91;
    string Message = 92;
    string NickName = 1;
    int32 Wins = 2;
    int32 Loses = 3;
    int64 Money = 4;
}
这里说明一下,对于我们的课程练习来说,OuterMessage.proto与HotfixMessage.proto消息定义放在他们哪个里面都是一样的。你自己也可以起不同名字的xxx.proto文件来划分与管理过多的消息定义。
生成消息文件后,就可以运行前后端项目,看到效果了。你可以打包输出后,开启多个客户端,用三个账号分别登录,观察进入也退出房间是不是正确的逻辑与每个座位上是不是正确显示了玩家信息。
下一节,将实现当每一个玩家都点准备开始游戏,房间中的三个玩家都准备好后,就正式开始游戏。
后面就是发牌和比较牌面,特效牌组的判断。进入到斗地主的核心地盘了!
什么春天,飞机等特效动画,音乐本课程就不会教了,这对于你们来说不难吧。


【推荐】国内首个AI IDE,深度理解中文开发场景,立即下载体验Trae
【推荐】编程新体验,更懂你的AI,立即体验豆包MarsCode编程助手
【推荐】抖音旗下AI助手豆包,你的智能百科全书,全免费不限次数
【推荐】轻量又高性能的 SSH 工具 IShell:AI 加持,快人一步
· AI与.NET技术实操系列:向量存储与相似性搜索在 .NET 中的实现
· 基于Microsoft.Extensions.AI核心库实现RAG应用
· Linux系列:如何用heaptrack跟踪.NET程序的非托管内存泄露
· 开发者必知的日志记录最佳实践
· SQL Server 2025 AI相关能力初探
· winform 绘制太阳,地球,月球 运作规律
· 震惊!C++程序真的从main开始吗?99%的程序员都答错了
· 【硬核科普】Trae如何「偷看」你的代码?零基础破解AI编程运行原理
· 超详细:普通电脑也行Windows部署deepseek R1训练数据并当服务器共享给他人
· 上周热点回顾(3.3-3.9)