
linux安装ElasticSearch
1.下载zip文件(根据实际需求下载对应版本的zip文件)
wget https://artifacts.elastic.co/downloads/elasticsearch/elasticsearch-5.5.1.zip
2.解压zip
unzip elasticsearch-5.5.1.zip
调用时可能遇到
-bash: unzip: command not found
说明liunx中没有unzip。
解决办法:通过以下命令安装
yum install -y unzip zip
3.elasticsearch使用java的jvm默认是使用1G的内存的,若linux内存不足会报error='Cannot allocate memory':
- [root@centos7.4-64 elasticsearch-6.2.2]# ./bin/elasticsearch -d
- Java HotSpot(TM) 64-Bit Server VM warning: INFO: os::commit_memory(0x00000000c5330000, 986513408, 0) failed; error='Cannot allocate memory' (errno=12)
解决办法:修改默认内存
[root@centos7.4-64 elasticsearch-6.2.2]# vim ./config/jvm.options
#修改内容
-Xms200m
-Xmx200m
然后按ESC,在调用:wq保存并退出
4.由于elasticsearch的安全性质,不能直接使用root用户进行操作
直接使用root用户操作会报:
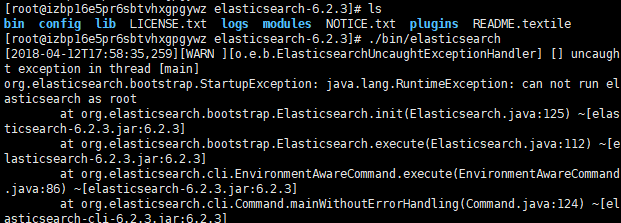
此时需要切换其他用户
1)添加用户:adduser 用户名
2)设置密码:passwd 用户名 ,再输入两次密码即可设置成功
3)切换用户:su 用户名
5.此时切换到刚创建的用户,调用./bin/elasticsearch,又报错了
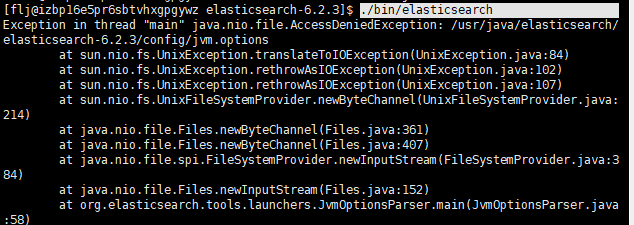
由以上问题可看出用户并不具备操作权限,因此改一下所属的用户权限
命令:chown elastic /usr/local/elasticsearch-6.2.2/ -R
在此,给大家科普一下知识:
chown :用来更改用户对文件的操作权限,只有被赋予了该权限才能进行相应的操作
通过ll命令可以查看当前目录下的文件的操作权限及对应拥有操作权限的人
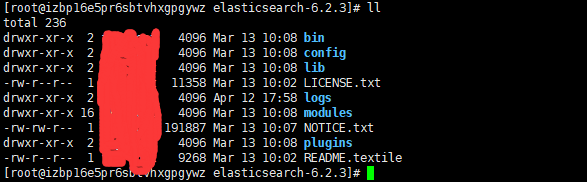
比如文件 LICENSE.txt这行
rw-是文件拥有者的权限,中间的r--是同组者的权限 最后的r--是其他人的权限
在这里每个权限占3位,分别是r:可读、w:可写、x:可操作
我们切回刚创建的用户,并启动elasticsearch,ok
6.默认情况下,Elastic 只允许本机访问,如果需要远程访问,可以修改 Elastic 安装目录的 config/elasticsearch.yml 文件,去掉 network.host 的注释,将它的值改成 0.0.0.0 ,然后重新启动 Elastic。
但要注意 network.host :后面必须空一位,否则会报以下错误
7.ElasticSearch启动错误处理方法(参考文档:https://www.cnblogs.com/configure/p/7479988.html)
在配置完elasticsearch,启动程序会报如下错误:
[1]: max file descriptors [65535] for elasticsearch process is too low, increase to at least [65536]
[2]: max number of threads [1024] for user [elk] is too low, increase to at least [2048]<br>[3]: max virtual memory areas vm.max_map_count [256000] is too low, increase to at least [262144][4]: system call filters failed to install; check the logs and fix your configuration or disable system call filters at your own risk1.针对错误[1]、[2],可以采取如下方式:
修改/etc/security/limits.conf配置文件:
[root@yqtrack-elk03 /]# vim /etc/security/limits.conf
添加如下配置项:* - nproc 65535* - nofile 409600elastic - memlock unlimited[root@yqtrack-elk03 /]# vim /etc/security/limits.d/90-nproc.conf
修改如下配置项目:* soft nproc unlimitedroot soft nproc unlimited [elk@yqtrack-elk03 /]$ ulimit -n
409600[elk@yqtrack-elk03 /]$ ulimit -u655352、针对错误[3],可以采取如下方式:
修改/etc/sysctl.conf文件配置项:
[root@localhost /]# vim /etc/sysctl.conf
# 一个进程可以拥有的VMA(虚拟内存区域)的数量:vm.max_map_count=262144# 调用虚拟内存的阈值数:vm.swappiness=1#禁用IPv6net.ipv6.conf.all.disable_ipv6 = 1net.ipv6.conf.default.disable_ipv6 = 1[root@localhost /]# sysctl -p3、针对错误[4],可以采取如下方式:
出现错误的原因:是因为centos6.x操作系统不支持SecComp,而elasticsearch 5.5.2默认bootstrap.system_call_filter为true进行检测,所以导致检测失败,失败后直接导致ES不能启动。
在elasticsearch.yml中添加配置项:bootstrap.system_call_filter为false:
# ----------------------------------- Memory -----------------------------------
bootstrap.memory_lock: falsebootstrap.system_call_filter: false重新启动程序,问题顺利解决!
