# 清空屏幕
cls
# 查看ip
ipconfig
# 测试网络
ping xxx
# 控制面板\程序\程序和功能\启动或关闭Windows功能\Telnet Client
# 测试:打开cmd,输入telnet
# 退出:quit
# 测试端口
C:\Users\ychen>telnet 192.168.128.78 3306
# 查看所有端口
netstat -ano
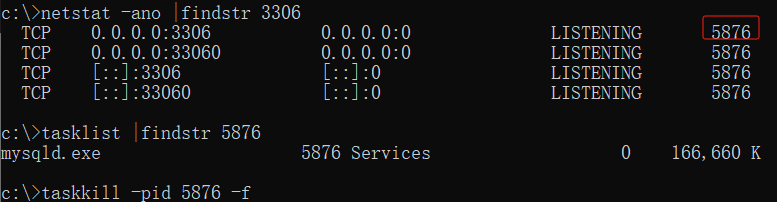
# 具体查看端口的号
netstat -ano |findstr 3306
# 通过pid来获取进程的信息
tasklist |findstr 5876
# 通过pid杀死端口进程
taskkill -pid 5876 -f
# 进入c盘目录
cd c:\
# 返回上级目录
cd ..
# 查看目录结构
dir
# 创建目录
md xxx
# 删除目录
rd xxx
# 文件拷贝
copy c:\work\a.txt c:\work\aa
# 移动文件
move c:\work\a.txt c:\work\aa
# 删除文件
del xxx
# 查看文件内容
more xxx
# 设置,应用,应用和功能,可选功能,OpenSSH客户端
ssh -p 22 user@xxx.xxx.xxx.xxx
# 将本地文件夹下的back01.sql上传到Linux的home路径下
scp /Users/back01.sql root@192.168.43.157:/home

# 将test文件夹上传到Linux的home目录下
scp -r /Users/test root@192.168.43.157:/home

PS C:\Users\chnq> scp root@192.168.43.157:/home/back01.sql /Users
root@192.168.43.157's password:
/Users/back01.sql: Permission denied                                                 # 下载失败,是因为本地的该文件夹需要管理员权限
PS C:\Users\chnq> scp root@192.168.43.157:/home/back01.sql D:\doc
root@192.168.43.157's password:
back01.sql                                                                            100% 1780   218.6KB/s   00:00
PS C:\Users\chnq> scp -r root@192.168.43.157:/home/test D:\doc
root@192.168.43.157's password:
back01.sql                                                                            100% 1780    13.1KB/s   00:00
# 使用命令ssh -p 22 user@xxx.xxx.xxx.xxx连接云服务器时报错
EAD+ychen224@CN-PF36VPKF MINGW64 ~
$ ssh -p 22 root@139.xxx.xxx.xxx
@@@@@@@@@@@@@@@@@@@@@@@@@@@@@@@@@@@@@@@@@@@@@@@@@@@@@@@@@@@
@    WARNING: REMOTE HOST IDENTIFICATION HAS CHANGED!     @
@@@@@@@@@@@@@@@@@@@@@@@@@@@@@@@@@@@@@@@@@@@@@@@@@@@@@@@@@@@
IT IS POSSIBLE THAT SOMEONE IS DOING SOMETHING NASTY!
Someone could be eavesdropping on you right now (man-in-the-middle attack)!
It is also possible that a host key has just been changed.
The fingerprint for the ED25519 key sent by the remote host is
SHA256:hM3Q5I/z6ycMd0JUrwSJ/LAUUY7dlcxzDwm7wlMCn7M.
Please contact your system administrator.
Add correct host key in /c/Users/ychen224/.ssh/known_hosts to get rid of this message.
Offending ECDSA key in /c/Users/ychen224/.ssh/known_hosts:15
Host key for 139.xxx.xxx.xxx has changed and you have requested strict checking.
Host key verification failed.

# 解决方案:清楚本地公钥,再次连接
EAD+ychen224@CN-PF36VPKF MINGW64 ~
$ ssh-keygen -R xxx.xxx.xxx.xxx
# Host 139.xxx.xxx.xxx found: line 13
# Host 139.xxx.xxx.xxx found: line 14
# Host 139.xxx.xxx.xxx found: line 15
/c/Users/ychen224/.ssh/known_hosts updated.
Original contents retained as /c/Users/ychen224/.ssh/known_hosts.old
ychen@DESKTOP-49HGBQ1 MINGW64 ~/Desktop
$ ftp
ftp> open 192.168.1.100 21
连接到 192.168.1.100。
220-FileZilla Server version 0.9.43 beta
220-written by Tim Kosse (tim.kosse@filezilla-project.org)
220 Please visit http://sourceforge.net/projects/filezilla/
530 Please log in with USER and PASS first.
用户(192.168.1.100:(none)): root
331 Password required for root
密码: ****
230 Logged on

ftp> ls
200 Port command successful
150 Opening data channel for directory list.
base.py
226 Successfully transferred ""
ftp: 收到 35 字节,用时 0.00秒 35.00千字节/秒。

ftp> get base.py
200 Port command successful
150 Opening data channel for file download from server of "/base.py"
226 Successfully transferred "/base.py"
ftp: 收到 14060 字节,用时 0.00秒 14060.00千字节/秒。

ftp> bye
221 Goodbye
# 连接linux
yum install -y vsftpd
cd /etc/vsftpd/
cp vsftpd.conf vsftpd.conf.bak

# 配置
vim /etc/vsftpd/vsftpd.conf
# 配置如下
anonymous_enable=YES
write_enable=YES
local_umask=022
anon_upload_enable=YES
anon_mkdir_write_enable=YES

# 修改权限
cd /var/ftp
chmod 777 /var/ftp/pub/

# 关闭防火墙
systemctl stop firewalld

# 启动
[root@node1 vsftpd]# systemctl start vsftpd
# 查看状态
[root@node1 vsftpd]# service vsftpd status
Redirecting to /bin/systemctl status vsftpd.service
● vsftpd.service - Vsftpd ftp daemon
   Loaded: loaded (/usr/lib/systemd/system/vsftpd.service; disabled; vendor preset: disabled)
   Active: active (running) since Wed 2024-01-17 16:05:41 CST; 2s ago
  Process: 2093 ExecStart=/usr/sbin/vsftpd /etc/vsftpd/vsftpd.conf (code=exited, status=0/SUCCESS)
 Main PID: 2094 (vsftpd)
    Tasks: 1
   Memory: 576.0K
   CGroup: /system.slice/vsftpd.service
           └─2094 /usr/sbin/vsftpd /etc/vsftpd/vsftpd.conf

Jan 17 16:05:41 node1 systemd[1]: Starting Vsftpd ftp daemon...
Jan 17 16:05:41 node1 systemd[1]: Started Vsftpd ftp daemon.

# win打开git bash -> ftp 192.168.128.100 -> 用户ftp -> 密码enter
ychen@DESKTOP-49HGBQ1 MINGW64 ~/Desktop
$ ftp 192.168.128.100
连接到 192.168.128.100。
220 (vsFTPd 3.0.2)
200 Always in UTF8 mode.
用户(192.168.128.100:(none)): ftp
331 Please specify the password.
密码:
230 Login successful.
ftp> pwd
257 "/"
ftp> ls
200 PORT command successful. Consider using PASV.
150 Here comes the directory listing.
pub
226 Directory send OK.
ftp: 收到 8 字节,用时 0.00秒 8000.00千字节/秒。
ftp> cd pub
250 Directory successfully changed.
ftp> ls
200 PORT command successful. Consider using PASV.
150 Here comes the directory listing.
test.txt
226 Directory send OK.
ftp: 收到 13 字节,用时 0.00秒 13000.00千字节/秒。
[root@node1 vsftpd]# systemctl start vsftpd
Job for vsftpd.service failed because the control process exited with error code. See "systemctl status vsftpd.service" and "journalctl -xe" for details.

# 解决方案,注释如下
# listen=yes
# listen_ipv6=no

# 依然报错,查看状态,提示:500 OOPS: unrecognised variable in config file: anon_other_write_enable
[root@node1 vsftpd]# service vsftpd status
Redirecting to /bin/systemctl status vsftpd.service
● vsftpd.service - Vsftpd ftp daemon
   Loaded: loaded (/usr/lib/systemd/system/vsftpd.service; disabled; vendor preset: disabled)
   Active: failed (Result: exit-code) since Wed 2024-01-17 16:04:27 CST; 37s ago
  Process: 2060 ExecStart=/usr/sbin/vsftpd /etc/vsftpd/vsftpd.conf (code=exited, status=2)

Jan 17 16:04:27 node1 systemd[1]: Starting Vsftpd ftp daemon...
Jan 17 16:04:27 node1 vsftpd[2060]: 500 OOPS: unrecognised variable in config file: anon_other_write_enable
Jan 17 16:04:27 node1 systemd[1]: vsftpd.service: control process exited, code=exited status=2
Jan 17 16:04:27 node1 systemd[1]: Failed to start Vsftpd ftp daemon.
Jan 17 16:04:27 node1 systemd[1]: Unit vsftpd.service entered failed state.
Jan 17 16:04:27 node1 systemd[1]: vsftpd.service failed.

# 解决方案,注释如下
#anon_other_write_enable =YES
# git bash本地C:\Users\xxx\.ssh目录生成id_rsa和id_rsa.pub
ssh-keygen -t rsa

# 本地C:\Users\xxx\.ssh目录下新建config文件,编写如下内容
host		onemake
user 		root
hostname 	192.168.128.100
Port              	 22
IdentityFile    	~/.ssh/id_rsa

# 将id_rsa.pub的内容复制到目标服务器~/.ssh/authorized_keys文件内

# 服务器配置
vim /etc/ssh/sshd_config
RSAAuthentication yes # 启用 RSA 认证
PubkeyAuthentication yes # 启用公钥私钥配对认证方式
AuthorizedKeysFile .ssh/authorized_keys # 公钥文件路径
# 重启
service sshd restart

# 本地测试,成功
PS C:\Users\xxx> ssh onemake
Last login: Wed Jan 17 20:59:43 2024 from 192.168.128.1

# 连接多个,使用上面生成的id_rsa.pub复制到另一个服务器,本地添加如下
host		master
user 		root
hostname 	192.168.128.78
Port              	 22
IdentityFile    	~/.ssh/id_rsa
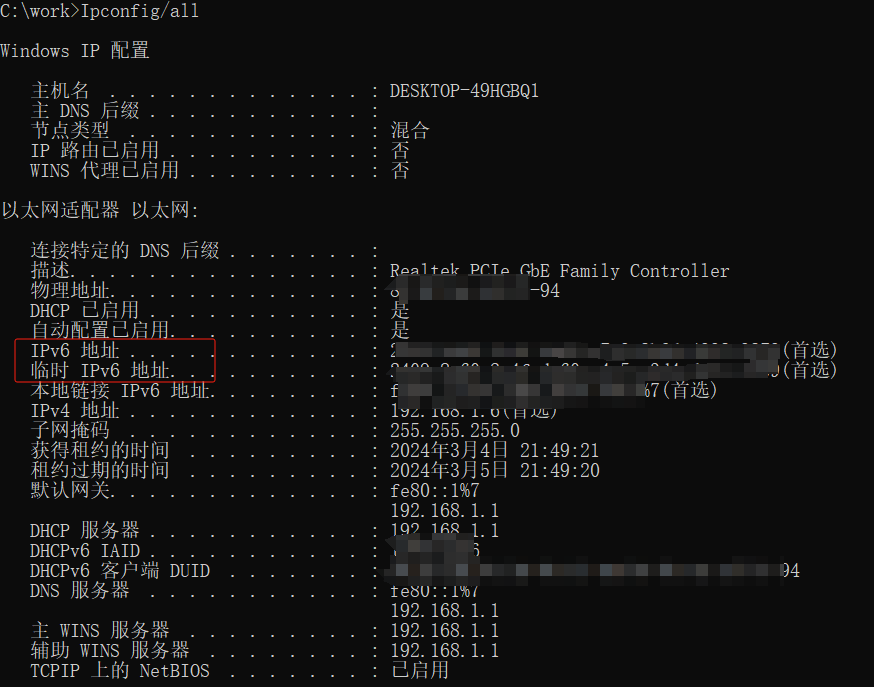
ipconfig/all>>C:\work\log.txt
# curl -o 名称 链接

C:\work>curl -o apache-hive-3.1.2-bin.tar.gz https://archive.apache.org/dist/hive/hive-3.1.2/apache-hive-3.1.2-bin.tar.gz
  % Total    % Received % Xferd  Average Speed   Time    Time     Time  Current
                                 Dload  Upload   Total   Spent    Left  Speed
  4  265M    4 11.9M    0     0  14596      0  5:18:22  0:14:18  5:04:04 25651

# 下载方式2,速度较慢
curl -o 名称 --interface "local-ipv6-address" 链接

C:\work>curl -o apache-hive-3.1.2-bin.tar.gz --interface "2409:8a60:2c4f:da69:e4c5:a3d4:debe:a0b9" https://archive.apache.org/dist/hive/hive-3.1.2/apache-hive-3.1.2-bin.tar.gz
  % Total    % Received % Xferd  Average Speed   Time    Time     Time  Current
                                 Dload  Upload   Total   Spent    Left  Speed
  0  265M    0 1242k    0     0  14321      0  5:24:28  0:01:28  5:23:00 16319
点击查看详情

 浙公网安备 33010602011771号