第14-15周 HTTP 协议、存储、Ajax
1、初始前后端通信
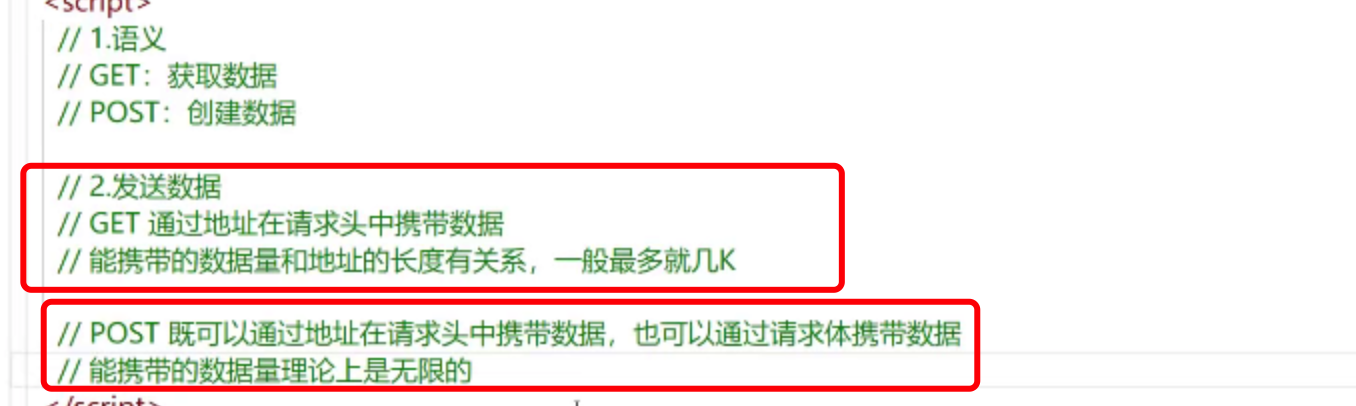
1、后端向前端发送数据
2、前端向后端发送数据
2、前后端通信的过程与概念解释
# 1、使用浏览器访问网页
        // 在浏览器中输入网址,会出

# 2、HTML 的标签
     //  浏览器在遇到 link/img/script/iframe 标签的时候,遇到一些特殊的标签,会再次向服务器发送请求。

     // a/form 还有一些标签,浏览器解析的时候,不会向服务器发送请求,只有用户点击的时候才向服务器发送请求

# 3、Ajax 和 Fetch
3、前后端的通信方式
2、HTTP 协议
1、初始 HTTP
2、HTTP报文
3、HTTP 方法
4、Get 和 POST 方法对比
5、HTTP 状态码
第 2 节 本地存储
1
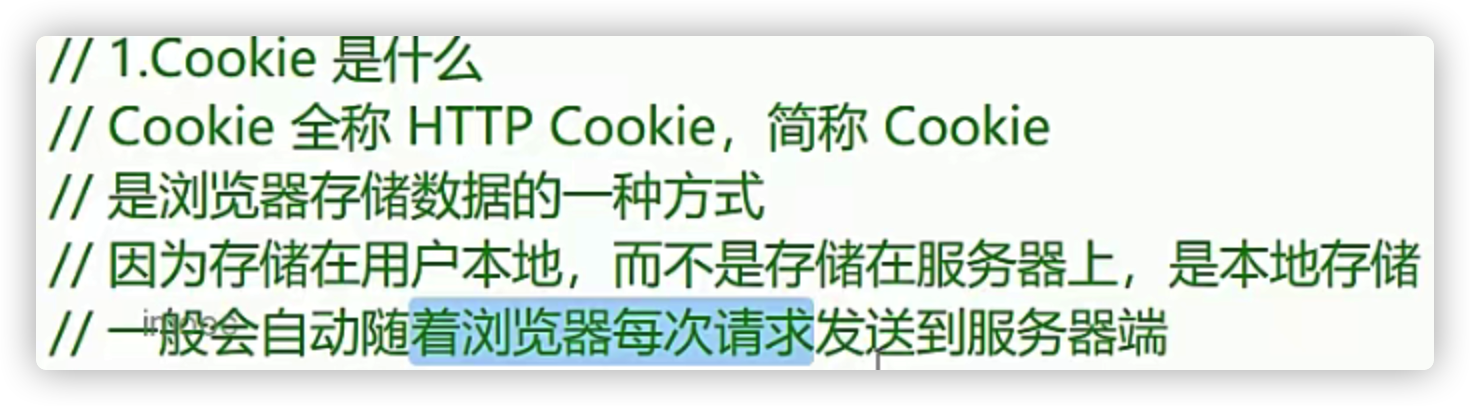

1 Cookie 的名称和值
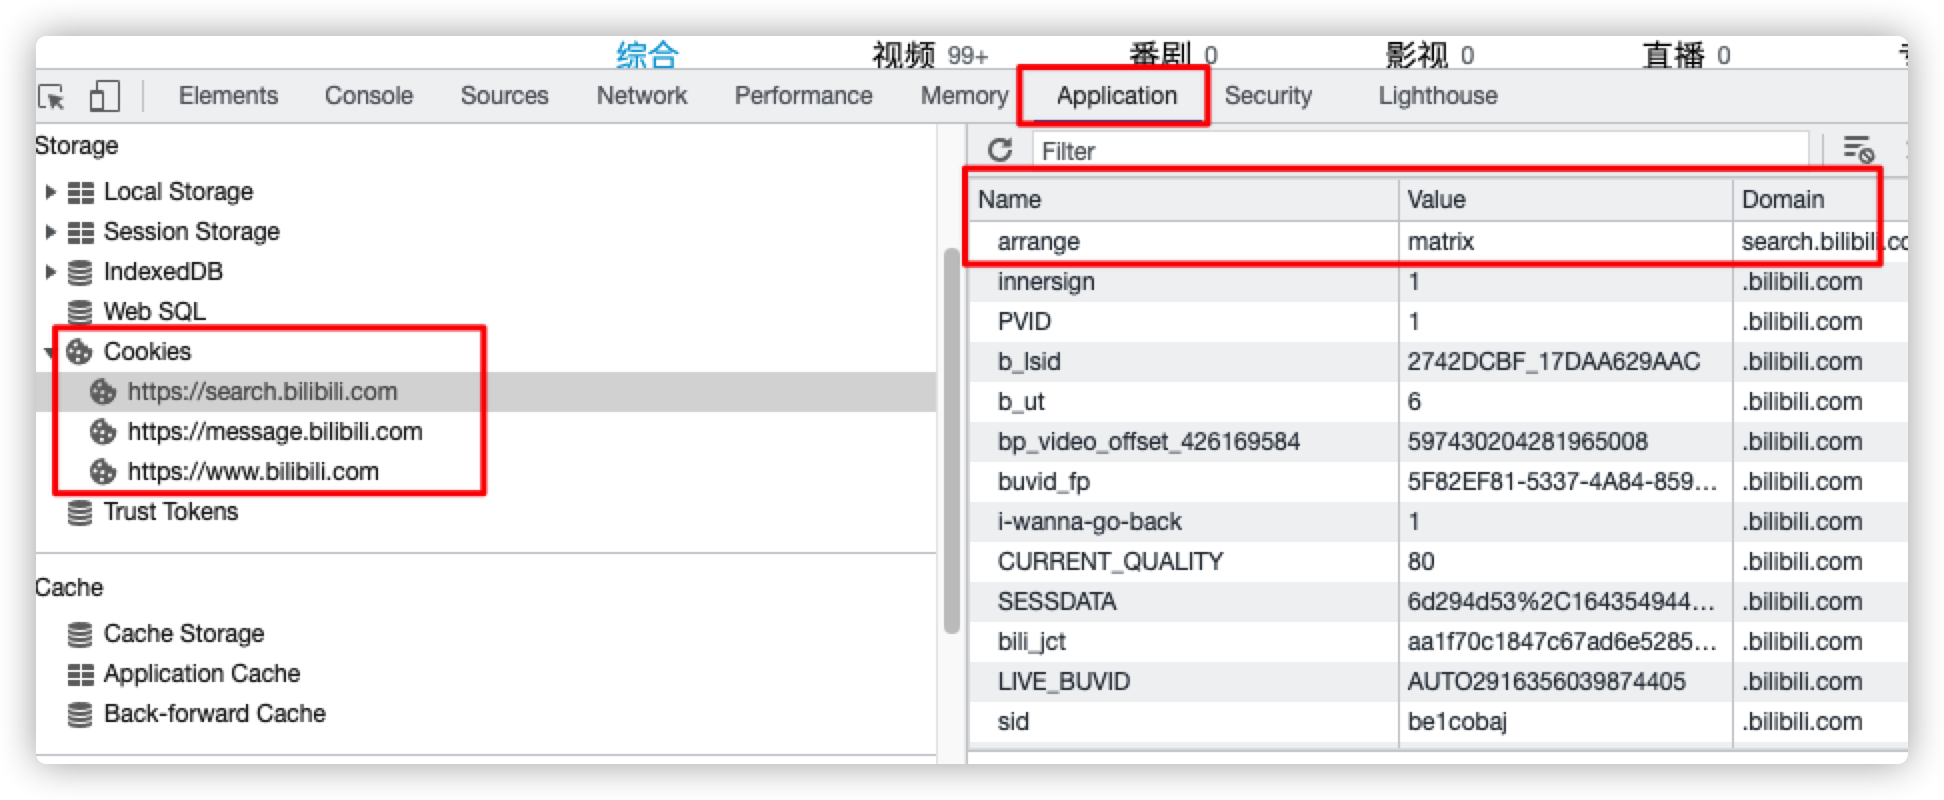
Cookie 在浏览器中存储的位置 【服务器-->浏览器】
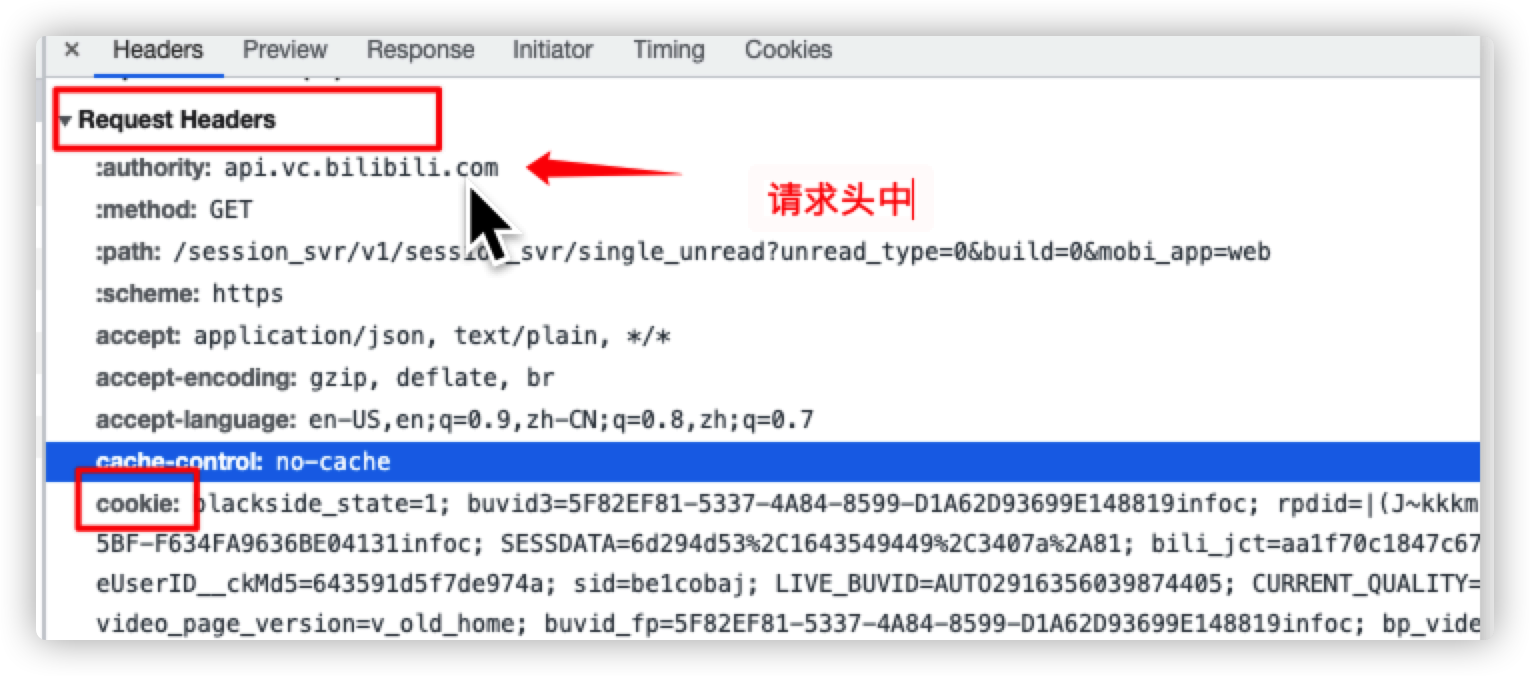
2 Cookie 发送给服务端
3 前端 获取和写入 cookie
前端 写入 cookie
<body>
    <script>
        document.cookie = 'username=ljs'
        document.cookie = 'username1=ljs1'
        document.cookie = 'username2=ljs2; age= 18'
    </script>
</body>
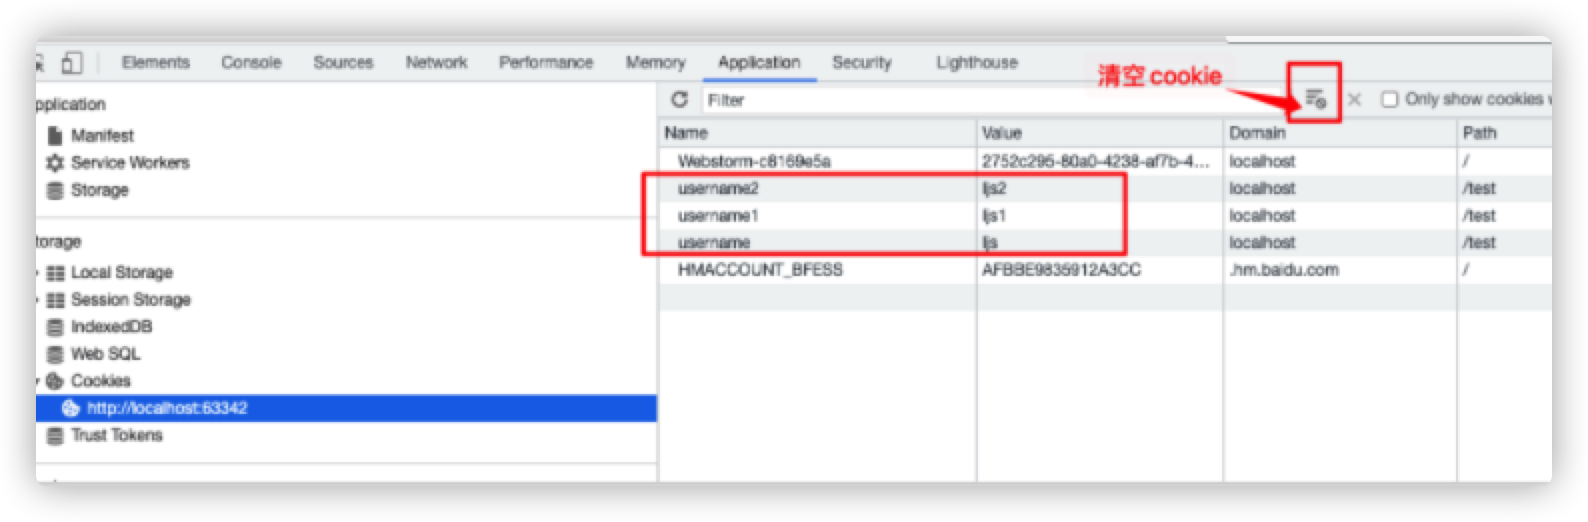
读取 CooKie :读取的是一个由名值对构成的字符串,每个名值之前由; (一个分号和一个空格)隔开
eg :username=zs; age=15
        <script>
            console.log(document.cookie)
        </script>
4
创建 Cookie 时候必须填写,其他的属性都可以使用默认值
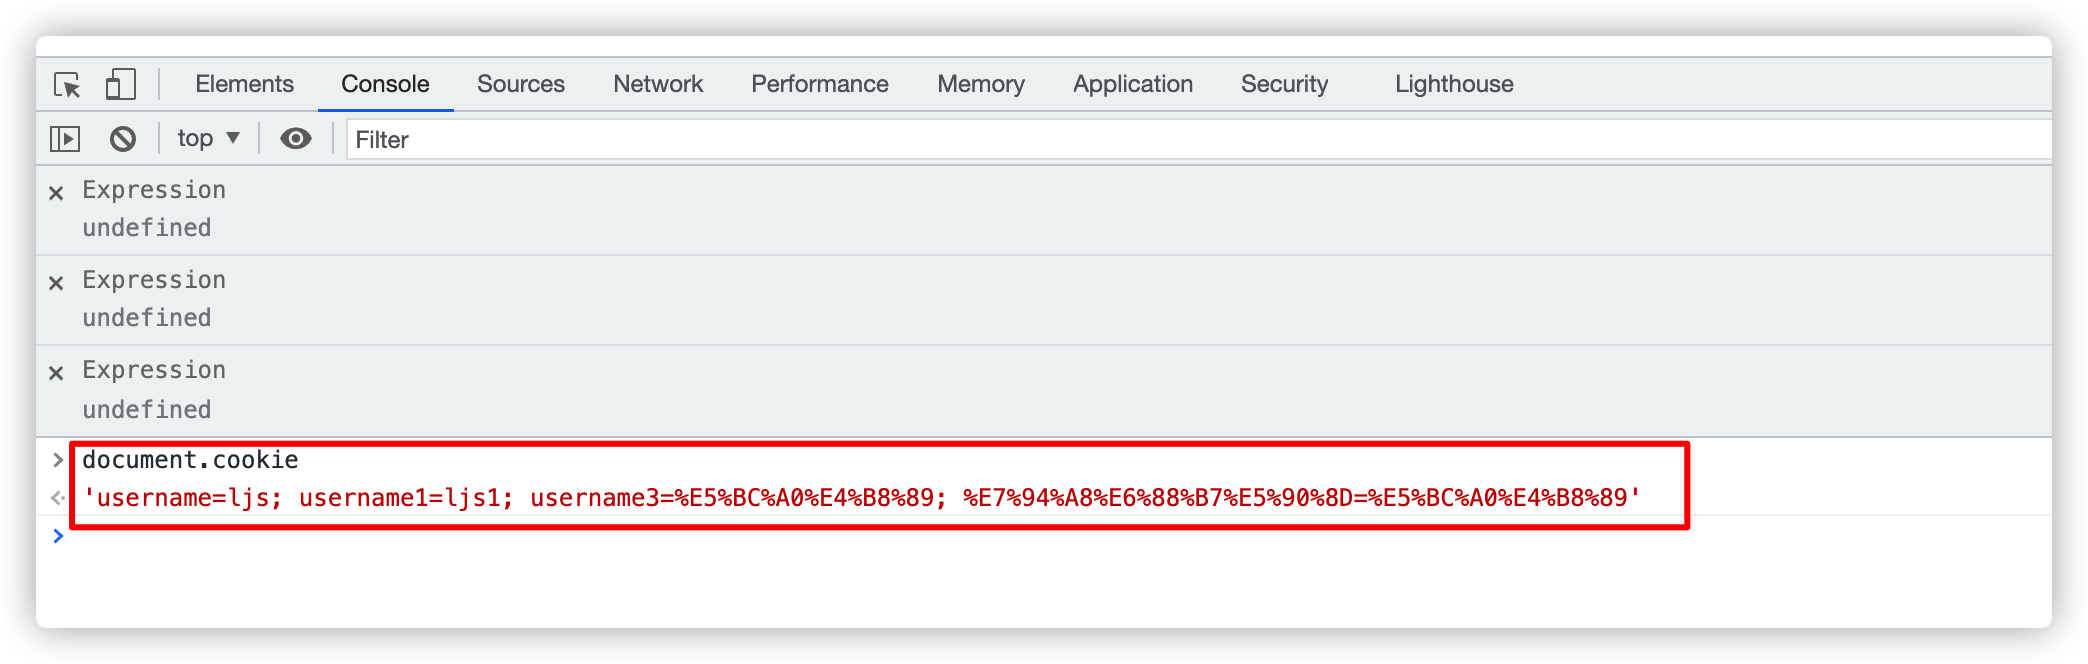
Cookie 的名称或者值包含非英文字母,写入的时候需要使用 encodeURIComponent() 编码,读取的时候用 decodeURIComponent() 解码
<body>
    <script>
        document.cookie = 'username=ljs'
        document.cookie = 'username1=ljs1'
        document.cookie = 'username2=ljs2'
        document.cookie = `username3=${encodeURIComponent('张三')}`
        document.cookie = `${encodeURIComponent('用户名')}=${encodeURIComponent('张三')}`
    </script>
</body>
2、失效时间
# 对于失效的 Cookie ,会被浏览器清除
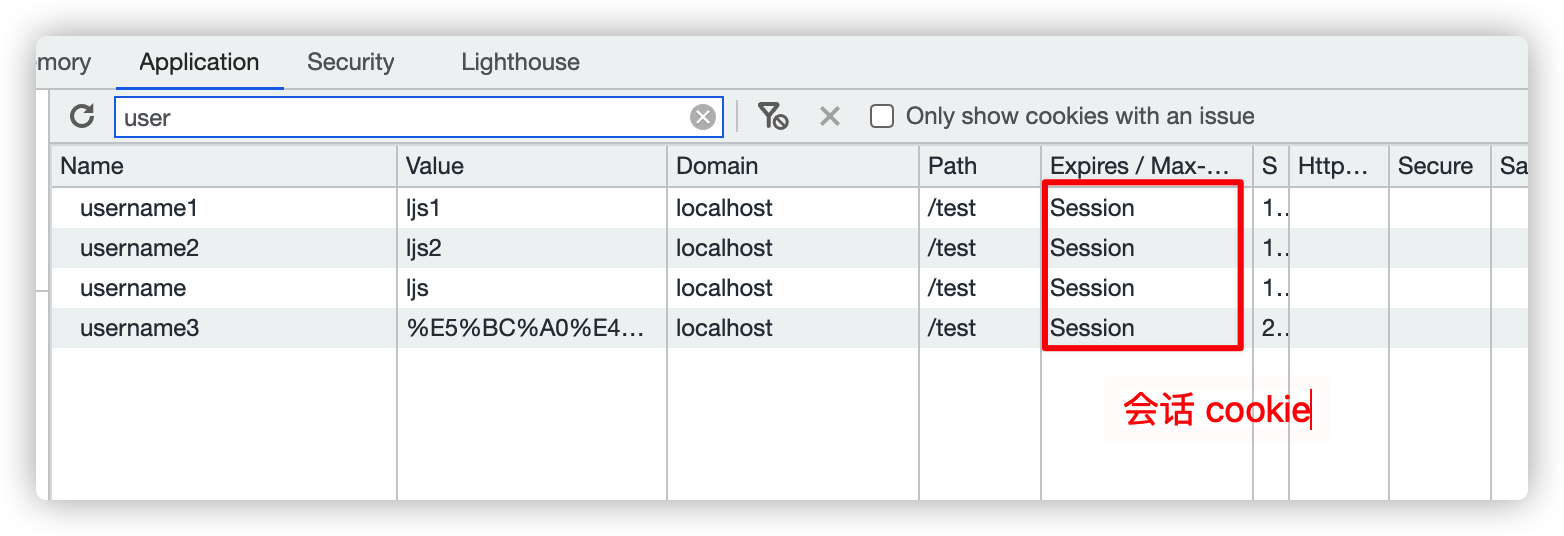
# 对于没有设置(到期)时间,这样的cookie 称为会话Cookie
会话Cookie 存在内存中,当会话结束(浏览器窗口关闭),浏览器关闭的时候,Cookie 消失
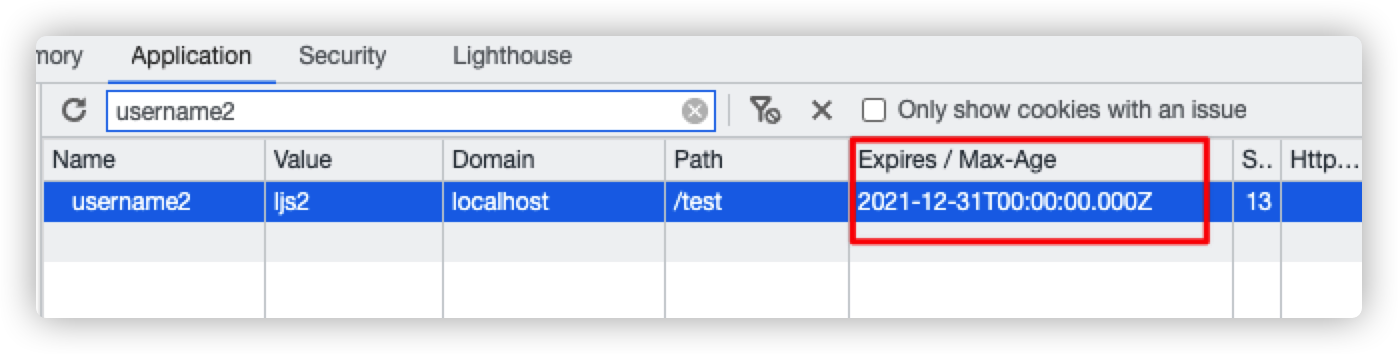
# 想要长时间存在,设置 expores 或者 Max-Age
document.cookie = `username2=ljs2; expires = ${new Date('2021-12-31 00:00:00')}`
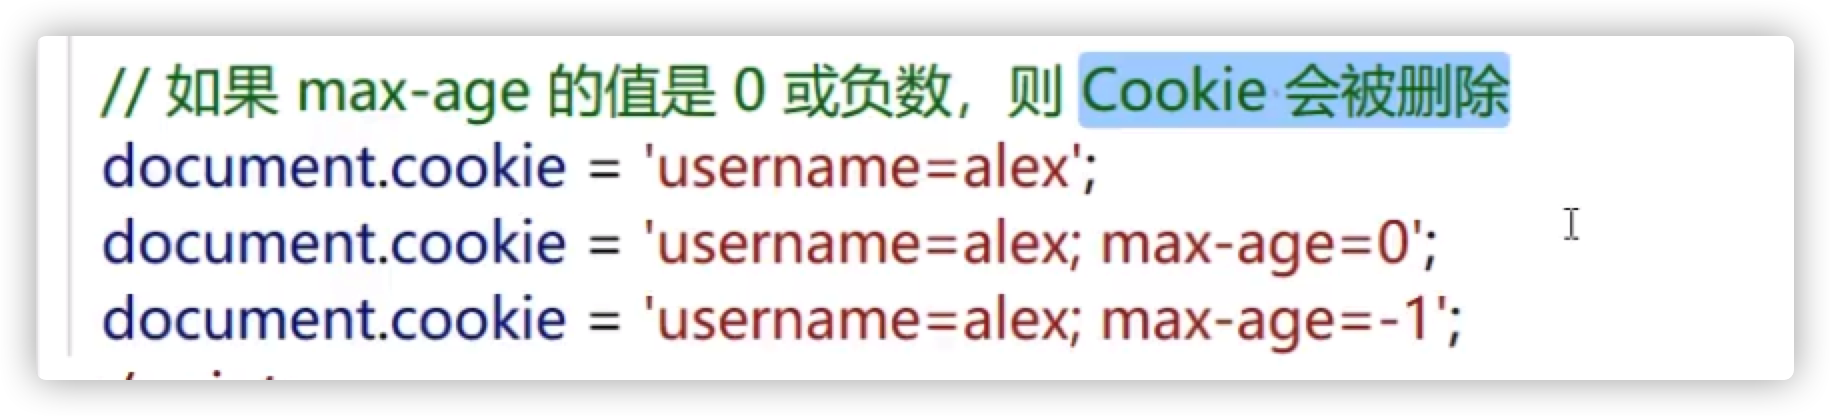
# 或者 max-age (秒为单位)
document.cookie = `username2=ljs2; max-age = 10`
# 如 max- age 的值是 0 或者 负数,立马删除这个 cookie

# 删除 Cookie
5
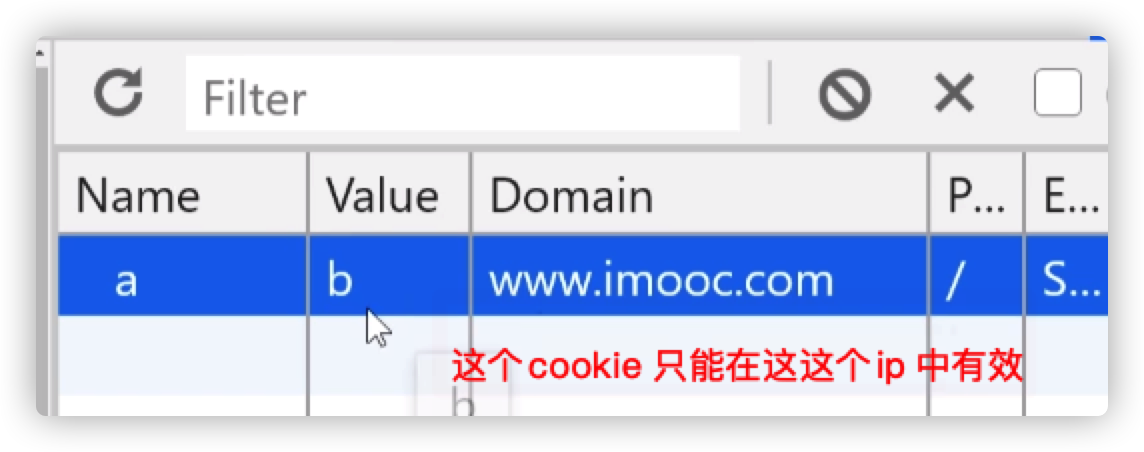
# 限制cookie的访问范围
# 使用 JS 只能读写当前域或者父域的 Cookie ,无法读取其他域的 Cookie
document.cookie = `username=alex;domain=www.imooc.com`

# 当前域 :    www.imooc.com
# 父域 :    .imooc.com
6


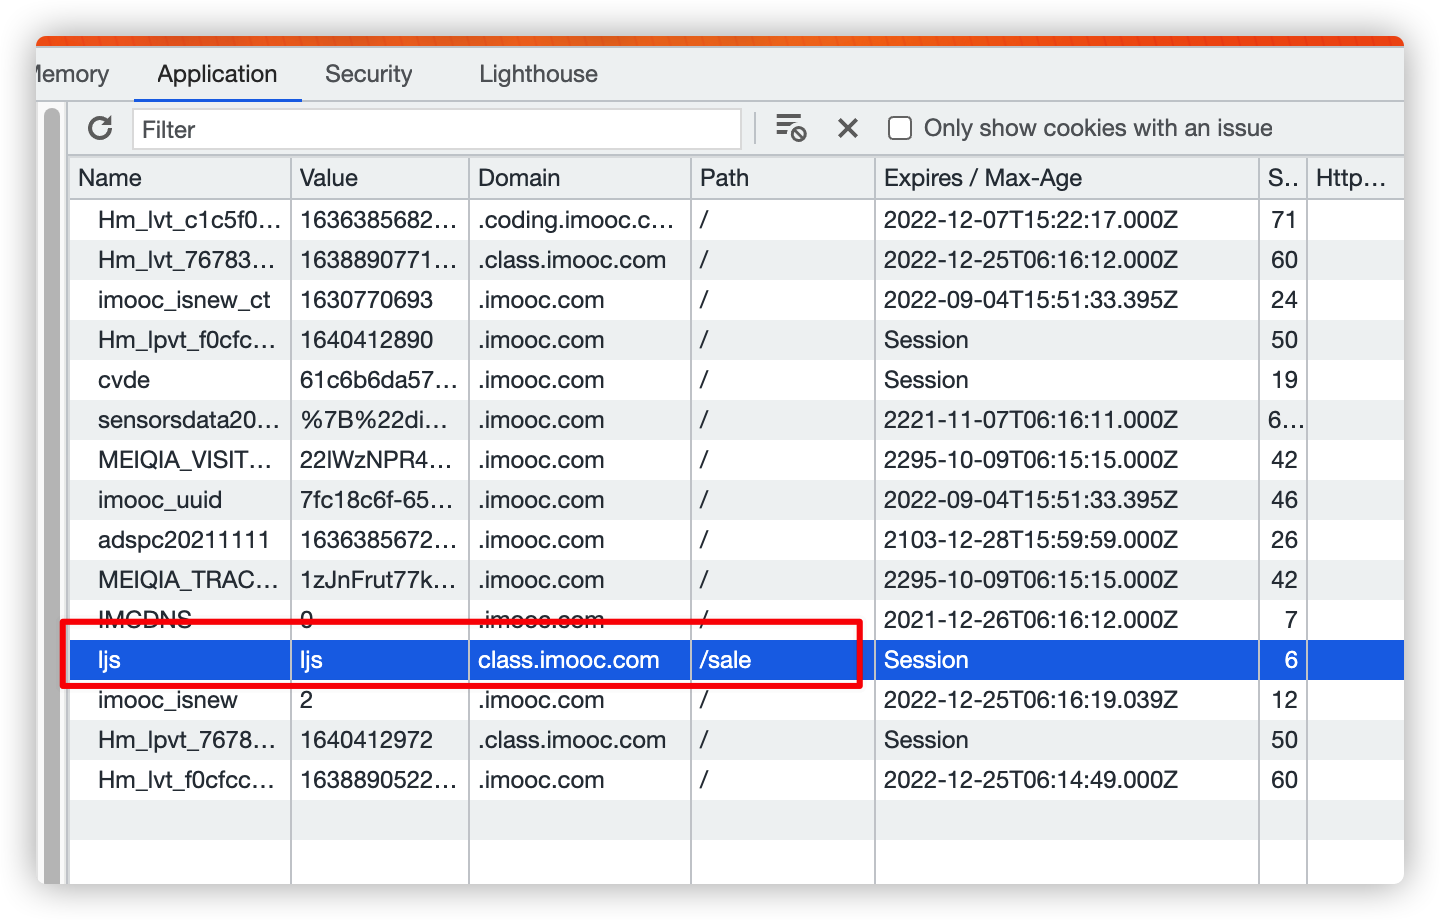
当 Name Domain Path 这3个字段都是相同的时候,才是同一个 Cookie
7 HttpOnly
设置了 HttpOnly 的属性 Cookie 不能通过 JS 去访问
8 Secure
Secure 限定了只有在使用 https 而不是 http 的情况下才可以发送给服务端
// Domain Path Secure 都满足条件,还不能过期的 Cookie 才能随着请求发送到服务器端
4 Cookie 的封装 【推荐使用】
1、cookie.js
// 写入 Cookie
const set = (name, value, { maxAge, domain, path, secure } = {}) => {
  let cookieText = `${encodeURIComponent(name)}=${encodeURIComponent(value)}`;

  if (typeof maxAge === 'number') {
    cookieText += `; max-age=${maxAge}`;
  }

  if (domain) {
    cookieText += `; domain=${domain}`;
  }

  if (path) {
    cookieText += `; path=${path}`;
  }

  if (secure) {
    cookieText += `; secure`;
  }

  document.cookie = cookieText;

  // document.cookie='username=alex; max-age=5; domain='
};

// 通过 name 获取 cookie 的值
const get = name => {
  name = `${encodeURIComponent(name)}`;

  const cookies = document.cookie.split('; ');

  for (const item of cookies) {
    const [cookieName, cookieValue] = item.split('=');

    if (cookieName === name) {
      return decodeURIComponent(cookieValue);
    }
  }

  return;
};

// 'username=alex; age=18; sex=male'
// ["username=alex", "age=18", "sex=male"]
// ["username","alex"]

// get('用户名');

// 根据 name、domain 和 path 删除 Cookie
const remove = (name, { domain, path } = {}) => {
  set(name, '', { domain, path, maxAge: -1 });
};

export { set, get, remove };
<body>
    <script type="module">
        import {set,get} from './cook.js'
        set('username', 'ljs');
        set('username', 'ljs2');
        set('age', 18);
        set('sex', 'male', {
            maxAge: 30 * 24 * 60
        })
       console.log(get('username'));
       console.log(get('sex'));
</script> </body>
练习1:切换 Cookie
<body>
    <button id = "cn"> 中文 </button>
    <button id = "en"> 英文</button>

    <script type="module">
        import {set, get} from './cook.js'

        // 获取按钮
        let cnBtn = document.getElementById('cn')
        let enBtn = document.getElementById('en')

        // 绑定事件
        cnBtn.addEventListener('click', () => {
            set('language', 'cn', {maxAge : 30 * 60});
       window.location = './xx.html'  // 强制刷新
        }, false)

        enBtn.addEventListener('click', () => {
            set('language', 'en', {maxAge : 30 * 60});
window.location = './xx.html' // 强制刷新
        }, false)

    </script>
</body>
联系2 :记住用户名
<body>

    <form action="post">
        <p>用户名:<input name = "username" type="text" placeholder="请输入用户名"></p>
    </form>
    <button id = "login">登录</button>
    <button id = "delete">删除</button>

    <script type="module">
        import {set, get, remove} from './cook.js'

        // 获取按钮
        let cnBtn = document.getElementById('login')
        let enBtn = document.getElementById('delete')

        let username = get('username');
        console.log("username==>",username);
        if (username != null && username != undefined) {
            // 设置 input 输入值
            document.getElementsByTagName("input")[0].value = username;
        }


        // 绑定事件
        cnBtn.addEventListener('click', () => {
            console.log("单击登录")
            set('username', 'cn', {maxAge : 30 * 60});
        }, false)

        enBtn.addEventListener('click', () => {
            console.log("单击删除")
            remove('username');
        }, false)


    </script>
</body>
5、Cookie 的注意事项
Cookie 有数量限制
Cookie 有大小限制 ,每个 Cookie 4kB

2 localStorage
1 localStorage 是什么
数据需要存储在本地,不会像 Cookie 发送到服务器。
单个域名下 localStorage 的总大小是 5M
2 浏览器中的 localStorage
3 基本用法
<body>
    <script>
        // 1. 添加 setItem
        localStorage.setItem("username", "age")
        localStorage.setItem("username", "age")
        localStorage.setItem("age", 18)

        // 2. 获取所有
        console.log(localStorage);

        // 3. length
        console.log(localStorage.length);

        // 4. 获取
        console.log(localStorage.getItem("username"))

        // 5. 删除
        localStorage.removeItem("username")

    // 6. 删除所有
     localStorage.clear()
    </script>
</body>
4 localStorage 的注意事项
1、localStorage 的存储期限
localStorage 是持久化本地存储,除非手动清楚(比如通过 js 删除,或者清楚浏览器缓存),否则数据永远是不能过期的
2、localStorage 键和值的类型
不是字符串,也会先转换为字符串类型在存进去
3、不同域名下能否共同用 localStorage 公有
不能
5 sessionStorage 的
浏览器关闭后,sessionStorage 中的数据会被清空
第3节 Ajax&Fetch与跨域请求
1 Ajax
1、Ajax 是什么
异步的想服务器发送请求,等到响应的过程中,不会阻塞当前页面,
ajax 是浏览器与服务器之间的一种异步通信方式
使用 ajax 可以在不重新加载整个页面的情况下,对页面的某个部分进行更新
2、Ajax 开发环境
参考资料,安装 mamp
选择的路径是 /Users/mac/工作/webstrom/ljs
在浏览器中输入 http://localhost:8888/小穆医生/aa.html 访问
3、Ajax 的 基本用法
1、XMLHttpRequest
2、Ajax 的使用步骤
1、构造 xhr 对象
2、准备发送请求
3、发送数据
<body>
    <script>
        // 1. 创建 xhr 对象
        const xhr = new XMLHttpRequest();

        // 2. 准备发送请求 [本地请求,或者远程请求], 使用异步请求
        xhr.open("GET", "http", true)

        // 3. 发送请求 请求体携带数据
        xhr.send(null)

        // 4 监听事件,处理响应,当获取到响应后,会出发 xhr 对象的 readystatechange
        // 事件,可以在该事件中响应进行处理
        // 状态的值 0 ~4 一共5个状态
        // 0: 没有初始化。尚未调用 open
        // 1: 启动。已经调用 open(), 但没有调用 send()
        // 2: 发送。已经调用 send(), 带没有接收到响应
        // 3: 接收。已经接收到部分数据
        // 4: 完成。已经接收到全部的响应数据,并且已经可以在浏览器中使用了
        xhr.onreadystatechang = () => {
            if (xhr.readyState !== 4) return;
            // 获取到服务端的响应后,响应的内容会自动填充到 xhr 对象的属性
            if (xhr.status >= 200 && xhr.status <300 || xhr.status === 304) {
                // 正常使用我们的响应数据
                console.log(xhr.responseText);
            }

        };
    </script>
</body>
3、Ajax 完成前后端通信 [Get 请求]
地址:http://localhost:8888/ajx/ajx.html
    <script>
        // 1. 创建 xhr 对象
        const xhr = new XMLHttpRequest();

        // 2. 准备发送请求 [本地请求,或者远程请求], 使用异步请求
        const url = 'https://www.imooc.com/api/http/search/suggest?words=js'
        xhr.open("GET", url, true)
// 设置请求头 【不是必须的】
xhr.setRequestHeader('Content-Type','application/x-www-form-urlencoded');
xhr.setRequestHeader('name','wanfeng'); //不是预定义的请求头
// 4 监听事件,处理响应,当获取到响应后,会出发 xhr 对象的 readystatechange
        // 事件,可以在该事件中响应进行处理
        // 状态的值 0 ~4 一共5个状态
        // 0: 没有初始化。尚未调用 open
        // 1: 启动。已经调用 open(), 但没有调用 send()
        // 2: 发送。已经调用 send(), 带没有接收到响应
        // 3: 接收。已经接收到部分数据
        // 4: 完成。已经接收到全部的响应数据,并且已经可以在浏览器中使用了
        xhr.onreadystatechange = () => {
            if (xhr.readyState !== 4) return;
            // 获取到服务端的响应后,响应的内容会自动填充到 xhr 对象的属性
            if (xhr.status >= 200 && xhr.status <300 || xhr.status === 304) {
                // 正常使用我们的响应数据
                console.log(xhr.responseText);
            }
        };
        // 发送请求 请求体携带数据
        xhr.send(null)
    </script>
Get 请求注意的事项
如果Get 有中文需要用 encodeURIComponent() 编码
eg : const url = `www.xxxx?$(encodeURIComponent('前端'))`
Post 请求
2 JSON
json.parse()
json.stringify()
3 跨域
1、什么是不同域,什么事同域
https(协议)://www.imooc.com(域名):443(端口号)/course/list(路径)
协议、域名、端口号,任何一个不一样,就是不同域
2、不同域,跨域,被浏览器阻止
其他客户端或者服务器都不存在跨域问题
3、跨域解决方案
方法一:JSONP
原理:
1、script 标签跨域不会被浏览器组成
2、JSONP 主要是利用 Script 标签,加载跨域文件。
使用 JSONP 实现跨域
//https://www.imooc.com/api/http/jsnop?callback=xxx
返回数据xxx({
"code": 200,
"data": [
]
})
<body>
    <script>
      // 1.JSONP 的原理
      // script 标签跨域不会被浏览器阻止
      // JSONP 主要就是利用 script 标签,加载跨域文件

      // 2.使用 JSONP 实现跨域
      // 服务器端准备好 JSONP 接口
      // https://www.imooc.com/api/http/jsonp?callback=handleResponse

      // 手动加载 JSONP 接口或动态加载 JSONP 接口
      const script = document.createElement('script');
      script.src =
        'https://www.imooc.com/api/http/jsonp?callback=handleResponse';
      document.body.appendChild(script);

      // 声明函数
      const handleResponse = data => {
        console.log(data);
      };

      // handleResponse({
      //   code: 200,
      //   data: [
      //     {
      //       word: 'jsp'
      //     },
      //     {
      //       word: 'js'
      //     },
      //     {
      //       word: 'json'
      //     },
      //     {
      //       word: 'js 入门'
      //     },
      //     {
      //       word: 'jstl'
      //     }
      //   ]
      // });

      // 优先使用 CORS,如果浏览器不支持 CORS 的话,再使用 JSONP
    </script>
    <!-- <script src="https://www.imooc.com/api/http/jsonp?callback=handleResponse"></script> -->
    <!-- 相当于 -->
    <!-- <script>
      handleResponse({
        code: 200,
        data: [
          {
            word: 'jsp'
          },
          {
            word: 'js'
          },
          {
            word: 'json'
          },
          {
            word: 'js 入门'
          },
          {
            word: 'jstl'
          }
        ]
      });
    </script> -->
  </body>
方法二:CORS [后端做的]
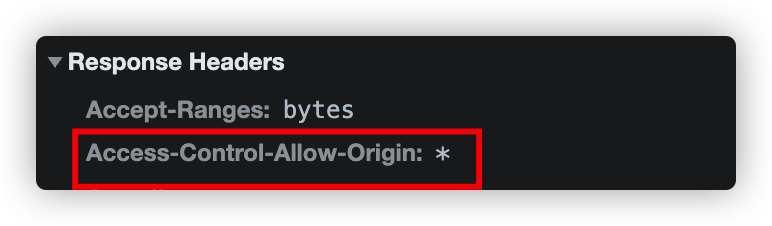
Access-Control-Allow-Origin : 表名允许所有的域名跨域请求它, * 是通配符。没有任何限制
只允许指定的域名的跨域请求
Access-Control-Allow-Origin: http://127.0.0.1:5500
发送过程
1、浏览器发送
2、后端在响应头中添加 Access-Control-Allow-Origin 头信息
3、浏览器接收到响应
4、如果是同域下的请求,浏览器不需要额外做啥,这次前后端通信完成
5、如果是跨域,浏览器从响应头中查找是否允许跨域访问
6、如果允许跨域,完成
7、如果不允许跨域,丢弃响应结果
4 XHR 对象
1、responseType 和 response 属性
解析为 json 数据
xhr.responseType = 'json';
    <script>
      // 1.responseType 和 response 属性
      const url = 'https://www.imooc.com/api/http/search/suggest?words=js';
      const xhr = new XMLHttpRequest();

      xhr.onreadystatechange = () => {
        if (xhr.readyState != 4) return;

        if ((xhr.status >= 200 && xhr.status < 300) || xhr.status === 304) {
          // 文本形式的响应内容
          // responseText 只能在没有设置 responseType 或者 responseType = '' 或 'text' 的时候才能使用
          // console.log('responseText:', xhr.responseText);

          // 可以用来替代 responseText
          console.log('response:', xhr.response);
          // console.log(JSON.parse(xhr.responseText));
        }
      };
      xhr.open('GET', url, true);

      // // xhr.responseType = '';
      // // xhr.responseType = 'text';
      xhr.responseType = 'json';

      xhr.send(null);
2、timeout 属性
设置请求超时,单位是 毫秒
xhr.timeout = 10000;
// 设置请求的超时时间(单位 ms)
      const url = 'https://www.imooc.com/api/http/search/suggest?words=js';
      const xhr = new XMLHttpRequest();

      xhr.onreadystatechange = () => {
        if (xhr.readyState != 4) return;

        if ((xhr.status >= 200 && xhr.status < 300) || xhr.status === 304) {
          console.log(xhr.response);
        }
      };

      xhr.open('GET', url, true);

      xhr.timeout = 10000;

      xhr.send(null);
3、withCredentials 属性 【了解】
指定使用 Ajax 发送请求时是否携带 Cookie
使用 Ajax 发送请求,默认情况下,同域时,会携带 Cookie;跨域时,不会
xhr.withCredentials = true;
最终能否成功跨域携带 Cookie,还要看服务器同不同意
const url = 'https://www.imooc.com/api/http/search/suggest?words=js';
      // const url = './index.html';

      const xhr = new XMLHttpRequest();

      xhr.onreadystatechange = () => {
        if (xhr.readyState != 4) return;

        if ((xhr.status >= 200 && xhr.status < 300) || xhr.status === 304) {
          console.log(xhr.response);
        }
      };

      xhr.open('GET', url, true);

      xhr.withCredentials = true;

      xhr.send(null);
4、XHR 的方法
1、abort() 终止当前请求
一般配合 abort 事件一起使用
<body>
    <script>
        // 1. 创建 xhr 对象
        const xhr = new XMLHttpRequest();

        // 2. 准备发送请求 [本地请求,或者远程请求], 使用异步请求
        const url = 'https://www.imooc.com/api/http/search/suggest?words=js'
        xhr.open("GET", url, true)

        // 4 监听事件,处理响应,当获取到响应后,会出发 xhr 对象的 readystatechange
        // 事件,可以在该事件中响应进行处理
        // 状态的值 0 ~4 一共5个状态
        // 0: 没有初始化。尚未调用 open
        // 1: 启动。已经调用 open(), 但没有调用 send()
        // 2: 发送。已经调用 send(), 带没有接收到响应
        // 3: 接收。已经接收到部分数据
        // 4: 完成。已经接收到全部的响应数据,并且已经可以在浏览器中使用了
        xhr.onreadystatechange = () => {
            console.log(xhr.readyState);
            if (xhr.readyState !== 4) return;
            // 获取到服务端的响应后,响应的内容会自动填充到 xhr 对象的属性
            if (xhr.status >= 200 && xhr.status <300 || xhr.status === 304) {
                // 正常使用我们的响应数据
                console.log(xhr.responseText);
            }
        };
        xhr.send(null)

        // 终止请求
        xhr.abort()
    </script>
</body>
2、setRequestHeaher()
设置请求头
// 仅仅在 post 请求,并且post 需要携带参数才需要设置头信息
// Content-Type 告诉服务器,浏览器发送的数据格式
//
xhr.setRequestHeader("Content-Type", 'application/x-www-form-urlencoded')
 // 仅仅在 post 请求,并且post 需要携带参数才需要设置头信息
        xhr.setRequestHeader("Content-Type", 'application/json')
        xhr.send(JSON.stringify(
            {
                username : 'alex'
            }
        ))

        xhr.setRequestHeader("Content-Type", 'application/x-www-form-urlencoded')
        xhr.send('aaa=1&bbb=2')
XHR 的事件
1、load 事件 【响应数据可以用的时候触发】
2、Error 事件 【请求发生错误的时候触发】
3、abort 事件 【】
4、timeout事件
<body>
    <script>
        // 1. 创建 xhr 对象
        const xhr = new XMLHttpRequest();

        // 2. 准备发送请求 [本地请求,或者远程请求], 使用异步请求
        const url = 'https://www.imooc.com/api/http/search/suggest?words=js'
        xhr.open("GET", url, true)

        xhr.addEventListener('load', ()=>{
            // 获取到服务端的响应后,响应的内容会自动填充到 xhr 对象的属性
            if (xhr.status >= 200 && xhr.status <300 || xhr.status === 304) {
                // 正常使用我们的响应数据
                console.log(xhr.responseText);
            }
        }, false)

        xhr.addEventListener('error', ()=>{
            console.log("error")
        }, false)


        // 需要和 abort 联合使用
         xhr.addEventListener('abort', () => {
             console.log("abort")
         }, false)
         xhr.abort()

        //
        xhr.timeout = 1000;
        xhr.addEventListener('timeout', () => {
            console.log("timeout")
        }, false)

        xhr.send(null)
    </script>
</body>
5 Ajax 进阶
1、FormData
1、使用 Ajax 提交表单
<!DOCTYPE html>
<html lang="en">
<head>
    <meta charset="UTF-8" />
    <title>FormData</title>
</head>
<body>
<form
        id="login"
        action="https://www.imooc.com/api/http/search/suggest?words=js"
        method="POST"
        enctype="multipart/form-data"
>
    <input type="text" name="username" placeholder="用户名" />
    <input type="password" name="password" placeholder="密码" />
    <input id="submit" type="submit" value="登录" />
</form>

<script>
    // 1.使用 Ajax 提交表单

    // 2.FormData 的基本用法
    // 通过 HTML 表单元素创建 FormData 对象
    // const fd = new FormData(表单元素);
    // xhr.send(fd);

    // 通过 append() 方法添加数据
    // const fd = new FormData(表单元素);
    // fd.append('age', 18);
    // fd.append('sex', 'male');
    // xhr.send(fd);

    // IE10 及以上可以支持

    const login = document.getElementById('login');
    // console.log(login.username);
    // console.log(login.password);
    const { username, password } = login;
    const btn = document.getElementById('submit');
    const url = 'https://www.imooc.com/api/http/search/suggest?words=js';

    btn.addEventListener(
            'click',
            e => {
                // 阻止表单自动提交
                e.preventDefault();

                // 表单数据验证

                // 发送 Ajax 请求
                const xhr = new XMLHttpRequest();

                xhr.addEventListener(
                        'load',
                        () => {
                            if (
                                    (xhr.status >= 200 && xhr.status < 300) ||
                                    xhr.status === 304
                            ) {
                                console.log(xhr.response);
                            }
                        },
                        false
                );

                xhr.open('POST', url, true);

                // 组装数据
                // const data = `username=${username.value}&password=${password.value}`;

                // FormData 可用于发送表单数据
                const data = new FormData(login);
                // data.append('age', 18);
                // data.append('sex', 'male');
                // console.log(data);
                // for (const item of data) {
                //   console.log(item);
                // }

                // xhr.setRequestHeader(
                //   'Content-Type',
                //   'application/x-www-form-urlencoded'
                // );

                xhr.send(data);

                // xhr.send('username=alex&password=12345');
            },
            false
    );
</script>
</body>
</html>
2、FormData 的基本用法
6 Ajax 引用
7 Ajax 扩展


 浙公网安备 33010602011771号