openstack-M
 openstack-M版搭建 适用于零基础同学
openstack
Openstack 介绍
什么是openstack
OpenStack 是当今最具影响力的云计算管理工具——通过命令或者基于 Web 的可视化控制面板来管理 IaaS 云端的资源池(服务器、存储和网络)
云计算 是通过虚拟化(kvm)技术去实现的,它是一种按量付费的模式!
OpenStack 系统或其演变版本目前被广泛应用在各行各业,包括自建私有云、公共云、租赁私有云及公私混合云
OpenStack 支持 KVM、Xen、Lvc、Docker等虚拟机软件或容器,默认为 KVM
OpenStack 采用 Python语言开发,遵循 Apache 开源协议,因此相比 CloudStack 来说,更轻量化,效率更高
官网
OpenStack 中有哪些组件
-
keystone: 授权 [授权后各个组件才可以进行相应的功能]
Keystone 认证所有 OpenStack 服务并对其进行授权。同时,它也是所有服务的端点目录。
-
glance: 提供虚拟机镜像模板 [镜像模板是用于创建虚拟机的]
[Glance 可存储和检索多个位置的虚拟机磁盘镜像。]
-
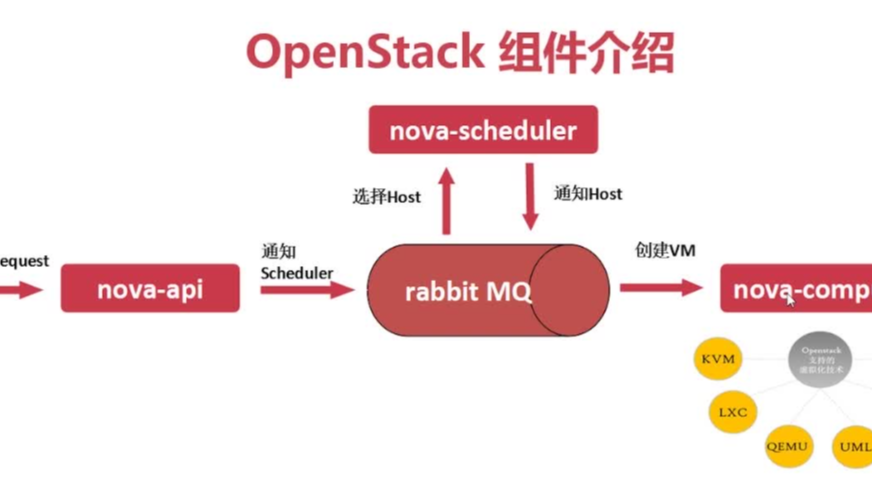
nova: 主要作用: 提供虚拟机的运行环境; nova本身是没有虚拟化技术的,它是通过调用kvm来提供虚拟化功能的。[管理虚拟机]
[管理虚拟机的整个生命周期:创建、运行、挂起、调度、关闭、销毁等。这是真正的执行部件。接受 DashBoard 发來的命令并完成具体的动作。但是 Nova 不是虛拟机软件,所以还需要虚拟机软件(如 KVM、Xen、Hyper-v 等)配合]
-
neutron: 给虚拟机提供网络。
[Neutron 能够连接其他 OpenStack 服务并连接网络。]
-
dashboard [Horizon]: web管理界面
-
Swift: 用于存储镜像 [对象存储]
[是一种高度容错的对象存储服务,使用 RESTful API 来存储和检索非结构数据对象。]
-
Cinder 给虚拟机添加硬盘
[通过自助服务 API 访问持久块存储。]
-
Ceilometer: 监控流量,按量付费
-
Heat: 编排
[启动10台云主机,每台云主机运行不同的脚本,形成自动化起服务]

openstack 安装
基本环境
虚拟机规划
节点 主机名 内存 IP 作用 cpu 磁盘空间 控制节点 controller 大于3G 10.0.0.11 管理 打开虚拟化 50G 计算节点 compute 大于1G 10.0.0.31 运行虚拟机 打开虚拟化 50G # 修改主机名 hostnamectl set-hostname controller hostnamectl set-hostname compute # host解析 < 控制节点 和 计算节点 > vim /etc/hosts …… 10.0.0.11 controller 10.0.0.31 compute
配置yum 源
< 控制节点 和 计算节点>
# 挂载本地镜像
mount /dev/cdrom /mnt/

# 设置开机自启
echo mount /dev/cdrom /mnt/ >> /etc/rc.local;chmod +x /etc/rc.local

# 配置 openstack 包
curl -O http://10.0.0.98/openstack/openstack_rpm.tar.gz      # 拉取软件包, 这里是我自己搭建的 私有仓库
tar zxvf openstack_rpm.tar.gz -C /opt/                        #  解压软件包到  /opt  目录
scp -r /opt/repo 10.0.0.31:/opt/                              # 复制到 计算节点上

# 配置本地yum 源  < 所有节点 >
vim /etc/yum.repos.d/local.repo
[local]
name=local
gpgcheck=0
baseurl=file:///mnt


[openstack]
name=openstack
gpgcheck=0
baseurl=file:///opt/repo
检测
[root@controller ~]# yum repolist
Loaded plugins: fastestmirror
Loading mirror speeds from cached hostfile
repo id               repo name                           status
local                    local                             3,894
openstack               openstack                           598
关闭安全服务
关闭防火墙
systemctl stop firewalld.service; systemctl disable firewalld.service关闭selinux
setenforce 0
设置时间服务
# 所有节点[安装软件包]
yum install chrony
# 控制节点
vim /etc/chrony.conf
……
server ntp6.aliyun.com iburst
……
allow 10.0.0.0/24     // 设置同步的网段,  也可以设置所有:    all

- 重启服务
systemctl restart chronyd
systemctl enable chronyd

# 计算节点
vim /etc/chrony.conf
……
server 10.0.0.11 iburst

- 重启服务
systemctl restart chronyd
systemctl enable chronyd
安装openstack
安装 OpenStack 客户端
yum -y install python-openstackclient # < 所有节点 >安装 openstack-selinux
RHEL 和 CentOS 默认启用了 SELinux . 安装
openstack-selinux软件包以便自动管理 OpenStack 服务的安全策略:yum -y install openstack-selinux # < 所有节点 >
SQL数据库
大多数
OpenStack服务使用SQL数据库来存储信息。 数据库运行在\(\textcolor{red}{控制节点}\)上
安装软件包
yum -y install mariadb mariadb-server python2-PyMySQL # `python2-PyMySQL` python模块
相关配置
- 创建并编辑
/etc/my.cnf.d/openstack.cnf,然后完成如下操作:在
[mysqld]部分,设置[ bind-address ]值为 本机监听的 IP 地址;以使得其它节点可以通过IP地址访问数据库:[mysqld] ... bind-address = 10.0.0.11在
[mysqld]部分,设置如下键值, 来启用一些必要的选项和 UTF-8 字符集:[mysqld] ... default-storage-engine = innodb # 默认存储引擎 innodb_file_per_table # 独立表空间文件 max_connections = 4096 # 最大连接数 collation-server = utf8_general_ci character-set-server = utf8 # 默认字符集 utf-8
重启服务
systemctl enable mariadb.service;systemctl start mariadb.service # 重启 并 开机自启
数据库安全初始化
为了保证数据库服务的安全性,运行
mysql_secure_installation脚本。特别需要说明的是,为数据库的root用户设置一个适当的密码。
如果不执行,那么启动后,需要同步数据库时就会报错
# mysql_secure_installation
……
# 输入root用户的当前密码
Enter current password for root (enter for none):   回车
……
# 设置 root 密码?[y/n]
Set root password? [Y/n] n       // 这里没有设置密码,因为的访问较快,如果在企业就必须设置
……
# 删除匿名用户?[Y/n]
Remove anonymous users? [Y/n] y
……
# 不允许 root 用户远程登录?[Y/n]
Disallow root login remotely? [Y/n] y
……
# 是否删除测试数据库并访问它?[Y/n]
Remove test database and access to it? [Y/n] y
……
# 现在重新加载特权表吗?[Y/n]
Reload privilege tables now? [Y/n] y

# 成功标准
Thanks for using MariaDB!
消息队列
多用于分布式系统之间 进行传递信息 ———— 消息队列
安全并配置组件
1.安装包
yum -y install rabbitmq-server2. 重启 并 开机自启
systemctl enable rabbitmq-server.service;systemctl start rabbitmq-server.service3.添加
openstack用户 [使openstack所有服务都能用上消息队列]rabbitmqctl add_user openstack RABBIT_PASS // 创建用户密码 Creating user "openstack" ... ...done.
- 可以用合适的密码替换
RABBIT_DBPASS,建议不修改,不然后面全部都要修改。4.给
openstack用户配置写和读权限rabbitmqctl set_permissions openstack ".*" ".*" ".*" //可读、可写、可配置 Setting permissions for user "openstack" in vhost "/" ... ...done.# 查看端口 netstat -ntulp | grep 5672 tcp 0 0 0.0.0.0:25672 0.0.0.0:* LISTEN 29675/beam.smp // 集群之间同步数据 用的端口 tcp6 0 0 :::5672 :::* LISTEN 29675/beam.smp // 客服端使用5.启用 rabbitmq 的管理插件 < 可省略 >
方便以后做监控
rabbitmq-plugins enable rabbitmq_management    // 执行后会产生 15672 端口< 插件的 >
The following plugins have been enabled:
  mochiweb
  webmachine
  rabbitmq_web_dispatch
  amqp_client
  rabbitmq_management_agent
  rabbitmq_management

Applying plugin configuration to rabbit@controller... started 6 plugins.

# 检查端口
netstat -ntulp | grep 5672
tcp        0      0 0.0.0.0:25672           0.0.0.0:*               LISTEN      29675/beam.smp
tcp        0      0 0.0.0.0:15672           0.0.0.0:*               LISTEN      29675/beam.smp
tcp6       0      0 :::5672                 :::*                    LISTEN      29675/beam.smp

# 访问
IP:15672
# 默认密码
用户:  guest
密码:  guest

Memcached
- 认证服务认证缓存使用Memcached缓存token。缓存服务memecached运行在控制节点。
- token: 用于验证用户登录信息, 利用memcached将token缓存下来,那么下次用户登录时,就不需要验证了[提高效率]
安装软件包
yum install -y memcached python-memcached修改配置文件
sed -i 's/127.0.0.1/10.0.0.11/g' /etc/sysconfig/memcached重启 并 开机自启
systemctl enable memcached.service;systemctl restart memcached.service
认证服务
- 认证管理,授权管理和服务目录
- 服务目录 :用户创建镜像[9292],虚拟机[nova:8774],网络[9696]等服时,都要访问该服务的服务端口,而openstack的服务较多,用户记起来很麻烦,即keystone提供的服务目录解决了这一问题
先决条件
在你配置 OpenStack 身份认证服务前,你必须创建一个数据库和管理员令牌(token)。
连接到数据库服务器:
mysql # 这里直接使用 mysql 命令即可 [应为我们再初始化的时候没有设置密码]创库并授权
# 创建 keystone数据库 并 对 keystone数据库授予恰当的权限:
CREATE DATABASE keystone;
GRANT ALL PRIVILEGES ON keystone.* TO 'keystone'@'localhost' \
  IDENTIFIED BY 'KEYSTONE_DBPASS';
GRANT ALL PRIVILEGES ON keystone.* TO 'keystone'@'%' \
  IDENTIFIED BY 'KEYSTONE_DBPASS';
退出数据库
exit
安装相关软件包
yum -y install openstack-keystone httpd mod_wsgi
修改配置文件
编辑文件
/etc/keystone/keystone.conf并完成如下操作过滤配置文件
# 先拷贝一份
cp /etc/keystone/keystone.conf{,.bak}

# 过滤
egrep -v '^$|#' /etc/keystone/keystone.conf.bak > /etc/keystone/keystone.conf
在
[DEFAULT]部分,定义初始管理令牌( token )的值:[DEFAULT] ... admin_token = ADMIN_TOKEN官网要求替换值,由于我们省略了生成token的步骤,所以我们直接使用 ADMIN_TOKEN 就可以了
在
[database]部分,配置数据库访问:[database] ... connection = mysql+pymysql://keystone:KEYSTONE_DBPASS@controller/keystone在
[token]部分,配置Fernet UUID令牌的提供者。[token] ... provider = fernet
keystone 认证方式:  UUID、  PKI、  Fernet;
# 都只是生成一段随机字符串的方法
检测
md5sum /etc/keystone/keystone.conf
d5acb3db852fe3f247f4f872b051b7a9  /etc/keystone/keystone.conf
同步数据库
< 初始化身份认证服务的数据库 >
同步数据库前
mysql keystone -e "show tables;" # 不会有表同步数据库
su -s /bin/sh -c "keystone-manage db_sync" keystonesu: 切换用户 -s: 指定 shell + **shell -c: 指定执行的命令 + 命令 keystone: 用户 # 意思: 切换到 keystone 用户执行 /bin/shell < keystone-manage db_sync > 命令同步数据库后
mysql keystone -e "show tables;" # 会出现表
初始化Fernet
keystone-manage fernet_setup --keystone-user keystone --keystone-group keystone验证结果
在 /etc/keystone 目录下会多一个 Fernet keys 目录
配置 Apache HTTP 服务器
编辑
/etc/httpd/conf/httpd.conf文件,配置ServerName选项为控制节点: [大约在95行]echo 'ServerName controller' >> /etc/httpd/conf/httpd.conf # 提高启动 http 速度创建文件并编辑
/etc/httpd/conf.d/wsgi-keystone.conf。vim /etc/httpd/conf.d/wsgi-keystone.conf Listen 5000 Listen 35357 <VirtualHost *:5000> WSGIDaemonProcess keystone-public processes=5 threads=1 user=keystone group=keystone display-name=%{GROUP} WSGIProcessGroup keystone-public WSGIScriptAlias / /usr/bin/keystone-wsgi-public WSGIApplicationGroup %{GLOBAL} WSGIPassAuthorization On ErrorLogFormat "%{cu}t %M" ErrorLog /var/log/httpd/keystone-error.log CustomLog /var/log/httpd/keystone-access.log combined <Directory /usr/bin> Require all granted </Directory> </VirtualHost> <VirtualHost *:35357> WSGIDaemonProcess keystone-admin processes=5 threads=1 user=keystone group=keystone display-name=%{GROUP} WSGIProcessGroup keystone-admin WSGIScriptAlias / /usr/bin/keystone-wsgi-admin WSGIApplicationGroup %{GLOBAL} WSGIPassAuthorization On ErrorLogFormat "%{cu}t %M" ErrorLog /var/log/httpd/keystone-error.log CustomLog /var/log/httpd/keystone-access.log combined <Directory /usr/bin> Require all granted </Directory> </VirtualHost>启动 Apache HTTP 服务并 开机自启
systemctl enable httpd.service;systemctl start httpd.service检测:
md5sum /etc/httpd/conf.d/wsgi-keystone.conf
8f051eb53577f67356ed03e4550315c2  /etc/httpd/conf.d/wsgi-keystone.conf
创建服务实体和API端点
配置环境变量
export OS_TOKEN=ADMIN_TOKEN                        # 配置认证令牌
export OS_URL=http://controller:35357/v3           # 配置端点URL
export OS_IDENTITY_API_VERSION=3                   # 配置认证 API 版本
查看环境变量
# env | grep OS
……
OS_IDENTITY_API_VERSION=3
OS_TOKEN=ADMIN_TOKEN
OS_URL=http://controller:35357/v3
创建服务实体和身份认证服务:
创建一个 keystone 服务,描述为 "OpenStack Identity"
openstack service create --name keystone --description "OpenStack Identity" identity
+-------------+----------------------------------+
| Field       | Value                            |
+-------------+----------------------------------+
| description | OpenStack Identity               |
| enabled     | True                             |
| id          | a3853693c1e245e38a29fe5217996179 |
| name        | keystone                         |
| type        | identity                         |
+-------------+----------------------------------+

创建认证服务的 API 端点:

openstack endpoint create --region RegionOne identity public http://controller:5000/v3
+--------------+----------------------------------+
| Field        | Value                            |
+--------------+----------------------------------+
| enabled      | True                             |
| id           | 30fff543e7dc4b7d9a0fb13791b78bf4 |
| interface    | public                           |
| region       | RegionOne                        |
| region_id    | RegionOne                        |
| service_id   | 8c8c0927262a45ad9066cfe70d46892c |
| service_name | keystone                         |
| service_type | identity                         |
| url          | http://controller:5000/v3        |
+--------------+----------------------------------+

openstack endpoint create --region RegionOne identity internal http://controller:5000/v3
+--------------+----------------------------------+
| Field        | Value                            |
+--------------+----------------------------------+
| enabled      | True                             |
| id           | 57cfa543e7dc4b712c0ab137911bc4fe |
| interface    | internal                         |
| region       | RegionOne                        |
| region_id    | RegionOne                        |
| service_id   | 6f8de927262ac12f6066cfe70d99ac51 |
| service_name | keystone                         |
| service_type | identity                         |
| url          | http://controller:5000/v3        |
+--------------+----------------------------------+

openstack endpoint create --region RegionOne identity admin http://controller:35357/v3
+--------------+----------------------------------+
| Field        | Value                            |
+--------------+----------------------------------+
| enabled      | True                             |
| id           | 78c3dfa3e7dc44c98ab1b1379122ecb1 |
| interface    | admin                            |
| region       | RegionOne                        |
| region_id    | RegionOne                        |
| service_id   | 34ab3d27262ac449cba6cfe704dbc11f |
| service_name | keystone                         |
| service_type | identity                         |
| url          | http://controller:35357/v3       |
+--------------+----------------------------------+
检测
openstack service list   # 查看服务
+----------------------------------+----------+----------+
| ID                               | Name     | Type     |
+----------------------------------+----------+----------+
| eb8a7814cbfc4bf3a480ac1c5a2c416d | keystone | identity |
+----------------------------------+----------+----------+

openstack endpoint list   # 查看API
+----------------------------------+-----------+--------------+--------------+---------+-----------+----------------------------+
| ID                               | Region    | Service Name | Service Type | Enabled | Interface | URL                        |
+----------------------------------+-----------+--------------+--------------+---------+-----------+----------------------------+
| 11b10e29f66d41ddadc2a41cf5932ba4 | RegionOne | keystone     | identity     | True    | public    | http://controller:5000/v3  |
| 6204801abfaf4d748dec2a946ca2f558 | RegionOne | keystone     | identity     | True    | admin     | http://controller:35357/v3 |
| 86d8b90352044b8483a2568ca0a08b0e | RegionOne | keystone     | identity     | True    | internal  | http://controller:5000/v3  |
+----------------------------------+-----------+--------------+--------------+---------+-----------+----------------------------+
创建域、项目、用户和角色
创建域 default:

openstack domain create --description "Default Domain" default
+-------------+----------------------------------+
| Field       | Value                            |
+-------------+----------------------------------+
| description | Default Domain                   |
| enabled     | True                             |
| id          | e0353a670a9e496da891347c589539e9 |
| name        | default                          |
+-------------+----------------------------------+

创建 admin 项目:

openstack project create --domain default --description "Admin Project" admin
+-------------+----------------------------------+
| Field       | Value                            |
+-------------+----------------------------------+
| description | Admin Project                    |
| domain_id   | e0353a670a9e496da891347c589539e9 |
| enabled     | True                             |
| id          | 343d245e850143a096806dfaefa9afdc |
| is_domain   | False                            |
| name        | admin                            |
| parent_id   | None                             |
+-------------+----------------------------------+

创建 admin 用户:  //将-prompt 替换为 ADMIN_PASS  / 000000

openstack user create --domain default --password ADMIN_PASS admin

+-----------+----------------------------------+
| Field     | Value                            |
+-----------+----------------------------------+
| domain_id | e0353a670a9e496da891347c589539e9 |
| enabled   | True                             |
| id        | ac3377633149401296f6c0d92d79dc16 |
| name      | admin                            |
+-----------+----------------------------------+

创建 admin 角色:

openstack role create admin
+-----------+----------------------------------+
| Field     | Value                            |
+-----------+----------------------------------+
| domain_id | None                             |
| id        | cd2cb9a39e874ea69e5d4b896eb16128 |
| name      | admin                            |
+-----------+----------------------------------+

openstack role add --project admin --user admin admin  [在 admin 的项目上; 给 admin 的用户添加 admin 角色]

创建``service``项目:

openstack project create --domain default --description "Service Project" service
+-------------+----------------------------------+
| Field       | Value                            |
+-------------+----------------------------------+
| description | Service Project                  |
| domain_id   | e0353a670a9e496da891347c589539e9 |
| enabled     | True                             |
| id          | 894cdfa366d34e9d835d3de01e752262 |
| is_domain   | False                            |
| name        | service                          |
| parent_id   | None                             |
+-------------+----------------------------------+
认证测试
创建 OpenStack 客户端环境脚本 [root目录下创建]
vim  admin-openrc

export OS_PROJECT_DOMAIN_NAME=default
export OS_USER_DOMAIN_NAME=default
export OS_PROJECT_NAME=admin
export OS_USERNAME=admin
export OS_PASSWORD=ADMIN_PASS  / 000000
export OS_AUTH_URL=http://controller:35357/v3
export OS_IDENTITY_API_VERSION=3
export OS_IMAGE_API_VERSION=2

# 加载环境变量
source admin-openrc

# 开机自动挂载
echo 'source admin-openrc' >> /root/.bashrc
测试
# 退出登录
logout

openstack token issue
+------------+-------------------------------------------------------------------------------------------------------------+
| Field      | Value                                                                                                         |
+------------+-------------------------------------------------------------------------------------------------------------+
| expires    | 2022-01-17T04:09:08.000000Z                                                                                   |
| id         | gAAAAABh5N3UrN738ClBL5plEMwNjfYm3mBCAJW5W_FufDp6IP-wkxrgQ_-                                                   |
|            | W68JYHMD9RC7h3dqvVdgWB0eL3yfxVZqbInJyZylRLwhxQWqVelwwjErcXOtM6LNXnh4SfPCHZtY6kMaCiGfY7Os-                     |
|            | suTB4ZFZlElFZTj8Cxqt_bNGQ7w_35lec-s                                                                           |
| project_id | b4b4a61b746748a99b2f5d97bcf9ef77
|
| user_id    | d57a3900a26a428cb2de164c10615105
|
+------------+-------------------------------------------------------------------------------------------------------------+
```
报错
  openstack token issue
  The request you have made requires authentication. (HTTP 401) (Request-ID: req-15d232f4-9dbb-46ab-9037-25d428b6ec04)


  原因: 前面将  ADMIN_PASS 修改为了 000000
Glance 服务
-
组件:
- glance-api 作用: 接收镜像API的调用,比如镜像发现、恢复、存储
- glance-registry 作用: 存储、处理和恢复镜像的元数据 [镜像的属性]
仓库授权
# 登录数据库
mysql -u root -p

# 创建 glance 数据库:
CREATE DATABASE glance;

# 对 glance 数据库授予恰当的权限:
GRANT ALL PRIVILEGES ON glance.* TO 'glance'@'localhost' \
  IDENTIFIED BY 'GLANCE_DBPASS';
GRANT ALL PRIVILEGES ON glance.* TO 'glance'@'%' \
  IDENTIFIED BY 'GLANCE_DBPASS';

# 退出数据库客户端。
创建用户关联角色
-
在 keystone 上
# 创建 glance 用户:
openstack user create --domain default --password GLANCE_PASS glance
+-----------+----------------------------------+
| Field     | Value                            |
+-----------+----------------------------------+
| domain_id | e0353a670a9e496da891347c589539e9 |
| enabled   | True                             |
| id        | e38230eeff474607805b596c91fa15d9 |
| name      | glance                           |
+-----------+----------------------------------+

# 在 service 项目上给 glance 用户添加 admin 角色
openstack role add --project service --user glance admin
创建服务并注册 API
-
在 keystone 上
创建 glance 服务实体:

openstack service create --name glance --description "OpenStack Image" image
+-------------+----------------------------------+
| Field       | Value                            |
+-------------+----------------------------------+
| description | OpenStack Image                  |
| enabled     | True                             |
| id          | 8c2c7f1b9b5049ea9e63757b5533e6d2 |
| name        | glance                           |
| type        | image                            |
+-------------+----------------------------------+
创建镜像服务的 API 端点:

openstack endpoint create --region RegionOne image public http://controller:9292
+--------------+----------------------------------+
| Field        | Value                            |
+--------------+----------------------------------+
| enabled      | True                             |
| id           | 340be3625e9b4239a6415d034e98aace |
| interface    | public                           |
| region       | RegionOne                        |
| region_id    | RegionOne                        |
| service_id   | 8c2c7f1b9b5049ea9e63757b5533e6d2 |
| service_name | glance                           |
| service_type | image                            |
| url          | http://controller:9292           |
+--------------+----------------------------------+

openstack endpoint create --region RegionOne image internal http://controller:9292
+--------------+----------------------------------+
| Field        | Value                            |
+--------------+----------------------------------+
| enabled      | True                             |
| id           | a6e4b153c2ae4c919eccfdbb7dceb5d2 |
| interface    | internal                         |
| region       | RegionOne                        |
| region_id    | RegionOne                        |
| service_id   | 8c2c7f1b9b5049ea9e63757b5533e6d2 |
| service_name | glance                           |
| service_type | image                            |
| url          | http://controller:9292           |
+--------------+----------------------------------+

openstack endpoint create --region RegionOne image admin http://controller:9292
+--------------+----------------------------------+
| Field        | Value                            |
+--------------+----------------------------------+
| enabled      | True                             |
| id           | 0c37ed58103f4300a84ff125a539032d |
| interface    | admin                            |
| region       | RegionOne                        |
| region_id    | RegionOne                        |
| service_id   | 8c2c7f1b9b5049ea9e63757b5533e6d2 |
| service_name | glance                           |
| service_type | image                            |
| url          | http://controller:9292           |
+--------------+----------------------------------+
安全并配置组件
安装相关软件
yum -y install openstack-glance修改配置
OpenStack镜像服务包括以下组件:
glance-api
接收镜像API的调用,诸如镜像发现、恢复、存储。
编辑文件 /etc/glance/glance-api.conf 并完成如下操作
# 备份文件
cp /etc/glance/glance-api.conf{,.bak}
egrep -v '^$|#' /etc/glance/glance-api.conf.bak > /etc/glance/glance-api.conf
# 在 [database] 部分,配置数据库连接: [database] ... connection = mysql+pymysql://glance:GLANCE_DBPASS@controller/glance # 在 [keystone_authtoken] 和 [paste_deploy] 部分,配置认证服务连接: [keystone_authtoken] ... auth_uri = http://controller:5000 auth_url = http://controller:35357 memcached_servers = controller:11211 auth_type = password project_domain_name = default user_domain_name = default project_name = service username = glance password = GLANCE_PASS [paste_deploy] # 认证方案为 keystone ... flavor = keystone # 在 [glance_store] 部分,配置本地文件系统存储和镜像文件位置< 存储路径 >: [glance_store] ... stores = file,http # 存储方式 文件[file],对象[http]存储 default_store = file filesystem_store_datadir = /var/lib/glance/images/
md5sum /etc/glance/glance-api.conf
3e1a4234c133eda11b413788e001cba3  /etc/glance/glance-api.conf
-
glance-registry
-
存储、处理和恢复镜像的元数据,元数据包括项诸如大小和类型。
# 编辑文件 /etc/glance/glance-registry.conf 并完成如下操作
# 备份文件
cp /etc/glance/glance-registry.conf{,.bak}
egrep -v "^$|#" /etc/glance/glance-registry.conf.bak > /etc/glance/glance-registry.conf
# 在 [database] 部分,配置数据库连接:

[database]
...
connection = mysql+pymysql://glance:GLANCE_DBPASS@controller/glance


# 在 [keystone_authtoken] 和 [paste_deploy] 部分,配置认证服务连接:

[keystone_authtoken]
...
auth_uri = http://controller:5000
auth_url = http://controller:35357
memcached_servers = controller:11211
auth_type = password
project_domain_name = default
user_domain_name = default
project_name = service
username = glance
password = GLANCE_PASS

[paste_deploy]
...
flavor = keystone
md5sum /etc/glance/glance-registry.conf
46acabd81a65b924256f56fe34d90b8f  /etc/glance/glance-registry.conf
同步数据库
su -s /bin/sh -c "glance-manage db_sync" glance
mysql glance -e 'show tables;'    # 检测
启动服务
# 启动镜像服务、配置他们开机自启
systemctl enable openstack-glance-api.service openstack-glance-registry.service
systemctl start openstack-glance-api.service openstack-glance-registry.service
验证操作
# 上传一个镜像测试
curl -O http://10.0.0.98/openstack/cirros-0.3.4-x86_64-disk.img

openstack image create "cirros" \
  --file cirros-0.3.4-x86_64-disk.img \
  --disk-format qcow2 --container-format bare \
  --public

# 测试
openstack image list
+--------------------------------------+--------+--------+
| ID                                   | Name   | Status |
+--------------------------------------+--------+--------+
| f30589ce-a8bd-48d4-9267-eaa15b1efe52 | cirros | active |
+--------------------------------------+--------+--------+
nova 计算服务
控制节点
仓库授权
登录数据库
mysql -u root -p创建 nova_api 和 nova 数据库, 并对数据库进行正确的授权:
CREATE DATABASE nova_api;
CREATE DATABASE nova;

GRANT ALL PRIVILEGES ON nova_api.* TO 'nova'@'localhost' IDENTIFIED BY 'NOVA_DBPASS';
GRANT ALL PRIVILEGES ON nova_api.* TO 'nova'@'%' IDENTIFIED BY 'NOVA_DBPASS';
GRANT ALL PRIVILEGES ON nova.* TO 'nova'@'localhost' IDENTIFIED BY 'NOVA_DBPASS';
GRANT ALL PRIVILEGES ON nova.* TO 'nova'@'%' IDENTIFIED BY 'NOVA_DBPASS';
退出数据库客户端。
创建用户并关联角色
创建 nova 用户:
openstack user create --domain default \
--password NOVA_PASS nova

+-----------+----------------------------------+
| Field     | Value                            |
+-----------+----------------------------------+
| domain_id | e0353a670a9e496da891347c589539e9 |
| enabled   | True                             |
| id        | 8c46e4760902464b889293a74a0c90a8 |
| name      | nova                             |
+-----------+----------------------------------+
给 nova 用户添加 admin 角色:
openstack role add --project service --user nova admin
openstack user create --domain default \
  --password NOVA_PASS nova
openstack role add --project service --user nova admin
创建服务并注册 api
创建 nova 服务实体:
openstack service create --name nova \
--description "OpenStack Compute" compute
+-------------+----------------------------------+
| Field       | Value                            |
+-------------+----------------------------------+
| description | OpenStack Compute                |
| enabled     | True                             |
| id          | 060d59eac51b4594815603d75a00aba2 |
| name        | nova                             |
| type        | compute                          |
+-------------+----------------------------------+
创建 Compute 服务 API 端点 :
openstack endpoint create --region RegionOne \
compute public http://controller:8774/v2.1/%\(tenant_id\)s
+--------------+-------------------------------------------+
| Field        | Value                                     |
+--------------+-------------------------------------------+
| enabled      | True                                      |
| id           | 3c1caa473bfe4390a11e7177894bcc7b          |
| interface    | public                                    |
| region       | RegionOne                                 |
| region_id    | RegionOne                                 |
| service_id   | e702f6f497ed42e6a8ae3ba2e5871c78          |
| service_name | nova                                      |
| service_type | compute                                   |
| url          | http://controller:8774/v2.1/%(tenant_id)s |
+--------------+-------------------------------------------+

openstack endpoint create --region RegionOne \
compute internal http://controller:8774/v2.1/%\(tenant_id\)s
+--------------+-------------------------------------------+
| Field        | Value                                     |
+--------------+-------------------------------------------+
| enabled      | True                                      |
| id           | e3c918de680746a586eac1f2d9bc10ab          |
| interface    | internal                                  |
| region       | RegionOne                                 |
| region_id    | RegionOne                                 |
| service_id   | e702f6f497ed42e6a8ae3ba2e5871c78          |
| service_name | nova                                      |
| service_type | compute                                   |
| url          | http://controller:8774/v2.1/%(tenant_id)s |
+--------------+-------------------------------------------+

openstack endpoint create --region RegionOne \
compute admin http://controller:8774/v2.1/%\(tenant_id\)s
+--------------+-------------------------------------------+
| Field        | Value                                     |
+--------------+-------------------------------------------+
| enabled      | True                                      |
| id           | 38f7af91666a47cfb97b4dc790b94424          |
| interface    | admin                                     |
| region       | RegionOne                                 |
| region_id    | RegionOne                                 |
| service_id   | e702f6f497ed42e6a8ae3ba2e5871c78          |
| service_name | nova                                      |
| service_type | compute                                   |
| url          | http://controller:8774/v2.1/%(tenant_id)s |
+--------------+-------------------------------------------+
安全并配置组件
安装相关软件
yum -y install openstack-nova-api openstack-nova-conductor openstack-nova-console openstack-nova-novncproxy openstack-nova-scheduleropenstack-nova-api: 接受并响应所有计算服务的请求, 管理云主机的生命周期 openstack-nova-conductor: 修改数据库中虚拟机的状态 openstack-nova-console / openstack-nova-novncproxy : web版的VNC 直接操作云主机 openstack-nova-scheduler: 调度器修改相关配置
- 编辑
/etc/nova/nova.conf文件并完成下面的操作:
备份文件
cp /etc/nova/nova.conf{,.bak}
egrep -v '^$|#' /etc/nova/nova.conf.bak  > /etc/nova/nova.conf
在 [DEFAULT]部分,只启用计算和元数据API:
[DEFAULT]
...
enabled_apis = osapi_compute,metadata  # 启用了两个API,端口为 8774 和 8775
在[api_database]和[database]部分,配置数据库的连接:
[api_database]
...
connection = mysql+pymysql://nova:NOVA_DBPASS@controller/nova_api
[database]
...
connection = mysql+pymysql://nova:NOVA_DBPASS@controller/nova
在 “[DEFAULT]” 和 “[oslo_messaging_rabbit]”部分,配置 “RabbitMQ” 消息队列访问:
[DEFAULT]
...
rpc_backend = rabbit     # 指定消息队列 rabbit
[oslo_messaging_rabbit] # 地址,用户和用户密码 ... rabbit_host = controller rabbit_userid = openstack rabbit_password = RABBIT_PASS在 “[DEFAULT]” 和 “[keystone_authtoken]” 部分,配置认证服务访问:
[DEFAULT]
...
auth_strategy = keystone
[keystone_authtoken] ... auth_uri = http://controller:5000 auth_url = http://controller:35357 memcached_servers = controller:11211 auth_type = password project_domain_name = default user_domain_name = default project_name = service username = nova password = NOVA_PASS在 [DEFAULT 部分,配置
my_ip来使用控制节点的管理接口的IP 地址。[DEFAULT] ... my_ip = 10.0.0.11在 [DEFAULT] 部分,使能 Networking 服务:
[DEFAULT]
...
use_neutron = True
firewall_driver = nova.virt.firewall.NoopFirewallDriver   # 禁用防火墙
注解:
-- 默认情况下,计算服务使用内置的防火墙服务。由于网络服务包含了防火墙服务,你必须使用nova.virt.firewall.NoopFirewallDriver防火墙服务来禁用掉计算服务内置的防火墙服务在[vnc]部分,配置VNC代理使用控制节点的管理接口IP地址
[vnc]
...
vncserver_listen = $my_ip
vncserver_proxyclient_address = $my_ip
在 [glance] 区域,配置镜像服务 API 的位置:
[glance]
...
api_servers = http://controller:9292
**在 [oslo_concurrency] 部分,配置锁路径: [锁文件的作用: 防止脚本或任务重复执行] **
[oslo_concurrency]
...
lock_path = /var/lib/nova/tmp
md5sum /etc/nova/nova.conf
47ded61fdd1a79ab91bdb37ce59ef192  /etc/nova/nova.conf
同步 数据库:
su -s /bin/sh -c "nova-manage api_db sync" nova
su -s /bin/sh -c "nova-manage db sync" nova
mysql nova_api -e "show tables;"
mysql nova -e "show tables;"
启动服务
systemctl enable openstack-nova-api.service openstack-nova-consoleauth.service openstack-nova-scheduler.service openstack-nova-conductor.service openstack-nova-novncproxy.service

systemctl start openstack-nova-api.service openstack-nova-consoleauth.service openstack-nova-scheduler.service openstack-nova-conductor.service openstack-nova-novncproxy.service
查看日志
tail -f /var/log/nova/nova-* | grep ERRO     # 没有输出即为成功

检测
openstack compute service list
+----+------------------+------------+----------+---------+-------+----------------------------+
| Id | Binary           | Host       | Zone     | Status  | State | Updated At                 |
+----+------------------+------------+----------+---------+-------+----------------------------+
|  1 | nova-consoleauth | controller | internal | enabled | up    | 2022-01-18T05:10:56.000000 |
|  2 | nova-scheduler   | controller | internal | enabled | up    | 2022-01-18T05:10:57.000000 |
|  3 | nova-conductor   | controller | internal | enabled | up    | 2022-01-18T05:10:57.000000 |
+----+------------------+------------+----------+---------+-------+----------------------------+
计算节点
安全并配置组件
安装相关软件
yum -y install openstack-nova-compute修改相关配置
编辑
/etc/nova/nova.conf文件并完成下面的操作:
备份文件
cp /etc/nova/nova.conf{,.bak}
egrep -v '^$|#' /etc/nova/nova.conf.bak  > /etc/nova/nova.conf
在[DEFAULT]和 [
oslo_messaging_rabbit]部分,配置RabbitMQ消息队列的连接:[DEFAULT] ... rpc_backend = rabbit[oslo_messaging_rabbit] ... rabbit_host = controller rabbit_userid = openstack rabbit_password = RABBIT_PASS在 “[DEFAULT]” 和 “[keystone_authtoken]” 部分,配置认证服务访问:
[DEFAULT] ... auth_strategy = keystone[keystone_authtoken] ... auth_uri = http://controller:5000 auth_url = http://controller:35357 memcached_servers = controller:11211 auth_type = password project_domain_name = default user_domain_name = default project_name = service username = nova password = NOVA_PASS在 [DEFAULT] 部分,配置 my_ip 选项:
[DEFAULT] ... my_ip = MANAGEMENT_INTERFACE_IP_ADDRESS注释:
将其中的 MANAGEMENT_INTERFACE_IP_ADDRESS 替换为计算节点上的管理网络接口的IP 地址,例如 :ref:
example architecture <overview-example-architectures>中所示的第一个节点 10.0.0.31 。
在 [DEFAULT] 部分,使能 Networking 服务:
[DEFAULT] ... use_neutron = True firewall_driver = nova.virt.firewall.NoopFirewallDriver注解
缺省情况下,Compute 使用内置的防火墙服务。由于 Networking 包含了防火墙服务,所以你必须通过使用 nova.virt.firewall.NoopFirewallDriver 来去除 Compute 内置的防火墙服务。
在[vnc]部分,启用并配置远程控制台访问:
[vnc] ... enabled = True vncserver_listen = 0.0.0.0 vncserver_proxyclient_address = $my_ip novncproxy_base_url = http://controller:6080/vnc_auto.html服务器组件监听所有的 IP 地址,而代理组件仅仅监听计算节点管理网络接口的 IP 地址。基本的 URL 指示您可以使用 web 浏览器访问位于该计算节点上实例的远程控制台的位置。
注解:
如果你运行浏览器的主机无法解析controller 主机名,你可以将 controller替换为你控制节点管理网络的IP地址。
在 [glance] 区域,配置镜像服务 API 的位置:
[glance] ... api_servers = http://controller:9292在 [oslo_concurrency] 部分,配置锁路径: [锁文件的作用: 防止脚本或任务重复执行]
[oslo_concurrency] ... lock_path = /var/lib/nova/tmp
[root@compute ~]# md5sum /etc/nova/nova.conf
2f53f4e0848bc5927493925a4ea61f63 /etc/nova/nova.conf
安全检测
确定您的计算节点是否开启虚拟化; 如果输出结果为 1或非零数 就不需要修改, 如果为零就需要修改
egrep -c '(vmx|svm)' /proc/cpuinfo在
/etc/nova/nova.conf文件的[libvirt]区域做出如下的编辑:[libvirt] ... virt_type = qemu cpu_mode = none
启动
systemctl enable libvirtd.service openstack-nova-compute.service;
systemctl start libvirtd.service openstack-nova-compute.service
测试
- 到 controller 节点
查看日志
tail -f /var/log/nova/nova-* | grep ERRO //没有输出即为成功
openstack compute service list
+----+------------------+------------+----------+---------+-------+----------------------------+
| Id | Binary | Host | Zone | Status | State | Updated At |
+----+------------------+------------+----------+---------+-------+----------------------------+
| 1 | nova-consoleauth | controller | internal | enabled | up | 2022-01-18T06:21:48.000000 |
| 2 | nova-scheduler | controller | internal | enabled | up | 2022-01-18T06:21:49.000000 |
| 3 | nova-conductor | controller | internal | enabled | up | 2022-01-18T06:21:49.000000 |
| 7 | nova-compute | compute1 | nova | enabled | up | 2022-01-18T06:21:42.000000 |
+----+------------------+------------+----------+---------+-------+----------------------------+
网络(neutron)服务
控制节点
创库授权
登录数据库
mysql -u root -p创建 neutron 数据库,并对 neutron 数据库授予合适的访问权限
CREATE DATABASE neutron; GRANT ALL PRIVILEGES ON neutron.* TO 'neutron'@'localhost' IDENTIFIED BY 'NEUTRON_DBPASS'; GRANT ALL PRIVILEGES ON neutron.* TO 'neutron'@'%' IDENTIFIED BY 'NEUTRON_DBPASS';
创建用户并关联角色
创建neutron用户:
openstack user create --domain default --password NEUTRON_PASS neutron +-----------+----------------------------------+ | Field | Value | +-----------+----------------------------------+ | domain_id | e0353a670a9e496da891347c589539e9 | | enabled | True | | id | b20a6692f77b4258926881bf831eb683 | | name | neutron | +-----------+----------------------------------+添加admin 角色到 neutron 用户:
openstack role add --project service --user neutron admin
创建服务注册api
创建 neutron 服务实体:
openstack service create --name neutron \ --description "OpenStack Networking" network +-------------+----------------------------------+ | Field | Value | +-------------+----------------------------------+ | description | OpenStack Networking | | enabled | True | | id | f71529314dab4a4d8eca427e701d209e | | name | neutron | | type | network | +-------------+----------------------------------+创建网络服务API端点:
openstack endpoint create --region RegionOne \ network public http://controller:9696 +--------------+----------------------------------+ | Field | Value | +--------------+----------------------------------+ | enabled | True | | id | 85d80a6d02fc4b7683f611d7fc1493a3 | | interface | public | | region | RegionOne | | region_id | RegionOne | | service_id | f71529314dab4a4d8eca427e701d209e | | service_name | neutron | | service_type | network | | url | http://controller:9696 | +--------------+----------------------------------+ openstack endpoint create --region RegionOne \ network internal http://controller:9696 +--------------+----------------------------------+ | Field | Value | +--------------+----------------------------------+ | enabled | True | | id | 09753b537ac74422a68d2d791cf3714f | | interface | internal | | region | RegionOne | | region_id | RegionOne | | service_id | f71529314dab4a4d8eca427e701d209e | | service_name | neutron | | service_type | network | | url | http://controller:9696 | +--------------+----------------------------------+ openstack endpoint create --region RegionOne \ network admin http://controller:9696 +--------------+----------------------------------+ | Field | Value | +--------------+----------------------------------+ | enabled | True | | id | 1ee14289c9374dffb5db92a5c112fc4e | | interface | admin | | region | RegionOne | | region_id | RegionOne | | service_id | f71529314dab4a4d8eca427e701d209e | | service_name | neutron | | service_type | network | | url | http://controller:9696 | +--------------+----------------------------------+
公共网络
安装组件
yum -y install openstack-neutron openstack-neutron-ml2 openstack-neutron-linuxbridge ebtables openstack-neutron-linuxbridge:网桥,用于创建桥接网卡 ebtables:防火墙gui'ze
配置服务组件
编辑
/etc/neutron/neutron.conf文件并完成如下操作:
备份文件
cp /etc/neutron/neutron.conf{,.bak} egrep -v '^$|#' /etc/neutron/neutron.conf.bak > /etc/neutron/neutron.conf在 [database] 部分,配置数据库访问:
[database] ... connection = mysql+pymysql://neutron:NEUTRON_DBPASS@controller/neutron在
[DEFAULT]部分,启用ML2插件并禁用其他插件:[DEFAULT] ... core_plugin = ml2 # 核心插件 service_plugins = # 服务插件为空 [禁用]在 “[DEFAULT]” 和 “[oslo_messaging_rabbit]”部分,配置 “RabbitMQ” 消息队列的连接:
[DEFAULT]
...
rpc_backend = rabbit
[oslo_messaging_rabbit] ... rabbit_host = controller rabbit_userid = openstack rabbit_password = RABBIT_PASS在 “[DEFAULT]” 和 “[keystone_authtoken]” 部分,配置认证服务访问:
[DEFAULT]
...
auth_strategy = keystone
[keystone_authtoken] ... auth_uri = http://controller:5000 auth_url = http://controller:35357 memcached_servers = controller:11211 auth_type = password project_domain_name = default user_domain_name = default project_name = service username = neutron password = NEUTRON_PASS在
[DEFAULT]和[nova]部分,配置网络服务来通知计算节点的网络拓扑变化:[DEFAULT] # 用于nova 和 neutron 之间互相通信 ... notify_nova_on_port_status_changes = True notify_nova_on_port_data_changes = True[nova] ... auth_url = http://controller:35357 auth_type = password project_domain_name = default user_domain_name = default region_name = RegionOne project_name = service username = nova password = NOVA_PASS在 [oslo_concurrency] 部分,配置锁路径:
[oslo_concurrency] ... lock_path = /var/lib/neutron/tmp
md5sum /etc/neutron/neutron.conf
79e80bfccdee7e3403656a52c22cdf1d /etc/neutron/neutron.conf
配置 Modular Layer 2 (ML2) 插件
编辑
/etc/neutron/plugins/ml2/ml2_conf.ini文件并完成以下操作:
备份文件
cp /etc/neutron/plugins/ml2/ml2_conf.ini{,.bak} egrep -v '^$|#' /etc/neutron/plugins/ml2/ml2_conf.ini.bak > /etc/neutron/plugins/ml2/ml2_conf.ini在[ml2]部分,启用flat和VLAN网络:
[ml2] ... type_drivers = flat,vlan # flat [桥接网络]**在[ml2]部分,禁用私有网络: **
[ml2] ... tenant_network_types = # 禁用私有网络在[ml2]部分,启用Linuxbridge机制:
[ml2] ... mechanism_drivers = linuxbridge # 桥接在[ml2] 部分,启用端口安全扩展驱动:
[ml2] ... extension_drivers = port_security [与安全组有关]在[ml2_type_flat]部分,配置公共虚拟网络为flat网络
[ml2_type_flat] ... flat_networks = provider在 [securitygroup]部分,启用 [ipset]增加安全组规则的高效性:
[securitygroup] ... enable_ipset = True
md5sum /etc/neutron/plugins/ml2/ml2_conf.ini
c1562515b53c380cbd460621f4cf5362 /etc/neutron/plugins/ml2/ml2_conf.ini
配置Linuxbridge代理
编辑
/etc/neutron/plugins/ml2/linuxbridge_agent.ini文件并且完成以下操作:
备份文件
cp /etc/neutron/plugins/ml2/linuxbridge_agent.ini{,.bak} egrep -v '^$|#' /etc/neutron/plugins/ml2/linuxbridge_agent.ini.bak > /etc/neutron/plugins/ml2/linuxbridge_agent.ini在[linux_bridge]部分,将公共虚拟网络和公共物理网络接口对应起来:
[linux_bridge] physical_interface_mappings = provider:PROVIDER_INTERFACE_NAME将 PUBLIC_INTERFACE_NAME 替换为底层的物理公共网络接口: eth0
在[vxlan]部分,禁止VXLAN覆盖网络:
[vxlan] enable_vxlan = False在
[securitygroup]部分,启用安全组并配置 Linuxbridge iptables firewall driver:[securitygroup] ... enable_security_group = True firewall_driver = neutron.agent.linux.iptables_firewall.IptablesFirewallDriver
md5sum /etc/neutron/plugins/ml2/linuxbridge_agent.ini
3f474907a7f438b34563e4d3f3c29538 /etc/neutron/plugins/ml2/linuxbridge_agent.ini
配置DHCP代理
编辑 /etc/neutron/dhcp_agent.ini 文件并完成下面的操作:
在
[DEFAULT]部分,配置Linuxbridge驱动接口,DHCP驱动并启用隔离元数据,这样在公共网络上的实例就可以通过网络来访问元数据[DEFAULT] ... interface_driver = neutron.agent.linux.interface.BridgeInterfaceDriver dhcp_driver = neutron.agent.linux.dhcp.Dnsmasq enable_isolated_metadata = True
md5sum /etc/neutron/dhcp_agent.ini
465d10fed920a274056b1c92045db8f4 /etc/neutron/dhcp_agent.ini
配置元数据代理
作用:访问实例的凭证
编辑 /etc/neutron/metadata_agent.ini 文件并完成以下操作:
在
[DEFAULT]部分,配置元数据主机以及共享密码:[DEFAULT] ... nova_metadata_ip = controller metadata_proxy_shared_secret = METADATA_SECRET
md5sum /etc/neutron/metadata_agent.ini
8c229feefc4c40c706e25c237cf196f4 /etc/neutron/metadata_agent.ini
为nova配置网络服务
编辑/etc/nova/nova.conf文件并完成以下操作:
在
[neutron]部分,配置访问参数,启用元数据代理并设置密码:[neutron] ... url = http://controller:9696 auth_url = http://controller:35357 auth_type = password project_domain_name = default user_domain_name = default region_name = RegionOne project_name = service username = neutron password = NEUTRON_PASS service_metadata_proxy = True metadata_proxy_shared_secret = METADATA_SECRET
md5sum /etc/nova/nova.conf
6334f359655efdbcf083b812ab94efc1 /etc/nova/nova.conf
超链接
- 网络服务初始化脚本需要一个超链接
/etc/neutron/plugin.ini指向ML2插件配置文件/etc/neutron/plugins/ml2/ml2_conf.ini
# ln -s /etc/neutron/plugins/ml2/ml2_conf.ini /etc/neutron/plugin.ini
同步数据库
su -s /bin/sh -c "neutron-db-manage --config-file /etc/neutron/neutron.conf \
--config-file /etc/neutron/plugins/ml2/ml2_conf.ini upgrade head" neutron
重启服务
systemctl restart openstack-nova-api.service
systemctl enable neutron-server.service neutron-linuxbridge-agent.service neutron-dhcp-agent.service neutron-metadata-agent.service
systemctl start neutron-server.service neutron-linuxbridge-agent.service neutron-dhcp-agent.service neutron-metadata-agent.service
检测
查看日志
tail -f /var/log/nova/nova-* | grep ERRO //没有输出即为成功
neutron agent-list
+--------------------+--------------------+------------+-------------------+-------+----------------+-----------------------+
| id | agent_type | host | availability_zone | alive | admin_state_up | binary |
+--------------------+--------------------+------------+-------------------+-------+----------------+-----------------------+
| 06460a49-8b7d- | Linux bridge agent | controller | | :-) | True | neutron-linuxbridge- |
| 4f4f-871a- | | | | | | agent |
| 1eb84bd04da1 | | | | | | |
| 0cc05ef8-1286-4339 | Metadata agent | controller | | :-) | True | neutron-metadata- |
| -8265-df0e96068589 | | | | | | agent |
| dfcf4acd-13a6-48f6 | DHCP agent | controller | nova | :-) | True | neutron-dhcp-agent |
| -ab8a-9d39ab050658 | | | | | | |
+--------------------+--------------------+------------+-------------------+-------+----------------+-----------------------+
计算节点
安装组件
yum -y install openstack-neutron-linuxbridge ebtables ipset
配置通用组件
编辑
/etc/neutron/neutron.conf文件并完成如下操作:
备份文件
cp /etc/neutron/neutron.conf{,.bak}
egrep -v '^$|#' /etc/neutron/neutron.conf.bak  > /etc/neutron/neutron.conf
在 “[DEFAULT]” 和 “[oslo_messaging_rabbit]”部分,配置 “RabbitMQ” 消息队列的连接:
[DEFAULT]
...
rpc_backend = rabbit
[oslo_messaging_rabbit] ... rabbit_host = controller rabbit_userid = openstack rabbit_password = RABBIT_PASS在 “[DEFAULT]” 和 “[keystone_authtoken]” 部分,配置认证服务访问:
[DEFAULT]
...
auth_strategy = keystone
[keystone_authtoken] ... auth_uri = http://controller:5000 auth_url = http://controller:35357 memcached_servers = controller:11211 auth_type = password project_domain_name = default user_domain_name = default project_name = service username = neutron password = NEUTRON_PASS在 [oslo_concurrency] 部分,配置锁路径:
[oslo_concurrency]
...
lock_path = /var/lib/neutron/tmp
md5sum /etc/neutron/neutron.conf
77ffab503797be5063c06e8b956d6ed0 /etc/neutron/neutron.conf
公共网络
配置Linuxbridge代理
由于该配置与控制节点一样,即复制到计算节点即可
scp -r 10.0.0.11:/etc/neutron/plugins/ml2/linuxbridge_agent.ini /etc/neutron/plugins/ml2/linuxbridge_agent.ini
md5sum /etc/neutron/plugins/ml2/linuxbridge_agent.ini
3f474907a7f438b34563e4d3f3c29538  /etc/neutron/plugins/ml2/linuxbridge_agent.ini
为nova配置网络服务
编辑
/etc/nova/nova.conf文件并完成下面的操作:
在
[neutron]部分,配置访问参数:[neutron] ... url = http://controller:9696 auth_url = http://controller:35357 auth_type = password project_domain_name = default user_domain_name = default region_name = RegionOne project_name = service username = neutron password = NEUTRON_PASS
md5sum /etc/nova/nova.conf
8e6590c8dc3d59beb3da37fdeeadfd1d  /etc/nova/nova.conf
重启服务
systemctl restart openstack-nova-compute.service
systemctl enable neutron-linuxbridge-agent.service
systemctl start neutron-linuxbridge-agent.service
检测
查看日志
tail -f /var/log/nova/nova-* | grep ERRO //没有输出即为成功控制节点
neutron agent-list
+--------------------+--------------------+------------+-------------------+-------+----------------+-----------------------+
| id                 | agent_type         | host       | availability_zone | alive | admin_state_up | binary                |
+--------------------+--------------------+------------+-------------------+-------+----------------+-----------------------+
| 06460a49-8b7d-     | Linux bridge agent | controller |                   | :-)   | True           | neutron-linuxbridge-  |
| 4f4f-871a-         |                    |            |                   |       |                | agent                 |
| 1eb84bd04da1       |                    |            |                   |       |                |                       |
| 0cc05ef8-1286-4339 | Metadata agent     | controller |                   | :-)   | True           | neutron-metadata-     |
| -8265-df0e96068589 |                    |            |                   |       |                | agent                 |
| 96919fa9-fc83-4c95 | Linux bridge agent | compute1   |                   | :-)   | True           | neutron-linuxbridge-  |
| -be8d-abdb9e507f2f |                    |            |                   |       |                | agent                 |
| dfcf4acd-13a6-48f6 | DHCP agent         | controller | nova              | :-)   | True           | neutron-dhcp-agent    |
| -ab8a-9d39ab050658 |                    |            |                   |       |                |                       |
+--------------------+--------------------+------------+-------------------+-------+----------------+-----------------------
Dashboard
安装软件包
yum -y install openstack-dashboard
修改配置
curl -O http://10.0.0.98/openstack/dashboard-set

cat dashboard-set >/etc/openstack-dashboard/local_settings
重启服务
systemctl restart httpd.service memcached.service
登录
http://controller/dashboard
注意:如果windows 没有做域名解析,需要改为 IP 地址
启动一个实例
1,创建虚拟网络 (网络名 + 子网)
网络名
neutron net-create --shared --provider:physical_network provider \
--provider:network_type flat provider
子网
neutron subnet-create --name provider \
--allocation-pool start=10.0.0.100,end=10.0.0.250 \
--dns-nameserver 223.5.5.5 --gateway 10.0.0.2 \
provider 10.0.0.0/24
2 ,创建m1.nano规格的主机
openstack flavor create --id 0 --vcpus 1 --ram 64 --disk 1 m1.nano
3, 生成和添加秘钥对
ssh-keygen -q -N "" -f ~/.ssh/id_rsa
openstack keypair create --public-key ~/.ssh/id_rsa.pub mykey
4, 增加安全组规则
openstack security group rule create --proto icmp default
openstack security group rule create --proto tcp --dst-port 22 default
5, 启动一个实例
1,查看网络 id
neutron net-list
+--------------------------------------+----------+--------------------------------------------------+
| id                                   | name     | subnets                                          |
+--------------------------------------+----------+--------------------------------------------------+
| 53ad6be8-f46f-4871-a789-8ac3d294e1a5 | provider | 80d85268-ba38-42aa-9674-bb11c38ef604 10.0.0.0/24 |
+--------------------------------------+----------+--------------------------------------------------+
2,查看可用镜像
openstack image list3, 启动服务
openstack server create --flavor m1.nano --image cirros \
--nic net-id=53ad6be8-f46f-4871-a789-8ac3d294e1a5 --security-group default \
--key-name mykey mo
4, 检测
nova list
+--------------------------------------+------+--------+------------+-------------+---------------------+
| ID                                   | Name | Status | Task State | Power State | Networks            |
+--------------------------------------+------+--------+------------+-------------+---------------------+
| f55e6194-2176-4bae-a983-639ea34c4e2d | mo   | ACTIVE | -          | Running     | provider=10.0.0.101 |
+--------------------------------------+------+--------+------------+-------------+---------------------+

 浙公网安备 33010602011771号