scrapy实例matplotlib脚本下载
利用scrapy框架实现matplotlib实例脚本批量下载至本地并进行文件夹分类;话不多说上代码:
首先是爬虫代码:
import scrapy
from scrapy.linkextractors import LinkExtractor
from urllib.parse import urljoin
from ..items import MatplotlibExamplesItem


class MatExamplesSpider(scrapy.Spider):
    name = 'mat_examples'
    # allowed_domains = ['matplotlib.org']
    start_urls = ['https://matplotlib.org/gallery/index.html']


    def parse(self, response):
        le = LinkExtractor(restrict_xpaths='//span[contains(@class, "caption-text")]/a[contains(@class, "reference internal")]')
        links = le.extract_links(response)
        for link in links:
            yield scrapy.Request(link.url, callback=self.parse_mat)


    def parse_mat(self, response):
        href = response.xpath('//div[contains(@class, "docutils container")]/a/@href').extract_first()
        # print('href:', href)
        url = response.urljoin(href)
        # print('url:', url)
        example = MatplotlibExamplesItem()
        example['file_urls'] = [url]
        return example
分析代码:
parse函数主要为了获取初始url中的所有实例所在页面的url,通过yield输出scrapy.Request中的callback来调用parse_mat函数,下面继续介绍parse_mat函数的作用;
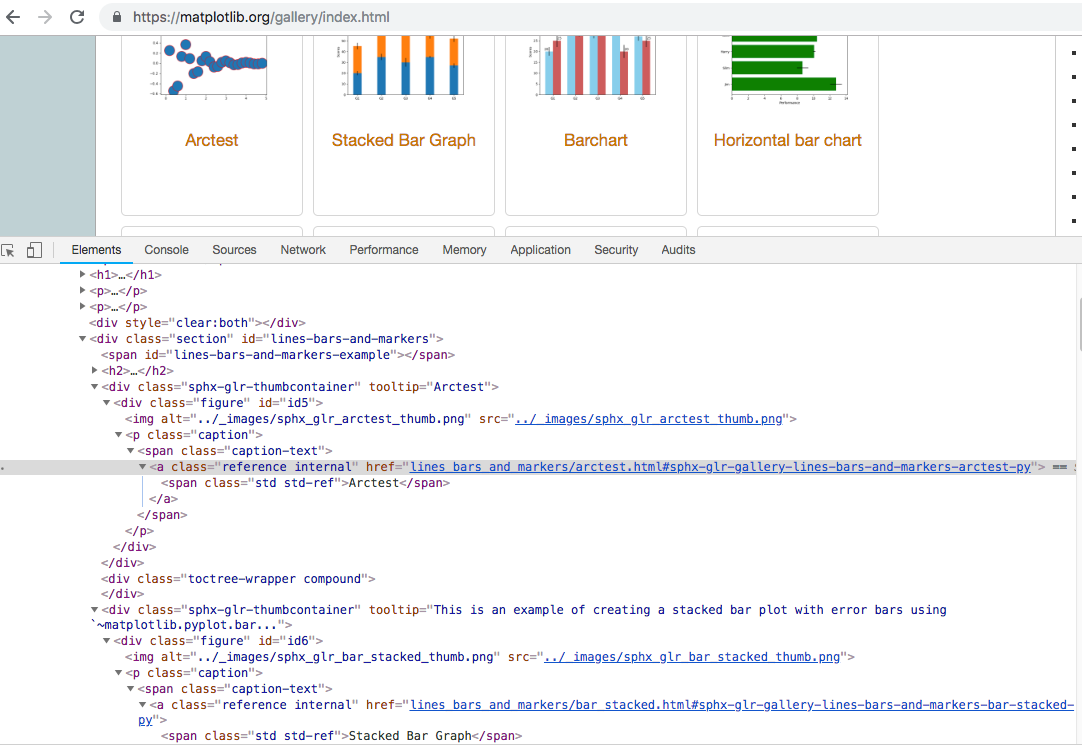
le = LinkExtractor(restrict_xpaths='//span[contains(@class, "caption-text")]/a[contains(@class, "reference internal")]')
此处代码主要是为了获取单个实例代码所在页面链接,如下图示:

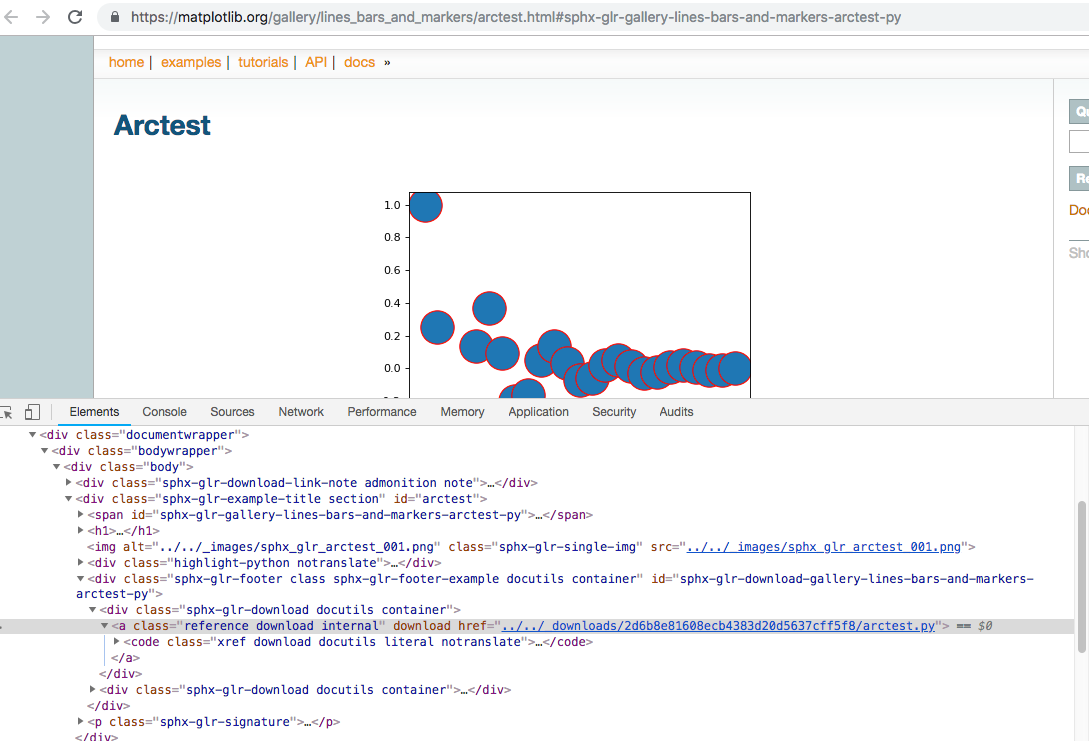
parse_mat函数主要是为了获取每个实例所在的下载链接,并存入item中返回至pipelines中进行下载;
href = response.xpath('//div[contains(@class, "docutils container")]/a/@href').extract_first() ---通过xpath规则获取对应的下载链接;
url = response.urljoin(href) ---通过urljoin方法将链接补全;
example = MatplotlibExamplesItem()
example['file_urls'] = [url] ----存入item中返回
下图为显示下载链接所在页面位置,便于使用xpath规则获取链接;

接下来写pipelines代码,具体代码如下:
from scrapy.pipelines.files import FilesPipeline
from urllib.parse import urlparse
from os.path import basename, dirname, join

class MatplotlibExamplesFilesPipeline(FilesPipeline):
    """docstring for Matploitem, spiderbExamplesFilesPipeline"""
    def file_path(self, request, response=None, info=None):
        # print('rl:', request.url)
        path = urlparse(request.url).path
        print('path', path)
        # return join(basename(dirname(path)), basename(path))
        return join(basename(path).split('.')[0], basename(path))
通过重写file_path方法保存下载文件,至于文件下载的文件或者路径可在setting中配置;
分析代码:
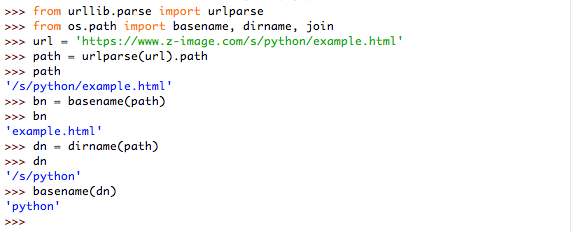
path = urlparse(request.url).path ---通过urlparse方法将url进行分解,以下用实例进行介绍该方法的输出:

实例1:介绍urlparse方法的输出

实例2:介绍basename与dirname方法的输出
return join(basename(path).split('.')[0], basename(path))
由于获取的下载链接:https://matplotlib.org/_downloads/2d6b8e81608ecb4383d20d5637cff5f8/arctest.py
所以basename(dirname(path))得到的是一串’2d6b8e81608ecb4383d20d5637cff5f8‘哈希值,于是就直接用basename(path).split('.')[0]为文件夹的名字
接下来写上简单的item的代码(这个代码最简单了,就是写url和file):
import scrapy


class MatplotlibExamplesItem(scrapy.Item):
    # define the fields for your item here like:
    # name = scrapy.Field()
    file_urls = scrapy.Field()
    files = scrapy.Field()
最后贴上setting的代码:
BOT_NAME = 'matplotlib_examples'

SPIDER_MODULES = ['matplotlib_examples.spiders']
NEWSPIDER_MODULE = 'matplotlib_examples.spiders'

ITEM_PIPELINES = {
    # 'scrapy.pipelines.files.FilesPipeline':1,
    'matplotlib_examples.pipelines.MatplotlibExamplesFilesPipeline':1,
}
FILES_STORE = 'result'

# Obey robots.txt rules
ROBOTSTXT_OBEY = False

# Disable cookies (enabled by default)
COOKIES_ENABLED = False

# Override the default request headers:
DEFAULT_REQUEST_HEADERS = {
  'user-agent' : 'Mozilla/5.0 (Macintosh; Intel Mac OS X 10_12_3) AppleWebKit/537.36 (KHTML, like Gecko) Chrome/71.0.3578.98 Safari/537.36'
}
'BOT_NAME' ----爬虫项目名称;一般进行新建scrapy爬虫后都自动写入了;
'ITEM_PIPELINES ' ---此处记得改为自己写的pipelines类名;
'FILES_STORE' ---此处为下载文件所在的文件夹;
其他的配置就基本了;例如是否遵循robots.txt协议,是否用cookies,user-agent改为与浏览器相同,这些都是为了避免被‘ban’;
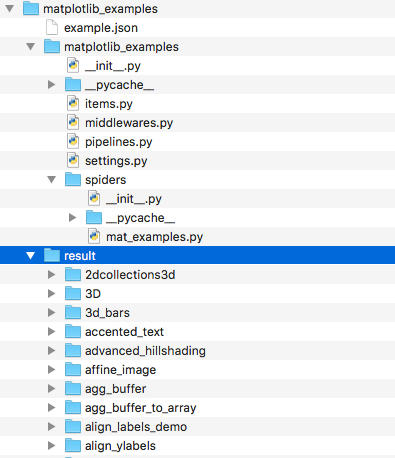
最后的最后附上项目:


