ELK环境搭建(ElasticSearch、Logstash 、Kibana)
-
前言
Elasticsearch是个开源分布式搜索引擎,它的特点有:分布式,零配置,自动发现,索引自动分片,索引副本机制,restful风格接口,多数据源,自动搜索负载等。
Logstash是一个完全开源的工具,他可以对你的日志进行收集、过滤,并将其存储供以后使用(如,搜索)。
Kibana 也是一个开源和免费的工具,它Kibana可以为 Logstash 和 ElasticSearch 提供的日志分析友好的 Web 界面,可以帮助您汇总、分析和搜索重要数据日志。
用途:
1.问题排查。我们常说,运维和开发这一辈子无非就是和问题在战斗,所以这个说起来很朴实的四个字,其实是沉甸甸的。很多公司其实不缺钱,就要稳定,而要稳定,就要运维和开发能够快速的定位问题,甚至防微杜渐,把问题杀死在摇篮里。日志分析技术显然问题排查的基石。基于日志做问题排查,还有一个很帅的技术,叫全链路追踪,比如阿里的eagleeye 或者Google的dapper,也算是日志分析技术里的一种。
2.监控和预警。 日志,监控,预警是相辅相成的。基于日志的监控,预警使得运维有自己的机械战队,大大节省人力以及延长运维的寿命。
3.关联事件。多个数据源产生的日志进行联动分析,通过某种分析算法,就能够解决生活中各个问题。比如金融里的风险欺诈等。这个可以可以应用到无数领域了,取决于你的想象力。
4.数据分析。 这个对于数据分析师,还有算法工程师都是有所裨益的。
-
下载安装包
官网下载:https://www.elastic.co/cn/downloads/


网速慢这边有百度网盘:
链接:https://pan.baidu.com/s/15bojKanJ5k_YbBayjP1bdw
提取码:m4vc
下载上述三个安装包之后,上传至服务器,准备开始安装

-
安装ElasticSearch
#创建用户组es
注:elasticsearch 不允许以 root 权限来运行!所以需要创建一个非root用户,由于ElasticSearch可以接收用户输入的脚本并且执行,为了系统安全考虑,
建议创建一个单独的用户用来运行ElasticSearch。
groupadd es
#创建新用户es,设置用户组为es,密码es
useradd es -g es -p es
#授权,更改elasticsearch-7.12.0文件夹所属用户及用户组为es:es(首先在/home/elk 目录下创建名成为elasticsearch-7.12.0文件夹)
chown -R es:es elasticsearch-7.12.0
#切换用户es
su - es
#开始安装解压
tar -xzvf elasticsearch-7.12.0-linux-x86_64.tar.gz
#修改es配置文件
1)调整jvm内存大小(机器内存够也可不调整)
vim elasticsearch-7.1.1/config/jvm.options
#修改如下配置
-Xms512m
-Xmx512m
2)vim /config/elasticsearch.yml

network.host: 0.0.0.0
http.port: 9200
cluster.name: es_cluster
path.data: /tmp/elasticsearch/data
path.logs: /tmp/elasticsearch/logs
注:#对应目录下用es用户创建data和logs文件夹
node.name: node-1
bootstrap.memory_lock: false
bootstrap.system_call_filter: false
cluster.initial_master_nodes: ["node-1"]
#修改虚拟机配置文件
1)vim  /etc/security/limits.conf
添加以下内容:
* soft nofile 65536
* hard nofile 65536

2)vim /etc/sysctl.conf
#添加以下配置信息
vm.max_map_count=262144

3)并且执行命令使前两个配置生效:
sysctl -p
#先别着急启动es
此时启动es有可能会爆出以下错误
[es@VM-0-10-centos bin]$ ./elasticsearch
warning: usage of JAVA_HOME is deprecated, use ES_JAVA_HOME
Future versions of Elasticsearch will require Java 11; your Java version from [/usr/local/jdk1.8.0_211/jre] does not meet this requirement. Consider switching to a distribution of Elasticsearch with a bundled JDK. If you are already using a distribution with a bundled JDK, ensure the JAVA_HOME environment variable is not set.
warning: usage of JAVA_HOME is deprecated, use ES_JAVA_HOME
Future versions of Elasticsearch will require Java 11; your Java version from [/usr/local/jdk1.8.0_211/jre] does not meet this requirement. Consider switching to a distribution of Elasticsearch with a bundled JDK. If you are already using a distribution with a bundled JDK, ensure the JAVA_HOME environment variable is not set.
大致意思就是当前JDK版本不符合该版本的es,我们需要做的就是要么更换本机jdk 匹配当前版本的es,要么使用该版本的自带jdk,我们选择使用自带的jdk。
在 /bin 下看到了一堆的可执行文件,其中有一个elasticsearch-env
vim elasticsearch-env
新增:ES_JAVA_HOME="/home/elk/elasticsearch-7.12.0/jdk/"
#好的,整理心情,启动es(es启动可能会很久,需要耐心等待...)
#elasticsearch常用命令
#启动命令
./elasticsearch
#后台启动命令
./elasticsearch -d
#设置开机自启动
systemctl enable elasticsearch.service
#检测是否启动成功
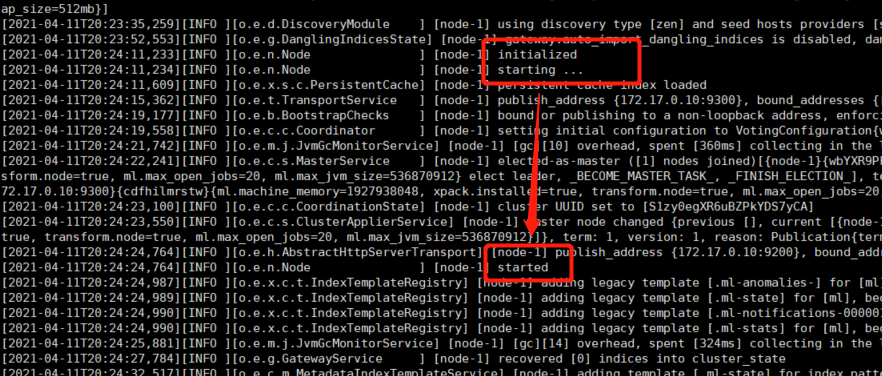
第一种方法:看启动日志

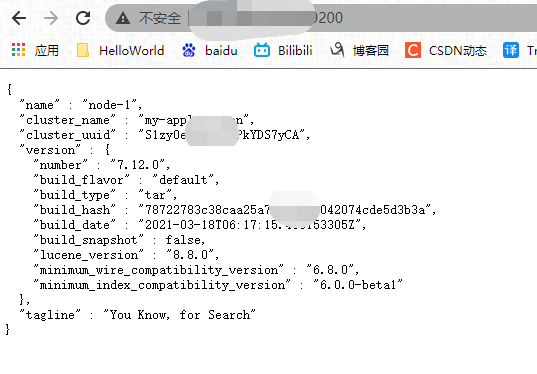
第二种方法:访问你本机的ip http://150.xxx.xxx.xxx:9200/

#安装Elasticsearch-Head
1)nodejs安装

# wget https://nodejs.org/dist/v10.9.0/node-v10.9.0-linux-x64.tar.xz    // 下载
# tar xf  node-v10.9.0-linux-x64.tar.xz       // 解压
# cd node-v10.9.0-linux-x64/                  // 进入解压目录
# ./bin/node -v                               // 执行node命令 查看版本
v10.9.0
2)解压文件的 bin 目录底下包含了 node、npm 等命令,我们可以使用 ln 命令来设置软连接:

ln -s /usr/software/nodejs/bin/npm   /usr/local/bin/
ln -s /usr/software/nodejs/bin/node   /usr/local/bin/

3)2)phantomjs安装配置
wget https://github.com/Medium/phantomjs/releases/download/v2.1.1/phantomjs-2.1.1-linux-x86_64.tar.bz2
#缺少bzip2包的同学记得安装下bzip2
yum -y install bzip2
tar -xvf phantomjs-2.1.1-linux-x86_64.tar.bz2
vim /etc/profile
export PATH=$PATH:/home/elk/phantomjs-2.1.1-linux-x86_64/bin
#注意环境变量$Path移动在最前面
source /etc/profile
4)elasticsearch-head安装(他的主要用处我也没搞清楚,后期再补充进来吧)
git clone git://github.com/mobz/elasticsearch-head.git
cd elasticsearch-head
yum install -y nodejs
npm install -g cnpm --registry=https://registry.npm.taobao.org
#可能时间比较长
5)/elasticsearch-head 目录下执行
npm install
npm run start
#安装完成后 ,访问地址
http://localhost:9200/ es #上面已经访问过了
http://localhost:9100/ es head #访问截图如下,连接刚才的es节点是否健

-
安装Logstash
#解压
tar -zxvf logstash-7.12.0-linux-x86_64.tar.gz
#修改配置文件
cd logstash-7.12.0/config/
vim log4j_to_es.conf    #没有改文件的自行创建一下
#文件中插入一下内容
input {
  stdin { }
  beats {
    port => 5000
  }
  tcp {
    port => 4569
    codec => "json"
  }
}
output {
    elasticsearch {
        action => "index"
        hosts => "本机ip:9200"
        index  => "%{[appname]}-%{+YYYY-MM}"
    }
    stdout { codec=> rubydebug }
}
#启动
./bin/logstash -f config/log4j_to_es.conf &
-
安装Kibana
#解压
tar -zxvf kibana-7.12.0-linux-x86_64
#修改Kibana的配置文件
cd kibana-7.12.0-linux-x86_64/config/
vim kibana.yml
修改配置文件如下:

# 端口
server.port: 5601
# 指定本机ip让外部能访问
server.host: "0.0.0.0"
# 请求数据指向的elasticsearch服务器
elasticsearch.hosts: ["http://ip:9200"]
#启动
sh kibana &
#访问地址:http://ip:5601


 浙公网安备 33010602011771号