OpenStack学习系列之一:OpenStack介绍及安装部署基础环境
OpenStack 是一种云操作系统,可控制整个数据中心内的大型计算、存储和网络资源池,所有资源都通过具有通用身份验证机制的API进行管理和配置。
使用仪表板,使管理员能够控制且同时授权用户通过 Web 界面配置资源。
除了标准的基础设施即服务功能之外,其它组件还提供编排、故障管理和服务管理以及其它服务,以确保用户应用程序的高可用性。
openstack部署安装环境
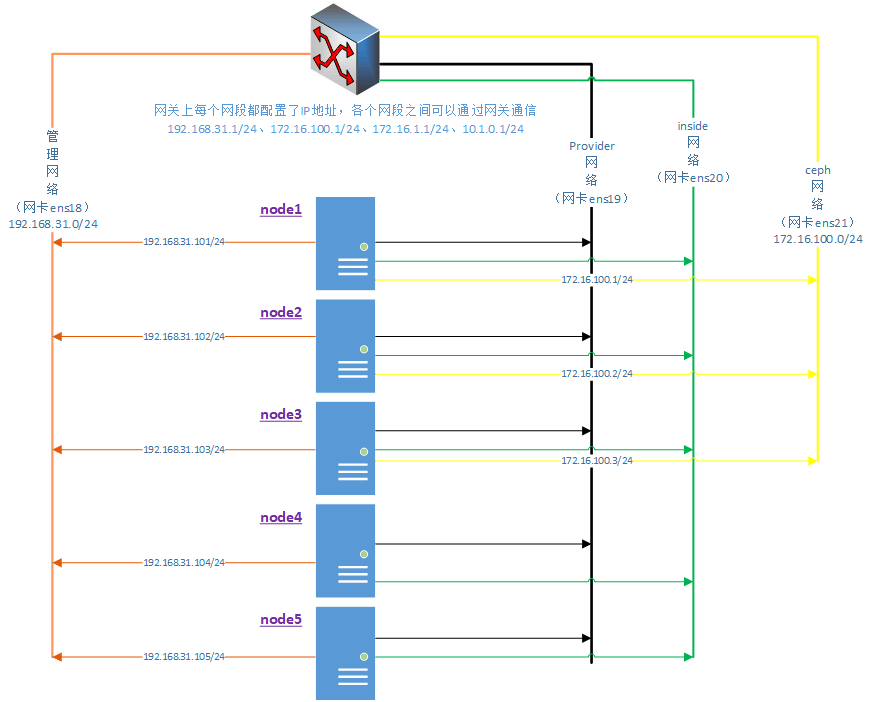
网络扑图:
使用软件版本:
- 操作系统:CentOS Linux release 8.5.2111,主机开启虚拟化
- openstack版本:centos-release-openstack-victoria.noarch
各个主机资源配置、角色及部署服务分布情况如下表所示:
|
节点
|
node1
|
node2
|
node3
|
node4
|
node5
|
|
网卡1
|
192.168.31.101
|
192.168.31.102
|
192.168.31.103
|
192.168.31.104
|
192.168.31.105
|
|
网卡2
|
provider
|
provider
|
provider
|
provider
|
provider
|
|
网卡3
|
inside
|
inside
|
inside
|
inside
|
inside
|
|
网卡4
|
172.16.100.11(ceph)
|
172.16.100.12(ceph)
|
172.16.100.13(ceph)
|
||
|
cpu/mem/系统盘
|
8/12G/200G
|
8/12G/200G
|
8/12G/200G
|
8/12G/200G
|
8/12G/200G
|
|
额外挂载硬盘
|
100Gx3+100G
|
100Gx3
|
100Gx3
|
200Gx2+200Gx2
|
200Gx2+200Gx2
|
|
硬盘分配
|
ceph使用:100Gx3(sdb/sdc/sdd)
nfs使用:100G(sde)
|
ceph使用:100Gx3(sdb/sdc/sdd)
|
ceph使用:100Gx3(sdb/sdc/sdd)
|
cinder使用:200Gx2(sdb/sdc)
swift使用:
200Gx2(sdd/sde)
|
cinder使用:200Gx2(sdb/sdc)
swift使用:
200Gx2(sdd/sde)
|
|
角色
|
控制节点
|
计算节点
|
计算节点
|
计算节点/存储节点
|
计算节点/存储节点
|
|
ceph服务(和cinder在一起有问题)
|
ceph(使用3块硬盘组建集群)
|
ceph(使用3块硬盘组建集群)
|
ceph(使用3块硬盘组建集群)
|
||
|
nfs服务
|
使用第一个节点的100G,挂载目录为/vmdata
|
网络及服务详详细描述:
- provider虚拟机网络: 网段为172.16.1.0/24,创建虚拟机时使用,物理网卡不需要配置IP地址
- inside虚拟机网络: 网段为10.1.0.0/24,创建虚拟机时使用,物理网卡不需要配置IP地址,和provider网络不是同一个物理网卡,存在网络隔离
- ceph网络: 网段172.16.100.0/24,安装部署ceph集群使用的内部网络
- 搭建nfs服务: 在node1节点上搭建nfs服务并对外提供访问路径为192.168.31.101:/vmdata
1.设置主机名,关闭防火墙和selinux,node1登录其它主机设置ssh免密
在控制节点node1上进行操作
# 配置主机名信息到/etc/hosts
echo -e "192.168.31.101 node1\n192.168.31.102 node2\n192.168.31.103 node3\n192.168.31.104 node4\n192.168.31.105 node5" >> /etc/hosts

# 生成ssh秘钥
[root@localhost ~]# ssh-keygen
Generating public/private rsa key pair.
Enter file in which to save the key (/root/.ssh/id_rsa):
Created directory '/root/.ssh'.
Enter passphrase (empty for no passphrase):
Enter same passphrase again:
Your identification has been saved in /root/.ssh/id_rsa.
Your public key has been saved in /root/.ssh/id_rsa.pub.
The key fingerprint is:
SHA256:Oo8Sm2MPmK3dzSTZFbs9vjgFrR2v4wOlnN4G/fajuOA root@localhost.localdomain
The key's randomart image is:
+---[RSA 3072]----+
|                 |
|                 |
|          ..     |
|          .o+    |
|        S.oO o   |
|   +.  + .Bo+ .  |
|  o o+= oo.=oo   |
|   o*o O. +oB.o. |
|  ...++ +E.*=*..o|
+----[SHA256]-----+

# 所有节点做ssh免密登录、设置主机名和同步hosts文件、关闭防火墙和selinux
for i in $(seq 5);do ssh-copy-id -i /root/.ssh/id_rsa.pub node$i;done
for i in $(seq 5);do ssh node$i hostnamectl set-hostname node$i;done
for i in $(seq 5);do scp /etc/hosts node$i:/etc/hosts;done
for i in $(seq 5);do ssh node$i "systemctl stop firewalld && systemctl disable firewalld";done
for i in $(seq 5);do ssh node$i "setenforce 0 && sed -i "s/SELINUX=enforcing/SELINUX=disabled/" /etc/selinux/config";done
2.所有主机设置时间同步
其它节点都和第一个节点同步时间,保证所有节点时间保持一致
# 在node1上给所有节点安装chrony
# 修改yum源为阿里源,因为Centos8在2021年12月31日停止提供源服务
for i in $(seq 5);do ssh node$i "sed -i 's/mirrorlist/#mirrorlist/g' /etc/yum.repos.d/CentOS-* && sed -i 's|#baseurl=http://mirror.centos.org|baseurl=http://mirrors.aliyun.com/centos-vault|g' /etc/yum.repos.d/CentOS-*";done
for i in $(seq 5);do ssh node$i "yum -y install chrony" ;done

---------------------------------------------# 控制节点node1安装配置
sed -i "s@^#allow.*@allow 192.168.31.0/24@" /etc/chrony.conf             # 修改配置
systemctl start chronyd && systemctl enable chronyd                      # 启动服务

---------------------------------------------# node1给其它节点安装配置
for i in $(seq 2 5);do ssh node$i 'sed -i "s@pool.*@pool node1 iburst@" /etc/chrony.conf';done
for i in $(seq 2 5);do ssh node$i 'systemctl start chronyd && systemctl enable chronyd';done

---------------------------------------------# 查看其它节点是否在对时
[root@node1 ~]# chronyc  clients
Hostname                      NTP   Drop Int IntL Last     Cmd   Drop Int  Last
===============================================================================
node2                           4      0   1   -    55       0      0   -     -
node3                           4      0   1   -    54       0      0   -     -
node4                           4      0   1   -    53       0      0   -     -
node5                           4      0   1   -    53       0      0   -     -
3.安装openstack软件源,指定版本为victoria
# 在node1上给所有节点安装openstack源文件
for i in $(seq 5);do ssh node$i yum -y install centos-release-openstack-victoria.noarch;done

# 再次修改openstack源服务,因为安装了openstack的源文件
for i in $(seq 5);do ssh node$i "sed -i 's/mirrorlist/#mirrorlist/g' /etc/yum.repos.d/CentOS-* && sed -i 's|#baseurl=http://mirror.centos.org|baseurl=http://mirrors.aliyun.com/centos-vault|g' /etc/yum.repos.d/CentOS-*";done
# 安装基础软件
for i in $(seq 5);do ssh node$i yum -y install python3-openstackclient crudini;done
4.安装mysql数据库(控制节点node1,mysql登录密码root/mysql)
yum -y install mariadb mariadb-server python2-PyMySQL

# 修改配置文件
crudini --set /etc/my.cnf.d/mariadb-server.cnf mysqld bind-address 192.168.31.101
crudini --set /etc/my.cnf.d/mariadb-server.cnf mysqld default-storage-engine innodb
crudini --set /etc/my.cnf.d/mariadb-server.cnf mysqld innodb_file_per_table on
crudini --set /etc/my.cnf.d/mariadb-server.cnf mysqld max_connections 4096
crudini --set /etc/my.cnf.d/mariadb-server.cnf mysqld collation-server utf8_general_ci
crudini --set /etc/my.cnf.d/mariadb-server.cnf mysqld character-set-server utf8

# 启动服务并初始化,初始化时第一个root密码为空直接回车,并设置root新密码为mysql并允许远程登录
systemctl enable mariadb.service && systemctl start mariadb.service

---------------------------------------------# 设置mysql服务root用户密码为mysql,并设置允许root远程登录
[root@node1 ~]# mysql_secure_installation

NOTE: RUNNING ALL PARTS OF THIS SCRIPT IS RECOMMENDED FOR ALL MariaDB
      SERVERS IN PRODUCTION USE!  PLEASE READ EACH STEP CAREFULLY!

In order to log into MariaDB to secure it, we'll need the current
password for the root user.  If you've just installed MariaDB, and
you haven't set the root password yet, the password will be blank,
so you should just press enter here.

Enter current password for root (enter for none):
OK, successfully used password, moving on...

Setting the root password ensures that nobody can log into the MariaDB
root user without the proper authorisation.

Set root password? [Y/n] y
New password:
Re-enter new password:
Password updated successfully!
Reloading privilege tables..
 ... Success!


By default, a MariaDB installation has an anonymous user, allowing anyone
to log into MariaDB without having to have a user account created for
them.  This is intended only for testing, and to make the installation
go a bit smoother.  You should remove them before moving into a
production environment.

Remove anonymous users? [Y/n] n
 ... skipping.

Normally, root should only be allowed to connect from 'localhost'.  This
ensures that someone cannot guess at the root password from the network.

Disallow root login remotely? [Y/n] n
 ... skipping.

By default, MariaDB comes with a database named 'test' that anyone can
access.  This is also intended only for testing, and should be removed
before moving into a production environment.

Remove test database and access to it? [Y/n] n
 ... skipping.

Reloading the privilege tables will ensure that all changes made so far
will take effect immediately.

Reload privilege tables now? [Y/n] y
 ... Success!

Cleaning up...

All done!  If you've completed all of the above steps, your MariaDB
installation should now be secure.

Thanks for using MariaDB!

---------------------------------------------# 查看mysql是否正常工作
[root@node1 ~]# netstat  -tunlp | grep 3306
tcp        0      0 192.168.31.101:3306     0.0.0.0:*               LISTEN      29356/mysqld
[root@node1 ~]# mysql -uroot -hnode1 -p
Enter password:
Welcome to the MariaDB monitor.  Commands end with ; or \g.
Your MariaDB connection id is 12
Server version: 10.3.28-MariaDB MariaDB Server

Copyright (c) 2000, 2018, Oracle, MariaDB Corporation Ab and others.

Type 'help;' or '\h' for help. Type '\c' to clear the current input statement.

MariaDB [(none)]>
5.安装消息队列rabbitmq(控制节点node1,添加用户密码opensack/openstack)
# 安装并启动rabbitmq
yum --enablerepo powertools -y install rabbitmq-server
systemctl enable rabbitmq-server && systemctl start rabbitmq-server

---------------------------------------------# 添加用户密码并设置权限
rabbitmqctl add_user openstack openstack && rabbitmqctl set_permissions openstack ".*" ".*" ".*"

---------------------------------------------# 查看rabbitmq状态,并查看用户及权限
[root@node1 ~]# rabbitmqctl status
[root@node1 ~]# rabbitmqctl list_user_permissions openstack
Listing permissions for user "openstack" ...
vhost	configure	write	read
/	.*	.*	.*

---------------------------------------------# 查看rabbitmq监听端口
[root@node1 ~]# netstat  -tunlp | grep 5672
tcp        0      0 0.0.0.0:25672           0.0.0.0:*               LISTEN      30155/beam.smp
tcp6       0      0 :::5672                 :::*                    LISTEN      30155/beam.smp
6.安装缓存服务memcache(控制节点node1)
# 安装并启动memcache服务
yum -y install memcached python3-memcached
sed -i 's/^OPTIONS.*/OPTIONS="-l 0.0.0.0"/' /etc/sysconfig/memcached
systemctl enable memcached && systemctl start memcached

---------------------------------------------# 查看memcache监听端口
[root@node1 ~]# netstat  -tunlp | grep memcached
tcp        0      0 0.0.0.0:11211           0.0.0.0:*               LISTEN      33130/memcached
7.安装nfs服务(控制节点node1)
安装nfs服务是为了在后面给cinder组件提供nfs存储后端
# 安装并启动nfs服务
yum -y install nfs-utils
systemctl  status nfs-server && systemctl  enable nfs-server

---------------------------------------------# 格式化node1上的最后一块100G硬盘,然后挂载到/vmdata目录下,并设置开机启动
[root@node1 ~]# fdisk  /dev/sde

Welcome to fdisk (util-linux 2.32.1).
Changes will remain in memory only, until you decide to write them.
Be careful before using the write command.

Device does not contain a recognized partition table.
Created a new DOS disklabel with disk identifier 0x2fb2433e.

Command (m for help): n
Partition type
   p   primary (0 primary, 0 extended, 4 free)
   e   extended (container for logical partitions)
Select (default p):

Using default response p.
Partition number (1-4, default 1):
First sector (2048-209715199, default 2048):
Last sector, +sectors or +size{K,M,G,T,P} (2048-209715199, default 209715199):

Created a new partition 1 of type 'Linux' and of size 100 GiB.

Command (m for help): w
The partition table has been altered.
Calling ioctl() to re-read partition table.
Syncing disks.
[root@node1 ~]# mkfs.xfs /dev/sde1
[root@node1 ~]# blkid | grep sde1
/dev/sde1: UUID="95bb36aa-5e44-4caf-b586-24a69cadf8d9" BLOCK_SIZE="512" TYPE="xfs" PARTUUID="2fb2433e-01"
[root@node1 ~]# mkdir /vmdata
[root@node1 ~]# vi /etc/fstab
UUID=95bb36aa-5e44-4caf-b586-24a69cadf8d9  /vmdata xfs defaults 0 0
[root@node1 ~]# df -h | grep vmdata
/dev/sde1            100G  746M  100G   1% /vmdata

---------------------------------------------# 配置nfs服务
[root@node1 ~]# vi /etc/exports
/vmdata   *(sync,rw,no_root_squash,no_subtree_check)
# 加载配置并生效
exportfs  -r  && exportfs  -v
[root@node1 ~]# showmount  -e node1
Export list for node1:
/vmdata *

 浙公网安备 33010602011771号