
这篇文章是关于ASP.NET Core中基于令牌的身份验证。基于令牌的身份验证系统背后的一般概念很简单。允许用户输入用户名和密码,以获取允许他们获取特定资源的令牌 - 而无需使用他们的用户名和密码。一旦获得其令牌,用户就可以向远程站点提供令牌 - 其提供对特定资源的访问一段时间。
要使用令牌或JWT身份验证,首先需要配置JWT身份验证中间件。
public void ConfigureServices(IServiceCollection services)
{
    services.AddAuthentication(JwtBearerDefaults.AuthenticationScheme)
    .AddJwtBearer(jwtBearerOptions =>
    {
        jwtBearerOptions.TokenValidationParameters = new TokenValidationParameters()
        {
            ValidateActor = true,
            ValidateAudience = true,
            ValidateLifetime = true,
            ValidateIssuerSigningKey = true,
            ValidIssuer = Configuration["Issuer"],
            ValidAudience = Configuration["Audience"],
            IssuerSigningKey = new SymmetricSecurityKey(Encoding.UTF8.GetBytes(Configuration["SigningKey"])),
            ValidateLifetime = true,
            ValidateIssuer = true,
            ValidateAudience = true,
        };
    });

    services.AddMvc();
}
您已完成配置,现在需要将身份验证中间件添加到应用程序构建器。你可以在Configure方法中做到这一点。
public void Configure(IApplicationBuilder app, IHostingEnvironment env)
{
    if (env.IsDevelopment())
    {
        app.UseDeveloperExceptionPage();
    }

    app.UseAuthentication();
    app.UseMvc();
}
现在您需要一个控制器操作方法,它可以帮助用户生成令牌。
[AllowAnonymous]
[HttpPost]
[Route("token")]
public IActionResult Post([FromBody]LoginViewModel loginViewModel)
{
    if (ModelState.IsValid)
    {
        //This method returns user id from username and password.
        var userId = GetUserIdFromCredentials(loginViewModel);
        if (userId == -1)
        {
            return Unauthorized();
        }

        var claims = new[]
        {
            new Claim(JwtRegisteredClaimNames.Sub, loginViewModel.Username),
            new Claim(JwtRegisteredClaimNames.Jti, Guid.NewGuid().ToString())
        };

        var token = new JwtSecurityToken
        (
            issuer: _configuration["Issuer"],
            audience: _configuration["Audience"],
            claims: claims,
            expires: DateTime.UtcNow.AddDays(60),
            notBefore: DateTime.UtcNow,
            signingCredentials: new SigningCredentials(new SymmetricSecurityKey(Encoding.UTF8.GetBytes(_configuration["SigningKey"])),
                    SecurityAlgorithms.HmacSha256)
        );

        return Ok(new { token = new JwtSecurityTokenHandler().WriteToken(token) });
    }

    return BadRequest();
}
现在,您可以使用[Authorize]属性保护资源。
[Authorize]
[Route("api/[controller]")] public class ValuesController : Controller
{
    [HttpGet]
    public IEnumerable<string> Get()
    {
        return new string[] { "value1", "value2" };
    }
}
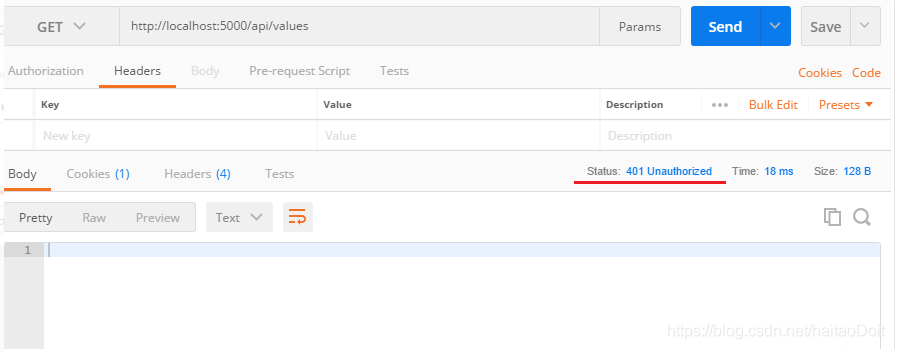
这是没有标题的POSTMAN get请求的屏幕截图。
现在,您可以使用令牌端点使用用户名和密码生成令牌,这将生成令牌。

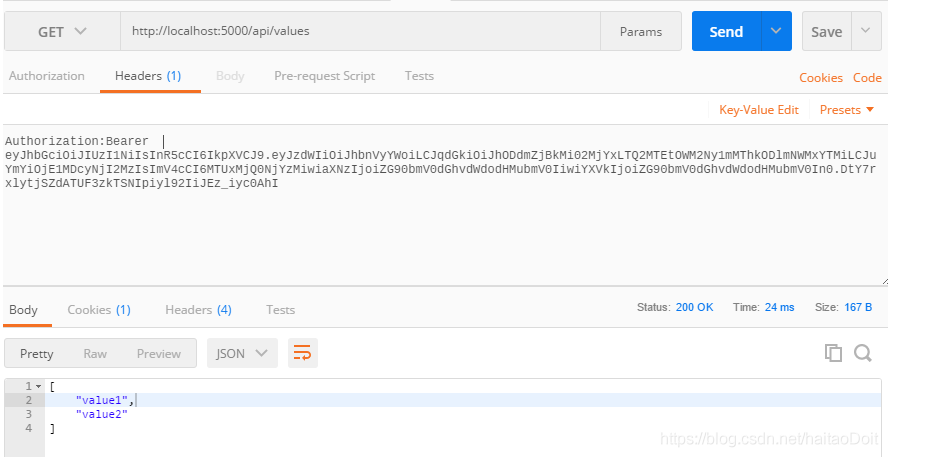
接下来,您可以使用Authorization标头请求值控制器,其中包含从令牌端点接收的令牌,该令牌将返回值。
如果你正在使用JQuery,你可以像这样使用JQuery Ajax方法。
$.ajax({
    type: 'GET',
    url: '/api/values',
    headers: {
        "Authorization": "Bearer YOUR-TOKEN"
    }
}).done(function (data) {
    console.log(data);
});
本问翻译自https://dotnetthoughts.net/token-based-authentication-in-aspnet-core/
GitHub地址:https://github.com/anuraj/AspNetCoreSamples/tree/master/WebApiAuthDemo
来自:https://blog.csdn.net/haitaoDoit/article/details/86607346?utm_medium=distribute.pc_relevant.none-task-blog-2~default~baidujs_title~default-1.essearch_pc_relevant&spm=1001.2101.3001.4242.2
