扩容云盘(ResizeDisk)只是扩大云盘的存储容量,不会扩容ECS实例的文件系统,您需要按照本文步骤扩容文件系统,实现ECS实例存储空间的扩展。
背景信息
本文示例中使用的配置如下:
- ECS实例的操作系统:公共镜像Alibaba Cloud Linux 2.1903 LTS 64位
- 数据盘:高效云盘
- 数据盘设备名:/dev/vdb
若您使用的操作系统和数据盘设备名与本文示例不同,请根据实际情况调整命令或参数配置。
确认分区表格式和文件系统
- 运行以下命令确认数据盘的分区表格式。
本示例中,原有的数据盘空间已做分区
/dev/vdb1。
- 如果
"System"="Linux",说明数据盘使用的是MBR分区表格式。
- 如果
"System"="GPT",说明数据盘使用的是GPT分区表格式。
[root@ecshost ~]# fdisk -lu /dev/vdb
Disk /dev/vdb: 42.9 GB, 42949672960 bytes, 83886080 sectors
Units = sectors of 1 * 512 = 512 bytes
Sector size (logical/physical): 512 bytes / 512 bytes
I/O size (minimum/optimal): 512 bytes / 512 bytes
Disk label type: dos
Disk identifier: 0x9277b47b

Device Boot Start End Blocks Id System
/dev/vdb1 2048 41943039 20970496 83 Linux
- 运行以下命令确认已有分区的文件系统类型。
本示例中,
/dev/vdb1的文件系统类型为ext4。
[root@ecshost ~]# blkid /dev/vdb1
/dev/vdb1: UUID="e97bf1e2-fc84-4c11-9652-73********24" TYPE="ext4"
说明 未分区并且未创建文件系统的数据盘,以及已分区但未创建文件系统的数据盘,不会返回结果。
- 运行以下命令确认文件系统的状态。
- ext*文件系统:
e2fsck -n /dev/vdb1
- xfs文件系统:
xfs_repair -n /dev/vdb1
注意 本示例中,文件系统状态为clean,表示文件系统状态正常。如果状态不是clean,请排查并修复。
[root@ecshost ~]# e2fsck -n /dev/vdb1
Warning! /dev/vdb1 is mounted.
Warning: skipping journal recovery because doing a read-only filesystem check.
/dev/vdb1: clean, 11/1310720 files, 126322/5242624 blocks
选择扩容分区或文件系统的方式
根据您查询到的分区格式和文件系统情况确定操作选项。
说明
- 如果一个已有分区采用了MBR分区格式,则不支持扩容到2TiB及以上。为避免造成数据丢失,建议您创建一块大于2TiB的云盘,格式化一个GPT分区,再将MBR分区中的数据拷贝到GPT分区中。具体操作,请参见分区格式化大于2 TiB数据盘。
- 当出现因扩容格式化工具问题导致的扩容失败时,您可以提前升级工具版本,或者卸载工具后重新安装。
选项一:扩展已有MBR分区
说明 为了防止数据丢失,不建议扩容已挂载的分区和文件系统。请先取消挂载(
umount)分区,完成扩容并正常使用后,重新挂载(mount)。针对不同的Linux内核版本,推荐以下操作方式:
- 实例内核版本小于3.6:先取消挂载该分区,再修改分区表,最后扩容文件系统。
- 实例内核版本大于等于3.6:先修改对应分区表,再通知内核更新分区表,最后扩容文件系统。
如果新增空间用于扩容已有的MBR分区,按照以下步骤在实例中完成扩容:
- 修改分区表。扩容文件系统。
- 运行以下命令查看分区信息,并记录旧分区的起始和结束的扇区位置。
本示例中,分区/dev/vdb1的起始扇区是2048,结束扇区是41943039。
[root@ecshost ~]# fdisk -lu /dev/vdb
Disk /dev/vdb: 42.9 GB, 42949672960 bytes, 83886080 sectors
Units = sectors of 1 * 512 = 512 bytes
Sector size (logical/physical): 512 bytes / 512 bytes
I/O size (minimum/optimal): 512 bytes / 512 bytes
Disk label type: dos
Disk identifier: 0x9277b47b

Device Boot Start End Blocks Id System
/dev/vdb1 2048 41943039 20970496 83 Linux
- 查看数据盘的挂载路径,根据返回的文件路径卸载分区,直至完全卸载已挂载的分区。
- 使用fdisk工具删除旧分区。
警告 删除旧分区如果出错,可能会删除分区内的数据。如有重要数据(例如数据库中的用户数据),请在操作前进行备份,避免因删除旧分区而造成数据丢失。
- 运行
fdisk -u /dev/vdb:分区数据盘。
- 输入p:打印分区表。
- 输入d:删除分区。
- 输入p:确认分区已删除。
- 输入w:保存修改并退出。
- 使用fdisk命令新建分区。
- 运行
fdisk -u /dev/vdb:分区数据盘。
- 输入p:打印分区表。
- 输入n:新建分区。
- 输入p:选择分区类型为主分区。
- 输入<分区号>:选择分区号。本示例选取了1。
- 设置新分区的起始位置和结束位置。
- 输入w:保存修改并退出。
本示例中,将/dev/vdb1由20GiB扩容到40GiB。
- 通知内核更新分区表。
运行partprobe /dev/vdb或者partx -u /dev/vdb1,通知内核数据盘的分区表已经修改,需要同步更新。
- 运行
lsblk /dev/vdb确保分区表已经增加。
- 运行
e2fsck -f /dev/vdb1再次检查文件系统,确认扩容分区后的文件系统状态为clean。
-
- ext*文件系统(例如ext3和ext4):依次运行以下命令调整ext*文件系统大小并重新挂载分区。
[root@ecshost ~]# resize2fs /dev/vdb1
resize2fs 1.43.5 (04-Aug-2017)
Resizing the filesystem on /dev/vdb1 to 7864320 (4k) blocks.
The filesystem on /dev/vdb1 is now 7864320 blocks long.
[root@ecshost ~]# mount /dev/vdb1 /mnt
- xfs文件系统:依次运行以下命令先重新挂载分区,再调整xfs文件系统大小。
说明 新版xfs_growfs根据挂载点识别待扩容设备,例如xfs_growfs /mnt。您可以运行xfs_growfs --help查看不同版本xfs_growfs的使用方法。
[root@ecshost ~]# mount /dev/vdb1 /mnt/
[root@ecshost ~]# xfs_growfs /mnt
meta-data=/dev/vdb1              isize=512    agcount=4, agsize=1310720 blks
         =                       sectsz=512   attr=2, projid32bit=1
         =                       crc=1        finobt=0 spinodes=0
data     =                       bsize=4096   blocks=5242880, imaxpct=25
         =                       sunit=0      swidth=0 blks
naming   =version 2              bsize=4096   ascii-ci=0 ftype=1
log      =internal               bsize=4096   blocks=2560, version=2
         =                       sectsz=512   sunit=0 blks, lazy-count=1
realtime =none                   extsz=4096   blocks=0, rtextents=0
data blocks changed from 5242880 to 7864320
选项二:新增并格式化MBR分区
如果新增空间用于增加新的MBR分区,按照以下步骤在实例中完成扩容:
- 运行
fdisk -u /dev/vdb命令新建分区。
本示例中,为新增的20GiB新建分区,作为/dev/vdb2使用。
- 运行命令
lsblk /dev/vdb查看分区。
[root@ecshost ~]# lsblk /dev/vdb
NAME   MAJ:MIN RM SIZE RO TYPE MOUNTPOINT
vdb    253:16   0  40G  0 disk
├─vdb1 253:17   0  20G  0 part
└─vdb2 253:18   0  20G  0 part
- 格式化新的分区。
- 创建ext4文件系统:
mkfs.ext4 /dev/vdb2。
[root@ecshost ~]# mkfs.ext4 /dev/vdb2
Filesystem label=
OS type: Linux
Block size=4096 (log=2)
Fragment size=4096 (log=2)
Stride=0 blocks, Stripe width=0 blocks
1310720 inodes, 5242880 blocks
262144 blocks (5.00%) reserved for the super user
First data block=0
Maximum filesystem blocks=2153775104
160 block groups
32768 blocks per group, 32768 fragments per group
8192 inodes per group
Superblock backups stored on blocks:
        32768, 98304, 163840, 229376, 294912, 819200, 884736, 1605632, 2654208,
        4096000

Allocating group tables: done
Writing inode tables: done
Creating journal (32768 blocks): done
Writing superblocks and filesystem accounting information: done
[root@ecshost ~]# blkid /dev/vdb2
/dev/vdb2: UUID="e3f336dc-d534-4fdd-****-b6ff1a55bdbb" TYPE="ext4"
- 创建ext3文件系统:
mkfs.ext3 /dev/vdb2。
- 创建xfs文件系统:
mkfs.xfs -f /dev/vdb2。
- 创建btrfs文件系统:
mkfs.btrfs /dev/vdb2。
- 运行
mount /dev/vdb2 /mnt挂载分区。
- 运行
df -h查看目前数据盘空间和使用情况。
显示新建文件系统的信息,表示挂载成功。
[root@ecshost ~]# df -h
Filesystem Size Used Avail Use% Mounted on
/dev/vda1 40G 1.6G 36G 5% /
devtmpfs 3.9G 0 3.9G 0% /dev
tmpfs 3.9G 0 3.9G 0% /dev/shm
tmpfs 3.9G 460K 3.9G 1% /run
tmpfs 3.9G 0 3.9G 0% /sys/fs/cgroup
/dev/vdb2 9.8G 37M 9.2G 1% /mnt
tmpfs 783M 0 783M 0% /run/user/0
选项三:扩展已有GPT分区
如果新增空间用于扩容已有的GPT分区,按照以下步骤在实例中完成扩容:
- 查看数据盘的挂载路径,根据返回的文件路径卸载分区,直至完全卸载已挂载的分区。
- 使用Parted工具为现有GPT分区分配容量。运行
fsck -f /dev/vdb1确认文件系统一致性。
- 运行
parted /dev/vdb命令进入parted分区工具。
如需查看parted工具使用说明,运行help命令。
- 运行
print查看分区信息,并记录现有分区的分区号和起始扇区的值。
若界面提示Fix/Ignore/Cancel?和Fix/Ignore?,均输入Fix即可。
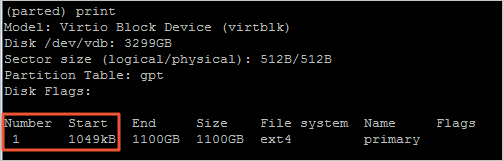
本示例中,现有分区大小为1TiB,分区号(即Number的值)为1,起始扇区(即Start)的值为1049kB。
- 运行
rm <分区号>命令删除现有分区。
- 运行
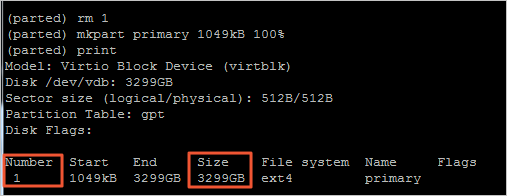
mkpart primary <原分区的起始扇区> <容量分配百分比>命令重新创建主分区。
本示例中,原分区的起始扇区为1049kB,且要将扩容后的总容量(即3TiB)全部分配给该分区,因此命令为:
mkpart primary 1049kB 100%
- 运行
print命令查看新分区是否创建成功。
如下图所示,新的GPT分区仍为1号分区,容量已变更为3TiB。
- 运行
quit退出Parted分区工具。
完整的示例代码如下:
[root@ecshost ~]# parted /dev/vdb
GNU Parted 3.1
Using /dev/vdb
Welcome to GNU Parted! Type 'help' to view a list of commands.
(parted) print
Error: The backup GPT table is not at the end of the disk, as it should be.
This might mean that another operating system believes the disk is smaller.
Fix, by moving the backup to the end (and removing the old backup)?
Fix/Ignore/Cancel? Fix
Warning: Not all of the space available to /dev/vdb appears to be used, you can
fix the GPT to use all of the space (an extra 4294967296 blocks) or continue
with the current setting?
Fix/Ignore? Fix
Model: Virtio Block Device (virtblk)
Disk /dev/vdb: 3299GB
Sector size (logical/physical): 512B/512B
Partition Table: gpt
Disk Flags:

Number  Start   End     Size    File system  Name     Flags
 1      1049kB  1100GB  1100GB  ext4         primary

(parted) rm 1
(parted) mkpart primary 1049kB 100%
(parted) print
Model: Virtio Block Device (virtblk)
Disk /dev/vdb: 3299GB
Sector size (logical/physical): 512B/512B
Partition Table: gpt
Disk Flags:

Number  Start   End     Size    File system  Name     Flags
 1      1049kB  3299GB  3299GB  ext4         primary

(parted) quit
Information: You may need to update /etc/fstab.
-
[root@ecshost ~]# fsck -f /dev/vdb1
fsck from util-linux 2.23.2
e2fsck 1.43.5 (04-Aug-2017)
Pass 1: Checking inodes, blocks, and sizes
Pass 2: Checking directory structure
Pass 3: Checking directory connectivity
Pass 4: Checking reference counts
Pass 5: Checking group summary information
/dev/vdb1: 11/67108864 files (0.0% non-contiguous), 4265369/268434944 blocks
- 扩展分区对应的文件系统并重新挂载分区。
- ext*文件系统(例如ext3和ext4):依次运行以下命令调整新分区的ext*文件系统大小并重新挂载分区。
[root@ecshost ~]# resize2fs /dev/vdb1
resize2fs 1.43.5 (04-Aug-2017)
Resizing the filesystem on /dev/vdb1 to 805305856 (4k) blocks.
The filesystem on /dev/vdb1 is now 805305856 blocks long.
[root@ecshost ~]# mount /dev/vdb1 /mnt
- xfs文件系统:依次运行以下命令先重新挂载分区再调整xfs文件系统大小。
说明 新版xfs_growfs根据挂载点识别待扩容设备,例如xfs_growfs /mnt。您可以运行xfs_growfs --help查看不同版本xfs_growfs的使用方法。
[root@ecshost ~]# mount /dev/vdb1 /mnt/
[root@ecshost ~]# xfs_growfs /mnt
选项四:新增并格式化GPT分区
如果新增空间用于增加新的分区并希望使用GPT分区格式,按照以下步骤在实例中完成扩容。示例采用一块32 TiB的数据盘,已有一个4.8TiB的分区/dev/vdb1,此次新建了一个/dev/vdb2分区。
- 使用fdisk工具查看数据盘中已有分区的信息。
[root@ecshost ~]# fdisk -l
Disk /dev/vda: 42.9 GB, 42949672960 bytes, 83886080 sectors
Units = sectors of 1 * 512 = 512 bytes
Sector size (logical/physical): 512 bytes / 512 bytes
I/O size (minimum/optimal): 512 bytes / 512 bytes
Disk label type: dos
Disk identifier: 0x000b1b45
Device Boot Start End Blocks Id System
/dev/vda1 * 2048 83875364 41936658+ 83 Linux
WARNING: fdisk GPT support is currently new, and therefore in an experimental phase. Use at your own discretion.
Disk /dev/vdb: 35184.4 GB, 35184372088832 bytes, 68719476736 sectors
Units = sectors of 1 * 512 = 512 bytes
Sector size (logical/physical): 512 bytes / 512 bytes
I/O size (minimum/optimal): 512 bytes / 512 bytes
Disk label type: gpt
Disk identifier: BCE92401-F427-45CC-8B0D-B30EDF279C2F
- 使用parted工具创建新分区并分配容量。为新分区创建文件系统。
- 运行
parted /dev/vdb进入分区工具。
- 运行
print free查看数据盘待分配的容量,记录已有分区的扇区位置和容量。
示例中
/dev/vdb1的起始位置为1049KB,结束扇区为5278GB,容量为5278GiB。
(parted) print free
Model: Virtio Block Device (virtblk)
Disk /dev/vdb: 35.2TB
Sector size (logical/physical): 512B/512B
Partition Table: gpt
Disk Flags:

Number  Start   End     Size    File system  Name  Flags
        17.4kB  1049kB  1031kB  Free Space
 1      1049kB  5278GB  5278GB  ext4         mnt
        5278GB  35.2TB  29.9TB  Free Space
- 运行
mkpart <分区名称> <起始扇区> <容量分配百分比>。
示例新建了一个名为test的/dev/vdb2分区,起始扇区为上一个分区的结束扇区,并将所有新增空间分配给该分区。
- 运行
print查看容量(Size)是否发生变化。
(parted) mkpart test 5278GB 100%
(parted) print
Model: Virtio Block Device (virtblk)
Disk /dev/vdb: 35.2TB
Sector size (logical/physical): 512B/512B
Partition Table: gpt
Disk Flags:

Number  Start   End     Size    File system  Name  Flags
 1      1049kB  5278GB  5278GB  ext4         mnt
 2      5278GB  35.2TB  29.9TB               test
- 运行
quit退出parted分区工具。
-
- 创建ext4文件系统:
mkfs.ext4 /dev/vdb2。
- 创建ext3文件系统:
mkfs.ext3 /dev/vdb2。
- 创建xfs文件系统:
mkfs.xfs -f /dev/vdb2。
- 创建btrfs文件系统:
mkfs.btrfs /dev/vdb2。
示例中创建了一个xfs文件系统,如下所示。
[root@ecshost ~]# mkfs -t xfs /dev/vdb2
meta-data=/dev/vdb2              isize=512    agcount=28, agsize=268435455 blks
         =                       sectsz=512   attr=2, projid32bit=1
         =                       crc=1        finobt=0, sparse=0
data     =                       bsize=4096   blocks=7301444096, imaxpct=5
         =                       sunit=0      swidth=0 blks
naming   =version 2              bsize=4096   ascii-ci=0 ftype=1
log      =internal log           bsize=4096   blocks=521728, version=2
         =                       sectsz=512   sunit=0 blks, lazy-count=1
realtime =none                   extsz=4096   blocks=0, rtextents=0
- 运行
fdisk -l查看分区容量变化。
[root@ecshost ~]# fdisk -l
Disk /dev/vda: 42.9 GB, 42949672960 bytes, 83886080 sectors
Units = sectors of 1 * 512 = 512 bytes
Sector size (logical/physical): 512 bytes / 512 bytes
I/O size (minimum/optimal): 512 bytes / 512 bytes
Disk label type: dos
Disk identifier: 0x000b1b45
Device Boot Start End Blocks Id System
/dev/vda1 * 2048 83875364 41936658+ 83 Linux
WARNING: fdisk GPT support is currently new, and therefore in an experimental phase. Use at your own discretion.
Disk /dev/vdb: 35184.4 GB, 35184372088832 bytes, 68719476736 sectors
Units = sectors of 1 * 512 = 512 bytes
Sector size (logical/physical): 512 bytes / 512 bytes
I/O size (minimum/optimal): 512 bytes / 512 bytes
Disk label type: gpt
Disk identifier: BCE92401-F427-45CC-8B0D-B30EDF279C2F
- 运行blkid查看存储设备的文件系统类型。
[root@ecshost ~]# blkid
/dev/vda1: UUID="ed95c595-4813-480e-****-85b1347842e8" TYPE="ext4"
/dev/vdb1: UUID="21e91bbc-7bca-4c08-****-88d5b3a2303d" TYPE="ext4" PARTLABEL="mnt" PARTUUID="576235e0-5e04-4b76-****-741cbc7e98cb"
/dev/vdb2: UUID="a7dcde59-8f0f-4193-****-362a27192fb1" TYPE="xfs" PARTLABEL="test" PARTUUID="464a9fa9-3933-4365-****-c42de62d2864"
- 挂载新分区。
[root@ecshost ~]# mount /dev/vdb2 /mnt
选项五:扩容裸设备文件系统
当数据盘没有创建分区,并且在裸设备上创建了文件系统时,您可以参见以下步骤直接扩容文件系统。
- 查看数据盘的挂载路径,根据返回的文件路径卸载。
- 根据文件系统的类型,执行不同的扩容命令。
- ext*:使用root权限执行resize2fs命令扩容文件系统,例如:
- xfs:使用root权限执行xfs_growfs命令扩容文件系统。
说明 新版xfs_growfs根据挂载点识别待扩容设备,例如xfs_growfs /mnt。您可以运行xfs_growfs --help查看不同版本xfs_growfs的使用方法。
- 新版xfs_growfs
- 未更新版xfs_growfs
- 将云盘挂载至挂载点。
- 运行
df -h查看数据盘扩容结果。
显示容量完成扩充,表示扩容成功。
[root@ecshost ~]# df -h
Filesystem Size Used Avail Use% Mounted on
/dev/vda1 40G 1.6G 36G 5% /
devtmpfs 3.9G 0 3.9G 0% /dev
tmpfs 3.9G 0 3.9G 0% /dev/shm
tmpfs 3.9G 460K 3.9G 1% /run
tmpfs 3.9G 0 3.9G 0% /sys/fs/cgroup
/dev/vdb 98G 37G 61G 37% /mnt
tmpfs 783M 0 783M 0% /run/user/0

 浙公网安备 33010602011771号