[WPF 自定义控件]简单的表单布局控件
1. WPF布局一个表单

<Grid Width="400" HorizontalAlignment="Center" VerticalAlignment="Center">
    <Grid.RowDefinitions>
        <RowDefinition Height="Auto" />
        <RowDefinition Height="Auto" />
        <RowDefinition Height="Auto" />
    </Grid.RowDefinitions>
    <Grid.ColumnDefinitions>
        <ColumnDefinition Width="Auto" />
        <ColumnDefinition Width="*" />
    </Grid.ColumnDefinitions>
    <TextBlock Text="用户名" HorizontalAlignment="Right" VerticalAlignment="Center" Margin="4" />
    <TextBox Grid.Column="1" Margin="4" />

    <TextBlock Text="密码" HorizontalAlignment="Right" VerticalAlignment="Center" Margin="4" Grid.Row="1" />
    <PasswordBox Grid.Row="1" Grid.Column="1" Margin="4" />

    <TextBlock Grid.Row="2" Text="确认密码" HorizontalAlignment="Right" VerticalAlignment="Center" Margin="4" />
    <PasswordBox Grid.Column="1" Grid.Row="2" Margin="4" />
</Grid>
在WPF中布局表单一直都很传统,例如使用上面的XAML,它通过Grid布局一个表单。这样出来的结果整整齐齐,看上去没什么问题,但当系统里有几十个表单页以后需要统一将标签改为上对齐,或者标签和控件中加一个:号等需求都会难倒开发人员。一个好的做法是使用某些控件库提供的表单控件;如果不想引入一个这么“重”的东西,可以自己定义一个简单的表单控件。
这篇文章介绍一个简单的用于布局表单的Form控件,虽然是一个很老的方案,但我很喜欢这个控件,不仅因为它简单实用,而且是一个很好的结合了ItemsControl、ContentControl、附加属性的教学例子。
Form是一个自定义的ItemsControl,部分代码可以参考自定义ItemsControl这篇文章。
2. 一个古老的方法
即使抛开验证信息、确认取消这些更高级的需求(表单的其它功能真的很多很多,但这篇文章只谈论布局),表单布局仍是个十分复杂的工作。幸好十年前ScottGu分享过一个简单的方案,很有参考价值:
WPF & Silverlight LOB Form Layout - Searching for a Better Solution: Karl Shifflett has another great WPF blog post that covers a cool way to perform flexible form layout for LOB scenarios.


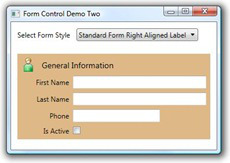
<pt:Form x:Name="formMain" Style="{DynamicResource standardForm}" Grid.Row="1">
  <pt:FormHeader>
    <pt:FormHeader.Content>
      <StackPanel Orientation="Horizontal">
        <Image Source="User.png" Width="24" Height="24" Margin="0,0,11,0" />
        <TextBlock VerticalAlignment="Center" Text="General Information" FontSize="14" />
      </StackPanel>
    </pt:FormHeader.Content>
  </pt:FormHeader>
  <TextBox pt:FormItem.LabelContent="_First Name" />
  <TextBox pt:FormItem.LabelContent="_Last Name"  />
  <TextBox pt:FormItem.LabelContent="_Phone" Width="150" HorizontalAlignment="Left" />
  <CheckBox pt:FormItem.LabelContent="Is _Active" />
</pt:Form>
使用代码和截图如上所示。这个方案最大的好处是只需在Form中声明表单的逻辑结构,隐藏了布局的细节和具体实现,而且可以通过Style设定不同表单的外观。
3. 我的实现
从十年前开始我就一直用这个方案布局表单,不过我对原本的方案进行了改进:
- 由于原本的代码是VB.NET,我把它改为了C#。
- 原本的方案提供了十分多的属性,我只保留了最基本的几个,其它都靠Style处理。因为我希望Form是一个80/20原则下的产物,很少的代码,很短的编程时间,可以处理大部分的需求。
3.1 用FormItem封装表单元素
在文章开头的表单中,TextBox、Password等是它的逻辑结构,其它都只是它外观和装饰,可以使用自定义的ItemsCntrol控件分离表单的逻辑结构和外观。之前自定义ItemsControl这篇文章介绍过,自定义ItemsControl可以首先定义ItemContainer,所以在实现Form的功能前首先实现FormItem的功能。
3.1.1 如何使用

<StackPanel Grid.IsSharedSizeScope="True">
    <kino:FormItem Label="用户名" IsRequired="True">
        <TextBox />
    </kino:FormItem>
    <kino:FormItem Label="密码" IsRequired="True">
        <PasswordBox />
    </kino:FormItem>
    <kino:FormItem Label="国家与地区(请选择居住地)">
        <ComboBox />
    </kino:FormItem>
</StackPanel>
Form的方案是将每一个表单元素放进单独的FormItem,再由Form负责布局。FormItem也可以单独使用,例如把FormItem放进StackPanel布局。
FormItem并不会为UI提供丰富的属性选项,那是需要赚钱的控件库才会提供的需求,而且除了Demo外应该没什么机会要为每个Form设定不同的外观。在一个程序内,通常只有以下两种情况:
-
通用表单的布局,一般最多只有几种,只需要给出对应数量的全局样式就足够应付。
-
复杂而独特的布局,应该不会很多,所以不在Form面对的80%应用场景,这种情况就特殊处理吧。
如果有一个程序有几十个表单而且每个表单布局全都不同,那么应该和产品经理好好沟通让TA不要这么任性。
3.1.2 FormItem的具体实现
<Style TargetType="local:FormItem">
    <Setter Property="IsTabStop"
            Value="False" />
    <Setter Property="Margin"
            Value="12,0,12,12" />
    <Setter Property="Padding"
            Value="8,0,0,0" />
    <Setter Property="LabelTemplate">
        <Setter.Value>
            <DataTemplate>
                <TextBlock Text="{Binding}"
                           VerticalAlignment="Center" />
            </DataTemplate>
        </Setter.Value>
    </Setter>
    <Setter Property="Template">
        <Setter.Value>
            <ControlTemplate TargetType="local:FormItem">
                <Grid x:Name="Root">
                    <Grid.ColumnDefinitions>
                        <ColumnDefinition Width="Auto"
                                          SharedSizeGroup="Header" />
                        <ColumnDefinition />
                    </Grid.ColumnDefinitions>
                    <Grid.RowDefinitions>
                        <RowDefinition Height="Auto" />
                        <RowDefinition Height="Auto" />
                    </Grid.RowDefinitions>
                    <StackPanel Orientation="Horizontal"
                                HorizontalAlignment="Right">
                        <TextBlock x:Name="IsRequiredMark"
                                   Margin="0,0,2,0"
                                   VerticalAlignment="Center"
                                   Grid.Column="2"
                                   Visibility="{Binding IsRequired,RelativeSource={RelativeSource Mode=TemplatedParent},Converter={StaticResource BooleanToVisibilityConverter}}"
                                   Text="*"
                                   Foreground="Red" />
                        <ContentPresenter Content="{TemplateBinding Label}"
                                          TextBlock.Foreground="#FF444444"
                                          ContentTemplate="{TemplateBinding LabelTemplate}"
                                          Visibility="{Binding Label,RelativeSource={RelativeSource Mode=TemplatedParent},Converter={StaticResource EmptyObjectToVisibilityConverter}}" />
                    </StackPanel>
                    <ContentPresenter Grid.Column="1"
                                      Margin="{TemplateBinding Padding}"
                                      x:Name="ContentPresenter" />
                    <ContentPresenter Grid.Row="1"
                                      Grid.Column="1"
                                      Visibility="{Binding Description,RelativeSource={RelativeSource Mode=TemplatedParent},Converter={StaticResource EmptyObjectToVisibilityConverter}}"
                                      Margin="{TemplateBinding Padding}"
                                      Content="{TemplateBinding Description}"
                                      TextBlock.Foreground="Gray" />
                </Grid>
            </ControlTemplate>
        </Setter.Value>
    </Setter>
</Style>
上面是FormItem的DefaultStyle。FormItem继承ContentControl并提供Label、LabelTemplate、Description和IsRequired四个属性,它的代码本身并不提供其它功能:
Label
本来打算让FormItem继承HeaderedContentControl,但考虑到语义上Label比Header更合适结果还是使用了Label。
LabelTemplate
根据多年来的使用经验,比起提供各种各样的属性,一个LabelTemplate能提供的更多更灵活。LabelTemplate可以玩的花样还挺多的,例如FormItem 使用如下Setter让标签右对齐:
<Setter Property="LabelTemplate">
    <Setter.Value>
        <DataTemplate>
            <TextBlock Text="{Binding}"
                       VerticalAlignment="Center"
                       HorizontalAlignment="Right" />
        </DataTemplate>
    </Setter.Value>
</Setter>
IsRequired
是否为必填项,如果为True则显示红色的*。
Description
说明,ControlTemplate使用了SystemColors.GrayTextBrush将文字设置为灰色。
一般来说有这些属性就够应对80%的需求。有些项目要求得更多,通常我会选择为这个项目单独定制一个派生自FormItem的控件,而不是让原本的FormItem更加臃肿。
SharedSizeGroup
FormItem中Label列是自适应的,同一个Form中不同FormItem的这个列通过SharedSizeGroup属性保持同步。应用了SharedSizeGroup属性的元素会找到IsSharedSizeScope设置true的父元素(也就是Form),然后同步这个父元素中所有SharedSizeGroup值相同的对应列。具体内容可见在网格之间共享大小调整属性这篇文章。
很多人喜欢将Label列设置为一个固定的值,但国际化后由于英文比中文长长长长很多,或者字体大小会改变,或者因为Label是动态生成的一开始就不清楚Label列需要的宽度,最终导致Label显示不完整。如果将Label列设置一个很大的宽度又会在大部分情况下显得左边很空旷,所以最好做成自适应。
3.2 用Form和附加属性简化表单构建
3.2.1 如何使用

<kino:Form Header="NormalForm">
    <TextBox kino:Form.Label="用户名" kino:Form.IsRequired="True" />
    <PasswordBox kino:Form.Label="密码" kino:Form.IsRequired="True" />
    <ComboBox kino:Form.Label="国家与地区(请选择居住地)" />
</kino:Form>
将FormItem封装到Form中可以灵活地添加更多功能(不过我也只是多加了个Header属性,一般来说已经够用)。可以看到使用附加属性的方式大大简化了布局Form的XAML,而更重要的是语义上更加“正常”一些(不过也有人反馈不喜欢这种方式,也可能只是我自己用习惯了)。
3.2.2 Form的基本实现
public partial class Form : HeaderedItemsControl
{
    public Form()
    {
        DefaultStyleKey = typeof(Form);
    }

    protected override bool IsItemItsOwnContainerOverride(object item)
    {
        bool isItemItsOwnContainer = false;
        if (item is FrameworkElement element)
            isItemItsOwnContainer = GetIsItemItsOwnContainer(element);

        return item is FormItem || isItemItsOwnContainer;
    }

    protected override DependencyObject GetContainerForItemOverride()
    {
        var item = new FormItem();
        return item;
    }
}
HeaderedItemsControl
Form是一个简单的自定义ItemsContro,继承HeaderedItemsControl是为了多一个Header属性及它的HeaderTemplate可用。
GetContainerForItemOverride
protected virtual DependencyObject GetContainerForItemOverride () 用于返回Item的Container。所谓的Container即Item的容器,一些ItemsControl不会把Items中的项直接呈现到UI,而是封装到一个Container,这个Container通常是个ContentControl,如ListBox的ListBoxItem。Form返回的是FormItem。
IsItemItsOwnContainer
protected virtual bool IsItemItsOwnContainerOverride (object item),确定Item是否是(或者是否可以作为)其自己的Container。在Form中,只有FormItem和IsItemItsOwnContainer附加属性的值为True的元素返回True。
3.2.3 使用附加属性简化XAML
比起用FormItem包装每个表单元素,如果每个TextBox、ComboBox等都有FormItem的Label、IsRequired属性那就简单太多了。这种情况可以使用附加属性解决,如前面示例代码所示,使用附加属性后上面的示例代码可以答复简化,而且完全隐藏了FormItem这一层,语义上更合理。
如果对附加属性不熟悉可以看我的这篇文章。
为此Form提供了几个附加属性,包括Label、LabelTemplate、Description、IsRequired和ContainerStyle,分别和FormItem中各属性对应,在Form中使用protected virtual void PrepareContainerForItemOverride (DependencyObject element, object item) 为FormItem设置Header、Description、IsRequired:
protected override void PrepareContainerForItemOverride(DependencyObject element, object item)
{
    base.PrepareContainerForItemOverride(element, item);

    if (element is FormItem formItem && item is FormItem == false)
    {
        if (item is FrameworkElement content)
            PrepareFormFrameworkElement(formItem, content);
    }
}

private void PrepareFormFrameworkElement(FormItem formItem, FrameworkElement content)
{
    formItem.Label = GetLabel(content);
    formItem.Description = GetDescription(content);
    formItem.IsRequired = GetIsRequired(content);
    formItem.ClearValue(DataContextProperty);
    Style style = GetContainerStyle(content);
    if (style != null)
        formItem.Style = style;
    else if (ItemContainerStyle != null)
        formItem.Style = ItemContainerStyle;
    else
        formItem.ClearValue(FrameworkElement.StyleProperty);

    DataTemplate labelTemplate = GetLabelTemplate(content);
    if (labelTemplate != null)
        formItem.LabelTemplate = labelTemplate;
}
ClearValue(FrameworkElement.StyleProperty)
注意formItem.ClearValue(FrameworkElement.StyleProperty)这句。Style是个可以使用继承值的属性(属性值继承使元素树中的子元素可以从父元素获取特定属性的值,并继承该值),也就是说如果写成formItem.Style=null它的Style就会成为Null,而不能继承父元素中设置的全局样式。(关于依赖属性的优先级,可以看我的另一篇文章:依赖属性:概述)
ClearValue(DataContextProperty)
另外还需注意formItem.ClearValue(DataContextProperty)这句,因为FormItem的DataContext会影响FormItem的Header等的绑定,所以需要清除它的DataContext的值,让它使用继承值。
Visibility
var binding = new Binding(nameof(Visibility));
binding.Source = content;
binding.Mode = BindingMode.OneWay;
formItem.SetBinding(VisibilityProperty, binding);
除了附加属性,FormItem还可以绑定表单元素的依赖属性。上面这段代码添加在PrepareFormFrameworkElement最后,用于将FormItem的Visibility绑定到表单元素的Visibility。一般来说表单元素的IsEnabled和Visibility都是常常被修改的值,因为它们本身就是UIElement的依赖属性,不需要为它们另外创建附加属性。
3.3 为表单布局添加层次

<Style TargetType="local:FormSeparator">
    <Setter Property="Margin"
            Value="0,8,0,8" />
    <Setter Property="Template">
        <Setter.Value>
            <ControlTemplate TargetType="local:FormSeparator">
                <Rectangle VerticalAlignment="Bottom"
                           Height="1" />
            </ControlTemplate>
        </Setter.Value>
    </Setter>
</Style>

<Style TargetType="local:FormTitle">
    <Setter Property="FontSize"
            Value="16" />
    <Setter Property="Margin"
            Value="0,0,0,12" />
    <Setter Property="Padding"
            Value="12,0" />
    <Setter Property="Foreground"
            Value="#FF333333" />
    <Setter Property="IsTabStop"
            Value="False" />
    <Setter Property="Template">
        <Setter.Value>
            <ControlTemplate TargetType="local:FormTitle">
                <StackPanel Margin="{TemplateBinding Padding}">
                    <ContentPresenter x:Name="ContentPresenter"
                                      ContentTemplate="{TemplateBinding ContentTemplate}"
                                      Content="{TemplateBinding Content}" />
                    <ContentPresenter Content="{TemplateBinding Description}"
                                      Visibility="{Binding Description,RelativeSource={RelativeSource Mode=TemplatedParent},Converter={StaticResource NullToValueConverter},ConverterParameter=Collapsed,FallbackValue=Visible}"
                                      Margin="0,2,0,0"
                                      TextBlock.FontSize="12"
                                      TextBlock.Foreground="Gray" />
                </StackPanel>
            </ControlTemplate>
        </Setter.Value>
    </Setter>
</Style>
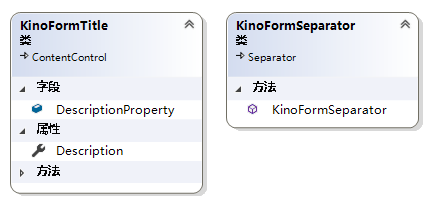
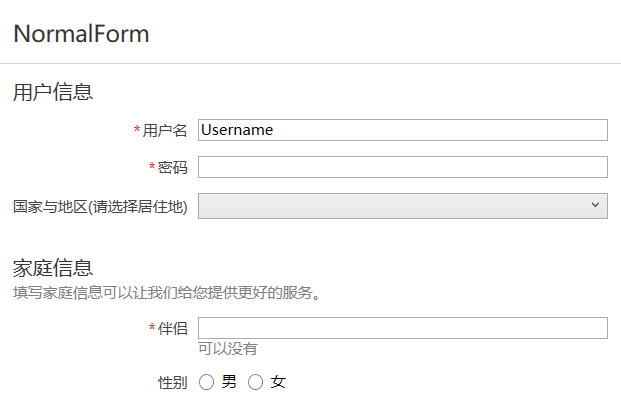
这两个控件为Form的布局提供层次感,两者都将IsItemItsOwnContainer附加属性设置为True,所以在Form中不会被包装为FormItem。这两个控件的使用如下:

<kino:Form Header="NormalForm">
    <kino:FormTitle Content="用户信息" />
    <TextBox kino:Form.Label="用户名" kino:Form.IsRequired="True" />
    <PasswordBox kino:Form.Label="密码" kino:Form.IsRequired="True" />
    <ComboBox kino:Form.Label="国家与地区(请选择居住地)" />

    <kino:FormSeparator />

    <kino:FormTitle Content="家庭信息" Description="填写家庭信息可以让我们给您提供更好的服务。" />
    <TextBox kino:Form.Label="伴侣" kino:Form.Description="可以没有"
     kino:Form.IsRequired="True" />
    <StackPanel kino:Form.Label="性别" Orientation="Horizontal">
        <RadioButton Content="男" GroupName="Sex" />
        <RadioButton Content="女" GroupName="Sex" Margin="8,0,0,0" />
    </StackPanel>
</kino:Form>
3.4 ShouldApplyItemContainerStyle
ShouldApplyItemContainerStyle的作用是返回一个值,该值表示是否将属性 ItemContainerStyle 或 ItemContainerStyleSelector 的样式应用到指定的项的容器元素。由于在Form中设置了:
[StyleTypedProperty(Property = "ItemContainerStyle", StyleTargetType = typeof(FormItem))]
但同时Form中很可能有FormTitle、FormSeparator,为避免ItemContainerStyle错误地应用到FormTitle和FormSeparator导致出错,需要添加如下代码:
protected override bool ShouldApplyItemContainerStyle(DependencyObject container, object item)
{
    return container is FormItem;
}
4. 其它方案
Form是一个简单的只满足了基本布局功能的表单方案,业务稍微复杂的程序可以考虑使用下面这些方案,由于这些方案通常包含在成熟的控件库里面(而且稍微超出了“入门"的范围),所以我只简单地介绍一下。
ASP.NET MVC的方案是通过在实体类的属性上添加各种标签:
[Required]
[EmailAddress]
[Display(Name = "Email Address")]
public string Email { get; set; }
UI上就可以这么使用:
<form asp-controller="Demo" asp-action="RegisterLabel" method="post">
    <label asp-for="Email"></label>
    <input asp-for="Email" /> <br />
</form>
使用同样结构的实体类,WPF还可以这么使用:
<dc:DataForm Data="{Binding SelectedItem}">
     <dc:DataFormFieldDescriptor PropertyName="Id" />
     <dc:DataFormFieldDescriptor PropertyName="FirstName"/>
     <dc:DataFormFieldDescriptor PropertyName="LastName"/>
     <dc:DataFormFieldDescriptor PropertyName="Gender"/>
     <dc:DataFormFieldDescriptor PropertyName="MainAddress">
         <dc:DataFormFieldDescriptor.SubFields>
             <dc:DataFormFieldDescriptor PropertyName="Address1"/>
             <dc:DataFormFieldDescriptor PropertyName="City"/>
             <dc:DataFormFieldDescriptor PropertyName="State"/>
         </dc:DataFormFieldDescriptor.SubFields>
     </dc:DataFormFieldDescriptor>
</dc:DataForm>
由DataForm选择表单元素并生成的做法也很多人喜欢,但对实体类的要求也较高。DataForm通常还可以更进一步--反射实体类的所有属性自动创建表单。如果需要的话可以直接买一个包含DataForm的控件库,或者将SilverlightTookit的DataForm移植过来用。这之后话题越来越不“入门”就割爱了。
5. 还有什么
作为一个表单怎么可以没有错误验证和提交按钮,提交按钮部分在接下来的文章里介绍,但错误验证是一个很大的功能(而且没有错误验证部分这个Form也能用),我打算之后再改进。
其它例如点击取消按钮要提示“内容已修改是否放弃保存”之类的功能太倾向业务了,不想包含在控件的功能中。
接下来的文章会继续介绍Form的其它小功能。
6. 参考
ScottGu's Blog - Nov 6th Links_ ASP.NET, ASP.NET AJAX, jQuery, ASP.NET MVC, Silverlight and WPF
ItemsControl Class (System.Windows.Controls) Microsoft Docs
附加属性1:概述
附加属性概述
自定义附加属性
7. 源码
作者:dino.c
出处:http://www.cnblogs.com/dino623/
说明:欢迎转载并请标明来源和作者。如有错漏请指出,谢谢。


 浙公网安备 33010602011771号