[UWP]用Shape做动画(2):使用与扩展PointAnimation
上一篇几乎都在说DoubleAnimation的应用,这篇说说PointAnimation。
1. 使用PointAnimation
使用PointAnimation可以让Shape变形,但实际上没看到多少人会这么用,毕竟WPF做的软件多数不需要这么花俏。
1.1 在XAML上使用PointAnimation
<Storyboard x:Name="Storyboard2"
            RepeatBehavior="Forever"
            AutoReverse="True"
            Duration="0:0:4">
    <PointAnimation Storyboard.TargetProperty="(Path.Data).(PathGeometry.Figures)[0].(PathFigure.StartPoint)"
                    Storyboard.TargetName="Path2"
                    To="0,0"
                    EnableDependentAnimation="True" />
    <PointAnimation Storyboard.TargetProperty="(Path.Data).(PathGeometry.Figures)[0].(PathFigure.Segments)[0].(LineSegment.Point)"
                    Storyboard.TargetName="Path2"
                    To="100,0"
                    EnableDependentAnimation="True" />
    <ColorAnimation To="#FF85C82E"
                    Storyboard.TargetProperty="(Shape.Fill).(SolidColorBrush.Color)"
                    Storyboard.TargetName="Path2" />
</Storyboard>


…


<Path Margin="0,20,0,0"
      x:Name="Path2"
      Fill="GreenYellow">
    <Path.Data>
        <PathGeometry>
            <PathFigure StartPoint="50,0">
                <LineSegment Point="50,0" />
                <LineSegment Point="0,100" />
                <LineSegment Point="0,100" />
                <LineSegment Point="100,100" />
                <LineSegment Point="100,100" />
            </PathFigure>
        </PathGeometry>
    </Path.Data>
</Path>

在这个例子里最头痛的地方是Property-path 语法,如果不能熟记的话最好依赖Blend生成。
1.2 在代码中使用PointAnimation
如果Point数量很多,例如图表,通常会在C#代码中使用PointAnimation:
_storyboard = new Storyboard();
Random random = new Random();

for (int i = 0; i < _pathFigure.Segments.Count; i++)
{
    var animation = new PointAnimation { Duration = TimeSpan.FromSeconds(3) };
    Storyboard.SetTarget(animation, _pathFigure.Segments[i]);
    Storyboard.SetTargetProperty(animation, "(LineSegment.Point)");
    animation.EnableDependentAnimation = true;
    animation.EasingFunction = new QuarticEase { EasingMode = EasingMode.EaseOut };
    animation.To = new Point((_pathFigure.Segments[i] as LineSegment).Point.X, (i % 2 == 0 ? 1 : -1) * i * 1.2 + 60);
    _storyboard.Children.Add(animation);
}
_storyboard.Begin();

因为可以直接SetTarget,所以Property-path语法就可以很简单。
2. 扩展PointAnimation
上面两个例子的动画都还算简单,如果更复杂些,XAML或C#代码都需要写到很复杂。我参考了这个网页
想做出类似的动画,但发现需要写很多XAML所以放弃用PointAnimation实现。这个页面的动画核心是这段HTML:
<polygon fill="#FFD41D" points="97.3,0 127.4,60.9 194.6,70.7 145.9,118.1 157.4,185.1 97.3,153.5 37.2,185.1 48.6,118.1 0,70.7
    67.2,60.9">

      <animate id="animation-to-check" begin="indefinite" fill="freeze" attributeName="points" dur="500ms" to="110,58.2 147.3,0 192.1,29 141.7,105.1 118.7,139.8 88.8,185.1 46.1,156.5 0,125 23.5,86.6
    71.1,116.7"/>

      <animate id="animation-to-star" begin="indefinite" fill="freeze" attributeName="points" dur="500ms" to="97.3,0 127.4,60.9 194.6,70.7 145.9,118.1 157.4,185.1 97.3,153.5 37.2,185.1 48.6,118.1 0,70.7
    67.2,60.9"/>

    </polygon>
只需一组Point的集合就可以控制所有Point的动画,确实比PointAnimation高效很多。 在WPF中可以通过继承Timeline实现一个PointCollectionAnimamtion,具体可以参考这个项目。可惜的是虽然UWP的Timeline类并不封闭,但完全不知道如何继承并派生一个自定义的Animation。
这时候需要稍微变通一下思维。可以将DoubleAnimation理解成这样:Storyboard将TimeSpan传递给DoubleAnimation,DoubleAnimation通过这个TimeSpan(有时还需要结合EasingFunction)计算出目标属性的当前值最后传递给目标属性,如下图所示:

既然这样,也可以接收到这个计算出来的Double,再通过Converter计算出目标的PointCollection值:
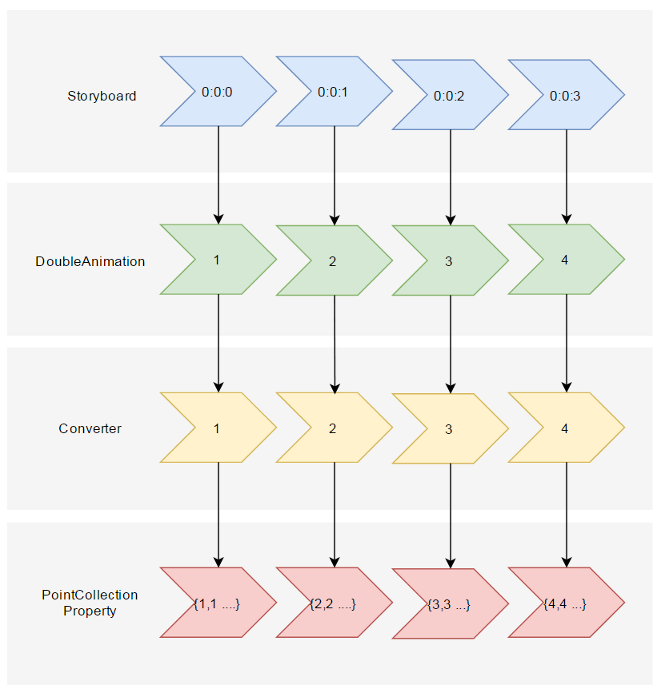
假设告诉这个Converter当传入的Double值(命名为Progress)为0的时候,PointCollection是{0,0 1,1 …},Progress为100时PointCollection是{1,1 2,2 …},当Progress处于其中任何值时的计算方法则是:
private PointCollection GetCurrentPoints(PointCollection fromPoints, PointCollection toPoints, double percentage)
{
    var result = new PointCollection();
    for (var i = 0;
        i < Math.Min(fromPoints.Count, toPoints.Count);
        i++)
    {
        var x = (1 - percentage / 100d) * fromPoints[i].X + percentage / 100d * toPoints[i].X;
        var y = (1 - percentage / 100d) * fromPoints[i].Y + percentage / 100d * toPoints[i].Y;

        result.Add(new Point(x, y));
    }
    return result;
}
这样就完成了从TimeSpan到PointCollection的转换过程。然后就是定义在XAML上的使用方式。参考上面PointCollectionAnimation,虽然多了个Converter,但XAML也应该足够简洁:
<local:ProgressToPointCollectionBridge x:Name="ProgressToPointCollectionBridge">
    <PointCollection>97.3,0 127.4,60.9 194.6,70.7 145.9,118.1 157.4,185.1 97.3,153.5 37.2,185.1 48.6,118.1 0,70.7 67.2,60.9</PointCollection>
    <PointCollection>110,58.2 147.3,0 192.1,29 141.7,105.1 118.7,139.8 88.8,185.1 46.1,156.5 0,125 23.5,86.6 71.1,116.7</PointCollection>
</local:ProgressToPointCollectionBridge>

<Storyboard x:Name="Storyboard1"
            FillBehavior="HoldEnd">
    <DoubleAnimation Duration="0:0:2"
                        To="100"
                        FillBehavior="HoldEnd"
                        Storyboard.TargetProperty="(local:ProgressToPointCollectionBridge.Progress)"
                        Storyboard.TargetName="ProgressToPointCollectionBridge"
                        EnableDependentAnimation="True"/>
</Storyboard>


…


<Polygon x:Name="polygon"
            Points="{Binding Source={StaticResource ProgressToPointCollectionBridge},Path=Points}"
            Stroke="DarkOliveGreen"
            StrokeThickness="2"
            Height="250"
            Width="250"
            Stretch="Fill" />
最终我选择了将这个Converter命名为ProgressToPointCollectionBridge。可以看出Polygon 将Points绑定到ProgressToPointCollectionBridge,DoubleAnimation 改变ProgressToPointCollectionBridge.Progress,从而改变Points。XAML的简洁程度还算令人满意,如果需要操作多个点的话相对于PointAnimation的优势就很大。
运行结果如下:

完整的XAML:
<UserControl.Resources>
    <local:ProgressToPointCollectionBridge x:Name="ProgressToPointCollectionBridge">
        <PointCollection>97.3,0 127.4,60.9 194.6,70.7 145.9,118.1 157.4,185.1 97.3,153.5 37.2,185.1 48.6,118.1 0,70.7 67.2,60.9</PointCollection>
        <PointCollection>110,58.2 147.3,0 192.1,29 141.7,105.1 118.7,139.8 88.8,185.1 46.1,156.5 0,125 23.5,86.6 71.1,116.7</PointCollection>
    </local:ProgressToPointCollectionBridge>
    <Storyboard x:Name="Storyboard1"
                FillBehavior="HoldEnd">
        <DoubleAnimation Duration="0:0:2"
                            To="100"
                            FillBehavior="HoldEnd"
                            Storyboard.TargetProperty="(local:ProgressToPointCollectionBridge.Progress)"
                            Storyboard.TargetName="ProgressToPointCollectionBridge"
                            EnableDependentAnimation="True">
            <DoubleAnimation.EasingFunction>
                <ElasticEase EasingMode="EaseInOut" />
            </DoubleAnimation.EasingFunction>
        </DoubleAnimation>
        <ColorAnimation Duration="0:0:2"
                        To="#FF48F412"
                        Storyboard.TargetProperty="(Shape.Fill).(SolidColorBrush.Color)"
                        Storyboard.TargetName="polygon"
                        d:IsOptimized="True">
            <ColorAnimation.EasingFunction>
                <ElasticEase EasingMode="EaseInOut" />
            </ColorAnimation.EasingFunction>
        </ColorAnimation>
    </Storyboard>
</UserControl.Resources>
<Grid x:Name="LayoutRoot"
        Background="White">
    <Polygon x:Name="polygon"
                Points="{Binding Source={StaticResource ProgressToPointCollectionBridge},Path=Points}"
                Stroke="DarkOliveGreen"
                StrokeThickness="2"
                Height="250"
                Width="250"
                Stretch="Fill"
                Fill="#FFEBF412" />
</Grid>
ProgressToPointCollectionBridge:
[ContentProperty(Name = nameof(Children))]
public class ProgressToPointCollectionBridge : DependencyObject
{
    public ProgressToPointCollectionBridge()
    {
        Children = new ObservableCollection<PointCollection>();
    }


    /// <summary>
    ///     获取或设置Points的值
    /// </summary>
    public PointCollection Points
    {
        get { return (PointCollection) GetValue(PointsProperty); }
        set { SetValue(PointsProperty, value); }
    }


    /// <summary>
    ///     获取或设置Progress的值
    /// </summary>
    public double Progress
    {
        get { return (double) GetValue(ProgressProperty); }
        set { SetValue(ProgressProperty, value); }
    }

    /// <summary>
    ///     获取或设置Children的值
    /// </summary>
    public Collection<PointCollection> Children
    {
        get { return (Collection<PointCollection>) GetValue(ChildrenProperty); }
        set { SetValue(ChildrenProperty, value); }
    }


    protected virtual void OnProgressChanged(double oldValue, double newValue)
    {
        UpdatePoints();
    }


    protected virtual void OnChildrenChanged(Collection<PointCollection> oldValue, Collection<PointCollection> newValue)
    {
        var oldCollection = oldValue as INotifyCollectionChanged;
        if (oldCollection != null)
            oldCollection.CollectionChanged -= OnChildrenCollectionChanged;

        var newCollection = newValue as INotifyCollectionChanged;
        if (newCollection != null)
            newCollection.CollectionChanged += OnChildrenCollectionChanged;

        UpdatePoints();
    }

    private void OnChildrenCollectionChanged(object sender, NotifyCollectionChangedEventArgs e)
    {
        UpdatePoints();
    }

    private void UpdatePoints()
    {
        if (Children == null || Children.Any() == false)
        {
            Points = null;
        }
        else if (Children.Count == 1)
        {
            var fromPoints = new PointCollection();
            for (var i = 0; i < Children[0].Count; i++)
                fromPoints.Add(new Point(0, 0));
            var toPoints = Children[0];
            Points = GetCurrentPoints(fromPoints, toPoints, Progress);
        }
        else
        {
            var rangePerSection = 100d / (Children.Count - 1);
            var fromIndex = Math.Min(Children.Count - 2, Convert.ToInt32(Math.Floor(Progress / rangePerSection)));
            fromIndex = Math.Max(fromIndex, 0);
            var toIndex = fromIndex + 1;
            PointCollection fromPoints;
            if (fromIndex == toIndex)
            {
                fromPoints = new PointCollection();
                for (var i = 0; i < Children[0].Count; i++)
                    fromPoints.Add(new Point(0, 0));
            }
            else
            {
                fromPoints = Children.ElementAt(fromIndex);
            }
            var toPoints = Children.ElementAt(toIndex);
            var percentage = (Progress / rangePerSection - fromIndex) * 100;

            Points = GetCurrentPoints(fromPoints, toPoints, percentage);
        }
    }

    private PointCollection GetCurrentPoints(PointCollection fromPoints, PointCollection toPoints, double percentage)
    {
        var result = new PointCollection();
        for (var i = 0;
            i < Math.Min(fromPoints.Count, toPoints.Count);
            i++)
        {
            var x = (1 - percentage / 100d) * fromPoints[i].X + percentage / 100d * toPoints[i].X;
            var y = (1 - percentage / 100d) * fromPoints[i].Y + percentage / 100d * toPoints[i].Y;

            result.Add(new Point(x, y));
        }
        return result;
    }

    #region DependencyProperties


    #endregion
}
3. 结语
如果将DoubleAnimation说成“对目标的Double属性做动画”,那PointAnimation可以说成“对目标的Point.X和Point.Y两个Double属性同时做动画”,ColorAnimation则是“对目标的Color.A、R、G、B四个Int属性同时做动画”。这样理解的话PointAnimation和ColorAnimation只不过是DoubleAnimation的延伸而已,进一步的说,通过DoubleAnimation应该可以延伸出所有类型属性的动画。不过我并不清楚怎么在UWP上自定义动画,只能通过本文的折衷方式扩展。虽然XAML需要写复杂些,但这样也有它的好处:
- 不需要了解太多Animation相关类的知识,只需要有依赖属性、绑定等基础知识就够了。
- 不会因为动画API的改变而更改,可以兼容WPF、Silverlight和UWP(大概吧,我没有真的在WPF上测试这些代码)。
- 代码足够简单,省去了计算TimeSpan及EasingFunction的步骤。 稍微修改下还可以做成泛型的
AnimationBridge < T >,提供PointCollection以外数据类型的支持。
结合上一篇文章再发散一下,总觉得将来遇到什么UWP没有提供的功能都可以通过变通的方法实现,Binding和DependencyProperty真是UWP开发者最好的朋友。
4. 参考
作者:dino.c
出处:http://www.cnblogs.com/dino623/
说明:欢迎转载并请标明来源和作者。如有错漏请指出,谢谢。

 浙公网安备 33010602011771号