WPF Caliburn 学习笔记(五)HelloCaliburn
我们来实现一个最简单的实例HelloCaliburn。
首先我们要引入下面几个.dll
- Caliburn.Core.dll
- Caliburn.Castle.dll
- Castle.MicroKernel.dll
- Caliburn.PresentationFramework.dll
- Microsoft.Practices.ServiceLocation.dll
- Castle.Windsor.dll
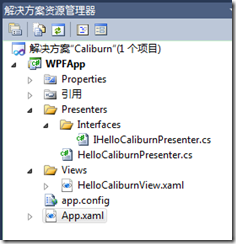
为了更好的了解Caliburn如何关联View和Presenter(业务逻辑层相当于ViewModel)。我们用了MVVM模式。
如下图:
配置Caliburn容器
在App.xaml中,我们要修改框架名称
代码
转到App.xaml.cs中
添加如下引用。
using Castle.Windsor;
using Microsoft.Practices.ServiceLocation;
using Caliburn.Castle;
using Castle.MicroKernel.Registration;
using WPFApp.Presenters.Interfaces;
using WPFApp.Presenters;
修改和添加App类
public partial class App
    {
//声明一个容器_container
        private WindsorContainer _container;

        public App()
        {
            RegisterComponents();
        }
        protected override IServiceLocator CreateContainer()
        {
            _container = new WindsorContainer();//实例化容器
            return new WindsorAdapter(_container);//注入容器
        }

        private void RegisterComponents()
        {//注入所有有关的页面
            _container.Register(Component.For<IHelloCaliburnPresenter>()//通过接口的方式注入容器
            .ImplementedBy<HelloCaliburnPresenter>()//注册Presenter
            .LifeStyle.Singleton);//以单例模式运行。
        }

        protected override object CreateRootModel()
        {
            return _container.Resolve<IHelloCaliburnPresenter>();//从刚才注入的容器中取数据
        }
    }
在到HelloCaliburnView.xaml页面
<Button Content="Click Me" Height="23"   Name="button1" Width="75"
 cal:Message.Attach="ShowMessage" />
后台代码要与之关联,我们把后台代码写在HelloCaliburnPresenter.cs中,因为我们通过Caliburn框架来实现了关联。
 public class HelloCaliburnPresenter : IHelloCaliburnPresenter
    {
        public HelloCaliburnPresenter()
        { }
       public void ShowMessage()
        {
            MessageBox.Show("Hello Caliburn");
       }
    }
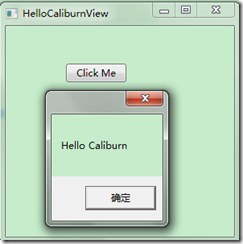
按F5运行效果:
作者:dingli
出处:http://www.cnblogs.com/dingli/
本文版权归作者和博客园共有,欢迎转载,但未经作者同意必须保留此段声明,且在文章页面明显位置给出原文连接,否则保留追究法律责任的权利。


