LNMP平台的redis对接安装
LNMP平台的redis对接安装
一、安装LNMP的各个组件
略过,详见往期博客。
https://www.cnblogs.com/dingcong1201/p/15132258.html
或使用下列脚本
#!/bin/bash
systemctl stop firewalld
systemctl disable firewalld
setenforce 0

#--------nginx--------

#------安装依赖包

yum -y install pcre-devel zlib-devel gcc gcc-c++ make

#------创建运行用户

useradd -M -s /sbin/nologin nginx

#-----编译安装

cd /opt
tar zxvf nginx-1.12.0.tar.gz

cd nginx-1.12.0/
./configure --prefix=/usr/local/nginx --user=nginx --group=nginx --with-http_stub_status_module  #指定安装路径、用户、组、添加模块

make -j4 && make install

#----优化路径

ln -s /usr/local/nginx/sbin/nginx /usr/local/sbin/

#----添加 Nginx 系统服务

cat > /lib/systemd/system/nginx.service <<EOF
[Unit]
Description=nginx
After=network.target
[Service]
Type=forking
PIDFile=/usr/local/nginx/logs/nginx.pid
ExecStart=/usr/local/nginx/sbin/nginx
ExecReload=/bin/kill -s HUP $MAINPID
ExecStop=/bin/kill -s QUIT $MAINPID
PrivateTmp=true
[Install]
WantedBy=multi-user.target
EOF

chmod 754 /lib/systemd/system/nginx.service
systemctl start nginx.service
systemctl enable nginx.service

cd /opt
tar zxvf nginx-1.12.0.tar.gz

cd nginx-1.12.0/
./configure --prefix=/usr/local/nginx --user=nginx --group=nginx --with-http_stub_status_module  #指定安装路径、用户、组、添加模块

make -j2 && make install

#----优化路径

ln -s /usr/local/nginx/sbin/nginx /usr/local/sbin/

#----添加 Nginx 系统服务

cat > /lib/systemd/system/nginx.service <<EOF
[Unit]
Description=nginx
After=network.target
[Service]
Type=forking
PIDFile=/usr/local/nginx/logs/nginx.pid
ExecStart=/usr/local/nginx/sbin/nginx
ExecReload=/bin/kill -s HUP $MAINPID
ExecStop=/bin/kill -s QUIT $MAINPID
PrivateTmp=true
[Install]
WantedBy=multi-user.target
EOF

chmod 754 /lib/systemd/system/nginx.service
systemctl start nginx.service
systemctl enable nginx.service


#-------mysql-----

#-----安装依赖包

yum -y install gcc gcc-c++ ncurses ncurses-devel bison cmake

#----配置软件模块

cd /opt/
tar zxvf mysql-5.7.17.tar.gz
tar zxvf boost_1_59_0.tar.gz
mv boost_1_59_0 /usr/local/boost

cd /opt/mysql-5.7.17/
cmake \
-DCMAKE_INSTALL_PREFIX=/usr/local/mysql \
-DMYSQL_UNIX_ADDR=/usr/local/mysql/mysql.sock \
-DSYSCONFDIR=/etc \
-DSYSTEMD_PID_DIR=/usr/local/mysql \
-DDEFAULT_CHARSET=utf8  \
-DDEFAULT_COLLATION=utf8_general_ci \
-DWITH_EXTRA_CHARSETS=all \
-DWITH_INNOBASE_STORAGE_ENGINE=1 \
-DWITH_ARCHIVE_STORAGE_ENGINE=1 \
-DWITH_BLACKHOLE_STORAGE_ENGINE=1 \
-DWITH_PERFSCHEMA_STORAGE_ENGINE=1 \
-DMYSQL_DATADIR=/usr/local/mysql/data \
-DWITH_BOOST=/usr/local/boost \
-DWITH_SYSTEMD=1

#-----编译安装

make -j 4 && make install

#-----创建mysql用户

useradd -M -s /sbin/nologin  mysql

#-----修改mysql 配置文件

cat > /etc/my.cnf <<EOF
[client]
port = 3306
default-character-set=utf8
socket=/usr/local/mysql/mysql.sock

[mysql]
port = 3306
default-character-set=utf8
socket = /usr/local/mysql/mysql.sock
auto-rehash

[mysqld]
user = mysql
basedir=/usr/local/mysql
datadir=/usr/local/mysql/data
port = 3306
character-set-server=utf8
pid-file = /usr/local/mysql/mysqld.pid
socket=/usr/local/mysql/mysql.sock
bind-address = 0.0.0.0
skip-name-resolve
max_connections=2048
default-storage-engine=INNODB
max_allowed_packet=16M
server-id = 1

sql_mode=NO_ENGINE_SUBSTITUTION,STRICT_TRANS_TABLES,NO_AUTO_CREATE_USER,NO_AUTO_VALUE_ON_ZERO,NO_ZERO_IN_DATE,NO_ZERO_DATE,ERROR_FOR_DIVISION_BY_ZERO,PIPES_AS_CONCAT,ANSI_QUOTES
EOF

#-----更改mysql安装目录和配置文件的属主属组

chown -R mysql:mysql /usr/local/mysql/
chown mysql:mysql /etc/my.cnf

#-----设置路径环境变量

echo 'export PATH=/usr/local/mysql/bin:/usr/local/mysql/lib:$PATH' >> /etc/profile
source /etc/profile

#-----初始化数据库

cd /usr/local/mysql/bin/
./mysqld \
--initialize-insecure \
--user=mysql \
--basedir=/usr/local/mysql \
--datadir=/usr/local/mysql/data

#-----添加mysqld系统服务

cp /usr/local/mysql/usr/lib/systemd/system/mysqld.service /usr/lib/systemd/system/
systemctl daemon-reload
systemctl start mysqld.service
systemctl enable mysqld

#-----mysql相关配置更改

yum -y install expect
mima () {
passwd=$1
/usr/bin/expect <<-EOF
spawn mysqladmin -u root -p password $passwd
expect "Enter password:"
send "\r"
expect eof
EOF
}
mima "123456"

shouquan () {
/usr/bin/expect <<-EOF
spawn mysql -u root -p
expect "Enter password:" {send "123456\r"}
expect "mysql>" {send "grant all privileges on *.* to 'root'@'%' identified by '123456';\r"}
expect "mysql>" {send "quit\r"}
expect eof
EOF
}
shouquan

#------PHP-----

#-----安装环境依赖包

yum -y install gd \
libjpeg libjpeg-devel \
libpng libpng-devel \
freetype freetype-devel \
libxml2 libxml2-devel \
zlib zlib-devel \
curl curl-devel \
openssl openssl-devel

#-----编译安装

cd /opt
tar jxvf php-7.1.10.tar.bz2

cd php-7.1.10
./configure \
--prefix=/usr/local/php \
--with-mysql-sock=/usr/local/mysql/mysql.sock \
--with-mysqli \
--with-zlib \
--with-curl \
--with-gd \
--with-jpeg-dir \
--with-png-dir \
--with-freetype-dir \
--with-openssl \
--enable-fpm \
--enable-mbstring \
--enable-xml \
--enable-session \
--enable-ftp \
--enable-pdo \
--enable-tokenizer \
--enable-zip

make -j4 && make install

#-----路径优化

ln -s /usr/local/php/bin/* /usr/local/bin/
ln -s /usr/local/php/sbin/* /usr/local/sbin/

#-----调整PHP配置文件
#调整主配置文件
cp /opt/php-7.1.10/php.ini-development /usr/local/php/lib/php.ini

sed -i '1170c mysqli.default_socket = /usr/local/mysql/mysql.sock' /usr/local/php/lib/php.ini

sed -i '939c date.timezone = Asia/Shanghai' /usr/local/php/lib/php.ini

#调整进程服务配置文件
cd /usr/local/php/etc/
cp  php-fpm.conf.default php-fpm.conf
sed -i '17c pid = run/php-fpm.pid' /usr/local/php/etc/php-fpm.conf

#调整扩展配置文件
cd /usr/local/php/etc/php-fpm.d/
cp www.conf.default www.conf

#-----启动php-fpm

/usr/local/php/sbin/php-fpm -c /usr/local/php/lib/php.ini

#PHP-FPM(FastCGI Process Manager:FastCGI 进程管理器)是一个 PHPFastCGI 管理器, 由于Nginx服务器不能处理动态页面,需要由 Nginx 把动态请求交给 php-fpm 进程进行解析。

#-----添加php-fpm系统管理

cd /opt/php-7.1.10/sapi/fpm
cp php-fpm.service /usr/lib/systemd/system/php-fpm.service
systemctl restart php-fpm.service

#-----配置 Nginx 支持 PHP 解析

sed -i '65c location ~ \.php$ {' /usr/local/nginx/conf/nginx.conf
sed -i '66c root html;' /usr/local/nginx/conf/nginx.conf
sed -i '67c fastcgi_pass   127.0.0.1:9000;' /usr/local/nginx/conf/nginx.conf
sed -i '68c fastcgi_index  index.php;' /usr/local/nginx/conf/nginx.conf
sed -i '69c fastcgi_param  SCRIPT_FILENAME  /usr/local/nginx/html$fastcgi_script_name;' /usr/local/nginx/conf/nginx.conf
sed -i '70c include        fastcgi_params;' /usr/local/nginx/conf/nginx.conf
sed -i '71c }' /usr/local/nginx/conf/nginx.conf

systemctl restart nginx.service

#-----验证PHP 测试页

cat >/usr/local/nginx/html/index.php <<EOF
<?php
phpinfo();
?>
EOF
二、安装redis服务
略过,详见往期博客。
https://www.cnblogs.com/dingcong1201/p/15270205.html
三、安装redis扩展
下载包地址:
https://codeload.github.com/phpredis/phpredis/zip/develop
http://download.redis.io/releases/redis-4.0.2.tar.gz
[root@localhost ~]# cd /opt
[root@localhost opt]# rz -E
#传入下载好的安装包
rz waiting to receive.
[root@localhost opt]# tar -zxvf redis-4.0.2.tgz
[root@localhost opt]# cd redis-4.0.2/
[root@localhost redis-4.0.2]# phpize
Configuring for:
PHP Api Version:         20160303
Zend Module Api No:      20160303
Zend Extension Api No:   320160303
[root@localhost redis-4.0.2]# ./configure --with-php-config=/usr/local/php/bin/php-config --enable-redis
[root@localhost redis-4.0.2]# make -j 2 && make install
......
Installing shared extensions:     /usr/local/php/lib/php/extenson-zts-20160303/
[root@localhost redis-4.0.2]# ls /usr/local/php/lib/php/extensions/no-debug-non-zts-20160303/
opcache.a  opcache.so  redis.so
四、修改php配置文件
[root@localhost redis-4.0.2]# vim /usr/local/php/lib/php.ini

##736行,取消注释并修改,指定redis模块目录
extension_dir = "/usr/local/php/lib/php/extensions/no-deb     ug-non-zts-20160303/"
##738行,取消注释并修改,参数项名称为extension,指定redis模块名称
extension = "redis.so"
[root@localhost redis-4.0.2]# systemctl restart php-fpm.service
[root@localhost redis-4.0.2]# php -m | grep redis
redis
五、测试连接
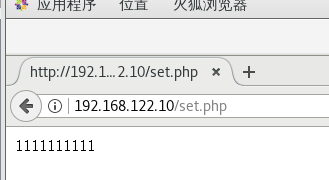
set
[root@localhost redis-4.0.2]# cd /usr/local/nginx/html/
[root@localhost html]# vim set.php

<?php
$redis = new redis();
$redis->connect('127.0.0.1', 6379);
$redis->set('test',"1111111111");
echo $redis->get('test');
?>

[root@localhost html]# curl http://192.168.122.10/set.php
1111111111[root@localhost html]#
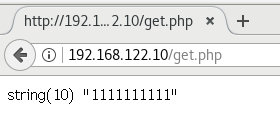
get
[root@localhost html]# vim get.php

<?php
$redis = new redis();
$redis->connect('127.0.0.1', 6379);
$result = $redis->get('test');
var_dump($result);
?>

[root@localhost html]# curl http://192.168.122.10/get.php
string(10) "1111111111"

 浙公网安备 33010602011771号