安卓自定义----带Edit的TextView标签组件
组件效果图如下, 组件包含两种显示方式, 第一种是TextView和EditText横排显示, 第二种是TextView和EditText竖排显示 :
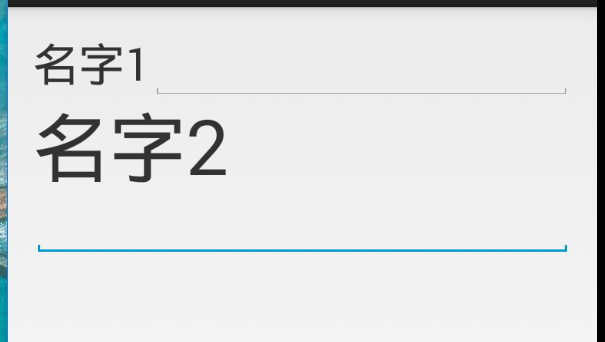
主activety_main.xml内容, 组件包含两种显示方式, 分别是horizontal 和 vertical, 所以还需要两个次要的布局文件:
<LinearLayout xmlns:android="http://schemas.android.com/apk/res/android"
    xmlns:tools="http://schemas.android.com/tools"
    android:layout_width="match_parent"
    android:layout_height="match_parent"
    android:paddingLeft="@dimen/activity_horizontal_margin"
    android:paddingRight="@dimen/activity_horizontal_margin"
    android:paddingTop="@dimen/activity_vertical_margin"
    android:paddingBottom="@dimen/activity_vertical_margin"
    android:orientation="vertical"
    tools:context=".main">

    <com.demo0.nono.labeledit.LabelEditText
        android:layout_width="fill_parent"
        android:layout_height="wrap_content"
        labelText="名字1"
        labelFontSize="30"
        labelPosition="left"
    />

    <com.demo0.nono.labeledit.LabelEditText
        android:layout_width="fill_parent"
        android:layout_height="wrap_content"
        labelText="名字2"
        labelFontSize="50"
        labelPosition="top"
        />
</LinearLayout>
组件包含两种显示方式, 分别是horizontal 和 vertical, 所以还需要两个次要的布局文件 horizontal.xml
<?xml version="1.0" encoding="utf-8"?>

<LinearLayout xmlns:android="http://schemas.android.com/apk/res/android"
    android:orientation="horizontal" android:layout_width="match_parent"
    android:layout_height="wrap_content">
    <TextView
        android:id="@+id/textView"
        android:layout_width="wrap_content"
        android:layout_height="wrap_content" />
    <EditText
        android:layout_width="fill_parent"
        android:layout_height="wrap_content" />
</LinearLayout>
vertical.xml
<?xml version="1.0" encoding="utf-8"?>

<LinearLayout xmlns:android="http://schemas.android.com/apk/res/android"
    android:orientation="vertical" android:layout_width="match_parent"
    android:layout_height="match_parent">
    <TextView
        android:id="@+id/textView"
        android:layout_width="wrap_content"
        android:layout_height="wrap_content" />

    <EditText
        android:layout_width="fill_parent"
        android:layout_height="wrap_content" />
</LinearLayout>
自定义的组件类代码:
package com.demo0.nono.labeledit;

import android.content.Context;
import android.util.AttributeSet;
import android.util.Log;
import android.view.LayoutInflater;
import android.widget.LinearLayout;
import android.widget.TextView;

/**
 * Created by nono on 2018/4/7.
 */
public class LabelEditText extends LinearLayout{
    private TextView textview;
    private String labelText;
    private String labelPosition;
    private int labelFontSize;

    public LabelEditText(Context context, AttributeSet attrs) {
        super(context, attrs);
        int resId = attrs.getAttributeResourceValue(null, "labelPosition", 0);
        if(resId != 0) {
            //如果能够获取到资源ID, 那就通过资源ID获取资源中配置的字符串
            labelPosition = getResources().getString(resId);
        }else{
            labelPosition = attrs.getAttributeValue(null, "labelPosition");
        }
        Log.d("lablePositionValue", labelPosition);
        resId = attrs.getAttributeResourceValue(null, "labelText", 0);
        if( resId != 0 ) {
            labelText = getResources().getString(resId);
        }else{
            labelText = attrs.getAttributeValue(null, "labelText");
        }

        resId = attrs.getAttributeResourceValue(null, "labelFontSize", 0);
        if( resId != 0 ) {
            labelFontSize = getResources().getInteger(resId);
        }else{
            labelFontSize = attrs.getAttributeIntValue(null, "labelFontSize", 14);
        }
        LayoutInflater li;
        li = (LayoutInflater)context.getSystemService( Context.LAYOUT_INFLATER_SERVICE );
        if("left".equals(labelPosition)) {
            li.inflate(R.layout.horizontal, this);
        }else{
            li.inflate(R.layout.vertical, this);
        }
        textview = (TextView)findViewById(R.id.textView);
        textview.setText( labelText );
        textview.setTextSize((float)labelFontSize);
    }
}
EOF
天道酬勤

 浙公网安备 33010602011771号