rabbitMQ实战生产者-交换机-队列-消费者细谈
生产者
rabbitmq的配置
创建交换机,创建queue,绑定交换机的routingkey到queue
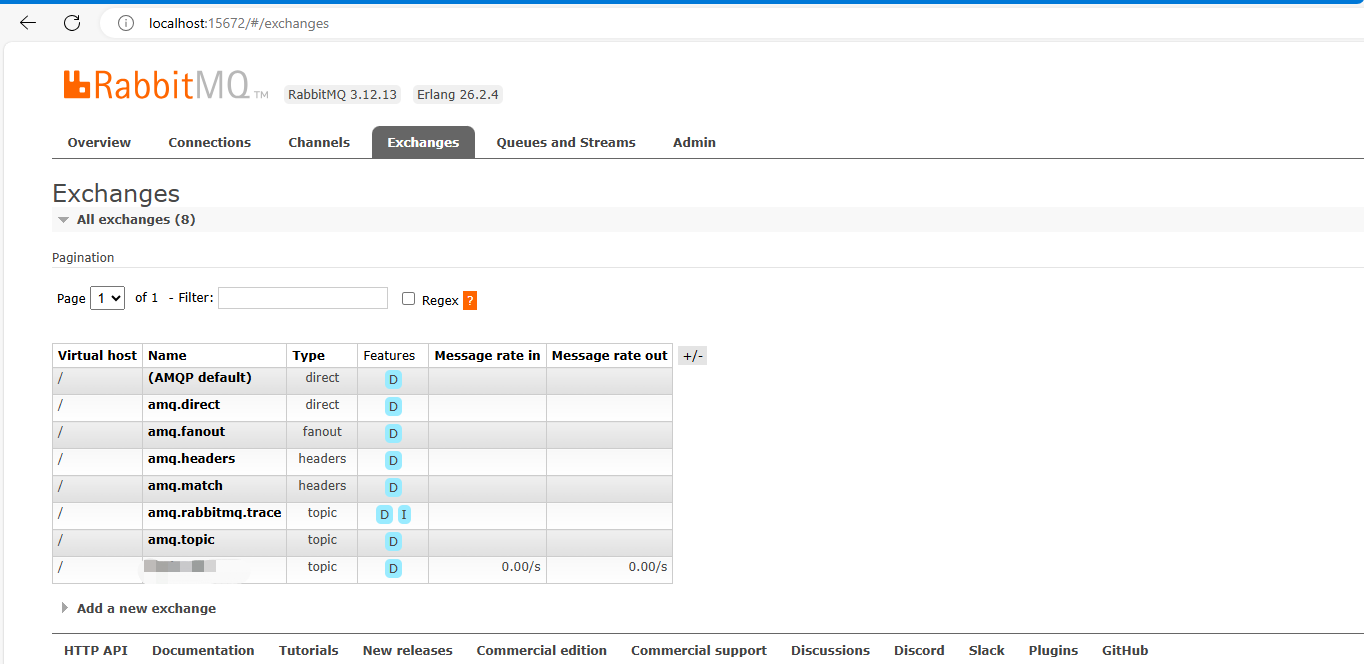
一,默认的exchange列表
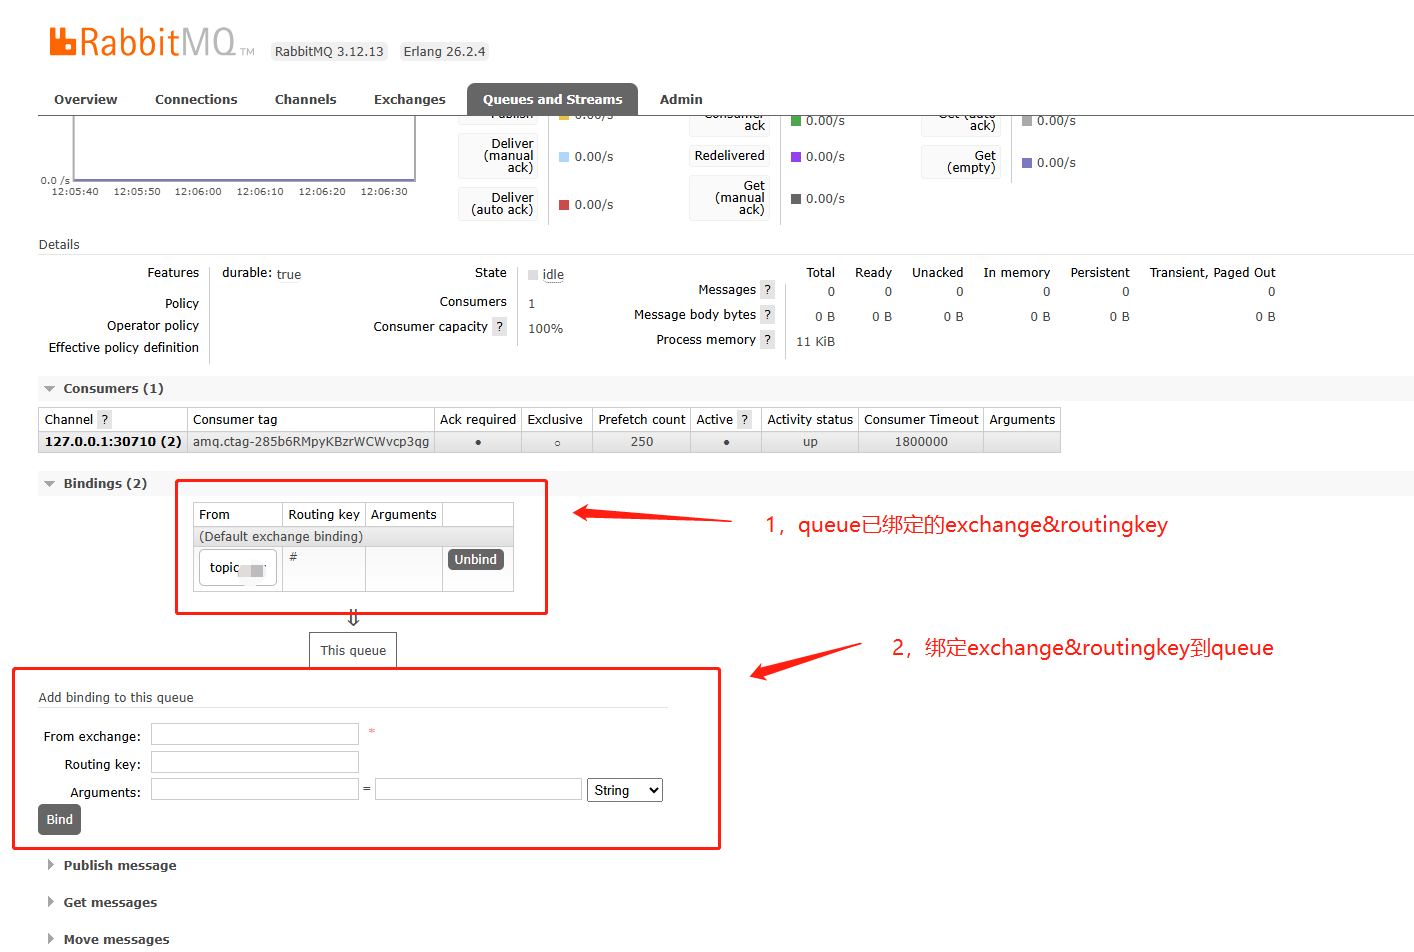
二,将exchange的routingkey绑定到queue
三,生产端关心消息将发放哪个交换机,哪个routingkey,
也可以用通配符(如calc.*,calc.#)匹配相应的routingkey
mq服务匹配exchange,routingkey,到queue
消费者只关心queue
以下是部分代码
python连接到mq
# 建立到RabbitMQ的连接
connection_params = pika.ConnectionParameters(
    host=mq['host'],
    port=mq['port'],
    virtual_host='/',
    credentials=pika.PlainCredentials(mq['username'], mq['passwd']),
    channel_max=1024,
    heartbeat=15,
    retry_delay=5,
    connection_attempts=10
)
connection = pika.BlockingConnection(connection_params)
channel = connection.channel()
default_routing_key = mq['routing_key']
python端的生产者
def send_message(message, retry=3, routing_key=default_routing_key):
    global channel
    global connection
    for i in range(retry):
        try:
            if not channel.is_open:
                channel = connection.channel()
            # 发送消息到 exchange
            channel.basic_publish(exchange=mq['exchange'], routing_key=routing_key, body=json.dumps(message),
                                  mandatory=True)
            logger.info(f"Sent message to MQ: {message}")
            break  # 如果发送成功,跳出循环
        except pika.exceptions.AMQPConnectionError as e:
            logger.error(f"Failed to send message to MQ: {e}, retrying...")
            connection = pika.BlockingConnection(connection_params)
        except pika.exceptions.ChannelWrongStateError as e:
            logger.error(f"Failed to send message to MQ: {e}, retrying...")
            channel = connection.channel()
        except Exception as e:
            logger.exception("MQ异常")
            if i < retry - 1:  # 如果不是最后一次重试,等待一段时间后继续尝试
                time.sleep(2 ** i)
python端的消费者,这个写的有点复杂了,消费者不需要指定交换机和routing_key
        def start_consuming():
            with lock:
                sub_flag = subscript_dict.get(func.__qualname__)
                if sub_flag:
                    logger.info(f"Function {func.__qualname__} has been subscribed, skipping...")
                    return
                subscript_dict[func.__qualname__] = True

            logger.info(f'process: {os.getpid()} thread: {threading.current_thread().name}, {func.__qualname__} start consuming ...')
            _connection = pika.BlockingConnection(connection_params)
            _channel = _connection.channel()
            # 声明交换机
            _channel.exchange_declare(exchange=exchange_name, exchange_type='topic', durable=True)

            # 声明一个排他队列,名称由 RabbitMQ 自动生成
            result = _channel.queue_declare(queue='', exclusive=True)
            queue_name = result.method.queue

            # 将队列绑定到交换机
            _channel.queue_bind(exchange=exchange_name, queue=queue_name, routing_key=routing_key)

            # 订阅队列的消息
            _channel.basic_consume(queue=queue_name, on_message_callback=wrapped_callback, auto_ack=True)

            logger.info(f'Waiting for messages in {queue_name}, server: {mq["host"]}:{mq["port"]}, exchange: {exchange_name},'
                        f' routing_key: {routing_key} ...')
            _channel.start_consuming()

        # 在装饰器中启动一个线程来执行订阅操作
        thread = threading.Thread(target=start_consuming)
        thread.daemon = True
        thread.start()

        return func  # 返回原始函数以保持签名不变
java端的连接
    @Bean
    @ConfigurationProperties(prefix = "spring.rabbitmq.template")
    public RabbitTemplate calcRabbitTemplate(final ConnectionFactory connectionFactory) {
        final RabbitTemplate rabbitTemplate = new RabbitTemplate(connectionFactory);
        rabbitTemplate.setMessageConverter(new Jackson2JsonMessageConverter());

        rabbitTemplate.setReturnsCallback(returnedMessage -> log.error("无法路由[消息:{},回应码:{},回应信息:{},交换机:{},路由键:{}]",
                returnedMessage.getMessage(), returnedMessage.getReplyCode(), returnedMessage.getReplyText(),
                returnedMessage.getExchange(), returnedMessage.getRoutingKey()));

        rabbitTemplate.setConfirmCallback((correlationData, ack, cause) -> log.info("交换机异步确认:[相关数据:{},确认情况:{},原因:{}]",
                correlationData, ack, cause));
        return rabbitTemplate;
    }
java端的生产者
    @Autowired
    @Qualifier("calcRabbitTemplate")
    private RabbitTemplate rabbitTemplate;

    public void sendMessage(Long testId, Integer current) {
        try {
            WsCalcDto wsCalcDto = new WsCalcDto(testId, current);
            WsMessageDto wsMessageDto = new WsMessageDto(wsCalcDto);
            rabbitTemplate.convertAndSend(
                    mqCalcConfig.getExchangeConfig().getExchangeName(),
                    mqCalcConfig.getRoutingKey(), wsMessageDto,
                    new GorgeMessagePostProcessor(mqCalcConfig.getMessageConfig()));
        } catch (Exception e) {
            log.error("发送消息到RabbitMQ失败", e);
        }
    }
java端的消费者
    @Autowired
    private MqCalcConfig mqCalcConfig;

    @RabbitListener(queues = "queue")
    public void processMessage(Message message, Channel channel) throws Exception {
        try {
            String body = new String(message.getBody(), StandardCharsets.UTF_8);
            log.info("接收RabbitMQ数据, {}", body);
            JSONObject jsonObject = JSON.parseObject(body);

            // ack表示确认消息,第二个参数为批量ack,multiple:false只确认该delivery_tag的消息,true确认该delivery_tag的所有消息
            channel.basicAck(message.getMessageProperties().getDeliveryTag(), false);
        } catch (Exception e) {
            log.error("消息消费异常", e);
            // Reject表示拒绝消息。requeue:false表示被拒绝的消息是丢弃;true表示重回队列
            channel.basicReject(message.getMessageProperties().getDeliveryTag(), true);
        }
    }
javascript端生产者
const amqp = require('amqplib');

async function producer() {
  try {
    // 1. 创建链接对象
    const connection = await amqp.connect('amqp://localhost:5672');

    // 2. 获取通道
    const channel = await connection.createChannel();

    // 3. 声明参数
    const exchangeName = 'qosEx';
    const routingKey = 'qos.test001.cool';
    const msg = 'Producer';

    // 4. 声明交换机
    await channel.assertExchange(exchangeName, 'topic', { durable: true });

    for (let i = 0; i < 5; i++) {
      // 5. 发送消息
      console.log(i);
      await channel.publish(
        exchangeName,
        routingKey,
        Buffer.from(`${msg} 第${i}条消息`)
      );
    }

    await channel.close();
  } catch (error) {
    console.log(error);
  }
}

producer();
javascript端消费者
const amqp = require('amqplib');

async function consumer() {
  // 1. 创建链接对象
  const connection = await amqp.connect('amqp://122.51.9.11:5672');

  // 2. 获取通道
  const channel = await connection.createChannel();

  // 3. 声明参数
  const exchangeName = 'qosEx';
  const queueName = 'qosQueue';
  const bindingKey = 'qos.#';
  // const bindingKey = 'qos.*';  无法匹配

  // 4. 声明交换机、对列进行绑定
  await channel.assertExchange(exchangeName, 'topic', { durable: true });
  await channel.assertQueue(queueName);
  await channel.bindQueue(queueName, exchangeName, bindingKey);

  // 5. 限流参数设置
  await channel.prefetch(1, false);// count:每次推送给消费端 N 条消息数目,如果这 N 条消息没有被ack,生产端将不会再次推送直到这 N 条消息被消费。global:在哪个级别上做限制,ture 为 channel 上做限制,false 为消费端上做限制,默认为 false。
  // 6. 限流,noAck参数必须设置为false
  await channel.consume(
    queueName,
    (msg) => {
      console.log('Consumer:', msg.content.toString());
      channel.ack(msg);
    },
    { noAck: false }
  );
}

consumer();

 浙公网安备 33010602011771号