GridView的介绍
应用:
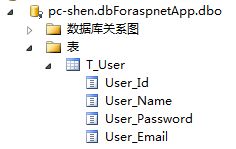
使用GridView来显示数据库中表的数据,如图:有一个T_User表

用GridView显示的效果是:(其实和数据库中的显示效果是一样一样的。)

当然还可以在此基础上进行修改。如启用编辑、删除、修改等功能。我不显示User_Id字段了等都是可以的。
操作过程:
方法1:在【服务器资源管理器】中添加上数据库的连接,找到要显示的表,将要显示的字段选中,直接拖动到页面就可以了。(微软nm就是智能),这个应用在测试过程中,很是实用。但在正规的项目中并不推荐。
方法2:当然你也可以先拖动一个GridView,然后再拖动一个SqlDataSource,效果都是一样一样的。
方法3:更过通常的做法,我们是GridView+ObjectDataSource+DataSet来实现这个功能(推荐)。
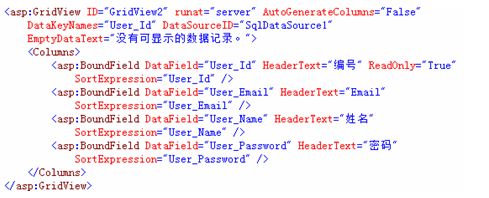
更改表头成汉字
在【源】中打到HeaderText,修改即可:

你还可以设置DataFormatString="{0:C2}"来将数字以美元形式来显示
给每一行添加一个按钮,当点击的时候,将所在的Id添加到一个ListBox列表中
在GridView的Columns中添加
            <asp:ButtonField ButtonType="Button" Text="添加" CommandName="add" />
            <asp:ButtonField ButtonType="Button" Text="取消" CommandName="cancel" />
这样就添加了两个按钮,这里的CommandName的值自己随便起。
然后在GirdView的RowCommand事件中添加如下代码:
protected void GridView2_RowCommand(object sender, GridViewCommandEventArgs e)
        {
            int index = Convert.ToInt32(e.CommandArgument);
            string id = GridView2.Rows[index].Cells[0].Text;
            if (e.CommandName == "add")
            {
                listBoxMsg.Items.Add(id);
            }
            else if (e.CommandName == "cancel")
            {
                while (listBoxMsg.Items.Contains(new ListItem(id)))
                {
                    listBoxMsg.Items.RemoveAt(listBoxMsg.Items.IndexOf(new ListItem(id)));
                }
            }
            else
            {
                return;
            }
        }
添加一个字段,明细字段,当点击的时候,就转到了另一个页面,并把Id传过去
在GridView的Columns中添加
 <asp:HyperLinkField DataTextField="User_Name" DataTextFormatString="查看{0}明细"
   DataNavigateUrlFields="User_Id" DataNavigateUrlFormatString="Details.aspx?id={0}" />
我想让Id字段以按钮的形式显示,这就用到了自定义模板(这个就很像ListView控件了)
把原来的User_Id的BoundField去掉
 <asp:TemplateField  HeaderText="User_Id"  InsertVisible="False" SortExpression="User_Id">
          <EditItemTemplate>
               <asp:Label ID="Label1" runat="server" Text='<%# Bind("User_Id") %>'></asp:Label>
         </EditItemTemplate>
         <ItemTemplate>
               <asp:Button ID="Button1" runat="server" Text='<%# Bind("User_Id") %>' />
         </ItemTemplate>
  </asp:TemplateField>
我想实现高亮显示,鼠标放在哪一行,哪一行高亮显示
添加
<RowStyle CssClass="shenRow" />
这个与Columns同级,剩下的就是js与css的知识了。
<style type="text/css">
        .light
        {
           background-color:Yellow;
        }
    </style>
    <script src="../Styles/jquery-1.4.1.js" type="text/javascript"></script>
    <script type="text/javascript">
        $(function () {
            $(".shenRow").mouseenter(function () {
                $(this).addClass("light");
            }).mouseleave(function () {
                $(this).removeClass("light");
            });
        });
    </script>


