Docker容器(六)——创建docker私有化仓库
docker私有化仓库是为了节约带宽(外网速度慢或者干脆不能连外网),以及自己定制系统。
(1).环境
youxi1 192.168.5.101 docker私有化仓库
youxi2 192.168.5.102 docker服务器
docker服务器会使用youxi1上的docker私有化仓库来pull/push镜像。
首先两台服务器都搭建docker,具体可以看:Docker容器(一)——Docker的介绍与部署(使用方法一的阿里云加速器地址,配置好即可)。
(2).使用docker-registry创建私有化仓库
docker-registry是官方提供的工具,可以用于创建私有化镜像仓库。
思路:直接下载并使用registry镜像启动docker实例。
1)配置youxi1为docker私有化仓库
关闭防火墙和SELinux
[root@youxi1 ~]# systemctl stop firewalld && systemctl disable firewalld
Removed symlink /etc/systemd/system/multi-user.target.wants/firewalld.service.
Removed symlink /etc/systemd/system/dbus-org.fedoraproject.FirewallD1.service.
[root@youxi1 ~]# cat /etc/sysconfig/selinux
SELINUX=disabled  //改为disabled
SELINUXTYPE=targeted
[root@youxi1 ~]# reboot  //重启系统
导入镜像
//在线导入镜像,使用该方法请一定要使用加速器地址
[root@youxi1 ~]# docker pull registry
c87736221ed0: Pull complete
1cc8e0bb44df: Pull complete
54d33bcb37f5: Pull complete
e8afc091c171: Pull complete
b4541f6d3db6: Pull complete
Digest: sha256:8004747f1e8cd820a148fb7499d71a76d45ff66bac6a29129bfdbfdc0154d146
Status: Downloaded newer image for registry:latest
docker.io/library/registry:latest
[root@youxi1 ~]# docker images
REPOSITORY          TAG                 IMAGE ID            CREATED             SIZE
registry            latest              f32a97de94e1        6 months ago        25.8MB
//导入本地镜像
[root@youxi1 ~]# docker load -i registry.tar
默认情况下,registry程序存放镜像信息的目录是镜像的/var/lib/registry,如果容器被删除,那么存放在容器中的镜像也会丢失。所以一般情况下,会使用-v选项来指定宿主机(物理机)的一个目录挂载到容器的/var/lib/registry下。另外该程序默认监听端口5000,使用-p选项映射。
[root@youxi1 ~]# docker run -d -p 5000:5000 -v /opt/registry:/var/lib/registry registry:latest
33405dbe1d5435172aea0544449629ef16f18b58d9c2fdb06f8fcdad55867f5b
[root@youxi1 ~]# docker ps
CONTAINER ID        IMAGE               COMMAND                  CREATED             STATUS              PORTS                    NAMES
33405dbe1d54        registry:latest     "/entrypoint.sh /etc…"   11 seconds ago      Up 10 seconds       0.0.0.0:5000->5000/tcp   confident_kare
[root@youxi1 ~]# yum -y install net-tools
[root@youxi1 ~]# netstat -antup | grep 5000
tcp6       0      0 :::5000                 :::*                    LISTEN      1744/docker-proxy
使用Windows浏览器查看,192.168.5.101:5000/v2/_catalog。

由于仓库里没有镜像,所以后面的中括号[]中显示为空。
2)在youxi2上使用私有仓库
在使用前,先使用youxi2下载一份任意镜像,如果有本地镜像可以直接导入即可。这里我下载了一份centos和一份busybox,其中BusyBox是一个集成了三百多个最常见的Linux命令和工具的软件,官网:https://busybox.net/。下载两个是为了测试修改配置文件和服务文件,使得docker加速节点指向私有化仓库
[root@youxi2 ~]# docker pull centos
Using default tag: latest
latest: Pulling from library/centos
d8d02d457314: Pull complete
Digest: sha256:307835c385f656ec2e2fec602cf093224173c51119bbebd602c53c3653a3d6eb
Status: Downloaded newer image for centos:latest
docker.io/library/centos:latest
[root@youxi2 ~]# docker pull busybox
Using default tag: latest
latest: Pulling from library/busybox
7c9d20b9b6cd: Pull complete
Digest: sha256:fe301db49df08c384001ed752dff6d52b4305a73a7f608f21528048e8a08b51e
Status: Downloaded newer image for busybox:latest
docker.io/library/busybox:latest
[root@youxi2 ~]# docker images
REPOSITORY          TAG                 IMAGE ID            CREATED             SIZE
busybox             latest              19485c79a9bb        2 weeks ago         1.22MB
centos              latest              67fa590cfc1c        4 weeks ago         202MB
修改配置文件或服务文件,以使得docker加速节点指向私有化仓库
//修改配置文件
[root@youxi2 ~]# vim /etc/docker/daemon.json
{
  "insecure-registries": ["192.168.5.101:5000"]
}
[root@youxi2 ~]# systemctl restart docker

//修改服务文件
[root@youxi2 ~]# vim /usr/lib/systemd/system/docker.service
//修改第14行
ExecStart=/usr/bin/dockerd -H fd:// --containerd=/run/containerd/containerd.sock
 --insecure-registry 192.168.5.101:5000
[root@youxi2 ~]# systemctl daemon-reload
[root@youxi2 ~]# systemctl restart docker
对已有的镜像重新打标签
[root@youxi2 ~]# docker tag centos:latest 192.168.5.101:5000/centos:latest
[root@youxi2 ~]# docker images
REPOSITORY                  TAG                 IMAGE ID            CREATED             SIZE
busybox                     latest              19485c79a9bb        2 weeks ago         1.22MB
192.168.5.101:5000/centos   latest              67fa590cfc1c        4 weeks ago         202MB
centos                      latest              67fa590cfc1c        4 weeks ago         202MB
将打好标签的镜像上传到私有化仓库
[root@youxi2 ~]# docker push 192.168.5.101:5000/centos:latest
The push refers to repository [192.168.5.101:5000/centos]
877b494a9f30: Pushed
latest: digest: sha256:a36b9e68613d07eec4ef553da84d0012a5ca5ae4a830cf825bb68b929475c869 size: 529
刷新浏览器,可以看到之前的网址显示了上传的镜像。

已经可以上传了,那么再试试下载功能
[root@youxi2 ~]# docker images  //查看现有
REPOSITORY                   TAG                 IMAGE ID            CREATED             SIZE
192.168.5.101:5000/busybox   latest              19485c79a9bb        2 weeks ago         1.22MB
busybox                      latest              19485c79a9bb        2 weeks ago         1.22MB
192.168.5.101:5000/centos    latest              67fa590cfc1c        4 weeks ago         202MB
centos                       latest              67fa590cfc1c        4 weeks ago         202MB
[root@youxi2 ~]# docker rmi 192.168.5.101:5000/busybox:latest  //删除一个私有化镜像
Untagged: 192.168.5.101:5000/busybox:latest
Untagged: 192.168.5.101:5000/busybox@sha256:dd97a3fe6d721c5cf03abac0f50e2848dc583f7c4e41bf39102ceb42edfd1808
[root@youxi2 ~]# docker images  //再次查看
REPOSITORY                  TAG                 IMAGE ID            CREATED             SIZE
busybox                     latest              19485c79a9bb        2 weeks ago         1.22MB
192.168.5.101:5000/centos   latest              67fa590cfc1c        4 weeks ago         202MB
centos                      latest              67fa590cfc1c        4 weeks ago         202MB
[root@youxi2 ~]# docker pull 192.168.5.101:5000/busybox  //下载镜像
Using default tag: latest
latest: Pulling from busybox
Digest: sha256:dd97a3fe6d721c5cf03abac0f50e2848dc583f7c4e41bf39102ceb42edfd1808
Status: Downloaded newer image for 192.168.5.101:5000/busybox:latest
192.168.5.101:5000/busybox:latest
[root@youxi2 ~]# docker images  //查看
REPOSITORY                   TAG                 IMAGE ID            CREATED             SIZE
192.168.5.101:5000/busybox   latest              19485c79a9bb        2 weeks ago         1.22MB
busybox                      latest              19485c79a9bb        2 weeks ago         1.22MB
192.168.5.101:5000/centos    latest              67fa590cfc1c        4 weeks ago         202MB
centos                       latest              67fa590cfc1c        4 weeks ago         202MB
[root@youxi2 ~]# docker run 192.168.5.101:5000/busybox:latest echo "hello world"  //测试
hello world
(3).使用harbor创建私有化仓库
harbor是由VMware公司开源的企业级Docker Registry管理项目,它包括权限管理(RBAC)、LDAP、日志审核、管理界面、自我注册、镜像复制和中文支持等功能。官方网址:https://github.com/goharbor/harbor
注意:安装harbar空间需要大于6G,内存大于2G。
1)在youxi1上班安装harbor
安装pip并更新,使用pip安装docker-compose
[root@youxi1 ~]# yum -y install python-pip
[root@youxi1 ~]# pip install --upgrade pip
[root@youxi1 ~]# pip install -U -i https://pypi.tuna.tsinghua.edu.cn/simple docker-compose
前往GItHub上下载Harbor的安装包,解压安装。下载地址:https://github.com/goharbor/harbor/releases
[root@youxi1 ~]# tar xf harbor-offline-installer-v1.9.0.tgz -C /usr/local/src/
[root@youxi1 ~]# cd /usr/local/src/harbor/
[root@youxi1 harbor]# vim harbor.yml
hostname: 192.168.5.101  //第5行,改为IP地址
harbor_admin_password: 123456  //第27行,管理员UI登录密码,根据需求修改
data_volume: /data  //第40行,默认存储harbor数据位置,默认即可
[root@youxi1 harbor]# ./prepare//初始化安装环境
[root@youxi1 harbor]# ./install.sh  //默认安装,没有Notary/Clair
......
[Step 3]: starting Harbor ...
Creating network "harbor_harbor" with the default driver
Creating harbor-log ... done
Creating redis         ... done
Creating registry      ... done
Creating harbor-db     ... done
Creating registryctl   ... done
Creating harbor-portal ... done
Creating harbor-core   ... done
Creating harbor-jobservice ... done
Creating nginx             ... done

✔ ----Harbor has been installed and started successfully.----

Now you should be able to visit the admin portal at http://192.168.5.101.
For more details, please visit https://github.com/goharbor/harbor .
[root@youxi1 harbor]# docker images  //查看一下
REPOSITORY                      TAG                        IMAGE ID            CREATED             SIZE
goharbor/prepare                dev                        265a282fa199        24 hours ago        147MB
goharbor/chartmuseum-photon     v0.9.0-v1.9.0              00c12627cbd7        10 days ago         131MB
goharbor/harbor-migrator        v1.9.0                     75d4de5e0f16        10 days ago         362MB
goharbor/redis-photon           v1.9.0                     3249afaa9965        10 days ago         109MB
goharbor/clair-photon           v2.0.9-v1.9.0              e54ad567c58f        10 days ago         165MB
goharbor/notary-server-photon   v0.6.1-v1.9.0              2cdecba59f38        10 days ago         138MB
goharbor/notary-signer-photon   v0.6.1-v1.9.0              973378593def        10 days ago         135MB
goharbor/harbor-registryctl     v1.9.0                     30a01bf0f4df        10 days ago         99.6MB
goharbor/registry-photon        v2.7.1-patch-2819-v1.9.0   32571099a9fe        10 days ago         82.3MB
goharbor/nginx-photon           v1.9.0                     f933d62f9952        10 days ago         43.9MB
goharbor/harbor-log             v1.9.0                     28e27d511335        10 days ago         82.6MB
goharbor/harbor-jobservice      v1.9.0                     f3cd0b181a89        10 days ago         141MB
goharbor/harbor-core            v1.9.0                     f2814ed8aadd        10 days ago         155MB
goharbor/harbor-portal          v1.9.0                     0778d4c5d27e        10 days ago         51.3MB
goharbor/harbor-db              v1.9.0                     a809e14d2d49        10 days ago         147MB
goharbor/prepare                v1.9.0                     aa594772c1e8        10 days ago         147MB
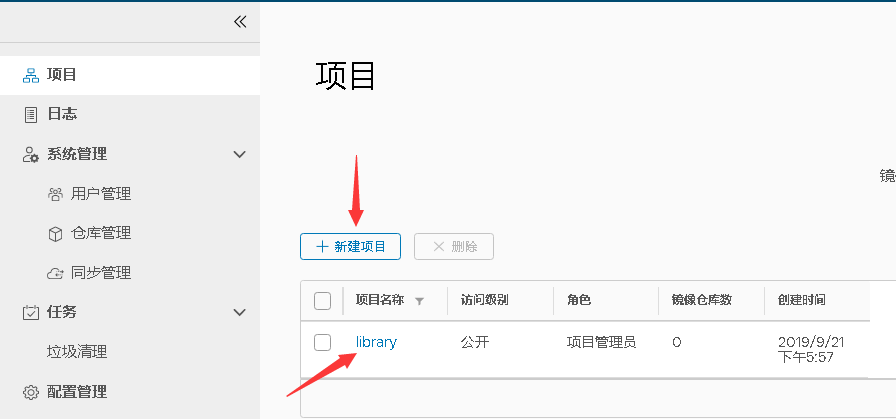
使用Windows浏览器访问192.168.5.101,账号是admin,密码是上面设置的123456。

自带一个项目,也可以自己新建
2)在youxi2上使用私有化仓库
下载两个测试镜像
[root@youxi2 ~]# docker pull centos
Using default tag: latest
latest: Pulling from library/centos
d8d02d457314: Pull complete
Digest: sha256:307835c385f656ec2e2fec602cf093224173c51119bbebd602c53c3653a3d6eb
Status: Downloaded newer image for centos:latest
docker.io/library/centos:latest
[root@youxi2 ~]# docker pull busybox
Using default tag: latest
latest: Pulling from library/busybox
7c9d20b9b6cd: Pull complete
Digest: sha256:fe301db49df08c384001ed752dff6d52b4305a73a7f608f21528048e8a08b51e
Status: Downloaded newer image for busybox:latest
docker.io/library/busybox:latest
[root@youxi2 ~]# docker images
REPOSITORY          TAG                 IMAGE ID            CREATED             SIZE
busybox             latest              19485c79a9bb        2 weeks ago         1.22MB
centos              latest              67fa590cfc1c        4 weeks ago         202MB
修改配置文件或服务文件,以使得docker加速节点指向私有化仓库
//修改配置文件
[root@youxi2 ~]# vim /etc/docker/daemon.json
{
  "insecure-registries": ["192.168.5.101"]
}
[root@youxi2 ~]# systemctl restart docker

//修改服务器文件
[root@youxi2 ~]# vim /usr/lib/systemd/system/docker.service
//修改第14行
ExecStart=/usr/bin/dockerd -H fd:// --containerd=/run/containerd/containerd.sock
--insecure-registry 192.168.5.101
[root@youxi2 ~]# systemctl daemon-reload
[root@youxi2 ~]# systemctl restart docker
对已有的镜像打上标签
[root@youxi2 ~]# docker login 192.168.5.101  //登录私有化仓库
Username: admin
Password:
WARNING! Your password will be stored unencrypted in /root/.docker/config.json.
Configure a credential helper to remove this warning. See
https://docs.docker.com/engine/reference/commandline/login/#credentials-store

Login Succeeded
[root@youxi2 ~]# docker tag centos:latest 192.168.5.101/library/centos:latest
[root@youxi2 ~]# docker images
REPOSITORY                     TAG                 IMAGE ID            CREATED             SIZE
busybox                        latest              19485c79a9bb        2 weeks ago         1.22MB
192.168.5.101/library/centos   latest              67fa590cfc1c        4 weeks ago         202MB
centos                         latest              67fa590cfc1c        4 weeks ago         202MB
将打好标签的镜像上传至私有化仓库
[root@youxi2 ~]# docker push 192.168.5.101/library/centos:latest
The push refers to repository [192.168.5.101/library/centos]
877b494a9f30: Pushed
latest: digest: sha256:a36b9e68613d07eec4ef553da84d0012a5ca5ae4a830cf825bb68b929475c869 size: 529
刷新浏览器,可以看到仓库镜像数变为了2

试完上传,再试试下载
[root@youxi2 ~]# docker images  //查看现有镜像
REPOSITORY                      TAG                 IMAGE ID            CREATED             SIZE
192.168.5.101/library/busybox   latest              19485c79a9bb        2 weeks ago         1.22MB
busybox                         latest              19485c79a9bb        2 weeks ago         1.22MB
centos                          latest              67fa590cfc1c        4 weeks ago         202MB
192.168.5.101/library/centos    latest              67fa590cfc1c        4 weeks ago         202MB
[root@youxi2 ~]# docker rmi 192.168.5.101/library/busybox:latest  //删除镜像
Untagged: 192.168.5.101/library/busybox:latest
Untagged: 192.168.5.101/library/busybox@sha256:dd97a3fe6d721c5cf03abac0f50e2848dc583f7c4e41bf39102ceb42edfd1808
[root@youxi2 ~]# docker images  //再次查看
REPOSITORY                     TAG                 IMAGE ID            CREATED             SIZE
busybox                        latest              19485c79a9bb        2 weeks ago         1.22MB
192.168.5.101/library/centos   latest              67fa590cfc1c        4 weeks ago         202MB
centos                         latest              67fa590cfc1c        4 weeks ago         202MB
[root@youxi2 ~]# docker pull 192.168.5.101/library/busybox:latest  //拉取
latest: Pulling from library/busybox
Digest: sha256:dd97a3fe6d721c5cf03abac0f50e2848dc583f7c4e41bf39102ceb42edfd1808
Status: Downloaded newer image for 192.168.5.101/library/busybox:latest
192.168.5.101/library/busybox:latest
[root@youxi2 ~]# docker images  //查看
REPOSITORY                      TAG                 IMAGE ID            CREATED             SIZE
192.168.5.101/library/busybox   latest              19485c79a9bb        2 weeks ago         1.22MB
busybox                         latest              19485c79a9bb        2 weeks ago         1.22MB
192.168.5.101/library/centos    latest              67fa590cfc1c        4 weeks ago         202MB
centos                          latest              67fa590cfc1c        4 weeks ago         202MB

 浙公网安备 33010602011771号