vue之路由(跳转、多级路由、守卫)、localStorage
一、vue-router使用
1、
1 2 3 4 5 6 7 8 9 10 11 12 13 14 15 16 17 18 19 20 21 22 | //引入VueRouter import VueRouter from 'vue-router' //引入Luyou 组件 import About from '../components/About' import Home from '../components/Home' //创建router实例对象,去管理一组一组的路由规则 const router = new VueRouter({ routes:[ { path:'/about', component:About }, { path:'/home', component:Home } ] }) //暴露router export default router |
2、
标签跳转:<router-link,
控制页面跳转:$router.push
1 2 3 4 5 6 7 8 9 10 11 12 13 14 15 | # 1 html 中通过标签跳转 <router-link :to="about_url"> <button>点我调到about-->标签的跳转</button> </router-link> <router-link to="/about"> <button>点我调到about-->标签的跳转</button> </router-link># 2 js 控制页面跳转 // 方式一:直接放地址形式 // this.$router.push('/about') // 方式二:对象形式 // this.$router.push({name: 'about'}) // this.$router.push({path: '/about'}) |
3、
1 2 3 4 5 6 7 8 9 | this.$router.push(path): 相当于点击路由链接(可以返回到当前路由界面)this.$router.replace(path): 用新路由替换当前路由(不可以返回到当前路由界面)this.$router.back(): 请求(返回)上一个记录路由this.$router.go(-1): 请求(返回)上一个记录路由this.$router.go(1): 请求下一个记录路由 |
$route.query 中取
以/xx/:id/:name 携带参数,需要从 $route.params中取
http://localhost:8081/login?user_id=9&age=18
1 2 3 4 5 6 7 8 9 10 11 | 跳转的时候: -标签跳转: <router-link to="/userinfo?user_id=9"> <router-link :to="{name:userinfo,query:{user_id:88}}"> -js跳转 this.$router.push("/userinfo?user_id=9") this.$router.push({name:'userinfo',query:{user_id:88}}) 取值的时候: this.$route.query.user_id |
方式二:/xx/:id/:name
1 2 3 4 5 6 7 8 9 10 11 12 13 14 15 16 17 | 配置路由: { path: '/userinfo/:id/:name', name: 'userinfo', component: UserDetail },跳转的时候: -标签跳转: <router-link to="/userinfo/88/lqz"> <router-link :to="{name:'userinfo',params:{id:88,name:lqz}}"> -js跳转 this.$router.push("/userinfo/88/lqz") this.$router.push({name:userinfo,params:{id:88,name:lqz}}) 取值的时候: this.$route.params.id |
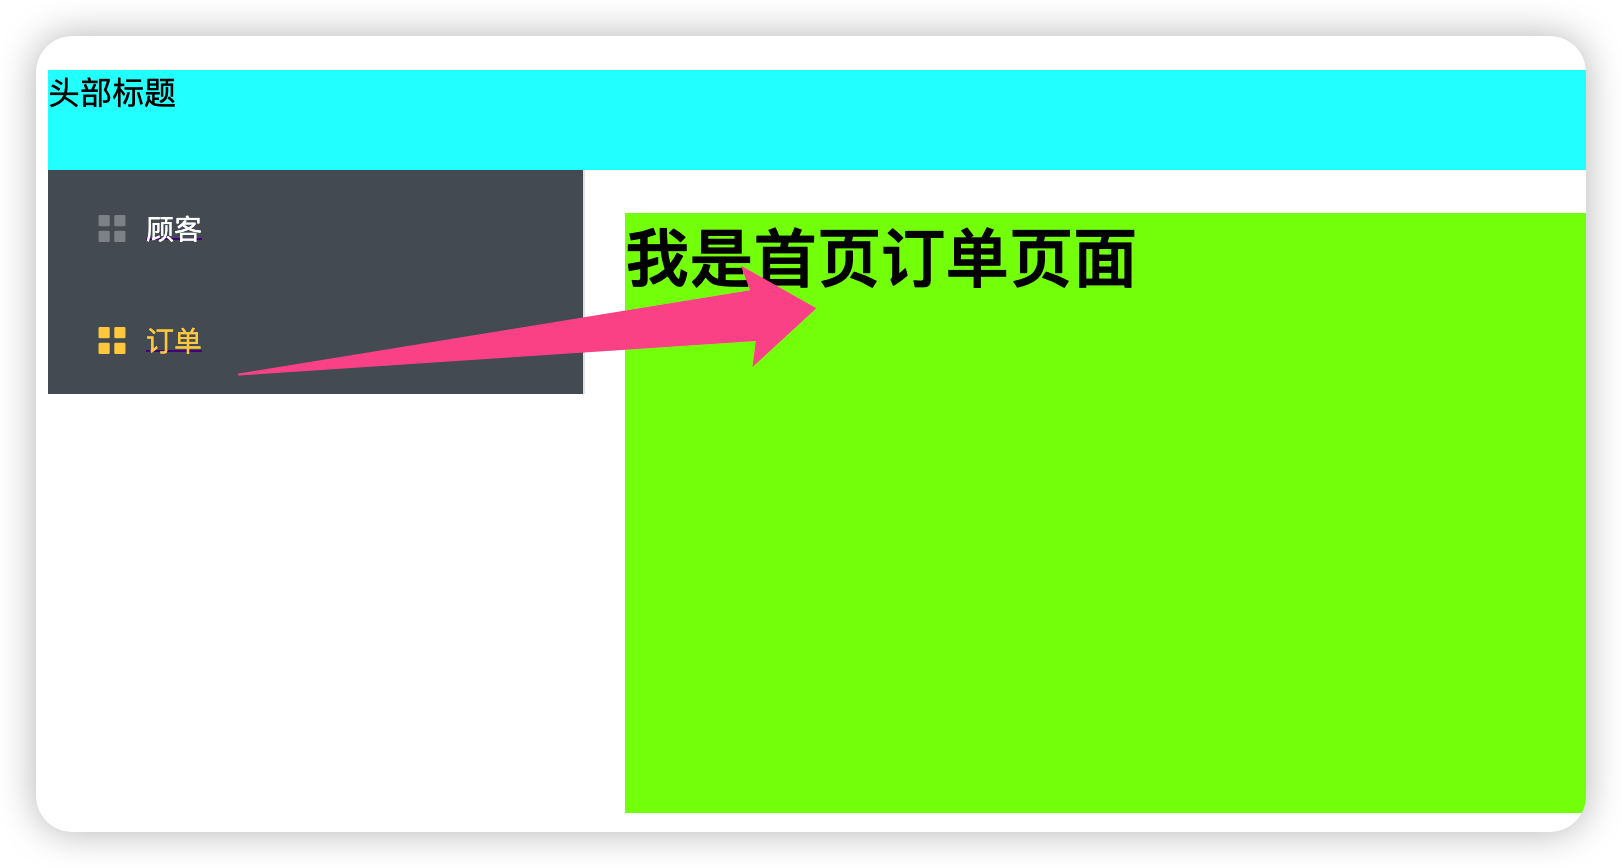
1 2 3 4 5 6 7 8 9 10 11 12 13 14 15 16 17 18 19 20 21 22 23 24 25 26 27 28 29 30 31 32 33 34 35 36 37 38 39 40 41 42 43 44 45 46 47 48 49 50 51 52 53 54 55 56 57 58 59 60 61 62 63 64 65 66 67 68 69 70 71 72 73 74 75 76 77 78 79 80 81 82 83 84 85 86 87 88 89 90 91 92 93 94 95 96 97 98 99 100 101 102 103 104 105 106 107 108 109 110 111 112 113 114 115 116 117 118 119 120 121 122 123 124 125 126 127 128 129 130 131 132 133 134 135 136 137 138 139 140 141 142 143 144 145 146 147 148 149 150 151 152 153 154 155 156 157 158 159 160 | <template> <div class="home"> <h1>首页</h1> <button @click="handleClick">点我调到about</button> <br> <!-- <router-link to="/about">--> <!-- <button>点我调到about–>标签的跳转</button>--> <!-- </router-link>--> <router-link :to="about_url"> <button>点我调到about-->标签的跳转</button> </router-link> <hr> <router-link to="/userinfo?user_id=9"> <button>点我跳转到userinfo,携带用户id</button> </router-link> <br> <button @click="handleClick2()">js跳转点我跳转到userinfo,?携带用户id</button> <br> <router-link to="/userinfo/88/lqz"> <button>点我跳转到userinfo,携带用户id</button> </router-link> <hr> <div> <div class="head"> 头部标题</div> <div class="main"> <el-row :gutter="20"> <el-col :span="4"> <el-menu default-active="2" class="el-menu-vertical-demo" @open="handleOpen" @close="handleClose" background-color="#545c64" text-color="#fff" active-text-color="#ffd04b"> <router-link to="/index"> <el-menu-item index="1"> <i class="el-icon-menu"></i> <span slot="title">首页</span> </el-menu-item> </router-link> <router-link to="/order"> <el-menu-item index="2"> <i class="el-icon-menu"></i> <span slot="title">订单</span> </el-menu-item> </router-link> </el-menu> </el-col> <el-col :span="20"> <div class="right"> <router-view/> </div> </el-col> </el-row> </div> </div> </div></template><script>export default { name: 'HomeView', data() { return { // about_url: '/about', // about_url: {'name': 'about'}, about_url: {'path': '/about'}, } }, methods: { handleClick() { // 方式一:直接放地址形式 // this.$router.push('/about') // 方式二:对象形式 // this.$router.push({name: 'about'}) // this.$router.push({path: '/about'}) // replace的使用 this.$router.replace({name: 'about'}) }, handleClick2() { // this.$router.push('/userinfo/77/aaa') this.$router.push({ name: 'userinfo', params: {id: 77, name: 'aaa'}, query: {aa: 'aaa'} }) } }}</script><style>.head { height: 50px; background-color: aqua;}.left { background-color: blanchedalmond; height: 300px;}.right { background-color: chartreuse; height: 300px;}</style>### 接收<template> <div class="home"> <h1>用户详情</h1> {{ user_id }} </div></template><script>export default { name: 'UserDetail', data() { return { // user_id: this.$route.query.user_id user_id: '' } }, created() { // this.$route代指当前路由对象 console.log(this.$route) // this.$route.query 代指当前路由对象传递的参数 ? 后的 // this.user_id = this.$route.query.user_id this.user_id = this.$route.params.id }}</script> |
children: []
1 2 3 4 5 6 7 8 9 10 11 12 13 14 15 16 17 18 19 20 21 22 23 | # 1 新建一个首页HomeView,一个IndexView和OrderView -构建出骨架,以后想点击只有这个位置变,就放一个 <router-view/> -IndexView和OrderView正常写 # 2 定义多级路由 { path: '/', name: 'home', component: HomeView, children: [ //通过children配置子级路由 { path: 'index', //此处一定不要写:/news component: IndexView }, { path: 'order',//此处一定不要写:/message component: OrderView } ] }, # 3 路由跳转:js,html |
跳转:
1 2 3 4 5 6 | <router-link to="/order"> <el-menu-item index="2"> <i class="el-icon-menu"></i> <span slot="title">订单</span> </el-menu-item></router-link> |
需动态改变的地方:
1 2 3 4 5 | <el-col :span="20"> <div class="right"> <router-view/> </div> </el-col> |
vue代码:
1 2 3 4 5 6 7 8 9 10 11 12 13 14 15 16 17 18 19 20 21 22 23 24 25 26 27 28 29 30 31 32 33 34 35 36 37 38 39 40 41 42 43 44 45 46 47 48 49 50 51 52 53 54 55 56 57 58 59 60 61 62 63 64 65 66 67 68 69 70 71 72 73 74 75 76 77 78 79 80 81 82 83 84 85 86 87 88 89 90 91 92 93 94 95 96 97 | <template> <div class="home"> <h1>首页</h1> <div> <div class="head"> 头部标题</div> <div class="main"> <el-row :gutter="20"> <el-col :span="4"> <el-menu default-active="2" class="el-menu-vertical-demo" @open="handleOpen" @close="handleClose" background-color="#545c64" text-color="#fff" active-text-color="#ffd04b"> <router-link to="/index"> <el-menu-item index="1"> <i class="el-icon-menu"></i> <span slot="title">顾客</span> </el-menu-item> </router-link> <router-link to="/order"> <el-menu-item index="2"> <i class="el-icon-menu"></i> <span slot="title">订单</span> </el-menu-item> </router-link> </el-menu> </el-col> <el-col :span="20"> <div class="right"> <router-view/> </div> </el-col> </el-row> </div> </div> </div></template><script>export default { name: 'HomeView', data() { return { // about_url: '/about', // about_url: {'name': 'about'}, about_url: {'path': '/about'}, } }, methods: { handleClick() { // 方式一:直接放地址形式 // this.$router.push('/about') // 方式二:对象形式 // this.$router.push({name: 'about'}) // this.$router.push({path: '/about'}) // replace的使用 this.$router.replace({name: 'about'}) }, handleClick2() { // this.$router.push('/userinfo/77/aaa') this.$router.push({ name: 'userinfo', params: {id: 77, name: 'aaa'}, query: {aa: 'aaa'} }) } }}</script><style>.head { height: 50px; background-color: aqua;}.left { background-color: blanchedalmond; height: 300px;}.right { background-color: chartreuse; height: 300px;}</style> |
作用:对路由进行权限控制
全局守卫(全局路由文件)
1 2 3 4 5 6 7 8 9 10 11 12 13 14 15 16 17 18 19 20 21 | //全局前置路由守卫————初始化的时候被调用、每次路由切换之前被调用router.beforeEach((to,from,next)=>{ console.log('前置路由守卫',to,from) if(to.meta.isAuth){ //判断是否需要鉴权 if(localStorage.getItem('name')==='lqz'){ next() }else{ alert('名不对,无权限查看!') } }else{ next() }})//全局后置路由守卫————初始化的时候被调用、每次路由切换之后被调用router.afterEach((to,from)=>{ console.log('后置路由守卫',to,from) document.title = to.meta.title || 'lqz系统'})export default router |
独享守卫(某个页面的路由)
1 2 3 4 5 6 7 8 9 10 11 12 13 14 15 16 17 18 19 20 21 22 23 24 25 26 27 28 29 30 31 32 33 34 35 36 37 38 39 40 41 42 43 44 45 46 47 48 49 50 51 52 53 54 55 56 57 58 59 60 61 62 63 | // 该文件专门用于创建整个应用的路由器import VueRouter from 'vue-router'//引入组件import About from '../pages/About'import Home from '../pages/Home'import News from '../pages/News'import Message from '../pages/Message'import Detail from '../pages/Detail'//创建并暴露一个路由器const router = new VueRouter({ routes:[ { name:'guanyu', path:'/about', component:About, meta:{title:'关于'} }, { name:'zhuye', path:'/home', component:Home, meta:{title:'主页'}, children:[ { name:'xinwen', path:'news', component:News, meta:{isAuth:true,title:'新闻'}, beforeEnter: (to, from, next) => { console.log('独享路由守卫',to,from) if(to.meta.isAuth){ //判断是否需要鉴权 if(localStorage.getItem('name')==='lqz'){ next() }else{ alert('名不对,无权限查看!') } }else{ next() } } }, { name:'xiaoxi', path:'message', component:Message, meta:{isAuth:true,title:'消息'}, children:[ { name:'xiangqing', path:'detail', component:Detail, meta:{isAuth:true,title:'详情'}, } ] } ] } ]})export default router |
注意:meta: { isAuth: false } 是在路由里面定义好的
组件内守卫(组件内)
1 2 3 4 5 6 7 8 9 10 11 12 13 14 15 16 17 18 19 20 21 22 23 24 25 26 27 | //进入守卫:通过路由规则,进入该组件时被调用 beforeRouteEnter (to, from, next) { }, //离开守卫:通过路由规则,离开该组件时被调用 beforeRouteLeave (to, from, next) { } //通过路由规则,进入该组件时被调用 beforeRouteEnter (to, from, next) { console.log('About--beforeRouteEnter',to,from) if(to.meta.isAuth){ //判断是否需要鉴权 if(localStorage.getItem('school')==='atguigu'){ next() }else{ alert('学校名不对,无权限查看!') } }else{ next() } }, //通过路由规则,离开该组件时被调用 beforeRouteLeave (to, from, next) { console.log('About--beforeRouteLeave',to,from) next() } |
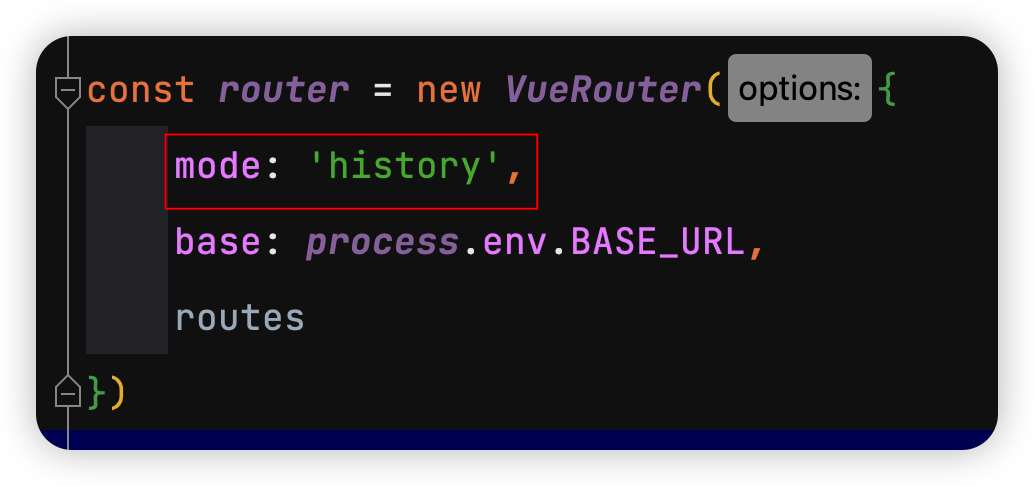
1 2 3 4 5 6 7 8 9 10 11 12 13 | 1 对于一个url来说,什么是hash值?—— #及其后面的内容就是hash值。2 hash值不会包含在 HTTP 请求中,即:hash值不会带给服务器。3 hash模式:地址中永远带着#号,不美观 。若以后将地址通过第三方手机app分享,若app校验严格,则地址会被标记为不合法。兼容性较好。4 history模式:地址干净,美观 。兼容性和hash模式相比略差。应用部署上线时需要后端人员支持,解决刷新页面服务端404的问题 |
二、localStorage系列
1、前端存储数据,可以存在哪?
# localStorage
# sessionStorage
# cookie
1 2 3 4 5 6 7 | - 可以放到cookie中,cookie有过期时间,一旦过期就清理了- 可以当到localStorage,永久存储,除非使用代码删除,清理浏览器 - 可以存到sessionStorage,关闭浏览器就没了 # 用户登录状态----》token串--->cookie中 |
2、LocalStorage的存、读、删
一下都是定义点击事件来模拟
1 2 3 4 5 6 7 8 9 10 11 12 13 14 15 | saveLocalStorage() { // 保存对象呢? var userinfo = {'name': 'lqz', 'age': 19} localStorage.setItem('userinfo', JSON.stringify(userinfo))},getLocalStorage() { var res = JSON.parse(localStorage.getItem('userinfo')) console.log(res)},deleteLocalStorage() { localStorage.clear() localStorage.removeItem('username')} |
3、session的存、读、删
1 2 3 4 5 6 7 8 9 10 11 12 13 | savesessionStorage() { // 保存对象呢? var userinfo = {'name': 'lqz', 'age': 19} sessionStorage.setItem('userinfo', JSON.stringify(userinfo))},getsessionStorage() { var res = JSON.parse(sessionStorage.getItem('userinfo')) console.log(res)},deletesessionStorage() { sessionStorage.clear() sessionStorage.removeItem('username')}, |
4、cookie --->js操作---》借助于第三方操作cookie
安装vue-cookies
1 | npm install vue-cookies -S |
在main.js引入
1 2 3 | import VueCookies from "vue-cookies";Vue.use(VueCookies); |
cookie的存、读、删
1 2 3 4 5 6 7 8 9 10 | savecookie() { // 保存对象呢? this.$cookies.set('name', 'lqz')},getcookie() { console.log(this.$cookies.get('name'))},deletecookie() { this.$cookies.remove('name')}, |
三、vue3介绍
1、tree-shaking、typeScript
1 2 3 4 | # tree-shaking是一种消除死代码的性能优化理论# TypeScript -javascript:坑---》填坑---》弱类型 -typeScript:强类型语言 |
2、组合式api和配置项api
1 2 3 4 5 6 7 8 9 10 11 12 13 14 15 16 17 18 19 20 | <template> <div> <button @click="increment">{{ count }}</button> </div></template><script>export default { data() { return { count: 0 }; }, methods: { increment() { this.count++; } }};</script> |
集中在setup中
1 2 3 4 5 6 7 8 9 10 11 12 13 14 15 16 17 18 19 20 21 22 23 24 | <template> <div> <button @click="increment">{{ count }}</button> </div></template><script>import { ref } from 'vue';export default { setup() { const count = ref(0); function increment() { count.value++; } return { count, increment }; }};</script> |


