Vue执行和开发流程、登录小案例、混入、插件、elementui
一、Vue执行流程
1、vue的执行流程
1 2 3 4 5 6 7 8 9 10 11 12 13 14 15 16 17 18 19 20 21 22 23 24 25 26 27 28 29 30 31 32 | # 1 为什么浏览器中访问某个地址,会显示某个页面组件 -根组件:App.vue 必须是 <template> <div id="app"> <router-view></router-view> </div> </template> -1 配置路由 router----》index.js---》const routes = [ { path: '/lqz', name: 'lqz', component: Lqz # 组件,需要导入 }, ] -2 放心大胆的写页面组件 -src---->views文件夹 # 2 在页面组件中使用小组件 -1 写一个小组件,我们写了个Child.vue -2 在父组件中,导入组件 # @ 代指src路径 import Child from "@/components/Child"; -3 父组件中,注册组件 components: { Child } -4 父组件中使用组件 <Child :msg="msg" @myevent="handleEvent"></Child> -5 自定义属性,自定义事件,插槽,跟之前一模一样 |
二、登录小案例
1、解决跨域问题、安装axios
1 2 3 4 5 6 7 8 9 10 11 12 13 14 15 16 17 18 19 20 21 22 23 24 25 26 27 28 29 30 31 32 33 34 35 36 37 38 39 40 41 42 43 44 45 46 47 48 49 50 51 52 53 54 55 56 57 58 59 60 61 62 63 64 65 66 67 | # 1 登录页面:LoginView.vue # 2 访问/login 显示这个页面组件# 3 在LoginView.vue写html,和js,axios -安装 axios -cnpm install -S axios # 把安装的axios放到package.json中# 4 写ajax,向后端发送请求,给按钮绑定两个一个事件 #安装axios,导入axios handleSubmit() { console.log(this.name, this.password) axios.post('http://127.0.0.1:8000/login/', { name: this.name, password: this.password }).then(res => { // console.log(res.data) if (res.data.code == 100) { //跳转到百度 location.href = 'http://www.baidu.com' } else { alert(res.data.msg) } }) }# 4 写个后端的登录接口,处理好跨域问题,处理跨域如下####解决后端跨域问题##### 1 安装 pip3.8 install django-cors-headers 2 注册app INSTALLED_APPS = ( ... 'corsheaders', ... ) 3 配置中间件 MIDDLEWARE = [ ... 'corsheaders.middleware.CorsMiddleware', ... ] 4 配置文件中加入:setting下面添加下面的配置 CORS_ORIGIN_ALLOW_ALL = True CORS_ALLOW_METHODS = ( 'DELETE', 'GET', 'OPTIONS', 'PATCH', 'POST', 'PUT', 'VIEW', ) CORS_ALLOW_HEADERS = ( 'XMLHttpRequest', 'X_FILENAME', 'accept-encoding', 'authorization', 'content-type', 'dnt', 'origin', 'user-agent', 'x-csrftoken', 'x-requested-with', 'Pragma', 'token' ) |
2、后端
1 2 3 4 5 6 7 8 9 10 11 12 13 | import jsondef login(request): data = json.loads(request.body) if request.method == 'POST': print(data) name = data.get('name') password = data.get('password') if name == 'ccy' and password == '123': print(name, password) return JsonResponse({'code': 200, 'msg': '登录成功!'}) else: return JsonResponse({'code': 400, 'msg': '登录失败!'}) |
注意这里的密码,前端传过去是字符串
3、前端
1 2 3 4 5 6 7 8 9 10 11 12 13 14 15 16 17 18 19 20 21 22 23 24 25 26 27 28 29 30 31 32 33 34 35 36 37 38 39 40 41 42 43 44 45 46 47 48 49 50 51 | ## views<template><div> <p>用户名: <input type="text" v-model="name"> </p> <p>密码: <input type="password" v-model="password"></p> <button @click="handleSubmit">登录</button></div></template><script>import axios from 'axios';export default { name: "LoginView", data () { return { name: '', password: '' } }, methods: { handleSubmit(){ console.log(this.name, this.password) axios.post('http://127.0.0.1:8000/login/',{ name: this.name, password: this.password }).then(res => { console.log(res.data.name, res.data.password) if (res.data.code === 200){ location.href = 'https://www.cnblogs.com/' }else { alert(res.data.msg) } }) } }}</script><style scoped></style>## routerimport LoginView from "@/views/LoginView";{ path: '/login', name: 'login', component: LoginView }, |
三、scoped、props、ref、混入
1、scoped 属性(作用范围)
新建的组件 加了scoped,表示样式只在当前组件生效,如果不加,子组件都会使用这个样式
1 2 | <style scoped></style> |
2、props 属性
父传子,在子组件的 export default写 props:
1 2 3 4 5 6 7 8 9 10 11 12 13 14 15 16 | # 父传子之自定义属性# 1 基本使用 props: ['msg'], # 2 限制类型: props: {'msg': Boolean}, # 3 限制类型,必填,默认值 props: { msg: { type: String, //类型 required: true, //必要性 default: '老王' //默认值 } } |
注意:
1 2 3 4 5 6 7 8 9 10 11 12 13 14 15 16 17 18 19 20 21 22 23 24 25 26 27 28 29 30 31 32 33 34 35 36 37 38 39 40 41 42 43 44 45 46 47 48 49 50 51 52 53 54 55 56 57 58 59 60 61 62 63 64 65 66 67 68 69 70 71 72 73 74 75 76 77 78 79 80 81 82 83 84 85 | ### 父组件:<template> <div class="home"> <h1>refs的使用</h1> <input type="text" v-model="name" ref="myinput"> ---> {{ name }} <br> <button @click="handleClick">点我看控制台</button> <h1>refs的使用----原生标签(组件)</h1> <HelloWorld ref="myhello"></HelloWorld> <h1>父传子的props</h1> <HelloWorld ></HelloWorld> </div></template><script>import HelloWorld from "@/components/HelloWorld";export default { name: 'HomeView', data() { return { name } }, methods: { handleClick(){ console.log(this.$refs) // {myinput: input, myhello: VueComponent} this.$refs.myinput.value = 'name1' console.log(this.$refs.myhello.name) this.$refs.myhello.handlerClick() this.$refs.myhello.name='test' } }, components: {HelloWorld},}</script><style></style>### 子组件<template> <div> <h2>我是helloworld组件:{{ name }}</h2> <button @click="handlerClick">点我看帅哥</button> <br> <br> <!-- 这里是子组件,{{ msg }}是应用父类传来的自定义属性--> {{ msg }} </div></template><script>export default { name: "HelloWorld", data() { return { name: '彭于晏' } }, methods: { handlerClick() { alert(this.name) } }, // props: ['msg'], // props: {'msg': Boolean}, props: { msg: { type: 'string', require: true, default: '老王' } },}</script><style scoped></style> |
3、ref属性
ref属性
-放在普通标签上,通过 this.$refs.名字---》取到的是dom对象,可以直接操作dom
-放在组件上,通过该this.$refs.名字---》取到的是组件对象,这样在父组件中,就拿到了子组件对象,对象属性和方法直接用即可,也可以修改
1 2 3 4 5 6 7 8 9 10 11 12 13 14 15 16 17 18 19 20 21 22 23 24 25 26 27 28 29 30 31 32 33 34 35 36 37 38 | <template> <div class="home"> <h1>refs的使用</h1> <input type="text" v-model="name" ref="myinput"> ---> {{ name }} <br> <button @click="handleClick">点我看控制台</button> <h1>refs的使用----原生标签(组件)</h1> <HelloWorld ref="myhello"></HelloWorld> </div></template><script>import HelloWorld from "@/components/HelloWorld";export default { name: 'HomeView', data() { return { name } }, methods: { handleClick(){ console.log(this.$refs) // {myinput: input, myhello: VueComponent} this.$refs.myinput.value = 'name1' console.log(this.$refs.myhello.name) this.$refs.myhello.handlerClick() this.$refs.myhello.name='test' } }, components: {HelloWorld},}</script><style></style> |
补充:
- 子组件中:this.children 拿到所有子组件对象
4、混入
1 2 3 4 5 6 7 8 | # 包下的 index.js 有特殊函数, -之前导入 import xx from './mixin/index.js' -可以写成 import xx from './mixin'# mixin(混入) 功能:可以把多个组件共用的配置提取成一个混入对象 |
使用步骤
1 src 下定义混入对象:mixin---> index.js中写
1 2 3 4 5 6 7 8 9 10 11 12 | export const lqz = { data() { return { name: 'lqz' } }, methods: { handleName() { alert(this.name) } }} |
2 使用混入:局部使用,组件中使用
1 2 3 4 5 6 7 8 9 10 11 | import {lqz} from '@/mixin'export default { name: 'AboutView', data() { return { } }, methods: { }, mixins:[lqz]} |
3 全局使用混入:每个组件都有效main.js中
1 2 3 | import {lqz} from '@/mixin'Vue.mixin(lqz) |
四、插件
1、插件功能
1 2 3 4 5 | # 插件功能:用于增强Vue,有很多第三方插件 (vuex,router,elemetui)# 定义自己的插件本质:包含install方法的一个对象,install的第一个参数是Vue,第二个以后的参数是插件使用者传递的数据 |
使用步骤:
1 2 3 4 5 6 7 8 9 10 11 12 13 14 15 16 17 18 19 20 21 22 23 24 25 26 27 28 29 30 31 32 33 34 35 | # 功能:用于增强Vue# 本质:包含install方法的一个对象,install的第一个参数是Vue,第二个以后的参数是插件使用者传递的数据。 ## 定义插件步骤 1 写个plugins/index.js 2 在js中写代码 import axios from "axios"; import Vue from "vue"; export default { install(a) { // 1 往全局Vue中放属性 Vue.prototype.$ajax = axios // 2 定义混入 Vue.mixin({ data() { return { name: '彭于晏', age: 19, }; }, }); // 3 往全局Vue中放方法 Vue.prototype.$common = () => { } // 4 自定义指令 v-if v-for 可以自定义以 } } 3 使用插件---main.js中 import plugins from "@/plugins"; Vue.use(plugins) |
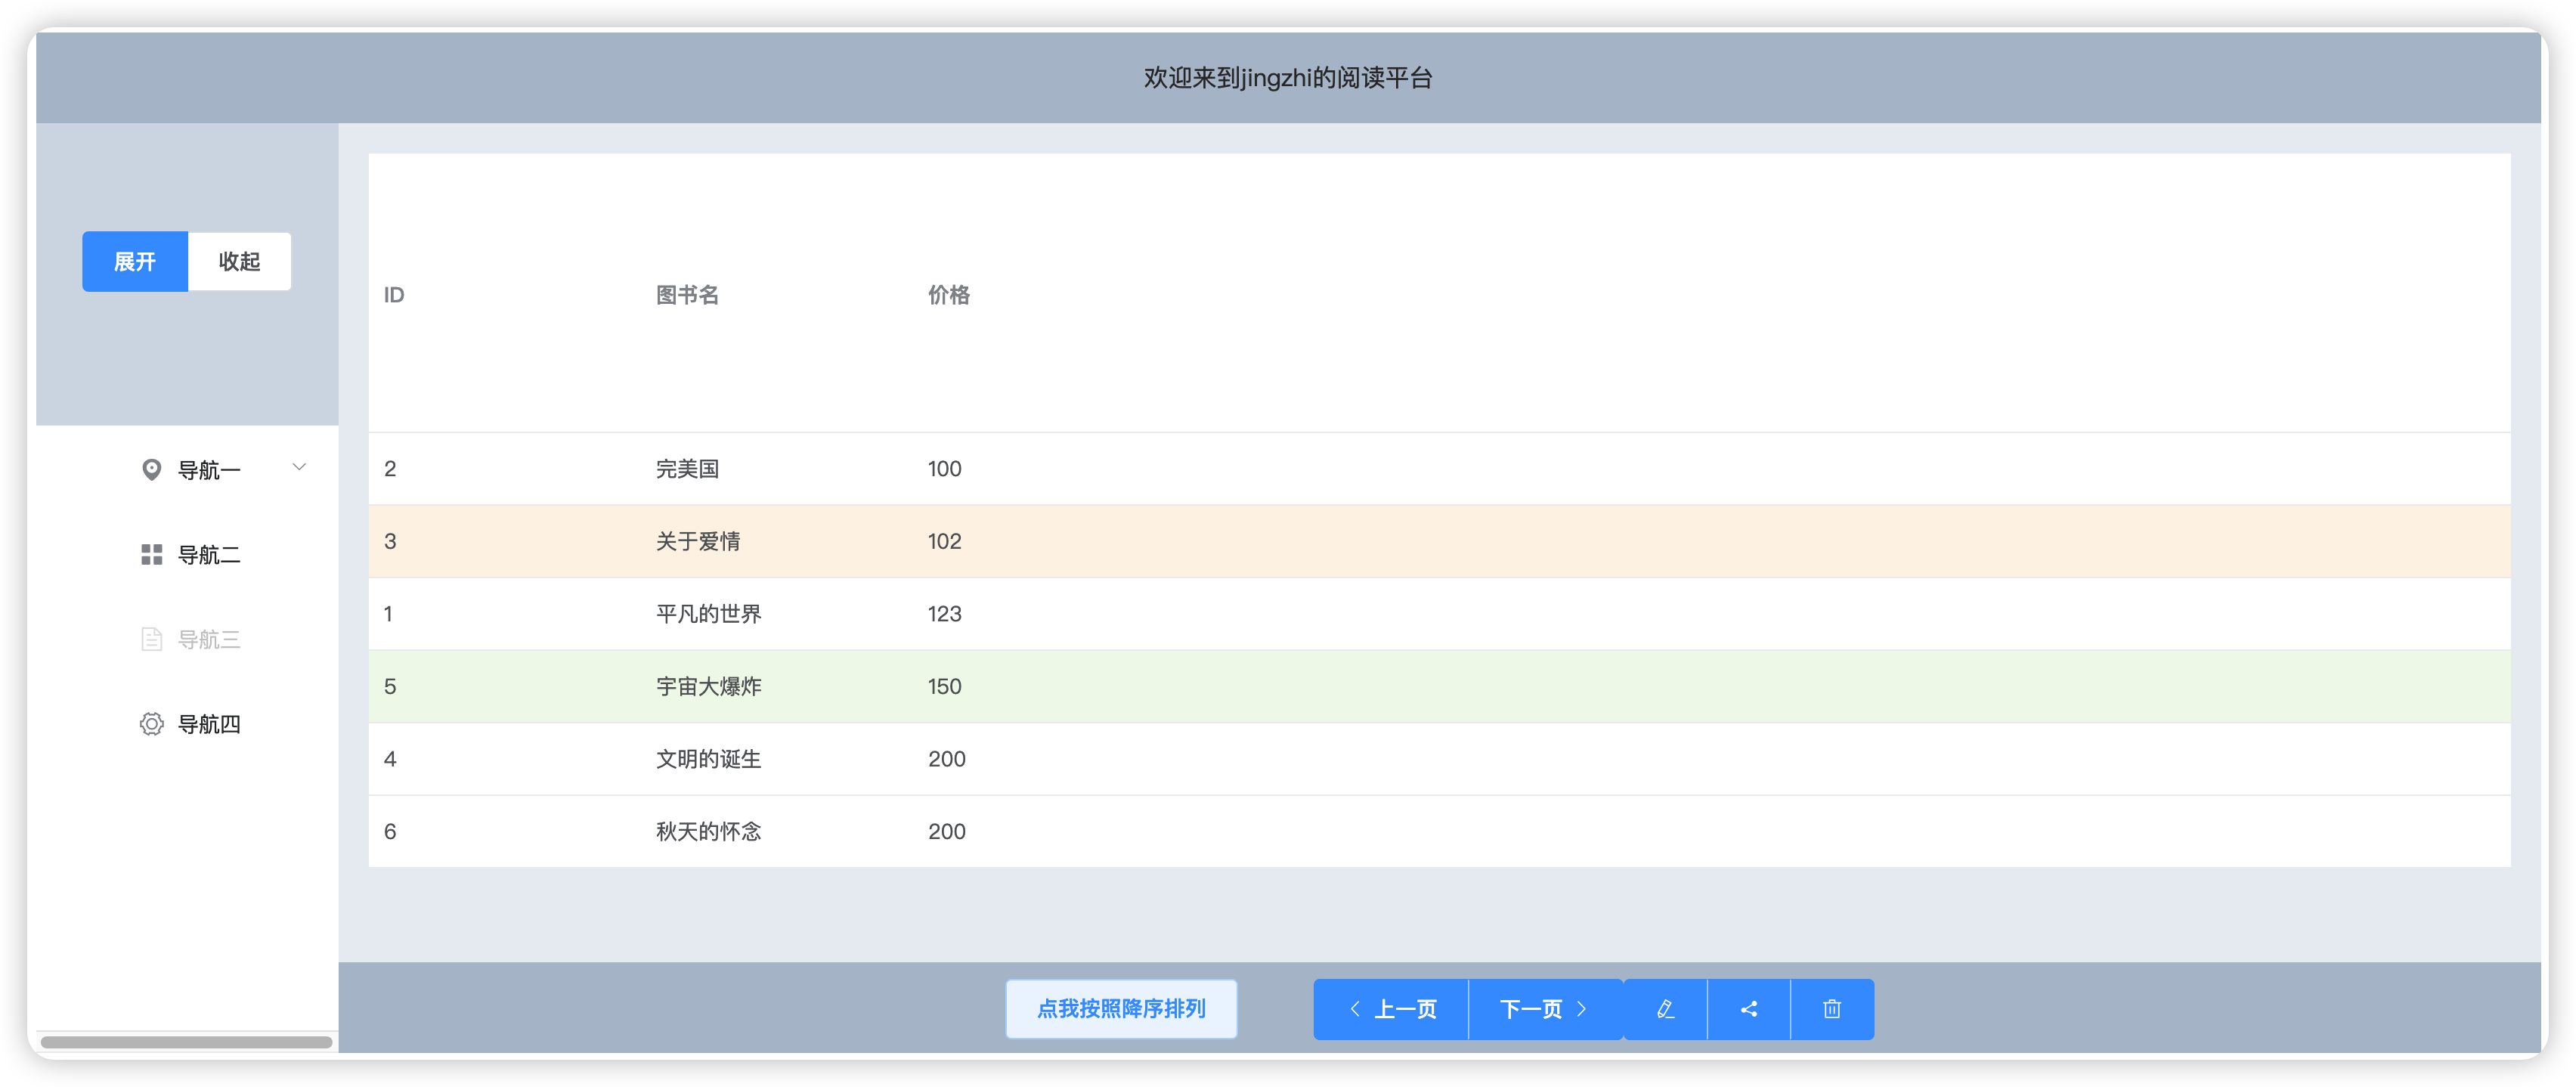
五、elementui
1 2 3 4 5 6 7 8 9 10 11 12 13 14 15 16 17 18 | # 美化咱们的项目--》跟bootstrap是一类东西# 常见的vue ui库1. Element-UI:Element-UI2 elementui-plus3. Ant Design-Vue4 vant https://vant-contrib.gitee.io/vant/v2/#/zh-CN/sku5 https://tdesign.tencent.com/vue/components/button6 https://nutui.jd.com/cat/index.html#/tab # elmentui使用 -安装:cnpm install element-ui -S -配置:main.js import ElementUI from 'element-ui'; import 'element-ui/lib/theme-chalk/index.css'; Vue.use(ElementUI); -去官网找好看的样子,复制 |
补充:table不显示,降低element-ui的版本
1 2 | npm uninstall element-uinpm install element-ui@2.9.2 -S |
vue 代码
1 2 3 4 5 6 7 8 9 10 11 12 13 14 15 16 17 18 19 20 21 22 23 24 25 26 27 28 29 30 31 32 33 34 35 36 37 38 39 40 41 42 43 44 45 46 47 48 49 50 51 52 53 54 55 56 57 58 59 60 61 62 63 64 65 66 67 68 69 70 71 72 73 74 75 76 77 78 79 80 81 82 83 84 85 86 87 88 89 90 91 92 93 94 95 96 97 98 99 100 101 102 103 104 105 106 107 108 109 110 111 112 113 114 115 116 117 118 119 120 121 122 123 124 125 126 127 128 129 130 131 132 133 134 135 136 137 138 139 140 141 142 143 144 145 146 147 148 149 150 151 152 153 | <template> <div> <br> <el-container> <el-header>欢迎来到jingzhi的阅读平台</el-header> <el-container> <el-aside width="200px"> <el-radio-group v-model="isCollapse" style="margin-bottom: 20px;"> <el-radio-button :label="false">展开</el-radio-button> <el-radio-button :label="true">收起</el-radio-button> </el-radio-group> <el-menu default-active="1-4-1" class="el-menu-vertical-demo" @open="handleOpen" @close="handleClose" :collapse="isCollapse"> <el-submenu index="1"> <template slot="title"> <i class="el-icon-location"></i> <span slot="title">导航一</span> </template> <el-menu-item-group> <span slot="title">分组一</span> <el-menu-item index="1-1">选项1</el-menu-item> <el-menu-item index="1-2">选项2</el-menu-item> </el-menu-item-group> <el-menu-item-group title="分组2"> <el-menu-item index="1-3">选项3</el-menu-item> </el-menu-item-group> <el-submenu index="1-4"> <span slot="title">选项4</span> <el-menu-item index="1-4-1">选项1</el-menu-item> </el-submenu> </el-submenu> <el-menu-item index="2"> <i class="el-icon-menu"></i> <span slot="title">导航二</span> </el-menu-item> <el-menu-item index="3" disabled> <i class="el-icon-document"></i> <span slot="title">导航三</span> </el-menu-item> <el-menu-item index="4"> <i class="el-icon-setting"></i> <span slot="title">导航四</span> </el-menu-item> </el-menu> </el-aside> <el-container> <el-main> <el-table :data="books_list" style="width: 100%" :row-class-name="tableRowClassName"> <el-table-column prop="id" label="ID" width="180"> </el-table-column> <el-table-column prop="title" label="图书名" width="180"> </el-table-column> <el-table-column prop="price" label="价格"> </el-table-column> </el-table> </el-main> <el-footer> <el-button type="primary" plain @click="handleClick" >点我按照降序排列</el-button> <el-button-group style="margin-left: 50px"> <el-button type="primary" icon="el-icon-arrow-left">上一页</el-button> <el-button type="primary">下一页<i class="el-icon-arrow-right el-icon--right"></i></el-button> </el-button-group> <el-button-group> <el-button type="primary" icon="el-icon-edit"></el-button> <el-button type="primary" icon="el-icon-share"></el-button> <el-button type="primary" icon="el-icon-delete"></el-button> </el-button-group> </el-footer> </el-container> </el-container> </el-container> </div></template><script>import axios from "axios";export default { name: "books_api", data() { return { isCollapse: true, books_list: [], ordering: 'price', url: 'http://127.0.0.1:8000/books/', } }, created() { axios.get(this.url).then(res => { console.log(res.data) this.books_list = res.data; }); }, methods: { tableRowClassName({row, rowIndex}) { if (rowIndex === 1) { return 'warning-row'; } else if (rowIndex === 3) { return 'success-row'; } return ''; }, handleClick() { if (this.ordering.indexOf('-') >= 0) { this.ordering = 'price'; } else { this.ordering = '-price'; } }, handleOpen(key, keyPath) { console.log(key, keyPath); }, handleClose(key, keyPath) { console.log(key, keyPath); } }, watch: { ordering() { axios.get(this.url + '?ordering=' + this.ordering).then(res => { this.books_list = res.data; }); } }}</script><style scoped>.el-table .warning-row { background: oldlace;}.el-table .success-row { background: #f0f9eb;}.el-menu-vertical-demo:not(.el-menu--collapse) { width: 200px; min-height: 400px;}</style> |
六、
1 2 3 4 5 6 7 8 9 10 11 12 13 14 15 16 17 18 19 20 21 22 23 24 25 26 27 28 29 30 31 32 33 | # 在Vue中实现集中式状态(数据)管理的一个Vue插件,对vue应用中多个组件的共享状态进行集中式的管理(读/写),也是一种组件间通信的方式,且适用于任意组件间通信# 使用步骤: 1 新建store/index.js import Vue from 'vue' import Vuex from 'vuex' Vue.use(Vuex) export default new Vuex.Store({ state: { num: 10 }, mutations: { add_mu(state, i) { state.num += i } }, actions: { add(context, i) { // 逻辑判断,跟后端交互,通过后在做 context.commit('add_mu', i) } }, }) 2 在组件中使用变量 拿值:this.$store.state.num 修改值:三种方式 -直接:this.$store.state.num += 1 -间接:this.$store.commit('add_mu',3) -间间接:this.$store.dispatch('add',10) 3 任意组件都都可以使用,实现了组件间通信 |


