Ajax技术+layer弹窗
一、Ajax技术简介
1、AJAX(Asynchronous Javascript And XML)翻译成中文就是“异步Javascript和XML”。
即使用Javascript语言与服务器进行异步交互,传输的数据为XML(当然,传输的数据不只是XML,现在更多使用json数据)。
局部刷新、一步提交
2、作用
前端技术,把前端的数据提交到后端的。Ajax技术就是局部刷新,异步提交,它不需要刷新整个页面,只需要刷新局部的,主要就是刷新的时候是无感知的
3、案例
html 前端页面:
1 2 3 4 5 6 7 8 9 10 11 12 13 14 15 16 17 18 19 20 21 22 23 24 25 26 27 28 29 30 31 32 33 34 35 36 37 38 39 | <!DOCTYPE html><html lang="en"><head> <meta charset="UTF-8"> <title>Title</title> <link href="https://cdn.bootcdn.net/ajax/libs/twitter-bootstrap/3.3.6/css/bootstrap.min.css" rel="stylesheet"> <script src="https://cdn.bootcdn.net/ajax/libs/jquery/3.6.4/jquery.js"></script> <script src="https://cdn.bootcdn.net/ajax/libs/twitter-bootstrap/3.3.6/js/bootstrap.min.js"></script></head><body><input type="text" name="" id="d1">+<input type="text" name="" id="d2">=<input type="text" name="" id="d3"><button class="btn btn-info">计算</button><script> $(".btn").click(function() { // 获取输入框中的内容 var d1 = $("#d1").val(); var d2 = $("#d2").val(); // 前端数据提交到后端 $.ajax({ // 1、提交到哪里 url: "", // 2、要指定请求方式提交 type: "post", // 3、指定要传递的数据 data: {'d1':d1,'d2':d2}, // 4、回调函数, 接收后端返回的数据 success : function(res){ {#console.log(res);#} $("#d3").val(res) } }) })</script></body></html> |
注意:Ajax 提交数据到后端的4个步骤
1 2 3 4 5 6 7 8 9 10 | $.ajax({ url:'/index/?a=1&b=2', type:'post', data:{'a':1, b:2} success:function(res) { # res:什么时候反序列化,什么时候不反序列化 console.log(res.username) console.log(res.data.password) } }) |
$.ajax({ }) ajax的调用,
后端返回的数据给res,大多数情况下,后端返回的数据直接就是json格式,如果是json格式的,就不用反序列化了
如果返回的是JSON格式的字符串,就需要反序列化
后端视图函数:
1 2 3 4 5 6 7 8 9 10 11 | def index(request): if request.method == 'POST': # 接收参数 d1 = request.POST.get('d1') d2 = request.POST.get('d2') # 做运算 d3 = int(d1) + int(d2) return HttpResponse(d3) # 返回给res return render(request, 'index.html') |
注意⚠️后端返回数据的多种情况:
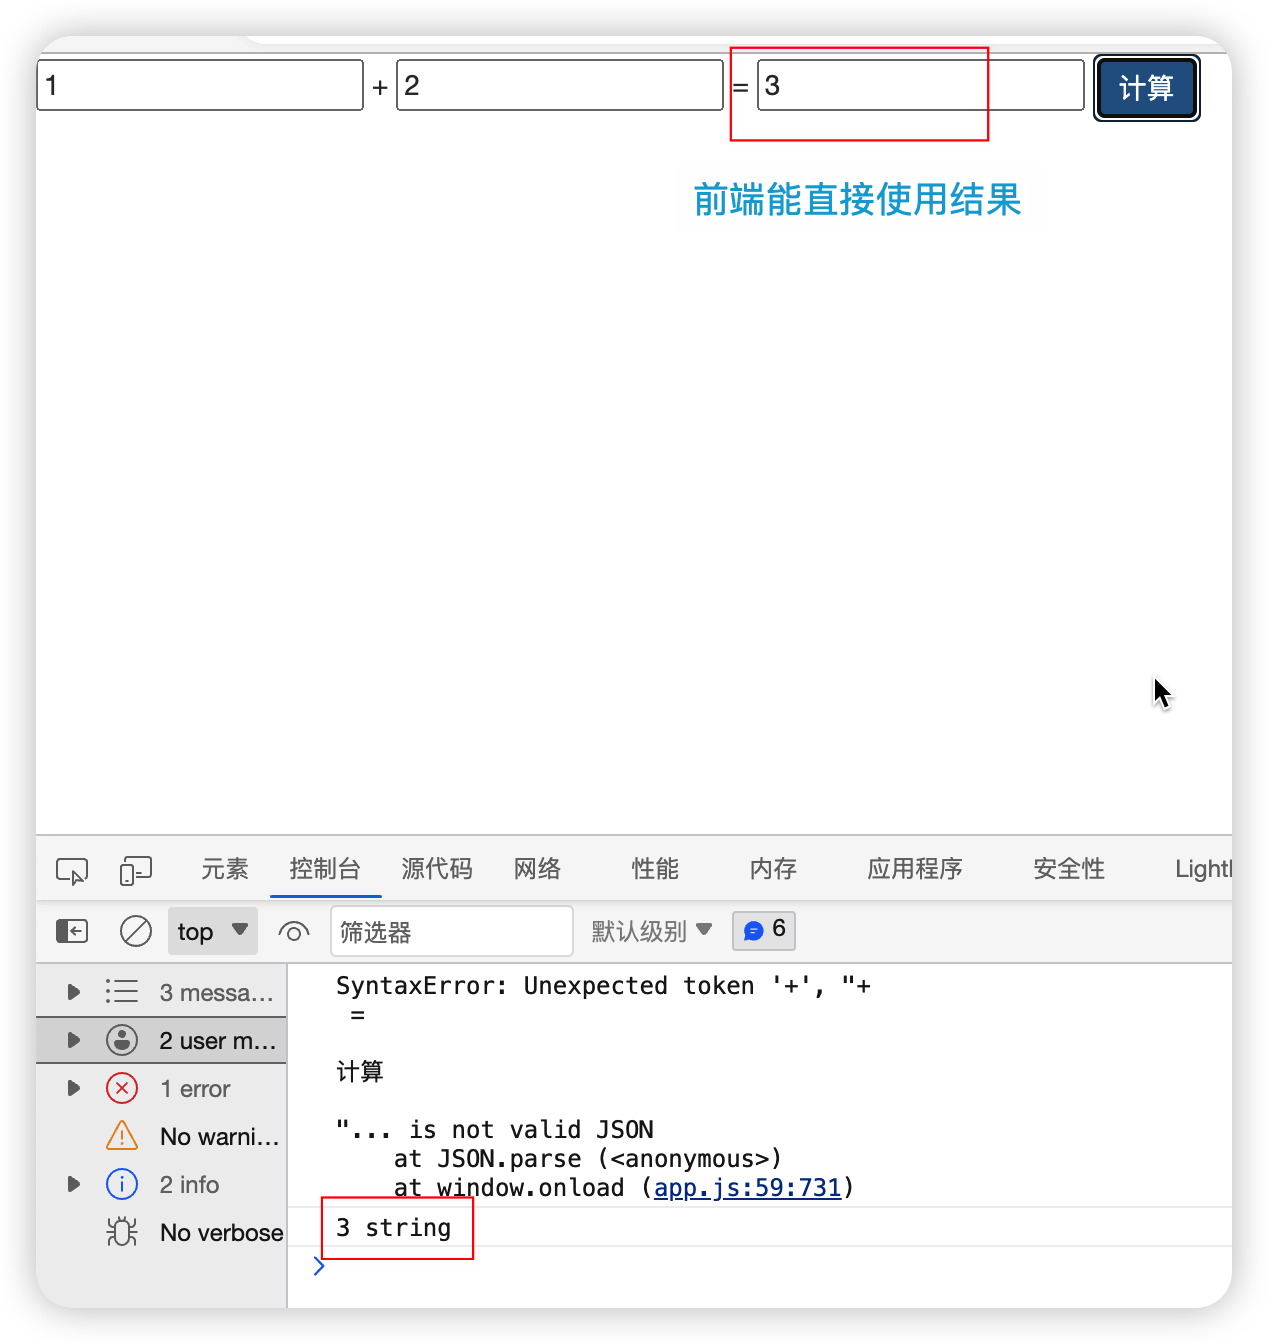
第一种:
当后端返回的值 res为string类型时,即 return HttpResponse(d3)。前端html页面可以直接使用。
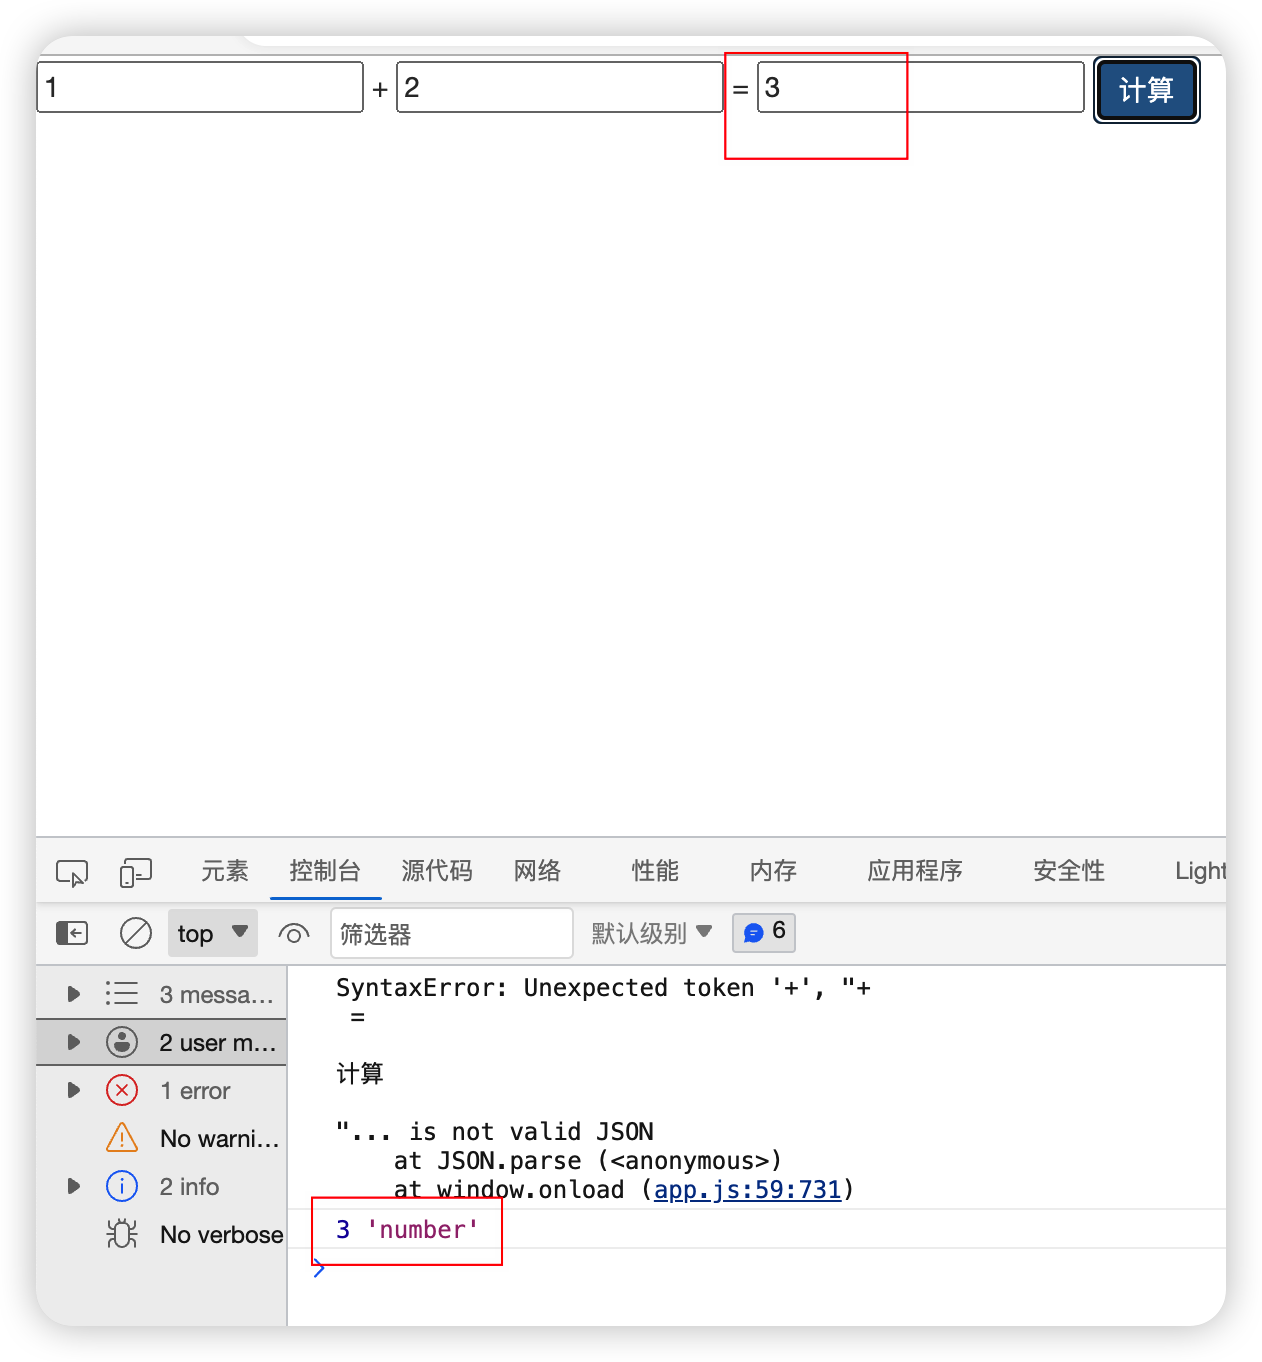
前端自行反序列化 JSON.parse()后可以改变类型,比如前端传来的d3是一个string,JSON.parse()后是number。
1 2 3 4 5 6 | success : function(res){ res = JSON.parse(res); console.log(res); console.log(res.code); {#$("#d3").val(res)#} } |
没有反序列化:前端能直接使用后端传来的string数据
反序列化以后:反序列化之后依旧可以直接使用,数据类型变为number
第二种:
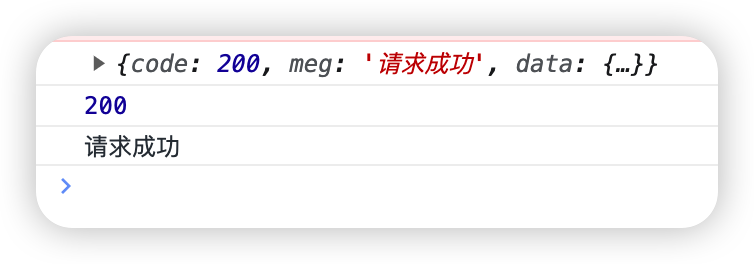
后端直接返回 JsonResponse()数据,前端不需要在反序列化,可以直接取值。
JsonResponse()返回的数据就是json数据
1 2 3 4 5 6 7 8 9 10 11 12 13 14 15 16 17 18 19 20 21 22 23 24 25 | # 后端from django.http import JsonResponsedef index(request): if request.method == 'POST': d = {'code': 200, 'meg': '请求成功', 'data': {'username': 'jingzhi'}} return JsonResponse(d) return render(request, 'index.html')# 前端 $.ajax({ // 1、提交到哪里 url: "", // 2、要指定请求方式提交 type: "post", // 3、指定要传递的数据 data: {'d1':d1,'d2':d2}, // 4、回调函数, 接收后端返回的数据 success : function(res){ console.log(res); console.log(res.code); console.log(res.meg); } }) |
第三种:
后端序列化后使用HttpResponse()方式,前端需要指定数据类型dataType: "json",
1 2 3 4 5 6 7 8 9 10 11 12 13 14 15 16 17 18 19 20 21 22 23 24 25 26 | # 后端def index(request): if request.method == 'POST': d = {'code': 200, 'meg': '请求成功', 'data': {'username': 'jingzhi'}} import json res = json.dumps(d, ensure_ascii=False) # res序列化为字符串 return HttpResponse(res) # 返回给res return render(request, 'index.html')# 前端$.ajax({ // 1、提交到哪里 url: "", // 2、要指定请求方式提交 type: "post", // 3、指定要传递的数据 data: {'d1':d1,'d2':d2}, dataType: "json", // 4、回调函数, 接收后端返回的数据 success : function(res){ console.log(res); console.log(res.code); console.log(res.meg); } }) |
二、
要满足的两个条件
1. 你传的数据一定要是json格式的
2. 一定要把ajax默认提交的urlencode改为'application/json'
1、html
1 2 3 4 5 6 7 8 9 10 11 12 13 14 15 16 17 18 19 20 21 22 23 24 25 26 27 | <!DOCTYPE html><html lang="en"><head> <meta charset="UTF-8"> <title>Title</title> <link href="https://cdn.bootcdn.net/ajax/libs/twitter-bootstrap/3.3.6/css/bootstrap.min.css" rel="stylesheet"> <script src="https://cdn.staticfile.org/jquery/2.1.1/jquery.min.js"></script> <script src="https://cdn.bootcdn.net/ajax/libs/twitter-bootstrap/3.3.6/js/bootstrap.min.js"></script></head><body><button class="btn btn-info">按钮</button><script> $(".btn").click(function () { $.ajax({ url: '/index/', type: 'post', data: JSON.stringify({a1: 1, a2: 2}), contentType : 'application/json', success: function (res) { console.log(res) } }) })</script></body></html> |
2、views
1 2 3 4 5 6 7 8 9 | from django.shortcuts import renderimport json# Create your views here.def index(request): print(request.body) # b'{"a1":1,"a2":2}' json_str = json.loads(request.body) # json.loads 能够自动进行二进制解码,然后再反序列化 print(json_str.get('a1')) return render(request, 'index.html') |
注意:
1. 针对ajax提交的json格式的数据,django后端不在把数据封装到request.POST中了。
2. 前端发送json数据的前提:数据进行序列化、指定内容类型
1 2 | data: JSON.stringify({a1: 1, a2: 2}),contentType : 'application/json', |
3、后端拿到数据是纯原生的,发送过来的数据是二进制形式的,后端需要解码、反序列化
三、
1、html
1 2 3 4 5 6 7 8 9 10 11 12 13 14 15 16 17 18 19 20 21 22 23 24 25 26 27 28 29 30 31 32 33 34 35 36 37 38 39 40 41 42 43 44 45 46 47 48 49 50 51 52 53 54 | <!DOCTYPE html><html lang="en"><head> <meta charset="UTF-8"> <title>Title</title> <link href="https://cdn.bootcdn.net/ajax/libs/twitter-bootstrap/3.3.6/css/bootstrap.min.css" rel="stylesheet"> <script src="https://cdn.staticfile.org/jquery/2.1.1/jquery.min.js"></script> <script src="https://cdn.bootcdn.net/ajax/libs/twitter-bootstrap/3.3.6/js/bootstrap.min.js"></script></head><body><form action=""> username: <input type="text" id="username"> password: <input type="password" id="password"> 文件: <input type="file" id="my_file"> <button class="btn btn-primary">提交</button> {# 两次提交,提交按钮可以放到form表单外#}</form>{#<button class="btn btn-info">按钮</button>#}<script> $(".btn").click(function (event) { // 拿普通数据 var username = $("#username").val(); var password = $("#password").val(); // 拿文件数据 {#var my_file = $("#my_file"); {#产生一个jq对象,在浏览器控制台可以查看#} {#console.log(my_file);#} var myfile = $("#my_file")[0].files[0]; {#console.log(myfile);#} // 发送文件数据到后端需要借助于FormData对象 var myFormDataObj = new FormData(); myFormDataObj.append('username', username); myFormDataObj.append('password', password); myFormDataObj.append('myfile', myfile); $.ajax({ url: '/index/', type: 'post', data: myFormDataObj, contentType:false, // 告诉浏览器不要做任何的编码格式处理,django自己来做处理 processData:false, // 告诉浏览器不要对我处理的数据做任何的处理 success: function (res) { {#console.log(res)#} } }); event.preventDefault(); {#阻止后续提交第一种方式#} {#return false #} {#阻止后续提交第二种方式#} })</script></body></html> |
关于 var myfile = $("#my_file")[0].files[0]; 的补充
$("#my_file") 返回一个包含匹配元素的数组。由于我们只对一个元素感兴趣,通过 [0] 来获取这个元素。
.files[0]: 一旦我们有了文件输入字段元素,我们可以通过 .files 属性访问用户选择的文件列表。因为文件输入字段允许用户一次选择多个文件,这是一个文件列表。在这里,我们使用 [0] 来获取列表中的第一个文件。因此,$("#my_file")[0].files[0] 返回用户选择的第一个文件。
2、views
1 2 3 4 5 6 7 8 9 10 11 12 13 14 15 16 | from django.shortcuts import render# Create your views here.def index(request): # print(request.body) # b'{"a1":1,"a2":2}' # json_str = json.loads(request.body) # json.loads 能够自动进行二进制解码,然后再反序列化 # print(json_str.get('a1')) if request.method == 'POST': print(request.POST.get('username')) # <QueryDict: {'username': ['DSAD'], 'password': ['DSADAS']}> print(request.FILES.get('myfile')) # <MultiValueDict: {'myfile': [<InMemoryUploadedFile: 462_001_afm_3600_5400.jpg (image/jpeg)>]}> file_obj = request.FILES.get('myfile') with open(file_obj.name, 'wb') as f: for line in file_obj: f.write(line) return render(request, 'index.html') |
四、
1、
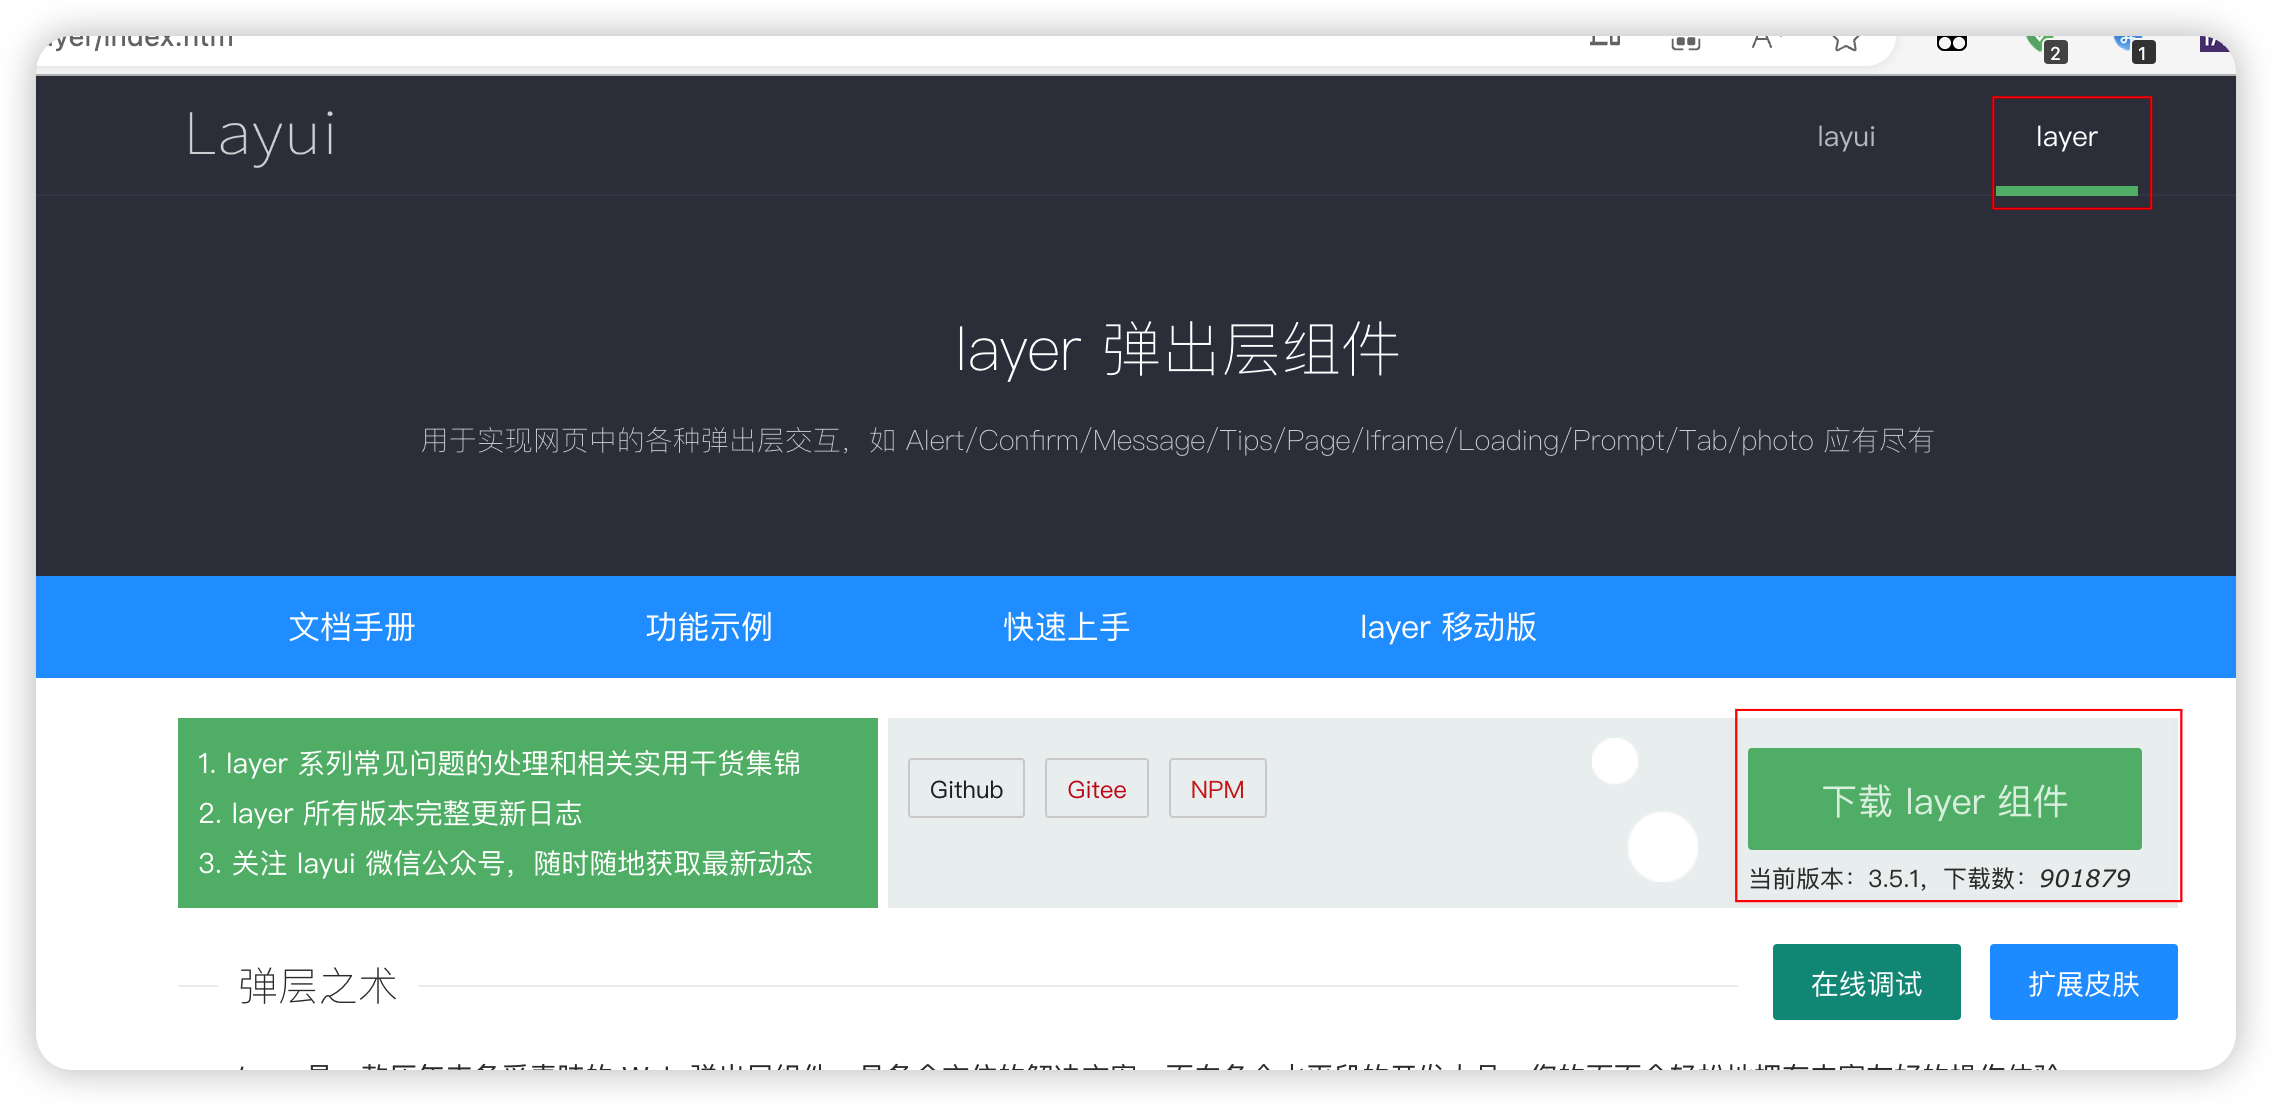
引入static文件
1 | <script src="/static/layer/layer.js"></script> |
引用效果
2、html
1 2 3 4 5 6 7 8 9 10 11 12 13 14 15 16 17 18 19 20 21 22 23 24 25 26 27 28 29 30 31 32 33 34 35 36 37 38 39 40 41 42 43 44 45 46 47 48 49 50 51 52 53 54 55 56 57 58 59 60 61 62 63 64 65 66 67 68 69 70 71 72 73 74 75 76 77 78 | {% extends 'home.html' %}{% block content %} <h1 class="text-center">图书列表展示</h1> <a href="/book_add/" class="btn btn-info">添加图书</a> <table class="table table-striped table-hover"> <thead> <tr> <th>标题</th> <th>价格</th> <th>出版日期</th> <th>出版社</th> <th>作者</th> <th>操作</th> </tr> </thead> <tbody> {% for foo in book_queryset %} <tr class="tr_{{ foo.pk }}"> <td>{{ foo.title }}</td> <td>{{ foo.price }}</td> <td>{{ foo.publish_date|date:'Y-m-d' }}</td> <td>{{ foo.publish.name }}</td> {#书查出版社,正向查询,外键字段跳表#} <td> {% for author in foo.authors.all %} {% if forloop.last %} {{ author.name }} {% else %} {{ author.name }} | {% endif %} {% endfor %} </td> <td> {# <a href="/book/edit/{{ foo.pk }}" class="btn btn-success">修改</a>#} <a href="/book_edit/?id={{ foo.pk }}" class="btn btn-success">修改</a> <a href="#" class="del btn btn-danger" delete_id="{{ foo.pk }}">删除</a> {#这里不能使用id标签,因为在for循环中,id不能重复 自定义一个id,a标签自动跳转也相当于有二次提交#} </td> </tr> {% endfor %} </tbody> </table>{% endblock %}{% block js %} <script> $(".del").click(function () { // 删除的逻辑:当我们点击删除按钮的时候,应该获取点击行的id值,然后,把这个id传到后端,后端接收这个id值 // 做删除逻辑 var id = $(this).attr('delete_id'); {#这里的this代表的是$(".btn")对象#} var _this = $(this); // 紧接着要发送ajax请求,最好做一个二次确认 layer.confirm('你确定要删除这条数据吗?', { btn: ['确定'] //按钮 }, function () { // 发送ajax请求 $.ajax({ url: '/book_del/', // {# 把请求提交到del视图函数中去#} type: 'post', data: {id: id}, success: function (res) { if (res.code == 200) { {#layer.msg(res.msg, {icon:2}, function () {#} {# location.reload();} {# ajax不会自动刷新页面 #} layer.msg(res.msg); {# 接收后端返回的信息 #} _this.parent().parent().remove(); {# this 指的是function (res) _this引用变量 #} {#$(".tr_" + id).remove(); 删除dom的tr行来实现不展示#} } } }); }); }) </script>{% endblock %} |
3、views
1 2 3 4 5 6 | def book_del(request): del_id = request.POST.get('id') # 这个id是 ajx传的 id = $(this).attr('delete_id'); print(del_id) models.Book.objects.filter(pk=del_id).delete() # return redirect('/authors_list/') ajax发过来的数据,不需要页面跳转 return JsonResponse({'code': 200, 'msg': '删除成功!'}) # 如果需要给前端返回数据+'data':{} |
4、效果
五、Ajax 实操
简易图书管理系统,前端通过Ajax传数据到后端
html
1 2 3 4 5 6 7 8 9 10 11 12 13 14 15 16 17 18 19 20 21 22 23 24 25 26 27 28 29 30 31 32 33 34 35 36 37 38 39 40 41 42 43 44 45 46 47 48 49 50 51 52 53 54 | {% extends 'home.html' %}{% block content %} <h1 class="text-center">修改作者</h1> <div class="container"> <div class="row"> <div class="form-group"> <input type="hidden" id="hidden_id" value="{{ author_obj.pk }}" name="hidden_id"> <div class="form-group"> 作者名:<input type="text" id="name" class="form-control" name="name" value="{{ author_obj.name }}"> </div> </div> <div class="form-group"> 年龄:<input type="text" id="age" class="form-control" name="age" value="{{ author_obj.age }}"> </div> <div class="form-group"> phone:<input type="text" id="phone" class="form-control" name="phone" value="{{ author_obj.author.phone }}"> </div> <div class="form-group"> addr:<input type="text" id="addr" class="form-control" name="addr" value="{{ author_obj.author.addr }}"> </div> <div class="form-group"> <input type="button" id="submitButton" class="btn btn-success btn-block" value="Submit"> </div> <script> $("#submitButton").click(function () { let id = $("#hidden_id").val(); let name = $("#name").val(); let age = $("#age").val(); let phone = $("#phone").val(); let addr = $("#addr").val(); console.log(id) console.log(name) $.ajax({ url: '/authors_edit/', type: 'post', data: {'id':id,'name': name, 'age': age, 'phone': phone, 'addr': addr}, success: function (res) { // 这里可以添加一些成功后的处理逻辑 alert(res.msg); window.location.href=res.url; }, error: function (err) { // 这里可以添加一些错误处理逻辑 alert("提交失败,请重试"); } }) }) </script> </div> </div>{% endblock %} |
views
1 2 3 4 5 6 7 8 9 10 11 12 13 14 15 16 17 18 19 | # 修改作者def authors_edit(request): author_edit_id = request.GET.get('id') # 先获取GET传参的id author_obj = models.Author.objects.filter(pk=author_edit_id).first() # 获取一个publish_obj对象 author_detail_obj = models.Author.objects.filter(pk=author_edit_id).first() # 获取一个publish_obj对象 if request.method == 'POST': new_id = request.POST.get('id') new_name = request.POST.get('name') new_age = request.POST.get('age') new_phone = request.POST.get('phone') new_addr = request.POST.get('addr') # 写入数据库 models.Author.objects.filter(pk=new_id).update(name=new_name, age=new_age) models.Authordetail.objects.filter(author__pk=author_edit_id).update(phone=new_phone, addr=new_addr) res = {'url': '/authors_list/', 'code': 200, 'msg': '后端拿到数据!', 'data': {'username': new_name}} return JsonResponse(res) return render(request, 'authors_edit.html', locals()) |


