多表联合查询、脚本使用pymysql
一、多表联合查询
1、数据准备
部门表和员工表
create table dep(
    id int primary key auto_increment,
    name varchar(20)
);

create table emp(
    id int primary key auto_increment,
    name varchar(20),
    sex enum('male','female') not null default 'male',
    age int,
    dep_id int
);
插入数据
insert into dep values
(200,'技术'),
(201,'人力资源'),
(202,'销售'),
(203,'运营'),
(205,'保洁');

insert into emp(name,sex,age,dep_id) values
('jason','male',18,200),
('egon','female',48,201),
('kevin','male',18,201),
('nick','male',28,202),
('owen','male',18,203),
('jerry','female',18,204);
2、多表查询
子查询
一条SQL语句的执行结果当成另外一条SQL语句的执行条件
问题:查看员工jason的部门名称:
select dep_id from emp where name='jason';

select * from dep where id=200;
把上述两条SQL语句合并为一条SQL语句
select * from dep where id= (select dep_id from emp where name='jason');
连表查询
把多张实际存在的表按照表关系连成一张虚拟表(不是实际存在的表,而是临时在内存中存的)
select * from emp,dep where emp.dep_id=dep.id;
联表的专业语法
inner join # 内连接,数据只取两张表中共有的数据
left join # 左连接,数据以左表为准,展示左表所有的数据,右表没有的数据使用NULL填充
right join # 右连接,数据以右表为准,展示右表所有的数据,左表没有的数据使用NULL填充
union # 连接多条SQL语句执行的结果
1. inner join
> select * from emp inner join dep where emp.dep_id = dep.id;

+----+-------+--------+-----+--------+-----+----------+
| id | name  | sex    | age | dep_id | id  | name     |
+----+-------+--------+-----+--------+-----+----------+
| 1  | jason | male   | 18  | 200    | 200 | 技术     |
| 2  | egon  | female | 48  | 201    | 201 | 人力资源 |
| 3  | kevin | male   | 18  | 201    | 201 | 人力资源 |
| 4  | nick  | male   | 28  | 202    | 202 | 销售     |
| 5  | owen  | male   | 18  | 203    | 203 | 运营     |
+----+-------+--------+-----+--------+-----+----------+
2. left join
>  select * from emp left join dep on  emp.dep_id = dep.id;

+----+-------+--------+-----+--------+--------+----------+
| id | name  | sex    | age | dep_id | id     | name     |
+----+-------+--------+-----+--------+--------+----------+
| 1  | jason | male   | 18  | 200    | 200    | 技术     |
| 2  | egon  | female | 48  | 201    | 201    | 人力资源 |
| 3  | kevin | male   | 18  | 201    | 201    | 人力资源 |
| 4  | nick  | male   | 28  | 202    | 202    | 销售     |
| 5  | owen  | male   | 18  | 203    | 203    | 运营     |
| 6  | jerry | female | 18  | 204    | <null> | <null>   |
+----+-------+--------+-----+--------+--------+----------+
3. right join
> select * from emp right join dep  on  emp.dep_id = dep.id;

+--------+--------+--------+--------+--------+-----+----------+
| id     | name   | sex    | age    | dep_id | id  | name     |
+--------+--------+--------+--------+--------+-----+----------+
| 1      | jason  | male   | 18     | 200    | 200 | 技术     |
| 3      | kevin  | male   | 18     | 201    | 201 | 人力资源 |
| 2      | egon   | female | 48     | 201    | 201 | 人力资源 |
| 4      | nick   | male   | 28     | 202    | 202 | 销售     |
| 5      | owen   | male   | 18     | 203    | 203 | 运营     |
| <null> | <null> | <null> | <null> | <null> | 205 | 保洁     |
+--------+--------+--------+--------+--------+-----+----------+
4. union
select * from emp left join dep on emp.dep_id=dep.id
union
select * from emp right join dep on emp.dep_id=dep.id;

+--------+--------+--------+--------+--------+--------+----------+
| id     | name   | sex    | age    | dep_id | id     | name     |
+--------+--------+--------+--------+--------+--------+----------+
| 1      | jason  | male   | 18     | 200    | 200    | 技术     |
| 2      | egon   | female | 48     | 201    | 201    | 人力资源 |
| 3      | kevin  | male   | 18     | 201    | 201    | 人力资源 |
| 4      | nick   | male   | 28     | 202    | 202    | 销售     |
| 5      | owen   | male   | 18     | 203    | 203    | 运营     |
| 6      | jerry  | female | 18     | 204    | <null> | <null>   |
| <null> | <null> | <null> | <null> | <null> | 205    | 保洁     |
+--------+--------+--------+--------+--------+--------+----------+
还可以起别名
select * from emp as e inner join dep as d on e.dep_id=d.id;
二、脚本中使用 pymysql
1、借助于第三方模块操作MySQL
pymysql
mysqlclient----->非常好用,一般情况下很难安装成功
mysqldb
2、安装模块
pip install pymysql;
3、实操模版
import pymysql

# 1 连接mysql服务端
conn = pymysql.connect(
    host='localhost',
    port=3306,
    user='root',
    password='Zjz5740##',
    db='data2',
    charset='utf8',
    autocommit=True
)
# 2 获取游标
cursor = conn.cursor(cursor=pymysql.cursors.DictCursor)

# 3 执行sql语句
# sql = "insert into emp(name, sex, age, hire_date) values('kevin','male',18, NOW())"
sql = "select * from emp"
# 4 开始执行
affect_rows = cursor.execute(sql)
# print(affect_rows)

# conn.commit()  # 修改、添加数据需要commit

# 5 拿到具体数据
# print(cursor.fetchall())
for i in cursor.fetchall():
    print(i)

# 6 关闭游标、连接
cursor.close()
conn.close()
注⚠️:cursor = conn.cursor(cursor=pymysql.cursors.DictCursor)中
pymysql.cursors.DictCursor是PyMySQL库提供的一个游标(cursor)类。它用于创建一个游标对象,该对象以字典形式返回查询结果,而不是默认的元组形式。
而默认是 cursor = conn.cursor() 这种方式创建的游标对象,查询结果以元组的形式返回,其中每个元素对应结果中的一个字段的值。
import pymysql

conn = pymysql.connect(host='localhost', user='user', password='password', database='mydb')
cursor = conn.cursor()

cursor.execute("SELECT * FROM users")
row = cursor.fetchone()
print(row[0])
大元组套小元组,一个小元组就是一条记录
4、简易登录注册代码使用mysql作为数据库
import pymysql

# 连接数据库
conn = pymysql.connect(
    host='localhost',
    user='root',
    password='Zjz5740##',
    database='atm'
    autocommit=True  # 针对增 改 删自动二次确认
)

# 注册函数
def register():
    # 获取用户输入的用户名和密码
    username = input("请输入用户名: ")
    password = input("请输入密码: ")

    # 查询用户是否已存在
    cursor = conn.cursor()
    sql = "SELECT * FROM user WHERE name = %s"  # 避免了sql注入
    cursor.execute(sql, (username,))
    result = cursor.fetchone()

    if result:
        print("该用户名已存在,请重新注册!")
    else:
        # 执行插入语句,将用户信息写入数据库
        insert_sql = "INSERT INTO user (name, password) VALUES (%s, %s)"
        cursor.execute(insert_sql, (username, password))
        conn.commit()
        print("注册成功!")
    cursor.close()

# 登录函数
def login():
    # 获取用户输入的用户名和密码
    username = input("请输入用户名: ")
    password = input("请输入密码: ")

    # 查询用户是否存在
    cursor = conn.cursor()
    sql = "SELECT * FROM user WHERE name = %s AND password = %s"
    cursor.execute(sql, (username, password))
    result = cursor.fetchone()

    if result:
        print("登录成功!")
    else:
        print("用户名或密码错误!")

    cursor.close()

# 主菜单
def main_menu():
    while True:
        print("1. 注册")
        print("2. 登录")
        print("3. 退出")

        choice = input("请选择操作: ")

        if choice == '1':
            register()
        elif choice == '2':
            login()
        elif choice == '3':
            break
        else:
            print("无效的选择,请重新输入!")

# 执行主菜单
main_menu()

# 关闭数据库连接
conn.close()
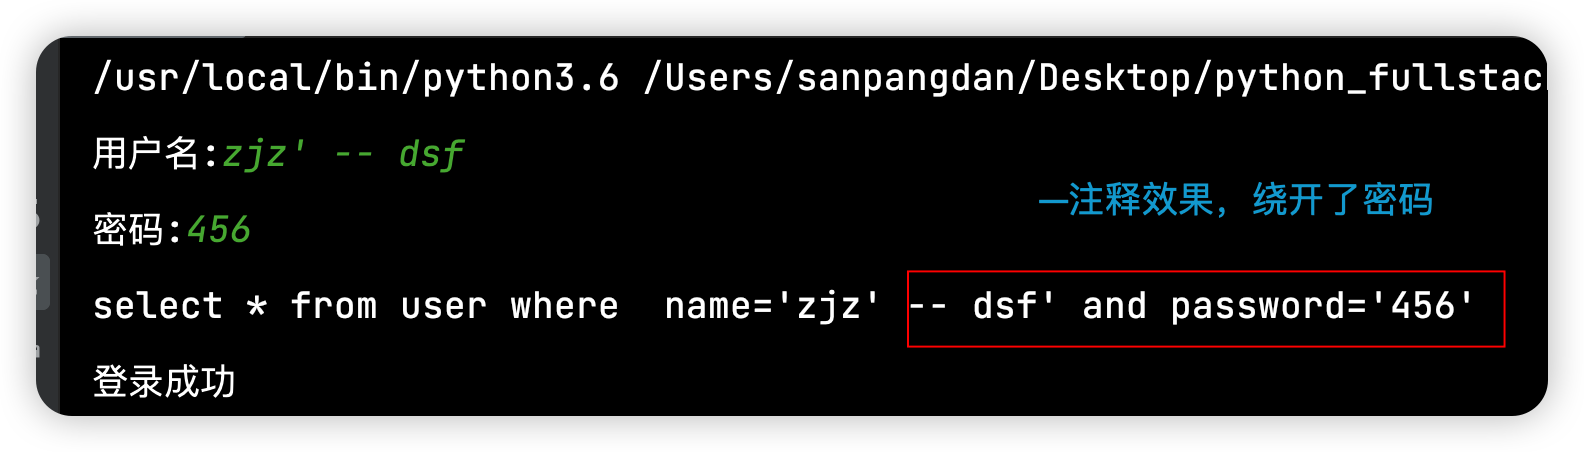
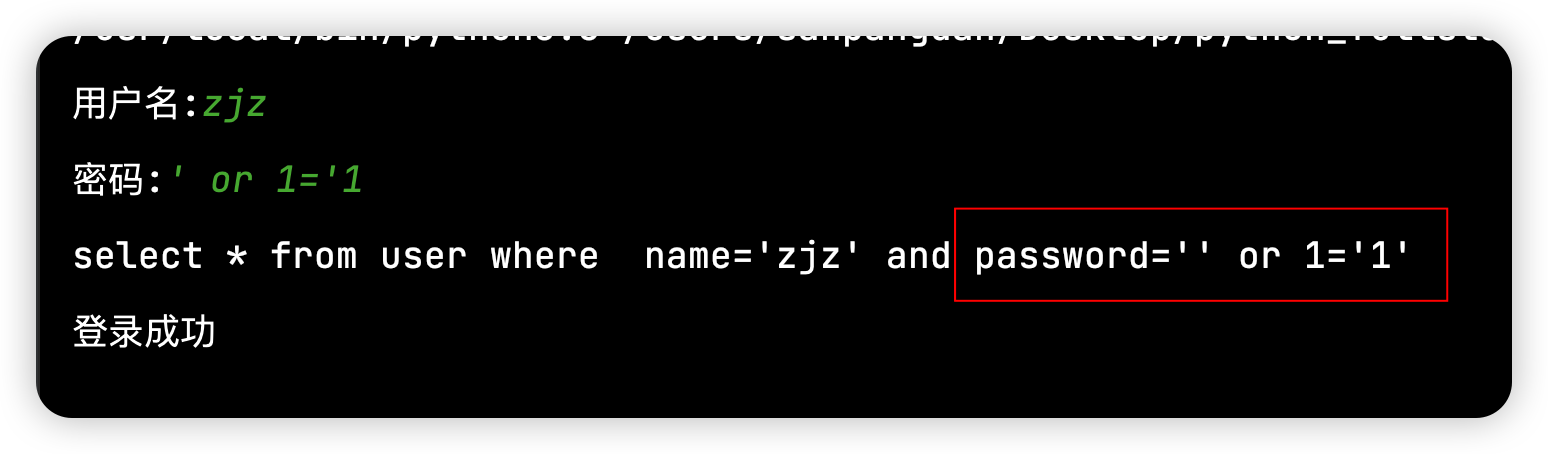
sql 注入
-
基于布尔逻辑的注入:攻击者利用布尔逻辑判断条件,通过构造恶意输入来绕过验证逻辑。例如,在登录页面的用户名和密码字段中输入
' OR '1'='1,攻击者可以成功绕过验证逻辑,因为这个输入会使SQL查询的条件始终为真。 -
基于注释的注入:攻击者使用注释符号(例如
--)注释掉原始SQL查询的一部分,然后在注释之后添加自己的恶意代码。这样,攻击者可以在注释符号后执行任意的SQL代码。 -
UNION注入:攻击者利用UNION操作符将恶意查询结果合并到原始查询中。通过构造恶意的UNION查询,攻击者可以从其他表中提取数据,甚至是敏感信息
import pymysql

conn = pymysql.connect(
    host='localhost',
    port=3306,
    user='root',
    passwd='Z740##',
    database='atm',
    charset='utf8mb4',
    autocommit=True
)

cursor = conn.cursor(cursor=pymysql.cursors.DictCursor)

username = input('用户名:').strip()
password = input('密码:').strip()

sql = "select * from user where  name='%s' and password='%s' " % (username, password)

print(sql)

affect_rows = cursor.execute(sql)

res = cursor.fetchone()

if res:
    print('登录成功')
else:
    print('登录失败')
第一种是使用-- 把密码那一部分的sql语句给注释掉了
第二种是‘ or 1=’1,把password设置为空,接上一个or 1=‘1’
5、修改mysql数据库库名、表名大写为小写案例
import pymysql

# MySQL 数据库配置
config = {
    'user': 'root',
    'password': 'password',
    'host': 'ip',
    'port': 3306,
    'cursorclass': pymysql.cursors.DictCursor,
}

db = None  # 初始化 db 为 None

try:
    # 连接数据库,创建 cursor 对象
    db = pymysql.connect(**config)
    cursor = db.cursor()
    cursor.execute("SHOW DATABASES")
    databases = cursor.fetchall()

    for database in databases:
        db_name = database['Database']
        if db_name in ['information_schema', 'performance_schema', 'mysql', 'sys']:
            continue
        # 库名为大写的情况
        if any(c.isupper() for c in db_name):
            new_db_name = db_name.lower()  # 转换为小写

            # 创建新数据库
            cursor.execute(f"CREATE DATABASE IF NOT EXISTS `{new_db_name}`")
            print(f'Created database {new_db_name}')

            # 切换到当前数据库
            db.select_db(db_name)
            # 获取当前数据库中的所有表
            cursor.execute(f"SHOW TABLES IN {db_name}")
            tables = cursor.fetchall()
            for table in tables:
                table_name = table[f'Tables_in_{db_name}']
                new_table_name = table_name.lower()
                cursor.execute(f"RENAME TABLE `{db_name}`.`{table_name}` TO `{new_db_name}`.`{new_table_name}`")
                print(f'Renamed table {table_name} to {new_table_name} in database {new_db_name}')
        # 库名为小写的情况
        else:
            db.select_db(db_name)
            cursor.execute(f"SHOW TABLES IN {db_name}")
            tables = cursor.fetchall()
            for table in tables:
                table_name = table[f'Tables_in_{db_name}']
                if any(c.isupper() for c in table_name):
                    new_table_name = table_name.lower()
                    cursor.execute(f"RENAME TABLE `{db_name}`.`{table_name}` TO `{db_name}`.`{new_table_name}`")
                    print(f'Renamed table {table_name} to {new_table_name} in database {db_name}')
except pymysql.Error as e:
    print(f"Error connecting to MySQL Platform: {e}")
finally:
    if db:
        db.close()

