zsh+oh-my-zsh + powerlevel10k
效果图

一、zsh特性
1、zsh是一款类似 bash的命令行解释器shell,它可支持丰富的主题和插件,并帮助使用者更加便捷的使用linux系统,大部分兼容bash
2、特性
- 开箱即用、可编程的命令行补全功能可以帮助用户输入各种参数以及选项。
- 在用户启动的所有shell中共享命令历史。
- 通过扩展的文件通配符,可以不利用外部命令达到find命令一般展开文件名。
- 改进的变量与数组处理。
- 在缓冲区中编辑多行命令。
- 多种兼容模式,例如使用/bin/sh运行时可以伪装成Bourne shell。
- 可以定制呈现形式的提示符;包括在屏幕右端显示信息,并在键入长命令时自动隐藏。
- 可加载的模块,提供其他各种支持:完整的TCP与Unix域套接字控制,FTP客户端与扩充过的数学函数。
- 完全可定制化。
- 其他还有很多功能通过使用插件实现
二、安装
1、zsh支持任意的linux发型版本,详细的不同操作系统安装教程
Installing ZSH · ohmyzsh/ohmyzsh Wiki · GitHub
Plugins Overview · ohmyzsh/ohmyzsh Wiki (github.com) 插件总览
apt-get install zsh
2、安装 oh-my-zsh, 它是zsh的一个增强辅助,更好管理zsh,因为zsh包括了很多配置
sh -c "$(wget https://raw.github.com/robbyrussell/oh-my-zsh/master/tools/install.sh -O -)"
3、设置zsh为默认shell
chsh -s $(which zsh)
4、查看版本
 zsh --version
zsh 5.8 (x86_64-debian-linux-gnu)
5、查看安装的主题和插件
ls  ~/.oh-my-zsh/themes
ls  ~/.oh-my-zsh/plugins
6、配置
zsh的配置文件路径在当前用户下 如我的路径是 ~/.zshrc,可以查看 cat ~/.zshrc
/ egrep -v "^[ \t]*#|^$"   .zshrc
export ZSH="$HOME/.oh-my-zsh"
ZSH_THEME="random"
plugins=(git wd web-search history history-substring-search zsh-autosuggestions z)
source $ZSH/oh-my-zsh.sh

export ZSH="$HOME/.oh-my-zsh"
ZSH_THEME="agnoster"
plugins=(git zsh-syntax-highlighting zsh-autosuggestions)
source $ZSH/oh-my-zsh.sh
source /root/.oh-my-zsh/custom/plugins/zsh-syntax-highlighting/zsh-syntax-highlighting.zsh
source /root/.oh-my-zsh/custom/plugins/zsh-autosuggestions/zsh-autosuggestions.zsh
alias k='kubectl'
alias kgp='kubectl get pods'
alias kgj='kubectl get jobs'
alias kgs='kubectl get services'
alias kgd='kubectl get deployment'
alias kgds='kubectl get DaemonSet'
alias kgss='kubectl get StatefulSets'
alias klf='kubectl logs -f '
alias kgpv='kubectl get pv'
alias kdp='kubectl delete pods'
alias kdj='kubectl delete jobs'
alias kcu='kubectl config use-context '
三、安装命令补全插件
1、把插件仓库克隆到$ZSH_CUSTOM/plugins (默认位置是 ~/.oh-my-zsh/custom/plugins)
git clone https://github.com/zsh-users/zsh-autosuggestions ${ZSH_CUSTOM:-~/.oh-my-zsh/custom}/plugins/zsh-autosuggestions
国内
git clone https://gitee.com/phpxxo/zsh-autosuggestions.git ${ZSH_CUSTOM:-~/.oh-my-zsh/custom}/plugins/zsh-autosuggestions
2、vim .zshrc
plugins=(git wd web-search history history-substring-search zsh-autosuggestions z)
source  ~/.zshrc
3、autojump 插件也非常好使,提升效率杠杠滴
它的用法是输入 j 目录名 或 j 目录名包含的字符(这个目录必须是之前 cd 访问过的),就可直接切换到相应的目录。不用再各种cd啦~具体看下面截图示例。
z 插件和 j插件的效果差不多
git clone git://github.com/wting/autojump.git
cd autojump
./install.py
然后在~/.zshrc 里加上如下语句再source ~/.zshrc即可生效
[[ -s /Users/xxxxxx/.autojump/etc/profile.d/autojump.sh ]] && source /Users/xxxxxx/.autojump/etc/profile.d/autojump.sh
注意:这个步骤在执行安装后自动会提示,xxxxxx指代你的用户名,到时候直接复制整句即可。
(若要卸载)
cd autojump
./uninstall.py
4、zsh-autosuggestions.zsh自动补全
git clone https://github.com/zsh-users/zsh-autosuggestions ${ZSH_CUSTOM:-~/.oh-my-zsh/custom}/plugins/zsh-autosuggestions
5、再来一个高亮显示常用命令的插件 zsh-syntax-highlighting
git clone https://github.com/zsh-users/zsh-syntax-highlighting.git ${ZSH_CUSTOM:-~/.oh-my-zsh/custom}/plugins/zsh-syntax-highlighting
在~/.zshrc,把zsh-syntax-highlighting添加到 Oh My Zsh 的插件列表中
plugins=(git wd web-search history history-substring-search zsh-syntax-highlighting zsh-autosuggestions z)
6、extract 插件
功能强大的解压插件,所有类型的文件解压一个命令x全搞定,再也不需要去记tar后面到底是哪几个参数了。
四、Powerlevel10k
简单来说就是一个 ZSH 的主题,只不过它的功能很强大,以下简称 p10k。
1、安装
git clone --depth=1 https://github.com/romkatv/powerlevel10k.git ${ZSH_CUSTOM:-~/.oh-my-zsh/custom}/themes/powerlevel10k
2、然后需要打开 ~/.zshrc 设置 ZSH_THEME:
ZSH_THEME="powerlevel10k/powerlevel10k
3、安装字体 Nerd Fonts
https://www.nerdfonts.com/font-downloads 官网下载
你可以如官网所说,通过 brew 来安装:
brew tap homebrew/cask-fonts
brew cask install font-hack-nerd-font
但是我不建议这样,包括不建议你下载 zip 包,因为这个文件太大了,太大了,太大了。。。
我们可以这样:
打开 Release v3.0.1 · ryanoasis/nerd-fonts · GitHub,滑动页面找到 Assets 区域,如图:

我们只要下载箭头所指的 Hack.zip 这个字体包,解压缩之后就会获得一些 ttf 字体文件,双击安装即可。
zshrc 设置字体
POWERLEVEL9K_MODE="nerdfont-complete"
ZSH_THEME="powerlevel10k/powerlevel10k"
注意,需要设置在 ZSH_THEME 之前。
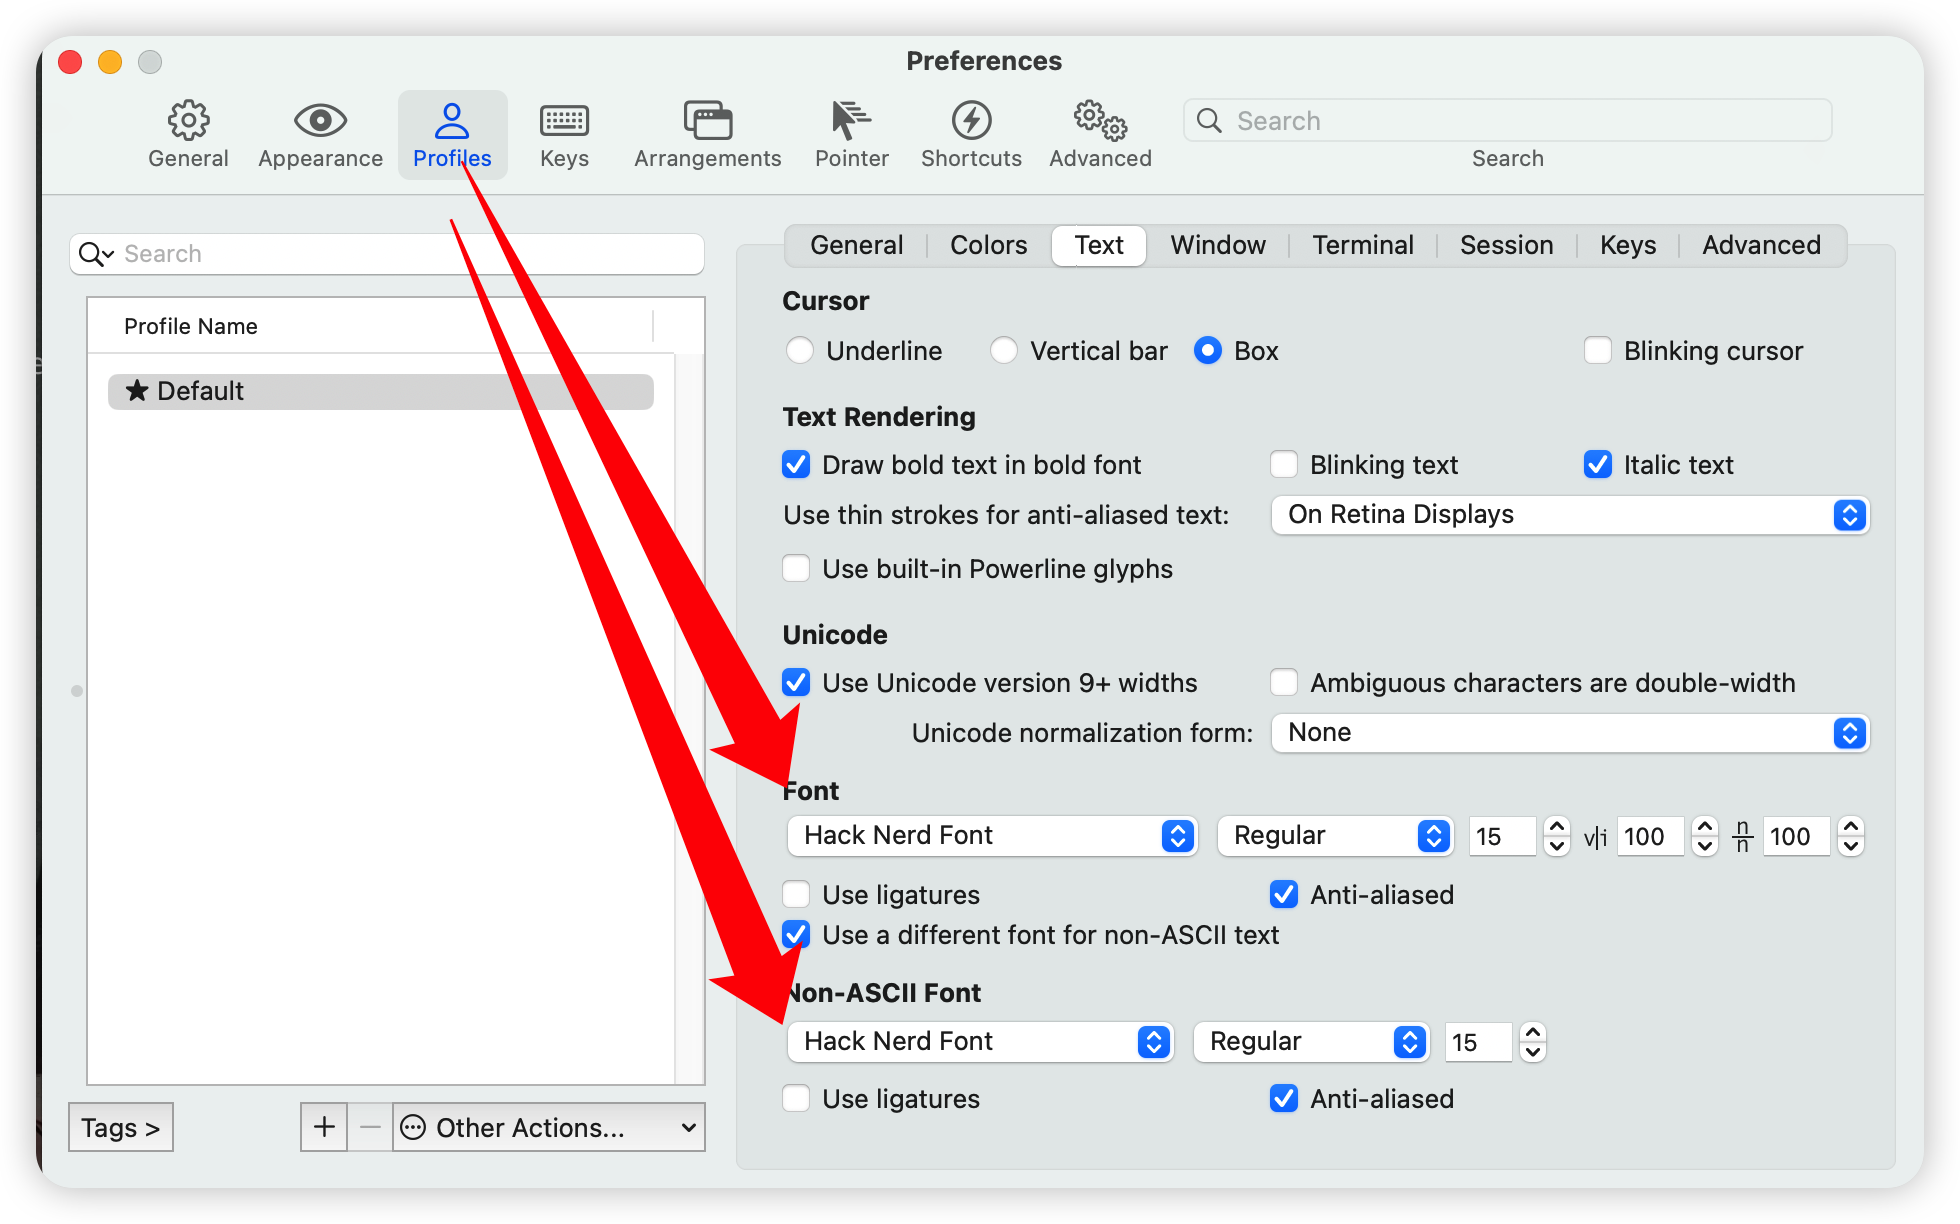
iTerm2 设置字体
操作路径:菜单栏 -> Profiles -> Open Profiles -> Edit Profiles -> 选择 Text

自动配置
如果你指定了 ZSH_THEME="powerlevel10k/powerlevel10k" 但是在 zshrc 里没进行任何手动的配置,打开 iTerm2 的时候就会触发自动配置的流程。
也可以通过以下命令再次进入自动配置的流程:
p10k configure
后面几个选项随意,执行完命令之后,就会初始化 p10k:在根目录下生成 ~/.p10k.zsh,并且在 ~/.zshrc 底部写入:
如果想废除 p10k 的配置,只需要删除 ~/.p10k.zsh,并且删除上面这条命令即可。
自定义配置
如果你想当高玩,也可以在 ~/.zshrc 里手动配置 p10k,或者在 ~/.p10k.zsh 基础上进行修改。
这个得要自己看文档摸索啦,这里我简单说几个配置:
- POWERLEVEL9K_LEFT_PROMPT_ELEMENTS
- POWERLEVEL9K_RIGHT_PROMPT_ELEMENTS
- POWERLEVEL9K_VCS_GIT_GITHUB_ICON
POWERLEVEL9K_LEFT_PROMPT_ELEMENTS
显示在命令行左边区域的元素:
POWERLEVEL9K_LEFT_PROMPT_ELEMENTS=(dir dir_writable vcs virtualenv os_icon)
显示在命令行右边区域的元素:
POWERLEVEL9K_RIGHT_PROMPT_ELEMENTS=(status background_jobs command_execution_time time)
可以在 POWERLEVEL9K_LEFT_PROMPT_ELEMENTS 和 POWERLEVEL9K_RIGHT_PROMPT_ELEMENTS 里用的字段有:
|
字段 |
含义 |
|---|---|
|
user |
用户名 |
|
dir |
当前目录名 |
|
vcs |
远程仓库信息 |
|
os_icon |
系统图标 |
|
date |
日期 |
|
host |
主机名 |
|
status |
上一条命令的执行状态 |
|
time |
当前时间 |
|
... |
... |
如果还想了解更多,如下
GitHub - romkatv/powerlevel10k: A Zsh theme
| Segment | Meaning |
|---|---|
anaconda |
virtual environment from conda |
asdf |
tool versions from asdf |
aws |
aws profile |
aws_eb_env |
aws elastic beanstalk environment |
azure |
azure account name |
background_jobs |
presence of background jobs |
battery |
internal battery state and charge level (yep, batteries literally included) |
command_execution_time |
duration (wall time) of the last command |
context |
user@hostname |
cpu_arch |
CPU architecture |
dir |
current working directory |
direnv |
direnv status |
disk_usage |
disk usage |
dotnet_version |
dotnet version |
fvm |
flutter environment from fvm |
gcloud |
google cloud cli account and project |
goenv |
go environment from goenv |
google_app_cred |
google application credentials |
go_version |
go version |
haskell_stack |
haskell version from stack |
ip |
IP address and bandwidth usage for a specified network interface |
java_version |
java version |
jenv |
java environment from jenv |
kubecontext |
current kubernetes context |
laravel_version |
laravel php framework version |
load |
CPU load |
luaenv |
lua environment from luaenv |
midnight_commander |
midnight commander shell |
nix_shell |
nix shell indicator |
nnn |
nnn shell |
lf |
lf shell |
nodeenv |
node.js environment from nodeenv |
nodenv |
node.js environment from nodenv |
node_version |
node.js version |
nordvpn |
nordvpn connection status |
nvm |
node.js environment from nvm |
os_icon |
your OS logo (apple for macOS, swirl for debian, etc.) |
package |
name@version from package.json |
perlbrew |
perl version from perlbrew |
phpenv |
php environment from phpenv |
php_version |
php version |
plenv |
perl environment from plenv |
prompt_char |
multi-functional prompt symbol; changes depending on vi mode: ❯, ❮, V, ▶ for insert, command, visual and replace mode respectively; turns red on error |
proxy |
system-wide http/https/ftp proxy |
public_ip |
public IP address |
pyenv |
python environment from pyenv |
ram |
free RAM |
ranger |
ranger shell |
rbenv |
ruby environment from rbenv |
rust_version |
rustc version |
rvm |
ruby environment from rvm |
scalaenv |
scala version from scalaenv |
status |
exit code of the last command |
swap |
used swap |
taskwarrior |
taskwarrior task count |
terraform |
terraform workspace |
terraform_version |
terraform version |
time |
current time |
timewarrior |
timewarrior tracking status |
todo |
todo items |
toolbox |
toolbox name |
vcs |
Git repository status |
vim_shell |
vim shell (:sh) |
virtualenv |
python environment from venv |
vi_mode |
vi mode (you don't need this if you've enabled prompt_char) |
vpn_ip |
virtual private network indicator |
wifi |
WiFi speed |
xplr |
xplr shell |
POWERLEVEL9K_VCS_GIT_GITHUB_ICON
如果它是一个 Github 目录,就会显示这个图标:
所以出现在窗口里的图标都可以自定义,可以通过命令查看目前正在使用的图标
get_icon_names
找到想要修改的 KEY 就可以修改图标了。
注意:需要使用
Nerd Fonts才能收获这满满的快乐。
有人问,这个图标的代码该去哪找呢?
在这里:?https://www.nerdfonts.com/cheat-sheet
这是 Nerd Fonts 能够支持的所有图标,可以直接使用关键字进行搜索。
比如,我想修改 Git 的图标:
找到喜欢的图标之后,右下角的 f113 就是这个图标的值,只需要这样就了:
POWERLEVEL9K_VCS_GIT_GITHUB_ICON=$'\uf113'
插件
到了这一步,你的 iTerm2 应该已经颜值爆表,足够好看了。
毕竟这是我们的饭碗,光好看不行,得好用,来了解一下强大的插件体系。
首先,我们先了解一下插件在 ~/.zshrc 的哪个位置,找到下面这个字段就不会错了
plugins=(git)
是不是简单多了。可以通过命令查看所有配置:
vim ~/.oh-my-zsh/plugins/git/git.plugin.zsh
VS Code 配置
如果你用的是 VS Code,需要再配置一下字体:
{
  "terminal.integrated.fontFamily": "Hack Nerd Font"
}
macOS安装字体nerd-font - 掘金 (juejin.cn)
这篇 iTerm2 + Oh My Zsh 教程手把手让你成为这条街最靓的仔-腾讯云开发者社区-腾讯云 (tencent.com)


