ansible循环
一、ansible迭代(循环)
loop循环语句
在写 playbook 的时候发现了很多 task 都要重复引用某个相同的模块,比如一次启动10个服务,或者一次拷贝10个文件,如果按照传统的写法最少要写10次,这样会使得 playbook很臃肿。Ansible提供了两个用于创建循环的关键字:loop和with_ (除了with_items,还有其他可用于循环的比如with_dict)
目前我们习惯于用loop替代with_*
格式:
- 对迭代项的引用,固定变量名为
"item"; - 要在
task中使用with_items或loop关键字给定要迭代的元素列表;
实操:
1、使用循环批量安装软件
方式1
1 2 3 4 5 6 7 8 9 10 11 12 | cat loop.yml- hosts: web remote_user: root tasks: - name: Install Packages yum: name: "{{ item }}" state: present loop: - rsync - glances |
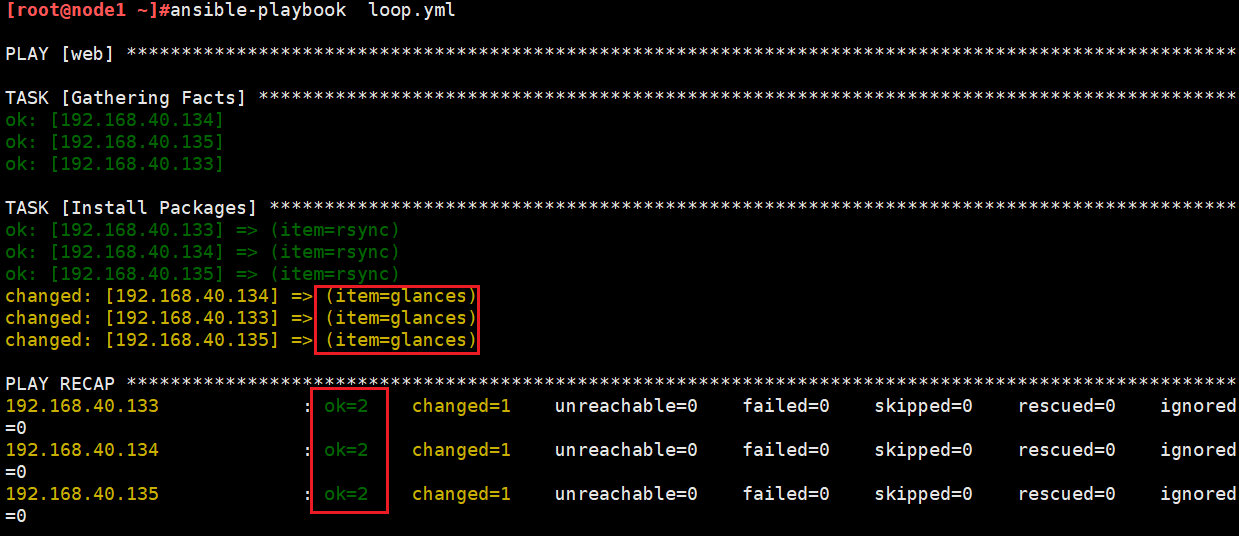
有执行结果可知,glances安装成功,rsync没有改变是因为软件已经安装有了。
方式2:
1 2 3 4 5 6 7 8 9 10 11 12 13 | cat loop1.yml- hosts: web remote_user: root vars: packages: - httpd - glances tasks: - name: Install Packages yum: name: "{{ packages }}" state: present |

方式采用变量方方式,显示上不如loop直观
方式3:loop调用vars的变量
1 2 3 4 5 6 7 8 9 10 11 12 13 | ---- hosts: web vars: test_name: - test1 - test2 - test3 tasks: - name: delete user user: name: "{{ item }}" state: present loop: "{{ test_name }}" |
2、使用循环批量启动服务
1 2 3 4 5 6 7 8 9 10 11 12 | cat loop_service.yml- hosts: NginxWebs remote_user: root tasks: - name: Start Service service: name: "{{ item }}" state: started loop: - httpd - mariadb-server |
3、使用循环批量创建用户
注:此处将loop换成with_items也是一样
1 2 3 4 5 6 7 8 9 10 11 12 13 14 15 16 17 18 19 20 21 | - hosts: web tasks: - name: Create Groups group: name: "{{ item }}" state: present loop: - group1 - group2 - group3 - name: Create Users user: name: "{{ item.user }}" group: "{{ item.group }}" uid: "{{ item.uid }}" state: present create_home: yes loop: - { user: user1,group: group1, uid: 2001 } - { user: user2,group: group2, uid: 2002 } - { user: user3,group: group3, uid: 2003 } |
4、使用循环批量拷贝文件
1 2 3 4 5 6 7 8 9 10 11 12 13 | - hosts: web tasks: - name: Copy Configuer File template: src: "{{ item.src }}" dest: "{{ item.dest }}" owner: "{{ item.owner }}" group: "{{ item.group }}" mode: "{{ item.mode }}" loop: - { src: "/root/conf/nginx.conf.j2", dest: "/etc/nginx/nginx.conf", owner: "root", group: "root", mode: "0644" } - { src: "/root/conf/example.com.conf.j2", dest: "/etc/nginx/conf.d/example.con.conf", owner: "root", group: "root", mode: "0644" } - { src: "/root/file/index.html", dest: "/data/nginx/example/index.html", owner: "nginx", group: "nginx", mode: 0644 } |
注意:应用template时用法和copy一致,但是此处dest目标路径需要自己提前创建好、属主(组)都要有
copy是这样介绍的:
1 2 3 4 5 6 7 8 | = dest Remote absolute path where the file should be copied to. If `src' is a directory, this must be a directory too. #如果 `src' 是一个目录,dest也必须是一个目录。 If `dest' is a non-existent path and if either `dest' ends with "/" or `src' is a directory, `dest' is created. #如果 `dest' 是不存在的路径,并且如果 `dest' 以“/”结尾或 `src' 是目录,则创建 `dest'。 If `dest' is a relative path, the starting directory is determined by the remote host. #如果“dest”是相对路径,则起始目录由远程主机确定。 If `src' and `dest' are files, the parent directory of `dest' is not created and the task fails if it does not already exist. #如果 `src' 和 `dest' 是文件,则不创建 `dest' 的父目录,如果不存在则任务失败。 type: path |
5、嵌套循环with_nested、with_cartesian
1 2 3 4 5 6 7 8 9 10 11 12 | cat loop6.yml---- hosts: web remote_user: root gather_facts: no tasks: - file: state: directory path: "/testdir/{{item.0}}/{{item.1}}" with_nested: - [ a, b, c ] - [ test1, test2 ] |
效果
1 2 3 4 5 6 7 8 9 10 11 12 13 | tree /testdir//testdir/|-- a| |-- test1| `-- test2|-- b| |-- test1| `-- test2`-- c |-- test1 `-- test29 directories, 0 files |
分别给用户授予3个数据库的所有权限
1 2 3 4 5 | - name: give users access to multiple databases mysql_user: name={{ item[0] }} priv={{ item[1] }}.*:ALL append_privs=yes password=foo with_nested: - [ 'alice', 'bob' ] - [ 'clientdb', 'employeedb', 'providerdb' ] |
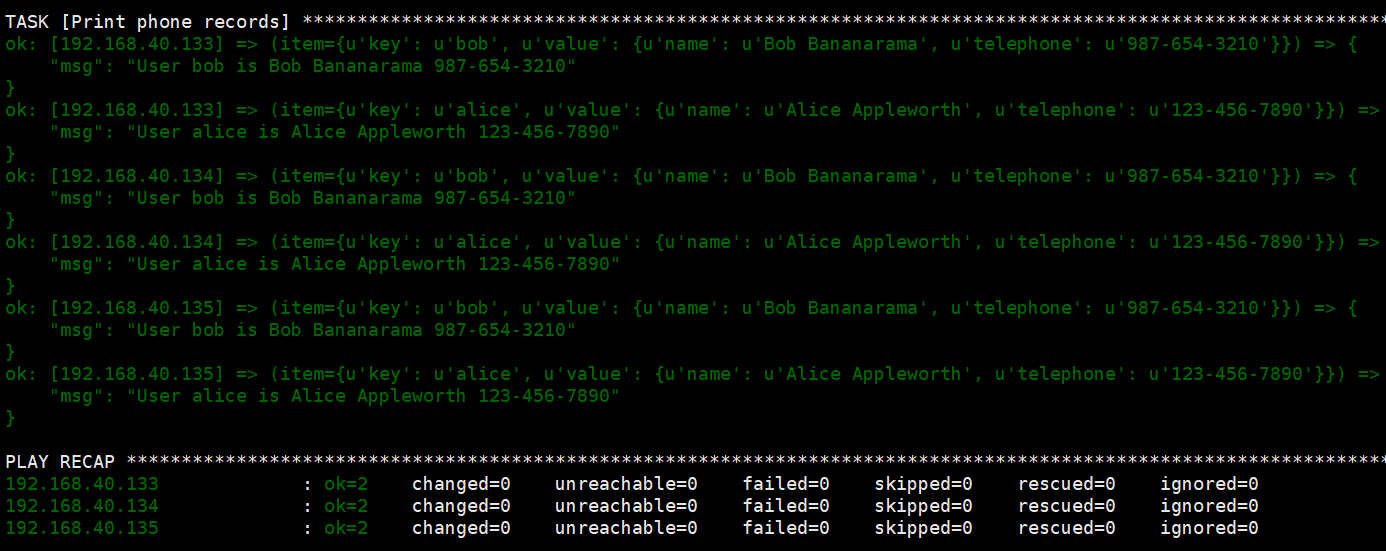
6、对哈希表循环(key:value)
1 2 3 4 5 6 7 8 9 10 11 12 13 14 15 | ---- hosts: web vars: users: alice: name: Alice Appleworth telephone: 123-456-7890 bob: name: Bob Bananarama telephone: 987-654-3210 tasks: - name: Print phone records debug: msg: "User {{ item.key }} is {{ item.value.name }} {{ item.value.telephone }}" with_dict: "{{users}}" |
7、对文件列表使用循环
1 2 3 4 5 6 7 8 9 10 11 | cat loop7.yml---- hosts: web tasks: - copy: src: "{{ item }}" dest: /etc/fooapp/ owner: root mode: 600 with_fileglob: - /playbooks/files/fooapp/* |
效果

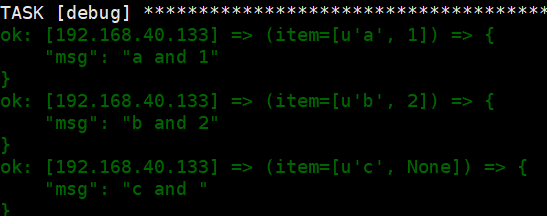
8、对列表循环
如果列表数目不匹配,用None补全
1 2 3 4 5 6 7 8 | ---- hosts: web tasks: - debug: msg: "{{ item.0 }} and {{ item.1 }}" with_together: - [ 'a', 'b', 'c' ] - [ 1, 2 ] |
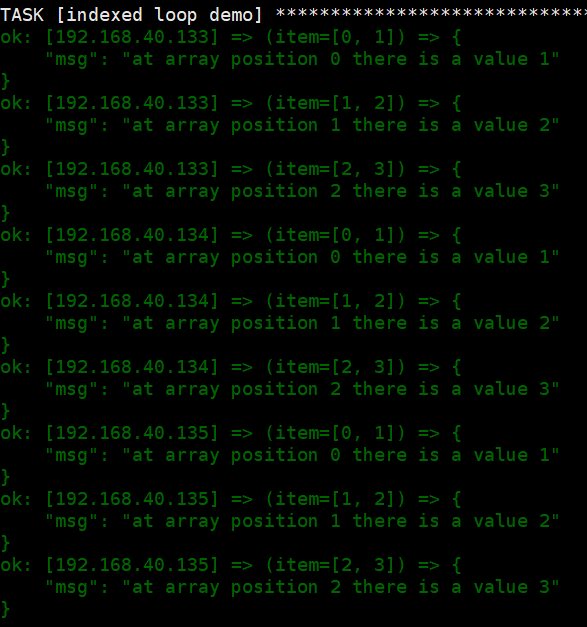
9、遍历列表和索引:with_indexed_items
1 2 3 4 5 6 | ---- hosts: web tasks: - name: indexed loop demo debug: "msg='at array position {{ item.0 }} there is a value {{ item.1 }}'" with_indexed_items: [1,2,3] |
10、重试循环
1 2 3 4 5 6 7 8 | ---- hosts: web tasks: - action: shell /usr/bin/foo register: result until: result.stdout.find("all systems go") != -1 retries: 5 delay: 10 |
"重试次数retries" 的默认值为3,"delay"为5
二、循环与when
如果将when与循环一起使用时,ansible会为每个循环项都执行单独的条件判断,不满足条件的项就会跳过。
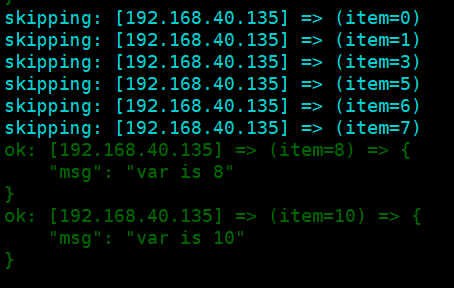
1、打印大于5的数字
1 2 3 4 5 6 7 8 9 10 | cat loop8.yml---- hosts: web debugger: on_failed tasks: - name: print items greater than 5 debug: msg: var is {{ item }} loop: [0,1,3,5,6,7,8,10] when: item > 7 |
效果:大于7的数字被执行
2、指定默认值default,当该集合未定义时,可以按条件跳过
1 2 3 4 5 6 7 8 9 | ---- hosts: web debugger: on_failed tasks: - name: print items greater than 5 debug: msg: "mylist is {{item}}" loop: "{{ mylist|default([4,5,6]) }}" when: item > 5 |
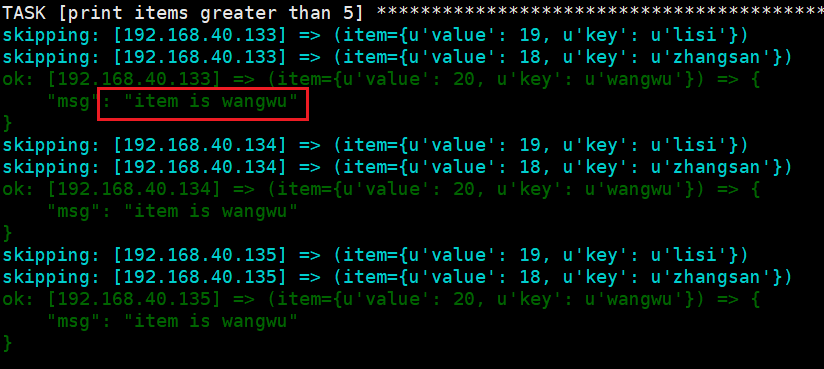
3、与字典循环
1 2 3 4 5 6 7 8 9 10 11 | ---- hosts: web debugger: on_failed vars: mydict: {"zhangsan":18,"lisi":19,"wangwu":20} tasks: - name: print items greater than 5 debug: msg: "item is {{item.key}}" loop: "{{ query('dict', mydict|default({})) }}" when: item.value > 19 |
效果大于19岁的只有wangwu
三、注册变量与loop
1 2 3 4 5 6 7 8 9 10 11 12 13 | ---- hosts: web gather_facts: no tasks: - name: delete user shell: echo '{{ item }}' loop: - test1 - test2 register: result - name: print debug: msg: "{{ result.results }}" |
四、同步文件案例
需求:将各个节点指定路径下的文件(文件不一定全有)同步到备份节点
1 2 3 4 5 6 7 8 9 10 11 12 13 14 15 16 17 18 19 20 21 22 23 24 25 26 27 28 29 30 31 32 33 34 35 36 37 38 39 40 41 42 43 44 45 46 47 48 49 50 51 52 53 54 55 56 57 58 59 60 61 62 63 64 65 66 67 68 69 70 71 72 73 74 75 76 77 78 79 80 81 82 83 84 85 86 87 88 89 90 | - hosts: all vars: node_map: node1: swarm-01 node2: swarm-02 node3: swarm-03 node4: swarm-04 node5: swarm-05 node6: swarm-06 node7: swarm-07 node8: swarm-08 node9: swarm-09 services: - elasticsearch - minio - mysql - nacos tasks: - name: 'Find the backup node' shell: grep backup_node /healsci/scripts/archive_conf.yml | awk '{print $2}' register: backup_node run_once: true - name: 'Create destination directories on backup node' file: path: "/mnt/backup_data/{{ backup_node.stdout }}/config_backup/{{ inventory_hostname }}/{{ item }}" state: directory delegate_to: "{{ node_map[backup_node.stdout] }}" with_items: "{{ services }}" - name: 'Check config files exist' stat: path: "/backup/{{ item }}" register: file_exist with_items: - elasticsearch - minio - mysql - nacos - name: 'Archive if directory exists' archive: path: "/backup/{{ item.item }}" dest: "/tmp/{{ inventory_hostname }}_{{ item.item }}.tar.gz" when: item.stat.exists and item.stat.isdir with_items: "{{ file_exist.results }}" - name: 'Fetch archives to control node first, then copy to backup node' fetch: src: "/tmp/{{ inventory_hostname }}_{{ item.item }}.tar.gz" dest: "/tmp/" flat: yes when: item.stat.exists with_items: "{{ file_exist.results }}" - name: 'Copy archives to backup node' copy: src: "/tmp/{{ inventory_hostname }}_{{ item.item }}.tar.gz" dest: "/mnt/backup_data/{{ backup_node.stdout }}/config_backup/{{ inventory_hostname }}/{{ item.item | regex_search('(elasticsearch|minio|mysql|nacos)') }}/" delegate_to: "{{ node_map[backup_node.stdout] }}" when: item.stat.exists with_items: "{{ file_exist.results }}" - name: 'Check systemd files exist' find: paths: ["{{ item[0] }}"] patterns: ["{{ item[1] }}"] recurse: yes register: systemd_files with_nested: - ["/etc/systemd/system/", "/usr/lib/systemd/system/"] - ["es*", "minio*", "mysql*", "nacos*"] - name: 'Set systemd_files to a list of found files' set_fact: systemd_files_list: "{{ systemd_files.results | map(attribute='files') | list | sum(start=[]) }}" - name: 'Fetch systemd files to control node' fetch: src: "{{ item.path }}" dest: "/tmp/{{ inventory_hostname }}/{{ item.path | regex_search('(es|minio|mysql|nacos)') | replace('es','elasticsearch') }}/" flat: yes with_items: "{{ systemd_files_list }}" - name: 'Copy systemd files to backup node' copy: src: "/tmp/{{ inventory_hostname }}/{{ item.path | regex_search('(es|minio|mysql|nacos)') | replace('es','elasticsearch') }}/{{ item.path | basename }}" dest: "/mnt/backup_data/{{ backup_node.stdout }}/config_backup/{{ inventory_hostname }}/{{ item.path | regex_search('(es|minio|mysql|nacos)') | replace('es','elasticsearch') }}/" delegate_to: "{{ node_map[backup_node.stdout] }}" with_items: "{{ systemd_files_list }}" |
注:
1、过滤器
"{{ item.path | regex_search('(es|minio|mysql|nacos)') | replace('es','elasticsearch') }}"
通过对当前的 item 施加一些过滤器,获得其路径。item 是 with_items 中当前迭代的那个元素,在这里即代表当前处理的那个系统文件。
2、嵌套循环的使用
1 2 3 4 5 6 7 8 9 | - name: 'Check systemd files exist' find: paths: ["{{ item[0] }}"] patterns: ["{{ item[1] }}"] recurse: yes register: systemd_files with_nested: - ["/etc/systemd/system/", "/usr/lib/systemd/system/"] - ["es*", "minio*", "mysql*", "nacos*"] |
3、jinja2 模版表达式
set_fact 是一个 Ansible 的模块,它用于定义新的变量(facts)或修改现有变量。这里使用 set_fact 定义了一个新的变量 systemd_files_list。
表达式 systemd_files.results | map(attribute='files') | list | sum(start=[]) 是一个 jinja2 模版表达式,主要进行了以下的操作:
-
systemd_files.results:systemd_files是前一任务注册的变量,.results获取它的results属性。results属性通常为一个列表,包含了find模块为每个路径模式查找到文件的结果,其中每个元素是一个字典,包含了files和其它的属性。 -
map(attribute='files'):map是一个jinja2过滤器,用于从systemd_files.results列表的每个元素(字典)中提取files属性的值。这里attribute='files'将会提取每个字典中files键对应的值,值通常为查找到的文件相关信息组成的列表。 -
list:将map过滤器的结果(一个迭代器)转为列表。 -
sum(start=[]):sum用于计算列表的总和,因为此时列表的元素仍为列表(每个子列表包含查找到的文件信息),所以sum实际上执行的是将这些子列表合并为一个大列表。参数start=[]是初始值,表示结果应该是个列表。
Ansible 小手册系列 十四(条件判断和循环) - 简书 (jianshu.com)


