nginx正向代理、反向代理
正向代理和反向代理的区别
正向代理:是帮助内网客户端访问外网服务器的,正向代理代理的是客户端,一般是客户端部署的
反向代理,是把外网客户端的请求转发给内网服务器。反向代理代理的是服务器,反向代理一般是服务器端部署的
简单罗列一下吧:
1、代理对象不同。正向代理代理的是客户端,反向代理代理的是服务器。正向代理帮助客户访问其无法访问的服务器资源,反向代理帮助服务器做负载均衡,另外,由于客户端跟真实服务器不直接接触,能起到一定安全防护的作用。
2、架设主体不同。正向代理一般是客户端架设的,比如在自己的机器上装一个代理软件,反向代理一般是服务器架设的,通常是在机器集群中部署个反向代理服务器。
3、保护对象不同。正向代理保护对象是客户端,反向代理保护对象是原始资源服务器。
4、作用目的不同。正向代理主要目的是解决访问限制问题,而反向代理一方面是作为负载均衡,再就是起到安全防护的作用。
一、正向代理(透明代理,代理上网)
适用于局域网访问外部网络,只能通过代理服务器来访问,这种代理服务就被称为正向代理。
通常某些服务因为安全问题,限制固定访问,因此可以通过正向代理解决
访问某些国外的服务访问慢,可以通过正向代理中继缓解丢包和延迟高的问题

正向代理的配置
1 2 3 4 5 6 7 8 9 | http { resolver 8.8.8.8; server { listen 8088; location / { proxy_pass http://$http_host$request_uri; } }} |
nginx实现代理上网,有三个关键点必须注意,其余的配置跟普通的nginx一样
1.增加dns解析resolver
2.增加无server_name名的server
3.proxy_pass指令
resolver表示DNS服务器
location表示匹配用户访问的资源,并作进一步转交和处理,可用正则表达式匹配
proxy_pass表示需要代理的地址
$http_host 表示用户访问资源的主机部分
$request_uri 表示用户访问资源的URI部分。
如,http://nginx.org/download/nginx-1.6.3.tar.gz,则request_uri=/download/nginx-1.6.3.tar.gz。
可以不设置监听端口号,nginx默认监听80端口,除非你要修改监听端口,可以用listen字段指定。
实战案例1:
在之前的编译nginx的基础上,我们对nginx二进制增加新的模快ngx_http_proxy_connect_module
1 2 3 | cd /root/workspace/packages/nginx && git clone https://github.com/chobits/ngx_http_proxy_connect_module.git./configure --prefix=/webserver/nginx18 --user=www --group=www --with-pcre --with-zlib=/root/workspace/packages/nginx/zlib-1.2.8 --with-openssl=/root/workspace/packages/nginx/openssl-1.0.2d --with-http_gzip_static_module --with-http_realip_module --with-http_stub_status_module --add-module=/root/workspace/packages/nginx/ngx_devel_kit-0.3.0 --with-ld-opt=-ljemalloc --with-stream --with-http_ssl_module --add-module=/root/workspace/packages/nginx/nginx_upstream_check_module-0.3.0 --with-http_gzip_static_module --add-module=/root/workspace/packages/nginx/ngx_http_proxy_connect_module |
缺少的库文件
1 2 3 4 5 6 7 8 9 10 11 12 13 14 15 16 17 | # wget https://ftp.pcre.org/pub/pcre/pcre-8.00.tar.gz# tar xf pcre-8.00.tar.gz && cd pcre-8.00 && ./configure --enable-utf8 --disable-shared --with-pic && make && make install# tar xf jemalloc-4.5.0.tar.bz2# cd jemalloc-4.5.0 && ./configure && make && make install# echo '/usr/local/lib' >> /etc/ld.so.conf.d/local.conf# ldd /webserver/nginx18/sbin/nginx linux-vdso.so.1 => (0x00007ffd2cb5d000) libjemalloc.so.2 => /usr/local/lib/libjemalloc.so.2 (0x00007fd040db2000) libdl.so.2 => /lib64/libdl.so.2 (0x00007fd040bae000) libpthread.so.0 => /lib64/libpthread.so.0 (0x00007fd040992000) libcrypt.so.1 => /lib64/libcrypt.so.1 (0x00007fd04075b000) libpcre.so.3 => /lib/x86_64-linux-gnu/libpcre.so.3 (0x00007fd0404eb000) libc.so.6 => /lib64/libc.so.6 (0x00007fd04011e000) libm.so.6 => /lib64/libm.so.6 (0x00007fd03fe1c000) /lib64/ld-linux-x86-64.so.2 (0x00007fd041005000) libfreebl3.so => /lib64/libfreebl3.so (0x00007fd03fc19000) |
缺少包
1 2 3 | # find / -iname "libpcre.so.3" # 找不到# ldd /webserver/nginx18/sbin/nginxlibpcre.so.3 => not found |
注:ldd本身不是一个程序,而仅是一个shell脚本:ldd可以列出一个程序所需要得动态链接库(so)
1 2 3 4 | # echo '/lib/x86_64-linux-gnu' > /etc/ld.so.conf.d/local.conf# ldconfig# ldd /webserver/nginx18/sbin/nginx |grep 'libpcre.so.3'libpcre.so.3 => /lib/x86_64-linux-gnu/libpcre.so.3 (0x00007fd0404eb000) |
测试编译是否正常
1 2 3 | # /webserver/nginx18/sbin/nginx -t -c /webserver/nginx18/conf/nginx.confnginx: the configuration file /webserver/nginx18/conf/nginx.conf syntax is oknginx: configuration file /webserver/nginx18/conf/nginx.conf test is successful |
正向代理的配置首先保证你的ngx_http_proxy_connect_module模块被编译到nginx二进制中
准备正向代理的配置文件
1 2 3 4 5 6 7 8 9 10 11 12 13 14 15 16 17 18 19 20 21 22 23 24 | # cat /webserver/nginx18/conf/vhost/proxy.confserver { # 正向代理监听的端口 listen 0.0.0.0:3128; # 正向代理中必须有的DNS解析指令 resolver 114.114.114.114; # 启用日志记录 access_log /webserver/nginx18/logs/proxy.log main; # forward proxy for CONNECT request proxy_connect; proxy_connect_allow 443 563; proxy_connect_connect_timeout 10s; proxy_connect_read_timeout 10s; proxy_connect_send_timeout 10s; # forward proxy for non-CONNECT request location / { proxy_pass http://$host; proxy_set_header Host $host; } } |
然后重启nginx即可
1 2 3 4 | # /webserver/nginx18/sbin/nginx -t -c /webserver/nginx18/conf/nginx.conf# /webserver/nginx18/sbin/nginx -s reload -c /webserver/nginx18/conf/nginx.conf #这里面引用了vhost中的配置include vhost/*.conf;<br># <strong>netstat -tunlp |grep 3128</strong>tcp 0 0 0.0.0.0:3128 0.0.0.0:* LISTEN 16553/nginx: master |
正向代理测试
1 2 3 4 5 6 7 8 9 10 11 12 13 14 15 16 17 18 19 20 21 22 23 24 | # curl https://github.com/ -I -x 161.101.x.x:3128HTTP/1.1 200 Connection EstablishedProxy-agent: nginxHTTP/1.1 200 OKdate: Wed, 29 Jul 2020 00:34:11 GMTcontent-type: text/html; charset=utf-8server: GitHub.comstatus: 200 OKvary: X-PJAX, Accept-Encoding, Accept, X-Requested-With, Accept-Encodingetag: W/"0645355c347925d40eae01189b1372c6"cache-control: max-age=0, private, must-revalidatestrict-transport-security: max-age=31536000; includeSubdomains; preloadx-frame-options: denyx-content-type-options: nosniffx-xss-protection: 1; mode=blockreferrer-policy: origin-when-cross-origin, strict-origin-when-cross-originexpect-ct: max-age=2592000, report-uri="https://api.github.com/_private/browser/errors"content-security-policy: default-src 'none'; base-uri 'self'; block-all-mixed-content; connect-src 'self' uploads.github.com www.githubstatus.com collector.githubapp.com api.github.com www.google-analytics.com github-cloud.s3.amazonaws.com github-production-repository-file-5c1aeb.s3.amazonaws.com github-production-upload-manifest-file-7fdce7.s3.amazonaws.com github-production-user-asset-6210df.s3.amazonaws.com cdn.optimizely.com logx.optimizely.com/v1/events wss://alive.github.com; font-src github.githubassets.com; form-action 'self' github.com gist.github.com; frame-ancestors 'none'; frame-src render.githubusercontent.com; img-src 'self' data: github.githubassets.com identicons.github.com collector.githubapp.com github-cloud.s3.amazonaws.com *.githubusercontent.com customer-stories-feed.github.com spotlights-feed.github.com; manifest-src 'self'; media-src 'none'; script-src github.githubassets.com; style-src 'unsafe-inline' github.githubassets.com; worker-src github.com/socket-worker.js gist.github.com/socket-worker.jsSet-Cookie: _gh_sess=f8%2BEHC2ipWawJaW%2BRIhaoHDpiKBaMNM9Qs6Kems7FPk0Jc13hBa28rZNLbtC9r3QEMvfN0JqDvOAsyyBKZMiG5QW3biYIFiQ8JxaGd0LjcmIRZ%2BVHqwYqrWVf23JtcsA6r1yIf3c%2BJy9QT92ANFDzxtpehY4F9ZWU7Wm%2B5iIY%2Fcb3h65b4t1ShJTue%2FA2dalNNAxSnvx%2FAm%2Br0p5IQRc9tGfevbWvL0bVYh8nqcezYEcExri65LLIwTwTkCzxasZfvLTQyDus05yMT8uQ%2F28Zw%3D%3D--zMmIhtSvd34s34pS--cFVCt72dLeREVdP%2BwqXrkA%3D%3D; Path=/; HttpOnly; Secure; SameSite=LaxSet-Cookie: _octo=GH1.1.176641920.1595982853; Path=/; Domain=github.com; Expires=Thu, 29 Jul 2021 00:34:13 GMT; Secure; SameSite=LaxSet-Cookie: logged_in=no; Path=/; Domain=github.com; Expires=Thu, 29 Jul 2021 00:34:13 GMT; HttpOnly; Secure; SameSite=LaxAccept-Ranges: bytesX-GitHub-Request-Id: BDE2:5AA6:205F20:2CDA3C:5F20C405 |
注:-I参数向服务器发出 HEAD 请求,然会将服务器返回的 HTTP 标头打印出来。 -x参数指定 HTTP 请求的代理。
实战案例2:
假设局域网内部有一个客户端IP为192.168.65.122,该客户端想访问公网资源http://112.127.97.202:18890。则可以设置一个正向代理服务器,连接公网和局域网。正向代理服务器局域网IP为192.168.65.164,则开放该IP对应的8888端口。
局域网客户端可通过访问192.168.65.164:8888来获取http://112.127.97.202:18890资源。
1 2 3 4 5 6 | server { listen 192.168.65.164:8888; location / { proxy_pass http://112.127.97.202:18890; }} |
运行nginx -s reload命令,使Nginx重新加载配置文件。
打开客户端浏览器,输入192.168.65.164:8888,即可看到http://112.127.97.202:18890内容
实战案例3:
1 2 3 4 5 6 7 8 9 10 11 12 13 14 15 16 17 18 19 20 21 22 23 | server { resolver 8.8.8.8; resolver_timeout 5s; listen 0.0.0.0:8080; access_log /home/reistlin/logs/proxy.access.log; error_log /home/reistlin/logs/proxy.error.log; location / { proxy_pass $scheme://$host$request_uri; proxy_set_header Host $http_host; proxy_buffers 256 4k; proxy_max_temp_file_size 0; proxy_connect_timeout 30; proxy_cache_valid 200 302 10m; proxy_cache_valid 301 1h; proxy_cache_valid any 1m; }} |
配置说明:
1,配置 DNS 解析 IP 地址,比如 Google Public DNS,以及超时时间(5秒)。
1 2 | resolver 8.8.8.8;resolver_timeout 5s; |
2,配置正向代理参数,均是由 Nginx 变量组成。其中 proxy_set_header 部分的配置,是为了解决如果 URL 中带 "."(点)后 Nginx 503 错误。
1 2 | proxy_pass $scheme://$host$request_uri;proxy_set_header Host $http_host; |
3,配置缓存大小,关闭磁盘缓存读写减少I/O,以及代理连接超时时间。
1 2 3 | proxy_buffers 256 4k;proxy_max_temp_file_size 0;proxy_connect_timeout 30; |
4,配置代理服务器 Http 状态缓存时间。
1 2 3 | proxy_cache_valid 200 302 10m;proxy_cache_valid 301 1h;proxy_cache_valid any 1m; |
https://blog.51cto.com/13673090/2306487 正向代理支持https
https://www.devopsman.cn/en/posts/nginx%E6%9D%83%E5%A8%81%E6%8C%87%E5%8D%97%E4%B8%93%E8%BE%91/20200729-nginx%E4%B8%93%E8%BE%91-05-nginx%E6%AD%A3%E5%90%91%E4%BB%A3%E7%90%86%E7%9A%84%E4%BD%BF%E7%94%A8/ 详细,有待学习整理
二、反向代理
客户端无法感知代理,因为客户端访问网络不需要配置,只要把请求发送到反向代理服务器,由反向代理服务器去选择目标服务器获取数据,然后再返回到客户端。
此时反向代理服务器和目标服务器对外就是一个服务器,暴露的是代理服务器地址,隐藏了真实服务器 IP 地址。
反向代理:把外网客户端的请求转发给内网服务器。反向代理代理的是服务器,反向代理一般是服务器端部署的
Nginx Proxy Manager web端配置反向代理
- 漂亮的用户界面:基于Tabler,界面使用起来很愉快。配置服务器从未如此有趣。
- 代理主机:公开您的专用网络 Web 服务并随时随地连接。
- 免费 SSL:内置的 Let's Encrypt 支持允许您免费保护您的 Web 服务。证书甚至可以自我更新!
- 部署简单:Nginx 代理管理器构建为 Docker 映像,而无需对 Nginx 或 Letsencrypt 有太多了解
- 多个用户:配置其他用户查看或管理他们自己的主机。完全访问权限可用。

反向代理配置
1 2 3 4 5 6 | server { server_name www.baidu.com; location / { proxy_pass http://www.baidu.com/; }} |
实战案例1:
/usr/local/nginx/conf/nginx.conf 添加server块如下:

实现效果:使用nignx反向代理,根据访问的路径跳转到不同端口的服务中,nginx监听端口为9001
访问http://192.168.43.193:9001/edu/ 直接跳转套127.0.0.1:8081
访问http://192.168.43.193:9001/vod/ 直接跳转套127.0.0.1:8082
实战案例2:
1 2 3 4 5 6 7 8 9 10 11 12 | server { listen 80; server_name xushuai.erp.com; location / { proxy_pass http://192.168.183.130:8080; proxy_read_timeout 600s; proxy_set_header X-Real-IP $remote_addr; proxy_set_header Host $host:$server_port; proxy_set_header X-Forwarded-For $proxy_add_x_forwarded_for; index index.html index.htm; } |
反代案例3:nginx反向代理获取用户真实ip
nginx做反向代理时,默认的配置后端获取到的ip都是来自于nginx,那么如何转发用户的真实IP到后端程序呢?
当前端使用nginx代理,后端使用php-fpm时,如果还是使用$_SERVER['REMOTE_ADDR'],那么php程序获取到的是nginx的ip地址,而不是用户的真实ip。
1 2 3 4 5 6 7 8 9 10 11 12 13 14 15 16 17 18 | upstream www.264.cn { ip_hash; server serving-server1.com:80; server serving-server2.com:80;}server { listen www.264.cn:80; server_name www.264.cn; location / { proxy_pass http://www.264.cn; } proxy_set_header Host $host; proxy_set_header X-Real-IP $remote_addr; proxy_set_header X-Forwarded-For $proxy_add_x_forwarded_for; } |
在nginx的配置文件中加入下面三个指令,这样后端php就可以使用$_SERVER['HTTP_X_REAL_IP']获取到访客的ip。
1 2 3 | proxy_set_header Host $host;proxy_set_header X-Real-IP $remote_addr;proxy_set_header X-Forwarded-For $proxy_add_x_forwarded_for; |
如果你想使用 http_x_forwared_for 会含有多个ip,其中第一个ip是客户端的ip,REMOTE_ADDR只能是客户端的ip,所以可以用正则提取 $http_x_forwarded_for的第一个 ip 给REMOTE_ADDR:
1 2 3 4 5 | set $realip $remote_addr;if ($http_x_forwarded_for ~ "^(\d+\.\d+\.\d+\.\d+)") {set $realip $1;}fastcgi_param REMOTE_ADDR $realip; |
实战案例4:利用 Nginx 反向代理搭建本地 yum 服务器
注:nginx部署端在外网,同时也要能连通内网服务器
http://www.manongjc.com/detail/20-bmvectntimzbsrw.html
实战案例5:Nginx 反向代理解决跨域问题
https://blog.csdn.net/qq_19734597/article/details/106344194
https://www.centoscn.vip/2039.html
https://www.runoob.com/w3cnote/nginx-proxy-balancing.html 反向代理
实战案例6、nginx反向代理配置去除前缀
使用nginx做反向代理的时候,可以简单的直接把请求原封不动的转发给下一个服务。设置proxy_pass请求只会替换域名,如果要根据不同的url后缀来访问不同的服务,则需要通过如下方法:
方法一:加"/"
1 2 3 4 5 6 7 8 9 10 11 12 13 14 15 16 17 18 19 20 21 22 23 | server { listen 8000; server_name abc.com; access_log "pipe:rollback /data/log/nginx/access.log interval=1d baknum=7 maxsize=1G" main; location ^~/user/ { proxy_set_header Host $host; proxy_set_header X-Real-IP $remote_addr; proxy_set_header X-Forwarded-For $proxy_add_x_forwarded_for; proxy_set_header X-NginX-Proxy true; proxy_pass http://user/; } location ^~/order/ { proxy_set_header Host $host; proxy_set_header X-Real-IP $remote_addr; proxy_set_header X-Forwarded-For $proxy_add_x_forwarded_for; proxy_set_header X-NginX-Proxy true; proxy_pass http://order/; }} |
^~/user/表示匹配前缀是user的请求,proxy_pass的结尾有/, 则会把/user/*后面的路径直接拼接到后面,即移除user。
方法二:rewrite
1 2 3 4 5 6 7 8 9 10 11 12 13 14 15 16 17 18 19 20 21 22 23 24 25 26 27 28 29 30 31 32 | upstream user { server localhost:8089 weight=5;}upstream order { server localhost:8090 weight=5;}server { listen 80; server_name abc.com; access_log "pipe:rollback /data/log/nginx/access.log interval=1d baknum=7 maxsize=1G" main; location ^~/user/ { proxy_set_header Host $host; proxy_set_header X-Real-IP $remote_addr; proxy_set_header X-Forwarded-For $proxy_add_x_forwarded_for; proxy_set_header X-NginX-Proxy true; rewrite ^/user/(.*)$ /$1 break; proxy_pass http://user; } location ^~/order/ { proxy_set_header Host $host; proxy_set_header X-Real-IP $remote_addr; proxy_set_header X-Forwarded-For $proxy_add_x_forwarded_for; proxy_set_header X-NginX-Proxy true; rewrite ^/order/(.*)$ /$1 break; proxy_pass http://order; }} |
proxy_pass结尾没有/,rewrite重写了url。
三、负载均衡
客户端发送多个请求到服务器,服务器处理请求,有一些可能要与数据库进行交互,服务器处理完毕之后,再将结果返回给客户端。

假设有 15 个请求发送到代理服务器,那么由代理服务器根据服务器数量,平均分配,每个服务器处理 5 个请求,这个过程就叫做负载均衡。
四、动静分离
为了加快网站的解析速度,可以把动态页面和静态页面交给不同的服务器来解析,加快解析的速度,降低由单个服务器的压力。
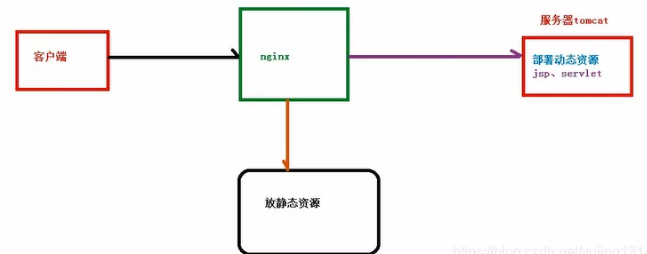
动静分离之前的状态:

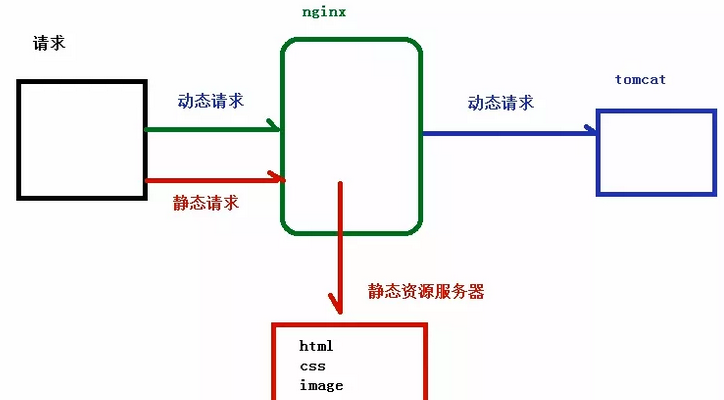
动静分离之后:

什么是动静分离?把动态请求和静态请求分开,不是讲动态页面和静态页面物理分离,可以理解为 Nginx 处理静态页面,Tomcat 处理动态页面。
动静分离大致分为两种:
-
纯粹将静态文件独立成单独域名放在独立的服务器上,也是目前主流方案。
-
将动态跟静态文件混合在一起发布,通过 Nginx 分开。
动静分离图析:

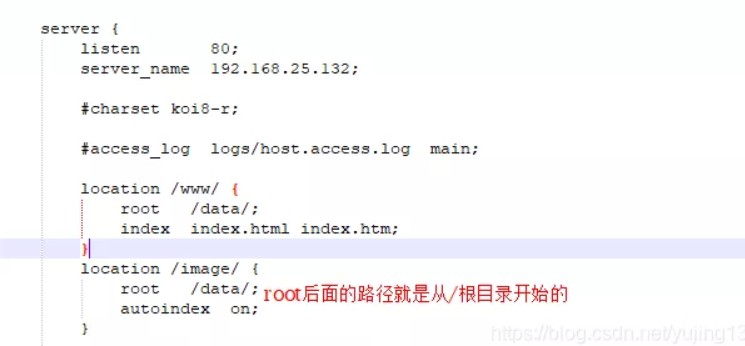
配置 Nginx,如下图:

使用wordpress-5.0.3-zh_CN.tar.gz做实验
Nginx服务器的配置:
1 2 3 4 5 6 7 8 9 10 11 12 13 14 15 16 17 18 | # tar xf wordpress-5.0.3-zh_CN.tar.gz# mv wordpress/* /data/nginx/php/# vim /apps/nginx/conf/conf.d/pc.confserver { listen 80; server_name www.xxxpc.net; location / { root /data/nginx/php; #指定静态资源的根,wordpress中的html文件和目录没有指定静态文件的具体位置,所以默认会去nginx的/下寻找静态资源 index index.html; } location ~ \.php$ { root /data/nginx/php; #指定php服务器存放资源文件的根路径 fastcgi_pass 192.168.38.37:9000; #发现php后缀的资源,反向代理给指定IP和端口号的php服务器 fastcgi_index index.php; #php的默认站点页面 fastcgi_param SCRIPT_FILENAME $document_root$fastcgi_script_name; #告知php服务器用户请求的资源的绝对路径和资源名称 include fastcgi_params; #包含fastcgi_params文件中的所有参数 }} |
php服务器配置:
1 2 3 4 5 6 7 8 9 | # tar xf wordpress-5.0.3-zh_CN.tar.gz # mv wordpress/* /data/nginx/php/ #把wordpress移动到Nginx所指定的php服务器的动态资源路径下# cd /data/nginx/php/# mysqlMariaDB [(none)]> grant all on wordpress.* to wordpress@'192.168.38.%' identified by 'centos'; #创建php连接数据库的用户和密码MariaDB [(none)]> create database wordpress; #创建wordpress用于存放数据的数据库[root@localhost php]# cp wp-config-sample.php wp-config.php #复制php连接数据库的配置文件[root@localhost php]# vim wp-config.php #修改一下php连接数据库的各种配置即可[root@localhost php]# systemctl start php72-php-fpm |
注:当Nginx和php不在同一台服务器时,Nginx和php各自服务器上都需要有wordpress的各种资源文件;因为用户请求的资源,只有动态资源才会往php服务器上转发,静态资源Nginx自己进行回复;
所以如果php有wordpress资源,但是Nginx上没有,则会造成页面无渲染效果;反之,如果Nginx上有wordpress资源,php上没有,则会提示File not found
https://www.cnblogs.com/dongzhanyi123/category/1806126.html nginx不错的整理
五、nginx的配置文件结构
1 2 3 4 5 6 7 8 9 10 11 12 13 14 15 16 17 18 19 20 21 22 23 24 25 26 27 | ... #全局块events { #events块 ...}http #http块{ ... #http全局块 server #server块 { ... #server全局块 location [PATTERN] #location块 { ... } location [PATTERN] { ... } } server { ... } ... #http全局块} |
- 1、全局块:配置影响nginx全局的指令。一般有运行nginx服务器的用户组,nginx进程pid存放路径,日志存放路径,配置文件引入,允许生成worker process数等。
- 2、events块:配置影响nginx服务器或与用户的网络连接。有每个进程的最大连接数,选取哪种事件驱动模型处理连接请求,是否允许同时接受多个网路连接,开启多个网络连接序列化等。
- 3、http块:可以嵌套多个server,配置代理,缓存,日志定义等绝大多数功能和第三方模块的配置。如文件引入,mime-type定义,日志自定义,是否使用sendfile传输文件,连接超时时间,单连接请求数等。
- 4、server块:配置虚拟主机的相关参数,一个http中可以有多个server。
- 5、location块:配置请求的路由,以及各种页面的处理情况。
https://www.cnblogs.com/dongye95/p/11096785.html#_label0_0 超长详细介绍nginx文件结构
https://mp.weixin.qq.com/s/8ubl8ZFT5J-DL4b9taBjuA


