ctcd及其数据备份
一 概述
https://juejin.im/post/5e02fb1f518825123b1aa341#heading-26
https://cloud.tencent.com/developer/article/1644102 二进制版etcd数据备份
https://blog.csdn.net/qq_27156945/article/details/103164683 二进制版etcd数据备份
http://www.mydlq.club/article/74/ kubeadm容器版数据备份
1 etcd简介
etcd是CoreOS团队于2013年6月发起的开源项目,它的目标是构建一个高可用的分布式键值(key-value)数据库。etcd内部采用raft协议作为一致性算法,etcd基于Go语言实现。
2 etcd的特点
- 简单:安装配置简单,而且提供了HTTP API进行交互,使用也很简单
- 安全:支持SSL证书验证
- 快速:根据官方提供的benchmark数据,单实例支持每秒2k+读操作
- 可靠:采用raft算法,实现分布式系统数据的可用性和一致性
3 概念术语
1 2 3 4 5 6 7 8 9 10 11 12 13 14 15 16 17 18 19 20 21 22 23 24 25 26 27 | Raft:etcd所采用的保证分布式系统强一致性的算法。Node:一个Raft状态机实例。Member: 一个etcd实例,它管理着一个Node,并且可以为客户端请求提供服务。Cluster:由多个Member构成可以协同工作的etcd集群。Peer:对同一个etcd集群中另外一个Member的称呼。Client: 向etcd集群发送HTTP请求的客户端。WAL:预写式日志,etcd用于持久化存储的日志格式。snapshot:etcd防止WAL文件过多而设置的快照,存储etcd数据状态。Proxy:etcd的一种模式,为etcd集群提供反向代理服务。Leader:Raft算法中通过竞选而产生的处理所有数据提交的节点。Follower:竞选失败的节点作为Raft中的从属节点,为算法提供强一致性保证。Candidate:当Follower超过一定时间接收不到Leader的心跳时转变为Candidate开始竞选。Term:某个节点成为Leader到下一次竞选时间,称为一个Term。Index:数据项编号,Raft中通过Term和Index来定位数据。 |
4 数据读写顺序
为了保证数据的强一致性,etcd集群中所有的数据流向都是一个方向,从 Leader (主节点)流向 Follower,也就是所有 Follower 的数据必须与 Leader 保持一致,如果不一致会被覆盖。
用户对于etcd集群所有节点进行读写
- 读取:由于集群所有节点数据是强一致性的,读取可以从集群中随便哪个节点进行读取数据
- 写入:etcd集群有leader,如果写入往leader写入,可以直接写入,然后然后Leader节点会把写入分发给所有Follower,如果往follower写入,然后Leader节点会把写入分发给所有Follower
5 leader选举
假设三个节点的集群,三个节点上均运行Timer(每个Timer持续时间是随机的),Raft算法使用随机Timer来初始化Leader选举流程,第一个节点率先完成了Timer,随后它就会向其他两个节点发送成为Leader的请求,其他节点接收到请求后会以投票回应然后第一个节点被选举为Leader。成为Leader后,该节点会以固定时间间隔向其他节点发送通知,确保自己仍是Leader。有些情况下当Follower们收不到Leader的通知后,比如说Leader节点宕机或者失去了连接,其他节点会重复之前选举过程选举出新的Leader。
6 判断数据是否写入
etcd认为写入请求被Leader节点处理并分发给了多数节点后,就是一个成功的写入。那么多少节点如何判定呢,假设总结点数是N,那么多数节点 Quorum=N/2+1。关于如何确定etcd集群应该有多少个节点的问题,上图的左侧的图表给出了集群中节点总数(Instances)对应的Quorum数量,用Instances减去Quorom就是集群中容错节点(允许出故障的节点)的数量,在集群中推荐的最少节点数量是3个。
二 etcd架构及解析
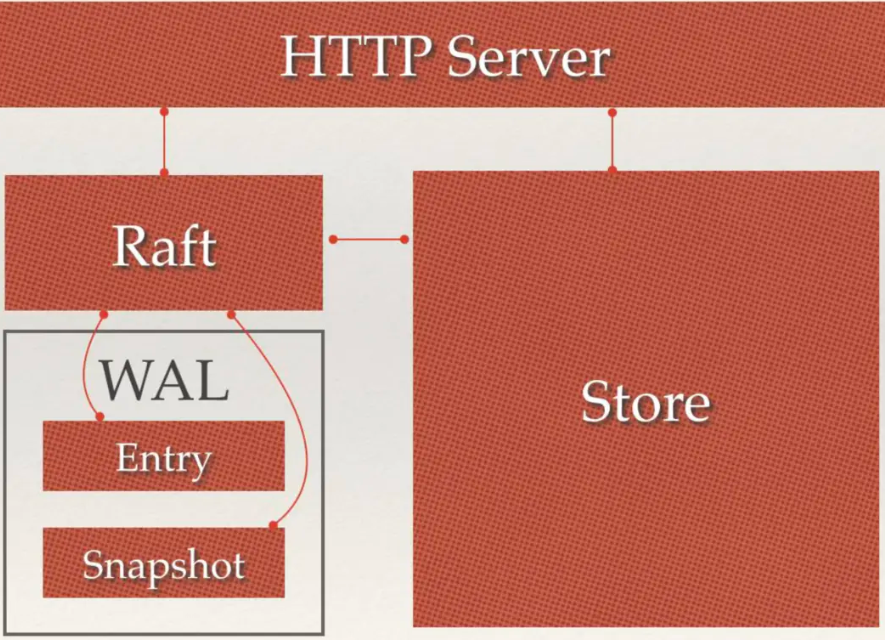
从 etcd 的架构图中我们可以看到,etcd 主要分为四个部分。
- HTTP Server:用于处理用户发送的 API 请求以及其它 etcd 节点的同步与心跳信息请求。
- Store:用于处理 etcd 支持的各类功能的事务,包括数据索引、节点状态变更、监控与反馈、事件处理与执行等等,是 etcd 对用户提供的大多数 API 功能的具体实现。
- Raft:Raft 强一致性算法的具体实现,是 etcd 的核心。
- WAL:Write Ahead Log(预写式日志),是 etcd 的数据存储方式。除了在内存中存有所有数据的状态以及节点的索引以外,etcd 就通过 WAL 进行持久化存储。WAL 中,所有的数据提交前都会事先记录日志。
- Snapshot 是为了防止数据过多而进行的状态快照;
- Entry 表示存储的具体日志内容。
通常,一个用户的请求发送过来,会经由 HTTP Server 转发给 Store 进行具体的事务处理,如果涉及到节点的修改,则交给 Raft 模块进行状态的变更、日志的记录,然后再同步给别的 etcd 节点以确认数据提交,最后进行数据的提交,再次同步。
三 安装部署
1 单机部署
可以使用二进制或源码下载安装,但是危害需要自己写配置文件,如何要启动需要自己写服务启动文件,推荐使用yum安装方式
1 2 3 4 5 6 | hostnamectl set-hostname etcd-1wget http://dl.fedoraproject.org/pub/epel/epel-release-latest-7.noarch.rpmrpm -ivh epel-release-latest-7.noarch.rpm# yum 仓库中的etcd版本为3.3.11,如果需要最新版本的etcd可以进行二进制安装yum -y install etcdsystemctl enable etcd |
可以查看yum安装的etcd的有效配置文件,根据自己的需求来修改数据存储目录,已经监听端口url/etcd的名称等
- etcd 默认将数据存放到当前路径的
default.etcd/目录下 - 在
http://localhost:2380和集群中其他节点通信 - 在
http://localhost:2379提供 HTTP API 服务,供客户端交互 - 该节点的名称默认为
default - heartbeat 为 100ms,后面会说明这个配置的作用
- election 为 1000ms,后面会说明这个配置的作用
- snapshot count 为 10000,后面会说明这个配置的作用
- 集群和每个节点都会生成一个 uuid
- 启动的时候,会运行 raft,选举出 leader
1 2 3 4 5 6 | [root@VM_0_8_centos tmp]# grep -Ev "^#|^$" /etc/etcd/etcd.confETCD_DATA_DIR="/var/lib/etcd/default.etcd"ETCD_LISTEN_CLIENT_URLS="http://localhost:2379"ETCD_NAME="default"ETCD_ADVERTISE_CLIENT_URLS="http://localhost:2379"[root@VM_0_8_centos tmp]# systemctl status etcd |
2 集群部署
1、host配置
1 2 3 4 5 | cat >> /etc/hosts << EOF172.16.0.8 etcd-0-8172.16.0.14 etcd-0-14172.16.0.17 etcd-0-17EOF |
2、etcd安装
1 2 3 4 5 6 | wget http://dl.fedoraproject.org/pub/epel/epel-release-latest-7.noarch.rpmrpm -ivh epel-release-latest-7.noarch.rpmyum -y install etcdsystemctl enable etcdmkdir -p /data/app/etcd/chown etcd:etcd /data/app/etcd/ |
3、默认配置文件
1 2 3 4 5 6 7 8 9 10 11 12 13 14 15 16 17 18 19 20 21 22 23 24 25 26 27 28 29 30 31 32 33 34 35 36 37 38 39 40 41 42 43 44 45 46 47 48 49 50 51 52 53 54 55 56 57 58 59 60 61 62 63 64 65 66 67 68 69 70 | [root@etcd-0-8 app]# cat /etc/etcd/etcd.conf#[Member]#ETCD_CORS=""ETCD_DATA_DIR="/data/app/etcd/" # etcd数据存储目录,建议存储在数据盘#ETCD_WAL_DIR=""ETCD_LISTEN_PEER_URLS="http://172.16.0.8:2380" # 与同伴的通讯地址,和其他节点同伴的通讯地址 ETCD_LISTEN_CLIENT_URLS="http://127.0.0.1:2379,http://172.16.0.8:2379" # 对外提供服务的地址#ETCD_MAX_SNAPSHOTS="5" # etcd最大快照保存数#ETCD_MAX_WALS="5" # etcd 最大walsETCD_NAME="etcd-0-8" # etcd节点名称,集群内需要唯一#ETCD_SNAPSHOT_COUNT="100000" # 指定有多少事务(transaction)被提交时,触发截取快照保存到磁盘#ETCD_HEARTBEAT_INTERVAL="100" # leader 多久发送一次心跳到 followers。默认值是 100ms#ETCD_ELECTION_TIMEOUT="1000" # 重新投票的超时时间,如果 follow 在该时间间隔没有收到心跳包,会触发重新投票,默认为 1000 ms#ETCD_QUOTA_BACKEND_BYTES="0"#ETCD_MAX_REQUEST_BYTES="1572864"#ETCD_GRPC_KEEPALIVE_MIN_TIME="5s"#ETCD_GRPC_KEEPALIVE_INTERVAL="2h0m0s"#ETCD_GRPC_KEEPALIVE_TIMEOUT="20s"##[Clustering]ETCD_INITIAL_ADVERTISE_PEER_URLS="http://172.16.0.8:2380" # 该节点同伴监听地址,这个值会告诉集群中其他节点ETCD_ADVERTISE_CLIENT_URLS="http://127.0.0.1:2379,http://172.16.0.8:2379" # 对外公告的该节点客户端监听地址,这个值会告诉集群中其他节点#ETCD_DISCOVERY=""#ETCD_DISCOVERY_FALLBACK="proxy"#ETCD_DISCOVERY_PROXY=""#ETCD_DISCOVERY_SRV=""ETCD_INITIAL_CLUSTER="etcd-0-8=http://172.16.0.8:2380,etcd-0-17=http://172.16.0.17:2380,etcd-0-14=http://172.16.0.14:2380" # 集群中所有节点的信 ETCD_INITIAL_CLUSTER_TOKEN="etcd-token" # 创建集群的 token,这个值每个集群保持唯一。这样的话,如果你要重新创建集群,即使配置和之前一样,也会再次生成新的集群和节点 uuid;否则会导致多个集群之间的冲突,造成未知的错误ETCD_INITIAL_CLUSTER_STATE="new"#ETCD_STRICT_RECONFIG_CHECK="true" # 新建集群的时候,这个值为 new;假如已经存在的集群,这个值为 existing#ETCD_ENABLE_V2="true"##[Proxy]#ETCD_PROXY="off"#ETCD_PROXY_FAILURE_WAIT="5000"#ETCD_PROXY_REFRESH_INTERVAL="30000"#ETCD_PROXY_DIAL_TIMEOUT="1000"#ETCD_PROXY_WRITE_TIMEOUT="5000"#ETCD_PROXY_READ_TIMEOUT="0"##[Security]#ETCD_CERT_FILE=""#ETCD_KEY_FILE=""#ETCD_CLIENT_CERT_AUTH="false"#ETCD_TRUSTED_CA_FILE=""#ETCD_AUTO_TLS="false"#ETCD_PEER_CERT_FILE=""#ETCD_PEER_KEY_FILE=""#ETCD_PEER_CLIENT_CERT_AUTH="false"#ETCD_PEER_TRUSTED_CA_FILE=""#ETCD_PEER_AUTO_TLS="false"##[Logging]#ETCD_DEBUG="false"#ETCD_LOG_PACKAGE_LEVELS=""#ETCD_LOG_OUTPUT="default"##[Unsafe]#ETCD_FORCE_NEW_CLUSTER="false"##[Version]#ETCD_VERSION="false"#ETCD_AUTO_COMPACTION_RETENTION="0"##[Profiling]#ETCD_ENABLE_PPROF="false"#ETCD_METRICS="basic"##[Auth]#ETCD_AUTH_TOKEN="simple" |
etcd-0-8配置:
1 2 3 4 5 6 7 8 9 10 11 | [root@etcd-server ~]# hostnamectl set-hostname etcd-0-8[root@etcd-0-8 ~]# egrep "^#|^$" /etc/etcd/etcd.conf -vETCD_DATA_DIR="/data/app/etcd/"ETCD_LISTEN_PEER_URLS="http://172.16.0.8:2380"ETCD_LISTEN_CLIENT_URLS="http://127.0.0.1:2379,http://172.16.0.8:2379"ETCD_NAME="etcd-0-8"ETCD_INITIAL_ADVERTISE_PEER_URLS="http://172.16.0.8:2380"ETCD_ADVERTISE_CLIENT_URLS="http://127.0.0.1:2379,http://172.16.0.8:2379"ETCD_INITIAL_CLUSTER="etcd-0-8=http://172.16.0.8:2380,etcd-0-17=http://172.16.0.17:2380,etcd-0-14=http://172.16.0.14:2380"ETCD_INITIAL_CLUSTER_TOKEN="etcd-token"ETCD_INITIAL_CLUSTER_STATE="new" |
etcd-0-14配置:
1 2 3 4 5 6 7 8 9 10 11 12 | [root@etcd-server ~]# hostnamectl set-hostname etcd-0-14[root@etcd-server ~]# mkdir -p /data/app/etcd/[root@etcd-0.14 ~]# egrep "^#|^$" /etc/etcd/etcd.conf -vETCD_DATA_DIR="/data/app/etcd/"ETCD_LISTEN_PEER_URLS="http://172.16.0.14:2380"ETCD_LISTEN_CLIENT_URLS="http://127.0.0.1:2379,http://172.16.0.14:2379"ETCD_NAME="etcd-0-14"ETCD_INITIAL_ADVERTISE_PEER_URLS="http://172.16.0.14:2380"ETCD_ADVERTISE_CLIENT_URLS="http://127.0.0.1:2379,http://172.16.0.14:2379"ETCD_INITIAL_CLUSTER="etcd-0-8=http://172.16.0.8:2380,etcd-0-17=http://172.16.0.17:2380,etcd-0-14=http://172.16.0.14:2380"ETCD_INITIAL_CLUSTER_TOKEN="etcd-token"ETCD_INITIAL_CLUSTER_STATE="new" |
etcd-0-7配置:
1 2 3 4 5 6 7 8 9 10 11 12 | [root@etcd-server ~]# hostnamectl set-hostname etcd-0-17[root@etcd-server ~]# mkdir -p /data/app/etcd/[root@etcd-0-17 ~]# egrep "^#|^$" /etc/etcd/etcd.conf -vETCD_DATA_DIR="/data/app/etcd/"ETCD_LISTEN_PEER_URLS="http://172.16.0.17:2380"ETCD_LISTEN_CLIENT_URLS="http://127.0.0.1:2379,http://172.16.0.17:2379"ETCD_NAME="etcd-0-17"ETCD_INITIAL_ADVERTISE_PEER_URLS="http://172.16.0.17:2380"ETCD_ADVERTISE_CLIENT_URLS="http://127.0.0.1:2379,http://172.16.0.17:2379"ETCD_INITIAL_CLUSTER="etcd-0-8=http://172.16.0.8:2380,etcd-0-17=http://172.16.0.17:2380,etcd-0-14=http://172.16.0.14:2380"ETCD_INITIAL_CLUSTER_TOKEN="etcd-token"ETCD_INITIAL_CLUSTER_STATE="new" |
配置完成后启动服务
systemctl start etcd
4 查看集群状态
查看etcd状态
1 2 3 4 5 6 7 8 9 10 11 12 13 14 15 16 17 18 | [root@etcd-0-8 default.etcd]# systemctl status etcd● etcd.service - Etcd Server Loaded: loaded (/usr/lib/systemd/system/etcd.service; enabled; vendor preset: disabled) Active: active (running) since 二 2019-12-03 15:55:28 CST; 8s ago Main PID: 24510 (etcd) CGroup: /system.slice/etcd.service └─24510 /usr/bin/etcd --name=etcd-0-8 --data-dir=/data/app/etcd/ --listen-client-urls=http://172.16.0.8:237912月 03 15:55:28 etcd-0-8 etcd[24510]: set the initial cluster version to 3.012月 03 15:55:28 etcd-0-8 etcd[24510]: enabled capabilities for version 3.012月 03 15:55:30 etcd-0-8 etcd[24510]: peer 56e0b6dad4c53d42 became active12月 03 15:55:30 etcd-0-8 etcd[24510]: established a TCP streaming connection with peer 56e0b6dad4c53d42 (stream Message reader)12月 03 15:55:30 etcd-0-8 etcd[24510]: established a TCP streaming connection with peer 56e0b6dad4c53d42 (stream Message writer)12月 03 15:55:30 etcd-0-8 etcd[24510]: established a TCP streaming connection with peer 56e0b6dad4c53d42 (stream MsgApp v2 reader)12月 03 15:55:30 etcd-0-8 etcd[24510]: established a TCP streaming connection with peer 56e0b6dad4c53d42 (stream MsgApp v2 writer)12月 03 15:55:32 etcd-0-8 etcd[24510]: updating the cluster version from 3.0 to 3.312月 03 15:55:32 etcd-0-8 etcd[24510]: updated the cluster version from 3.0 to 3.312月 03 15:55:32 etcd-0-8 etcd[24510]: enabled capabilities for version 3.3 |
查看端口监听(如果未在本地监听环回地址,那么在本地使用etcdctl不能正常连入进去)
1 2 3 4 | [root@etcd-0-8 default.etcd]# netstat -lntup |grep etcdtcp 0 0 172.16.0.8:2379 0.0.0.0:* LISTEN 25167/etcdtcp 0 0 127.0.0.1:2379 0.0.0.0:* LISTEN 25167/etcdtcp 0 0 172.16.0.8:2380 0.0.0.0:* LISTEN 25167/etcd |
查看集群状态(可以看到etcd-0-17)
1 2 3 4 5 6 7 8 9 | [root@etcd-0-8 default.etcd]# etcdctl member list2d2e457c6a1a76cb: name=etcd-0-8 peerURLs=http://172.16.0.8:2380 clientURLs=http://127.0.0.1:2379,http://172.16.0.8:2379 isLeader=false56e0b6dad4c53d42: name=etcd-0-14 peerURLs=http://172.16.0.14:2380 clientURLs=http://127.0.0.1:2379,http://172.16.0.14:2379 isLeader=trued2d2e9fc758e6790: name=etcd-0-17 peerURLs=http://172.16.0.17:2380 clientURLs=http://127.0.0.1:2379,http://172.16.0.17:2379 isLeader=false[root@etcd-0-8 ~]# etcdctl cluster-healthmember 2d2e457c6a1a76cb is healthy: got healthy result from http://127.0.0.1:2379member 56e0b6dad4c53d42 is healthy: got healthy result from http://127.0.0.1:2379member d2d2e9fc758e6790 is healthy: got healthy result from http://127.0.0.1:2379 |
四 简单使用
1、增加
set 指定某个键的值。例如:
1 2 | $ etcdctl set /testdir/testkey "Hello world"Hello world<br><br>支持的选项包括: |
mk 如果给定的键不存在,则创建一个新的键值。例如:
1 2 | $ etcdctl mk /testdir/testkey "Hello world"Hello world--ttl '0' 超时时间(单位为秒),不配置(默认为 0)。则永不超时 |
当键存在的时候,执行该命令会报错,例如:
1 2 | $ etcdctl mk /testdir/testkey "Hello world"Error: 105: Key already exists (/testdir/testkey) [8] |
mkdir
如果给定的键目录不存在,则创建一个新的键目录。例如:
1 | $ etcdctl mkdir testdir2--ttl '0' 超时时间(单位为秒),不配置(默认为0)则永不超时。 |
当键目录存在的时候,执行该命令会报错,例如:
1 2 | $ etcdctl mkdir testdir2Error: 105: Key already exists (/testdir2) [9] |
setdir 创建一个键目录,如果目录不存在就创建,如果目录存在更新目录TTL。
1 | $ etcdctl setdir testdir3--ttl '0' 超时时间(单位为秒),不配置(默认为0)则永不超时。 |
2、删除
rm 删除某个键值。例如:
1 2 | $ etcdctl rm /testdir/testkeyPrevNode.Value: Hello--dir 如果键是个空目录或者键值对则删除 --recursive 删除目录和所有子键 --with-value 检查现有的值是否匹配 --with-index '0'检查现有的index是否匹配 |
当键不存在时,则会报错。例如:
1 2 | $ etcdctl rm /testdir/testkeyError: 100: Key not found (/testdir/testkey) [7] |
rmdir 删除一个空目录,或者键值对。
1 2 | $ etcdctl setdir dir1$ etcdctl rmdir dir1 |
若目录不空,会报错:
1 2 3 4 | $ etcdctl set /dir/testkey hihi$ etcdctl rmdir /dirError: 108: Directory not empty (/dir) [17] |
3、更新
update 当键存在时,更新值内容。例如:
1 2 | $ etcdctl update /testdir/testkey "Hello"Hello--ttl '0' 超时时间(单位为秒),不配置(默认为 0)则永不超时。 |
当键不存在时,则会报错。例如:
1 2 | $ etcdctl update /testdir/testkey2 "Hello"Error: 100: Key not found (/testdir/testkey2) [6] |
updatedir 更新一个已经存在的目录。
1 | $ etcdctl updatedir testdir2--ttl '0' 超时时间(单位为秒),不配置(默认为0)则永不超时。 |
4、查询
get 获取指定键的值。例如:
1 2 | $ etcdctl get /testdir/testkeyHello world<br><br>--sort 对结果进行排序 <br>--consistent 将请求发给主节点,保证获取内容的一致性。 |
当键不存在时,则会报错。例如:
1 2 | $ etcdctl get /testdir/testkey2Error: 100: Key not found (/testdir/testkey2) [5] |
ls 列出目录(默认为根目录)下的键或者子目录,默认不显示子目录中内容。
1 2 3 4 5 6 7 | $ etcdctl ls/testdir/testdir2/dir$ etcdctl ls dir/dir/testkey、<br><br>--sort 将输出结果排序 <br>--recursive 如果目录下有子目录,则递归输出其中的内容 <br>-p 对于输出为目录,在最后添加/进行区分 |
5 watch
watch 监测一个键值的变化,一旦键值发生更新,就会输出最新的值并退出。
例如:用户更新testkey键值为Hello watch。
1 2 3 4 5 6 | $ etcdctl get /testdir/testkeyHello world$ etcdctl set /testdir/testkey "Hello watch"Hello watch$ etcdctl watch testdir/testkeyHello watch--forever 一直监测直到用户按CTRL+C退出 --after-index '0' 在指定index之前一直监测 --recursive 返回所有的键值和子键值 |
exec-watch
监测一个键值的变化,一旦键值发生更新,就执行给定命令。
例如:用户更新testkey键值。
1 2 | $ etcdctl exec-watch testdir/testkey -- sh -c 'ls'config Documentation etcd etcdctl README-etcdctl.md README.md READMEv2-etcdctl.md--after-index '0' 在指定 index 之前一直监测 --recursive 返回所有的键值和子键值 |
6 备份
备份etcd的数据。
1 | $ etcdctl backup --data-dir /var/lib/etcd --backup-dir /home/etcd_backup<br><br>--data-dir etcd的数据目录 <br>--backup-dir 备份到指定路径 |
7 member
通过list、add、remove命令列出、添加、删除etcd实例到etcd集群中。
查看集群中存在的节点
1 2 | $ etcdctl member list8e9e05c52164694d: name=dev-master-01 peerURLs=http://localhost:2380 clientURLs=http://localhost:2379 isLeader=true |
向集群中新加节点
1 2 | $ etcdctl member add etcd3 http://192.168.1.100:2380Added member named etcd3 with ID 8e9e05c52164694d to cluster |
示例
1 2 3 4 5 6 7 8 9 10 11 12 13 14 15 16 17 18 19 20 21 22 23 24 25 26 27 28 29 30 31 32 33 34 35 36 37 38 39 40 41 42 43 44 45 46 47 48 49 50 51 52 53 54 55 56 57 58 59 60 61 62 63 64 65 66 67 68 69 70 71 72 73 74 75 76 77 78 79 80 81 82 83 84 85 86 87 88 89 90 91 92 93 94 95 96 97 98 99 100 101 102 103 104 105 106 107 108 109 110 111 112 113 114 115 116 117 118 119 120 121 122 123 124 125 126 127 128 129 130 131 132 133 134 135 136 137 138 139 | # 设置一个key值[root@etcd-0-8 ~]# etcdctl set /msg "hello k8s"hello k8s# 获取key的值[root@etcd-0-8 ~]# etcdctl get /msghello k8s# 获取key值的详细信息[root@etcd-0-8 ~]# etcdctl -o extended get /msgKey: /msgCreated-Index: 12Modified-Index: 12TTL: 0Index: 12hello k8s# 获取不存在的key回报错[root@etcd-0-8 ~]# etcdctl get /xxzxError: 100: Key not found (/xxzx) [12]# 设置key的ttl,过期后会被自动删除[root@etcd-0-8 ~]# etcdctl set /testkey "tmp key test" --ttl 5tmp key test[root@etcd-0-8 ~]# etcdctl get /testkeyError: 100: Key not found (/testkey) [14]# key 替换操作[root@etcd-0-8 ~]# etcdctl get /msghello k8s[root@etcd-0-8 ~]# etcdctl set --swap-with-value "hello k8s" /msg "goodbye"goodbye[root@etcd-0-8 ~]# etcdctl get /msggoodbye# mk 仅当key不存在时创建(set对同一个key会覆盖)[root@etcd-0-8 ~]# etcdctl get /msggoodbye[root@etcd-0-8 ~]# etcdctl mk /msg "mktest"Error: 105: Key already exists (/msg) [18][root@etcd-0-8 ~]# etcdctl mk /msg1 "mktest"mktest# 创建自排序的key[root@etcd-0-8 ~]# etcdctl mk --in-order /queue s1s1[root@etcd-0-8 ~]# etcdctl mk --in-order /queue s2s2[root@etcd-0-8 ~]# etcdctl ls --sort /queue/queue/00000000000000000021/queue/00000000000000000022[root@etcd-0-8 ~]# etcdctl get /queue/00000000000000000021s1# 更新key值[root@etcd-0-8 ~]# etcdctl update /msg1 "update test"update test[root@etcd-0-8 ~]# etcdctl get /msg1update test# 更新key的ttl及值[root@etcd-0-8 ~]# etcdctl update --ttl 5 /msg "aaa"aaa# 创建目录[root@etcd-0-8 ~]# etcdctl mkdir /testdir# 删除空目录[root@etcd-0-8 ~]# etcdctl mkdir /test1[root@etcd-0-8 ~]# etcdctl rmdir /test1# 删除非空目录[root@etcd-0-8 ~]# etcdctl get /testdir/testdir: is a directory[root@etcd-0-8 ~]#[root@etcd-0-8 ~]# etcdctl rm --recursive /testdir# 列出目录内容[root@etcd-0-8 ~]# etcdctl ls //tmp/msg1/queue[root@etcd-0-8 ~]# etcdctl ls /tmp/tmp/a/tmp/b# 递归列出目录的内容[root@etcd-0-8 ~]# etcdctl ls --recursive //msg1/queue/queue/00000000000000000021/queue/00000000000000000022/tmp/tmp/b/tmp/a# 监听key,当key发生改变的时候打印出变化[root@etcd-0-8 ~]# etcdctl watch /msg1xxx[root@VM_0_17_centos ~]# etcdctl update /msg1 "xxx"xxx# 监听某个目录,当目录中任何 node 改变的时候,都会打印出来[root@etcd-0-8 ~]# etcdctl watch --recursive /[update] /msg1xxx[root@VM_0_17_centos ~]# etcdctl update /msg1 "xxx"xxx# 一直监听,除非 `CTL + C` 导致退出监听[root@etcd-0-8 ~]# etcdctl watch --forever /# 监听目录,当发生变化时执行一条命令[root@etcd-0-8 ~]# etcdctl exec-watch --recursive / -- sh -c "echo change"change# backup[root@etcd-0-14 ~]# etcdctl backup --data-dir /data/app/etcd --backup-dir /root/etcd_backup2019-12-04 10:25:16.113237 I | ignoring EntryConfChange raft entry2019-12-04 10:25:16.113268 I | ignoring EntryConfChange raft entry2019-12-04 10:25:16.113272 I | ignoring EntryConfChange raft entry2019-12-04 10:25:16.113293 I | ignoring member attribute update on /0/members/2d2e457c6a1a76cb/attributes2019-12-04 10:25:16.113299 I | ignoring member attribute update on /0/members/d2d2e9fc758e6790/attributes2019-12-04 10:25:16.113305 I | ignoring member attribute update on /0/members/56e0b6dad4c53d42/attributes2019-12-04 10:25:16.113310 I | ignoring member attribute update on /0/members/56e0b6dad4c53d42/attributes2019-12-04 10:25:16.113314 I | ignoring member attribute update on /0/members/2d2e457c6a1a76cb/attributes2019-12-04 10:25:16.113319 I | ignoring member attribute update on /0/members/d2d2e9fc758e6790/attributes2019-12-04 10:25:16.113384 I | ignoring member attribute update on /0/members/56e0b6dad4c53d42/attributes# 使用v3版本[root@etcd-0-14 ~]# export ETCDCTL_API=3[root@etcd-0-14 ~]# etcdctl --endpoints="http://172.16.0.8:2379,http://172.16.0.14:2379,http://172.16.0.17:2379" snapshot save mysnapshot.dbSnapshot saved at mysnapshot.db[root@etcd-0-14 ~]# etcdctl snapshot status mysnapshot.db -w json{"hash":928285884,"revision":0,"totalKey":5,"totalSize":20480} |
小结
-
etcd 默认只保存 1000 个历史事件,所以不适合有大量更新操作的场景,这样会导致数据的丢失。 etcd 典型的应用场景是配置管理和服务发现,这些场景都是读多写少的。
-
相比于 zookeeper,etcd 使用起来要简单很多。不过要实现真正的服务发现功能,etcd 还需要和其他工具(比如 registrator、confd 等)一起使用来实现服务的自动注册和更新。
-
目前 etcd 还没有图形化的工具。
五、kubeadm容器版的简单操作
1、k8s中etcd以pod形式存在,查询
# kubectl get pod -n kube-system | grep etcd
etcd-master 1/1 Running 4 5d5、
2、进入pod
# kubectl exec etcd-master -n kube-system -it -- /bin/sh
3、设置etcdctl 使用的版本,k8s中使用v3版本
#export ETCDCTL_API=3
4、查询etcd中所有的key
# etcdctl --cacert=/etc/kubernetes/pki/etcd/ca.crt --cert=/etc/kubernetes/pki/etcd/healthcheck-client.crt --key=/etc/kubernetes/pki/etcd/healthcheck-client.key get / --prefix --keys-only
5、查询指定key的数据,如/registry/serviceaccounts/kubernetes-dashboard/admin-user的数据
# etcdctl --cacert=/etc/kubernetes/pki/etcd/ca.crt
--cert=/etc/kubernetes/pki/etcd/healthcheck-client.crt
--key=/etc/kubernetes/pki/etcd/healthcheck-client.key get
/registry/serviceaccounts/kubernetes-dashboard/admin-user --prefix
/registry/serviceaccounts/kubernetes-dashboard/admin-user
k8s
v1ServiceAccount
½
admin-userkubernetes-dashboard"*5b3bc5c6−b822−49ad