ubuntu
Ubuntu 20.04.5 LTS (Focal Fossa)
一、网络配置
1、配置静态ip
1 2 3 4 5 6 7 8 9 10 11 12 13 14 15 16 17 18 19 20 21 22 23 24 25 26 27 28 29 30 31 32 33 34 35 36 37 38 | vim /etc/network/interfaces#interfaces(5) file used by ifup(8) and ifdown(8)auto loiface lo inet loopbackauto ens33iface ens33 inet staticaddress 192.168.40.201gateway 192.168.40.2netmask 255.255.255.0dns-nameservers 114.114.114.114 8.8.8.8 (/etc/resolv.conf 自动会去读取 )# /etc/init.d/networking restart (或者ifup ens33 重启网卡)[ ok ] Restarting networking (via systemctl): networking.service# cat /etc/resolv.conf nameserver 114.114.114.114解决:root@ubuntu:~# route 查看路由Kernel IP routing tableDestination Gateway Genmask Flags Metric Ref Use Iface192.168.40.0 * 255.255.255.0 U 0 0 0 ens33192.168.122.0 * 255.255.255.0 U 0 0 0 virbr0root@ubuntu:~# route add default gw 192.168.40.2 (添加本机的路由)root@ubuntu:~# routeKernel IP routing tableDestination Gateway Genmask Flags Metric Ref Use Ifacedefault 192.168.40.2 0.0.0.0 UG 0 0 0 ens33192.168.40.0 * 255.255.255.0 U 0 0 0 ens33192.168.122.0 * 255.255.255.0 U 0 0 0 virbr0root@ubuntu:~# ping baidu.comPING baidu.com (220.181.38.148) 56(84) bytes of data.64 bytes from 220.181.38.148: icmp_seq=1 ttl=128 time=51.3 ms64 bytes from 220.181.38.148: icmp_seq=2 ttl=128 time=34.3 ms64 bytes from 220.181.38.148: icmp_seq=3 ttl=128 time=34.6 ms |
22.04版本 无线网卡+ 网线电口设置为静态ip
1 2 3 4 5 6 7 8 9 10 11 12 13 14 15 16 17 18 19 20 21 22 23 24 25 26 27 28 29 30 31 32 | cat 01-network-manager-all.yamlnetwork: version: 2 wifis: wlp3s0: dhcp4: false addresses: [ip/23] routes: - to: default via: 192.168.1.1 table: 100 # 为 wlp3s0 指定路由表 100 routing-policy: - from: ip table: 100 nameservers: addresses: [8.8.8.8, 8.8.4.4] access-points: "wifi-name": password: "xxxxxx" ethernets: enp2s0: dhcp4: false addresses: [ip/24] routes: - to: default via: ip table: 101 # 为 enp2s0 指定路由表 101 routing-policy: - from: 192.168.100.1 table: 101 nameservers: addresses: [8.8.8.8, 8.8.4.4] |
18.04版本
1 2 3 4 5 6 7 8 9 10 11 12 | cat /etc/netplan/01-netcfg.yamlnetwork: version: 2 renderer: networkd ethernets: enp6s18: addresses: - 10.x.x.44/24 gateway4: 10.x.1.1x nameservers: addresses: - xxxx |
ifconfig配置网卡
1 2 | ifconfig eth0 [$Private IP] netmask [$Subnet mask]route add 0.0.0.0/0 gw [$Gateway] |
2、配置阿里源
vim /etc/apt/sources.list
1 2 3 4 5 6 7 8 9 10 11 12 13 14 15 16 17 18 19 20 21 22 23 24 25 26 27 28 29 30 31 32 | ubantu16.04:deb http://mirrors.aliyun.com/ubuntu/ xenial maindeb-src http://mirrors.aliyun.com/ubuntu/ xenial maindeb http://mirrors.aliyun.com/ubuntu/ xenial-updates maindeb-src http://mirrors.aliyun.com/ubuntu/ xenial-updates maindeb http://mirrors.aliyun.com/ubuntu/ xenial universedeb-src http://mirrors.aliyun.com/ubuntu/ xenial universedeb http://mirrors.aliyun.com/ubuntu/ xenial-updates universedeb-src http://mirrors.aliyun.com/ubuntu/ xenial-updates universedeb http://mirrors.aliyun.com/ubuntu/ xenial-security maindeb-src http://mirrors.aliyun.com/ubuntu/ xenial-security maindeb http://mirrors.aliyun.com/ubuntu/ xenial-security universedeb-src http://mirrors.aliyun.com/ubuntu/ xenial-security universeubantu18.04:deb http://mirrors.aliyun.com/ubuntu/ bionic main restricted universe multiversedeb-src http://mirrors.aliyun.com/ubuntu/ bionic main restricted universe multiversedeb http://mirrors.aliyun.com/ubuntu/ bionic-security main restricted universe multiversedeb-src http://mirrors.aliyun.com/ubuntu/ bionic-security main restricted universe multiversedeb http://mirrors.aliyun.com/ubuntu/ bionic-updates main restricted universe multiversedeb-src http://mirrors.aliyun.com/ubuntu/ bionic-updates main restricted universe multiversedeb http://mirrors.aliyun.com/ubuntu/ bionic-proposed main restricted universe multiversedeb-src http://mirrors.aliyun.com/ubuntu/ bionic-proposed main restricted universe multiversedeb http://mirrors.aliyun.com/ubuntu/ bionic-backports main restricted universe multiversedeb-src http://mirrors.aliyun.com/ubuntu/ bionic-backports main restricted universe multiverse |
#升级软件列表
1 2 3 4 5 | sudo apt-get update sudo apt-get upgrade sudo apt-get dist-upgrade |
ubuntu20.04升级22.04
do-release-upgrade
1 2 3 4 5 6 7 8 9 10 | deb https://mirrors.tuna.tsinghua.edu.cn/ubuntu/ focal main restricted universe multiverse# deb-src https://mirrors.tuna.tsinghua.edu.cn/ubuntu/ focal main restricted universe multiversedeb https://mirrors.tuna.tsinghua.edu.cn/ubuntu/ focal-updates main restricted universe multiverse# deb-src https://mirrors.tuna.tsinghua.edu.cn/ubuntu/ focal-updates main restricted universe multiversedeb https://mirrors.tuna.tsinghua.edu.cn/ubuntu/ focal-backports main restricted universe multiverse# deb-src https://mirrors.tuna.tsinghua.edu.cn/ubuntu/ focal-backports main restricted universe multiversedeb https://mirrors.tuna.tsinghua.edu.cn/ubuntu/ focal-security main restricted universe multiverse# deb-src https://mirrors.tuna.tsinghua.edu.cn/ubuntu/ focal-security main restricted universe multiversedeb [arch=amd64] https://mirrors.tuna.tsinghua.edu.cn/docker-ce/linux/ubuntu focal stable# deb-src [arch=amd64] https://mirrors.tuna.tsinghua.edu.cn/docker-ce/linux/ubuntu focal stable |
ubuntu 18.04 安装docker和nvidia-container-toolkit
1 2 3 4 5 6 7 8 9 10 11 12 13 14 15 16 17 18 19 20 21 22 | ##安装dockerapt-get -y install apt-transport-https ca-certificates curl software-properties-commoncurl -fsSL http://mirrors.aliyun.com/docker-ce/linux/ubuntu/gpg | sudo apt-key add -add-apt-repository "deb [arch=amd64] http://mirrors.aliyun.com/docker-ce/linux/ubuntu $(lsb_release -cs) stable"apt-get update && apt-get install -y docker-ce##安装nvidia-container-toolkitcurl -s -L https://nvidia.github.io/nvidia-docker/gpgkey | sudo apt-key add -distribution=$(. /etc/os-release;echo $ID$VERSION_ID)curl -s -L https://nvidia.github.io/nvidia-docker/$distribution/nvidia-docker.list | tee /etc/apt/sources.list.d/nvidia-docker.listcurl -s -L https://nvidia.github.io/nvidia-docker/$distribution/nvidia-docker.list | tee /etc/apt/sources.list.d/nvidia-docker.listapt-get updateapt-get install -y nvidia-container-toolkitsystemctl restart dockerdocker run -d --gpus all --name=dcgm-exporter --restart=always -p 9400:9400 nvcr.io/nvidia/k8s/dcgm-exporter:2.3.5-2.6.5-ubuntu20.04 |
二、常见问题
1、root账户问题
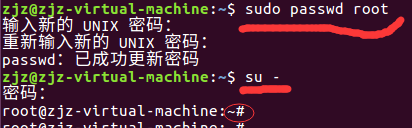
1、初始登录的时候root密码是随机的,自己改一个。
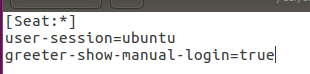
2、登录界面没有root选项

解决:
1 2 3 | gedit /usr/share/lightdm/lightdm.conf.d/50-ubuntu.conf第三行加入:greeter-show-manual-login=true |
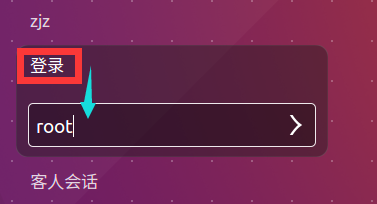
再次登录出现“登录”选项
进入最小化界面
1 | ctrl+alt+f1 |
ubantu18.04版本不一样,请参照
1 | http://www.c3389.com/index.php/post/454.html |
问题
ubuntu重启后进入桌面版,nvidia-driver报错 Failed to initialize NVML: Driver/library version mismatch
设置运行级别(最小化)
解决:(遗留问题,每次重启服务器,nvidia-driver就需要重新装一次)
1 2 3 4 5 6 7 8 9 10 11 12 | #查看运行级别为5runlevel#查看默认运行级别systemctl get-default#修改默认运行级别systemctl set-default graphical.target由命令行模式更改为图形界面模式等效于 telinit 5systemctl set-default multi-user.target由图形界面模式更改为命令行模式等效于 telinit 3 |
2、vi编辑器问题
Ubuntu安装完成后vi编辑器键盘不能正常使用,使用下面方法解决:
1 2 3 4 5 | cat > /etc/vim/vimrc.tiny << EOFset runtimepath=~/.vim,/var/lib/vim/addons,/usr/share/vim/vimfiles,/usr/share/vim/vim81,/usr/share/vim/vimfiles/after,/var/lib/vim/addons/after,~/.vim/afterset nocompatibleset backspace=2EOF |
3、跨系统粘贴复制
在Ubuntu的命令行中执行一下命令(报错找六)
1 2 3 | # apt-get autoremove open-vm-tools# apt-get install open-vm-tools# apt-get install open-vm-tools-desktop |
记得重启系统
4、root登录一直索要密码
安装apt-get install openssh-server
注意:/etc/ssh/ssh_config下不能瞎动
正确修改文件:/etc/ssh/sshd_config
5、不能使用TAB键、上下键,命令行不显示当前路径的解决
因默认ubuntu创建的普通帐号,默认shell为/bin/sh,而这不支持tab等键的,所以将「指定用户」帐号的shell改为/bin/bash就可以了。
查看当前的shell
1 2 | # echo $SHELL/bin/sh |
修改shell为/bin/bash
1 | usermod -s /bin/bash 用户名 |
6、root登录报错mesg:ttyname failed
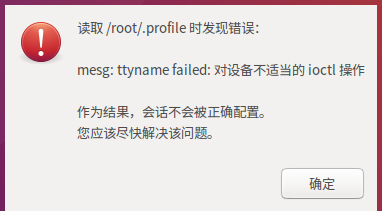
方法一:
将/root/.profile文件中的mesg n
替换成tty -s && mesg n
重启
方法二:
将非root账户目录中的.profile复制到/root/:
例如:cp /home/username/.profile /root/
重启
三、安装docker
1、安装相关包
1 2 3 4 5 6 7 | # 先更新一下软件源库信息$ sudo apt-get update $ sudo apt-get install \ apt-transport-https \ ca-certificates \ curl \ software-properties-common |
2、阿里云仓库
1 2 3 4 5 6 | $ curl -fsSL https://mirrors.aliyun.com/docker-ce/linux/ubuntu/gpg | sudo apt-key add -$ sudo add-apt-repository \ "deb [arch=amd64] https://mirrors.aliyun.com/docker-ce/linux/ubuntu \ $(lsb_release -cs) \ stable" |
3、安装
1 2 | $ sudo apt-get update$ sudo apt-get install docker-ce # 安装最新版的docker |
16.04遇到依赖问题(不知道为啥没有自动解决依赖!!!)
1 2 3 | The following packages have unmet dependencies: docker-ce : Depends: containerd.io (>= 1.4.1) but it is not going to be installedE: Unable to correct problems, you have held broken packages. |
解决:
1 2 3 | curl -O https://download.docker.com/linux/debian/dists/buster/pool/stable/amd64/containerd.io_1.4.3-1_amd64.debapt install ./containerd.io_1.4.3-1_amd64.deb |


