跟着老齐学django笔记第一章
python manage.py migrate
*blog模型创建好以后,进行数据迁移
python manage.py makemigrations && python manage.py migrate
可以通过 python manage.py sqlmigrate blog 0001 来查看刚才迁移的动作
BEGIN;
--
-- Create model BlogArticles
--
CREATE TABLE "yf_BogArticles" ("id" integer NOT NULL PRIMARY KEY AUTOINCREMENT, "title" varchar(300) NOT NULL, "body" text NOT NULL, "publish" datetime NOT NULL, "author_id" integer NOT NULL REFERENCES "auth_user" ("id") DEFERRABLE INITIALLY DEFERRED);
CREATE INDEX "yf_BogArticles_author_id_4d5af411" ON "yf_BogArticles" ("author_id");
COMMIT;
注册模型
进入blog/admin.py对博客类进行注册
from django.contrib import admin
from .models import BlogArticles #引入模型
# Register your models here.


class BlogArticlesAdmin(admin.ModelAdmin):
    list_display = ("title", "author", "publish") #显示的列
    list_filter = ("publish","author") #过滤字段
    search_fields = ("title","body") #查找字段
    raw_id_fields = ("author",)
    date_hierarchy = "publish"  #按日期分类
    ordering = ['publish','author'] #排序


admin.site.register(BlogArticles,BlogArticlesAdmin) #注册模型
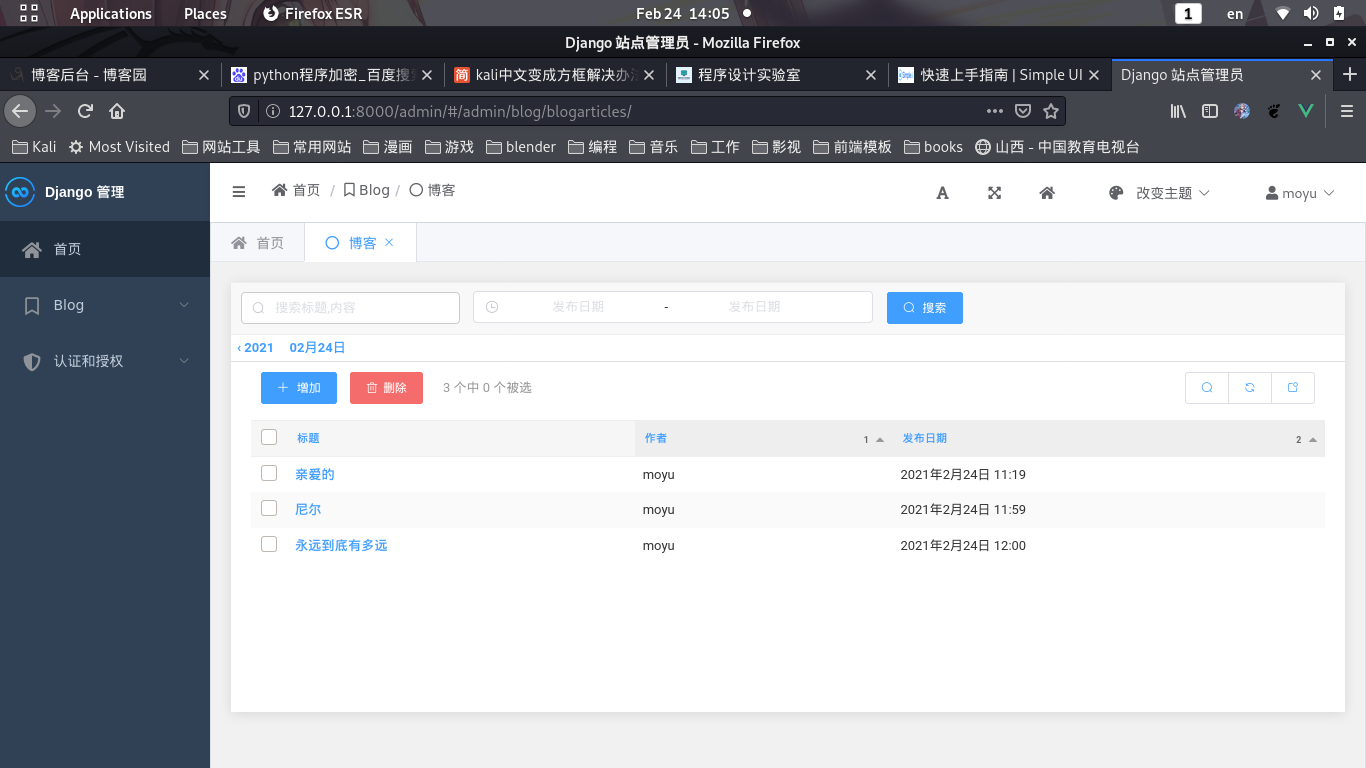
然后python manage.py runserver 启动,进入管理员界面,我这里使用了simpleui覆盖了原来的admin模板,效果如图:

*接下来进入交互模式,来熟悉下模型的查询,并让博客的标题显示出来
(django) ┌──(moyu㉿moyu)-[~/Code/mysite]
└─$ python manage.py shell
Python 3.9.1 (default, Dec  8 2020, 07:51:42)
[GCC 10.2.0] on linux
Type "help", "copyright", "credits" or "license" for more information.
(InteractiveConsole)
>>> from django.contrib.auth.models import User
>>> from blog.models import BlogArticles
>>> user =User.objects.get(username = 'moyu')
>>> user.username
'moyu'
>>> user.id
1
>>> blogs = BlogArticles.objects.all()
>>> blogs
<QuerySet [<BlogArticles: 永远到底有多远>, <BlogArticles: 尼尔>, <BlogArticles: 亲爱的>]>
>>> for blog in blogs:
...     print(blog.title)
...
永远到底有多远
尼尔
亲爱的
*接下来就要把标题显示到前端了
进入view.py
from django.shortcuts import render
from .models import BlogArticles
# Create your views here.

def blog_title(request):
    blogs =BlogArticles.objects.all()
    return render(request, "blog/titles.html",{"blogs":blogs})
*然后进入template目录创建base.html
{% load static %}
<!DOCTYPE html>
<html lang="zh-hans">
    <head>
        <title>{% block title %}{% endblock %}</title>

        {% include 'admin/includes/css-part.html' %}

        <link rel="stylesheet" type="text/css" href="{% static '/css/bootstrap.min.css' %}">


        {% include 'admin/includes/js-part.html' %}

        <script src="https://unpkg.com/element-ui/lib/index.js"></script>
        <script type="text/javascript" src="{% static '/admin/js/vendor/jquery/jquery.min.js' %}"></script>

     </head>
    <body>
        <!-- Content -->
        <div class="container" >
        <div class = "content">
            {% block content %}
            {% endblock %}
        </div>
        <!-- EndContent-->
        {% block footer %}
        <div id="footer"></div>
        {% endblock %}
    </div>
    </body>
</html>
本来想学习使用下vue+elementui的,无奈功力不够,先用bootstrap学习吧,把下载好的bootstrap.min.css放到statics/css目录下引用就好
然后在template目录下新建blog文件夹,创建title.html页面代码如下:
{% extends "base.html" %}

{% block title %}博客页面{% endblock %}

{% block content %}
<div class="row">
  <h1>博客文章</h1>
  <div class="col-xs-12 col-md-8">
    <ul>
      {% for blog in blogs %}
      <li>{{ blog.title }}</li>
      {% endfor %}
    </ul>
  </div>
</div>
{% endblock %}
*然后来编写路由,在blog里新建urls.py
from django.urls import path,re_path
from . import views


urlpatterns = [
    re_path('^$',views.blog_title,name = "blog_title"),
]
在项目目录的url下面添加
path('blog/',include(('blog.urls','blog'),namespace='blog')),
完整代码如下
"""mysite URL Configuration

The `urlpatterns` list routes URLs to views. For more information please see:
    https://docs.djangoproject.com/en/3.0/topics/http/urls/
Examples:
Function views
    1. Add an import:  from my_app import views
    2. Add a URL to urlpatterns:  path('', views.home, name='home')
Class-based views
    1. Add an import:  from other_app.views import Home
    2. Add a URL to urlpatterns:  path('', Home.as_view(), name='home')
Including another URLconf
    1. Import the include() function: from django.urls import include, path
    2. Add a URL to urlpatterns:  path('blog/', include('blog.urls'))
    路由的三种写法
    1、总
    2、总+子
"""
from django.contrib import admin
from django.urls import path,include,re_path
from rest_framework import routers
from quickstart import views


router = routers.DefaultRouter()
router.register(r'users',views.UserViewSet)
router.register(r'groups',views.GroupViewSet)
# 使用自动URL路由连接我们的API。
# 另外,我们还包括支持浏览器浏览API的登录URL。

urlpatterns = [
    path('admin/', admin.site.urls),
    # path('',include('users.urls')),  #将users的url包含到总路由
    re_path(r'^api-auth/', include('rest_framework.urls', namespace='rest_framework')),
    re_path(r'^', include(router.urls)),
    path('blog/',include(('blog.urls','blog'),namespace='blog')),
]
因为还在学习drf所以有一些drf的路由,随后再做drf的笔记,先跟着老齐走一遍基础
pis:因为学习的过程中,或者自己再使用django的过程中,遇到各种问题,比如django admin的页面内容分配权限之类的,感觉无从下手,先跟着教程走两边,系统下django框架的学习,也慢慢地熟悉源码,以便可以灵活的使用。
继续给博客标题加上超链接,把titles.html中的代码稍微修改下
 {% for blog in blogs %}
      <li><a href="{{ blog.id }}">{{ blog.title }}</a></li>
      {% endfor %}
再view.py中编写内容视图
def blog_article(request,article_id):
    article = BlogArticles.objects.get(id = article_id) #通过article_id取到对应的文章
    pub = article.publish
    return render(request,"blog/content.html",{"article":article, "publish":pub })
在template中编写content.html
{% extends "base.html" %}

{% block title %}{{ article.title }}{% endblock %}

{% block content %}
<div class="row text-center vertical-middle-sm">
    <h1>{{ article.title }}</h1>

</div>
<div class="row">
    <div class ="col-xs-12 col-md-8">
        <p class="text-center"><span> {{ article.author.username }}</span>
        <span style="margin-left:20px">{{ publish }}</span></p>
        <div>{{ article.body }}</div>
    </div>
</div>

{% endblock %}
有了view和template配置路由把view给template即可,在blog的urls中添加
re_path(r'(?P<article_id>\d)/$',views.blog_article,name = 'blog_detail')
如果传递的参数article_id数据库里没有怎么办,在views.py中做如下更改
from django.shortcuts import render,get_object_or_404
def blog_article(request,article_id):
    # article = BlogArticles.objects.get(id = article_id) #通过article_id取到对应的文章
    article = get_object_or_404(BlogArticles,id = article_id)
    pub = article.publish
    return render(request,"blog/content.html",{"article":article, "publish":pub })
这里的get_object_or_404方法跟踪过去
def get_object_or_404(klass, *args, **kwargs):
    """
    Use get() to return an object, or raise a Http404 exception if the object
    does not exist.

    klass may be a Model, Manager, or QuerySet object. All other passed
    arguments and keyword arguments are used in the get() query.

    Like with QuerySet.get(), MultipleObjectsReturned is raised if more than
    one object is found.
    """
    queryset = _get_queryset(klass)
    if not hasattr(queryset, 'get'):
        klass__name = klass.__name__ if isinstance(klass, type) else klass.__class__.__name__
        raise ValueError(
            "First argument to get_object_or_404() must be a Model, Manager, "
            "or QuerySet, not '%s'." % klass__name
        )
    try:
        return queryset.get(*args, **kwargs)
    except queryset.model.DoesNotExist:
        raise Http404('No %s matches the given query.' % queryset.model._meta.object_name)
*klass 一般是数据模型中的一个类
*args, **kwargs查询时的条件参数


