【转载】 tf.image.sample_distorted_bounding_box (为图像生成单个随机变形的边界框)
原文地址: https://blog.csdn.net/tz_zs/article/details/77920116
版权声明:本文为博主原创文章,遵循 CC 4.0 BY-SA 版权协议,转载请附上原文出处链接和本声明。
本文链接:https://blog.csdn.net/tz_zs/article/details/77920116
————————————————————————————————
tf.image.sample_distorted_bounding_box
此函数为图像生成单个随机变形的边界框。函数输出的是可用于裁剪原始图像的单个边框。返回值为3个张量:begin,size和 bboxes。
前2个张量用于 tf.slice 剪裁图像。
后者(第三个)可以用于 tf.image.draw_bounding_boxes 函数来画出边界框。
sample_distorted_bounding_box(
    image_size,
    bounding_boxes,
    seed=None,
    seed2=None,
    min_object_covered=None,
    aspect_ratio_range=None,
    area_range=None,
    max_attempts=None,
    use_image_if_no_bounding_boxes=None,
    name=None
)
定义在:tensorflow/python/ops/image_ops_impl.py.
请参阅指南:图像操作>图像使用边框
为图像生成一个随机扭曲的边界框.
在图像识别或对象定位任务中,除了ground-truth标签外,通常还会提供边界框注释. 训练这种系统的一种常用技术是随机地扭曲图像,同时保留其内容,即数据增强.
这个运算输出中的对象的随机扭曲的定位,即边界框,给定一个image_size, bounding_boxes 和一系列的限制.
该操作的输出是一个可用于裁剪原始图像的单个边界框.输出返回为3个张量:begin, size 和 bboxes. 前两个张可直接送入 tf.slice 以裁剪图像.可以提供后者 tf.image.draw_bounding_boxes 以可视化边界框的外观.
边界框 被提供并作为[y_min, x_min, y_max, x_max]返回. 边界框坐标在 [0.0, 1.0] 相对于底层图像的宽度和高度的浮点数.
例如:
# Generate a single distorted bounding box.
begin, size, bbox_for_draw = tf.image.sample_distorted_bounding_box(
    tf.shape(image),
    bounding_boxes=bounding_boxes,
    min_object_covered=0.1)

# Draw the bounding box in an image summary.
image_with_box = tf.image.draw_bounding_boxes(tf.expand_dims(image, 0),
                                              bbox_for_draw)
tf.summary.image('images_with_box', image_with_box)

# Employ the bounding box to distort the image.
distorted_image = tf.slice(image, begin, size)
请注意,如果没有边界框信息可用,则设置use_image_if_no_bounding_boxes=true将假定存在覆盖整个图像的单个隐式边界框.
如果use_image_if_no_bounding_boxes为false并且没有提供边界框,则会引发错误.
参数:
- image_size:一个Tensor,必须是下列类型之一:uint8,int8,int16,int32,int64,是1维的,并且包含 [height, width, channels] .
- bounding_boxes:一个float32类型的Tensor,三维的,形状为[batch, N, 4], 描述与图像相关的Ñ个边界框.
- seed:可选的int,默认为0;如果seed或者seed2其中之一被设置为非零,则随机数发生器由给定的seed播种;否则,它会被随机种子播种.
- seed2:可选的int,默认为0;用于避免种子碰撞的第二个种子.
- min_object_covered:一个float32类型的张量,默认为0.1, 图像的裁剪区域必须至少包含提供的任何边界框的这一部分;该参数的值应该是非负的;在0的情况下,裁剪区域不需要与任何提供的边界框重叠.
- aspect_ratio_range:一个可选的floats列表,默认为[0.75, 1.33], 图像的裁剪区域必须在此范围内具有 宽高比=宽度/高度 (ratio = width / height).
- area_range:一个可选的floats列表,默认为[0.05, 1], 图像的裁剪区域必须在此范围内包含所提供图像的一部分.
- max_attempts:可选的int,默认为100,生成指定约束图像的裁剪区域的 尝试次数;max_attempts失败后,返回整个图像.
- use_image_if_no_bounding_boxes:可选的bool,默认为False.如果未提供边界框,则控制行为.如果为true,则假定覆盖整个输入的隐式边界框.如果为false,则提出错误.
- name:操作的名称(可选).
返回:
Tensor对象的元型态组 (begin, size, bboxes) .
- begin:一个Tensor,与image_size具有相同类型;1维,包含[offset_height, offset_width, 0],提供给tf.slice的输入.
- size:一个Tensor,与image_size具有相同类型;1维,包含[target_height, target_width, -1],提供给tf.slice的输入.
- bboxes:一个float32类型的Tensor,三维的, 形状为[1, 1, 4], 表示随机变形后的边界框, 提供给 tf.image.draw_bounding_boxes 的输入.
-------------------------------------------------------------------------------------
例子:
图片: ( cat.jpg )

import matplotlib.pyplot as plt
import tensorflow as tf
import numpy as np


image_raw_data = tf.gfile.FastGFile("./cat.jpg",'rb').read()

with tf.Session() as sess:
    img_data = tf.image.decode_jpeg(image_raw_data)

    # 输出解码之后的三维矩阵。
    #print(img_data.eval())
    #print(img_data.get_shape())
    img_data.set_shape([1797, 2673, 3])
    print(img_data.get_shape())


with tf.Session() as sess:
    boxes = tf.constant([[[0.05, 0.05, 0.9, 0.7], [0.35, 0.47, 0.5, 0.56]]])

    # sample_distorted_bounding_box要求输入图片必须是实数类型。
    image_float = tf.image.convert_image_dtype(img_data, tf.float32)

    begin, size, bbox_for_draw = tf.image.sample_distorted_bounding_box(
        tf.shape(image_float), bounding_boxes=boxes, min_object_covered=0.4)


    # 截取后的图片
    distorted_image = tf.slice(image_float, begin, size)


    # 在原图上用标注框画出截取的范围。由于原图的分辨率较大(1797x2673),生成的标注框
    # 在Jupyter Notebook上通常因边框过细而无法分辨,这里为了演示方便先缩小分辨率。
    image_small = tf.image.resize_images(image_float, [180, 267], method=0)

    batchced_img = tf.expand_dims(image_small, 0)

    image_with_box = tf.image.draw_bounding_boxes(batchced_img, bbox_for_draw)


    #执行会话,一次性获得标注框内图像和带有标注框的原图像
    distorted_image_, image_with_box_=sess.run([distorted_image, image_with_box])

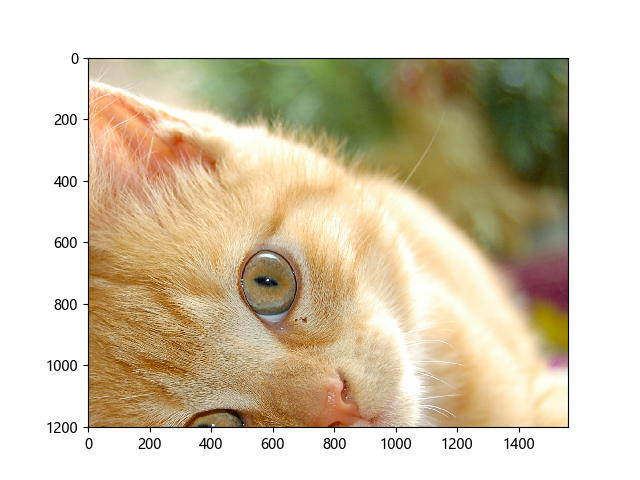
    plt.imshow(distorted_image_)
    plt.show()

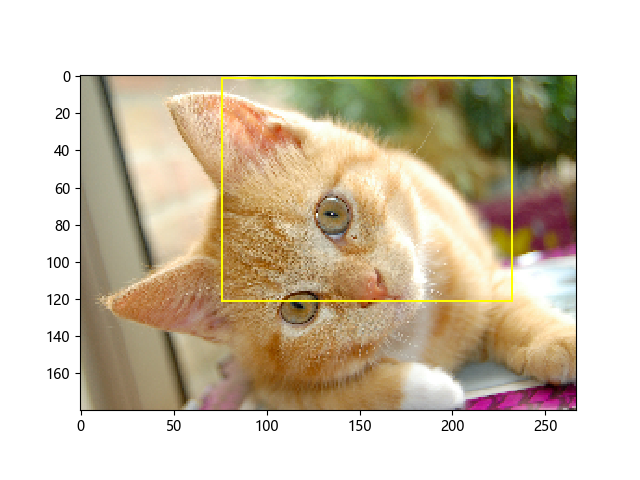
    plt.imshow(image_with_box_[0])
    plt.show()
distorted_image: 标注框所裁剪出的图像

image_with_box: 带有标注框的原图像:

官方翻译地址:
https://www.w3cschool.cn/tensorflow_python/tensorflow_python-vmxq2rpm.html
posted on 2020-04-08 17:01 Angry_Panda 阅读(1274) 评论(0) 编辑 收藏 举报


