【快应用】实现自定义导航栏组件

1. 简介

导航栏组件,主要用于头部导航。

导航栏(Nav_bar)组件结构大致分为两部分,一部分是图标,另一部分是文本,子组件实现,父组件引用。

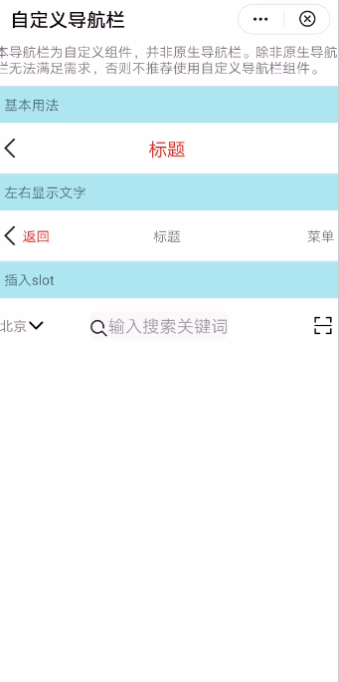
效果图如下:

cke_710.png

基本布局代码如下:

<template>

  <div class="container">

    <text>本导航栏为自定义组件,并非原生导航栏。除非原生导航栏无法满足需求,否则不推荐使用自定义导航栏组件。</text>

    <text class="section">基本用法</text>

    <div class="example-body">

      <nav_bar height="50px" backgroundcolor="#ffffff" left-icon="{{leftIcon}}" title="标题" 

          @clickleft="back" title-style="font-size: 40px; color:red"></nav_bar>

</div>

</div>

<template>

2.开发指引

2.1自定义子组件

1.定义布局样式。

导航栏组件布局包括三个部分:左侧图标内容部分、标题内容部分、右侧图标内容部分。

左侧图标内容部分、右侧图标内容部分通过image+text+slot组件实现

标题内容部分由text+slot组件实现。

代码如下:

<template>

  <div>

    <div class="navbar_content" style="height:{{height}};background-color:{{backgroundcolor}}">

      <div class="navbar_btns_left" onclick="clickLeft">

        <div if="leftIcon.length">

          <image style="height: 50px" src="{{leftIcon}}"></image>

        </div>

        <div if="leftText.length">

          <text style="{{leftTextStyle}}">{{ leftText }}</text>

        </div>

        <slot name="left"></slot>

      </div>

      <div class="navbar_container" onclick="clickTitle">

        <text class="text_context" style="{{titleStyle}}" 

            if="title.length">{{ title }}</text>

        <slot name="mid"></slot>

      </div>

      <div class="navbar_btns_right" onclick="clickRight">

        <div if="rightIcon.length">

          <image style="height: 50px" src="{{rightIcon}}"></image>

        </div>

        <div class="*" if="rightText.length && !rightIcon.length">

          <text style="{{rightTextStyle}}">{{ rightText }}</text>

        </div>

        <slot name="right"></slot>

      </div>

    </div>

  </div>

</template>

2.2子组件设计

支持的属性如下:

属性名

类型

默认值

说明

title

String

null

标题文字

height 

String

null

导航栏高度

backgroundcolor

String

null

导航栏背景色

leftText

String

null

左侧按钮文本

rightText

String

null

右侧按钮文本

leftIcon

String

null

左侧按钮图标

rightIcon

String

null

右侧按钮图标

支持的事件:

事件名称

说明

返回值

clickLeft

点击当前点击状态

clickRight 

点击当前点击状态

clickTitle

点击当前点击状态


2.3父子组件通信

2.3.1父组件给子组件传递数据

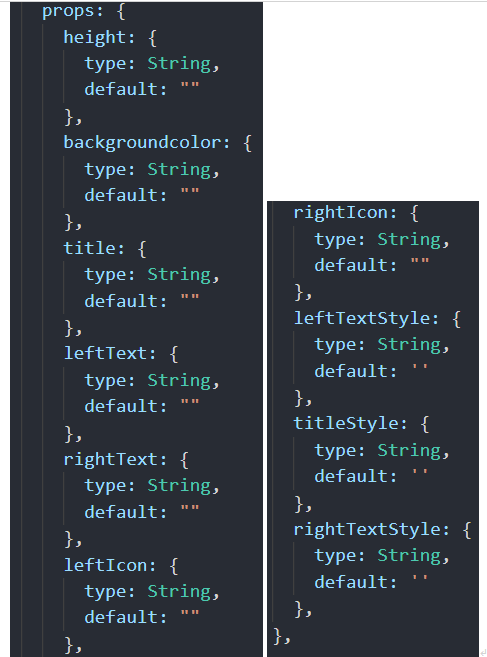
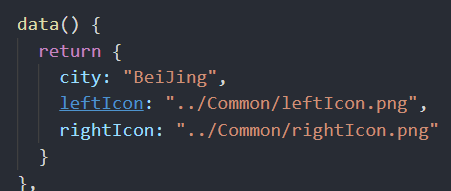
子组件通过在props定义参数,接收来自父组件的传值数据,如height、title等。如下图所示:

  cke_16452.png 

cke_21738.png

cke_27159.png

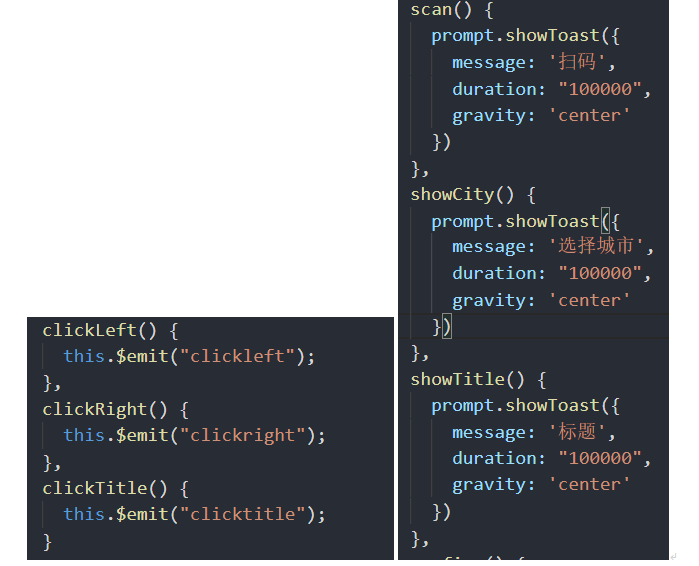
2.3.2子组件通过this.$emit方法触发父组件的自定义事件

cke_33780.png

3.总结

实现导航栏组件,您可以从中学会如下知识点:

l  熟悉快应用子组件的设计和属性定义;

l  熟悉父子组件通信;

l  熟悉slot组件的运用;


想欲了解更多详情,请参见:

华为快应用官网:

https://developer.huawei.com/consumer/cn/doc/development/quickApp-References/quickapp-animation-styles-0000001123530340


最后附上完整的实现代码:

导航栏组件nav_bar.ux

<template>

  <div>

    <div class="navbar_content" style="height:{{height}};background-color:{{backgroundcolor}}">

      <div class="navbar_btns_left" onclick="clickLeft">

        <div if="leftIcon.length">

          <image style="height: 50px" src="{{leftIcon}}"></image>

        </div>

        <div if="leftText.length">

          <text style="{{leftTextStyle}}">{{ leftText }}</text>

        </div>

        <slot name="left"></slot>

      </div>

      <div class="navbar_container" onclick="clickTitle">

        <text class="text_context" style="{{titleStyle}}" 

            if="title.length">{{ title }}</text>

        <slot name="mid"></slot>

      </div>

      <div class="navbar_btns_right" onclick="clickRight">

        <div if="rightIcon.length">

          <image style="height: 50px" src="{{rightIcon}}"></image>

        </div>

        <div class="*" if="rightText.length && !rightIcon.length">

          <text style="{{rightTextStyle}}">{{ rightText }}</text>

        </div>

        <slot name="right"></slot>

      </div>

    </div>

  </div>

</template>

<script>

  /** 

   * NavBar 自定义导航栏

   * @description 导航栏组件,主要用于头部导航

   * @tutorial https://ext.dcloud.net.cn/plugin?id=52

   * @property {String} title 标题文字

   * @property {String} height 导航栏高度

   * @property {String} backgroundcolor 导航栏背景色

   * @property {String} leftText 左侧按钮文本

   * @property {String} rightText 右侧按钮文本

   * @property {String} leftIcon 左侧按钮图标

   * @property {String} rightIcon 右侧按钮图标

   * @property {String} leftTextStyle 左侧按钮文本样式

   * @property {String} titleStyle 中间标题文本样式

   * @property {String} rightTextStyle 右侧按钮文本样式

   * @event {Function} clickLeft 左侧按钮点击时触发

   * @event {Function} clickRight 右侧按钮点击时触发

   * @event {Function} clickTitle 中间标题点击时触发

  */

  module.exports = {

    props: {

      height: {

        type: String,

        default: ""

      },

      backgroundcolor: {

        type: String,

        default: ""

      },

      title: {

        type: String,

        default: ""

      },

      leftText: {

        type: String,

        default: ""

      },

      rightText: {

        type: String,

        default: ""

      },

      leftIcon: {

        type: String,

        default: ""

      },

      rightIcon: {

        type: String,

        default: ""

      },

      leftTextStyle: {

        type: String,

        default: ''

      },

      titleStyle: {

        type: String,

        default: ''

      },

      rightTextStyle: {

        type: String,

        default: ''

      },

    },


    onInit() {

      this.$page.setTitleBar({ text: '自定义导航栏' })

    },

    clickLeft() {

      this.$emit("clickleft");

    },

    clickRight() {

      this.$emit("clickright");

    },

    clickTitle() {

      this.$emit("clicktitle");

    }

  }

</script>


<style>

  .navbar_content {

    display: flex;

    align-items: center;

    flex-direction: row;

  }


  .navbar_btns_left {

    width: 150px;

  }

  .navbar_container {

    width: 500px;

  }

  .text_context {

    width: 480px;

    text-align: center;

  }

  .navbar_btns_right {

    width: 150px;

    justify-content: flex-end;

  }

</style>


主页面hello.ux

<import name="nav_bar" src="./Nav_bar/nav_bar.ux"></import>

<template>

  <div class="container">

    <text>本导航栏为自定义组件,并非原生导航栏。除非原生导航栏无法满足需求,否则不推荐使用自定义导航栏组件。</text>

    <text class="section">基本用法</text>

    <div class="example-body">

      <nav_bar height="50px" backgroundcolor="#ffffff" left-icon="{{leftIcon}}" title="标题" @clickleft="back" title-style="font-size: 40px; color:red"></nav_bar>

    </div>

    <text class="section">左右显示文字</text>

    <div class="example-body">

      <nav_bar left-icon="{{leftIcon}}" left-text="返回" title="标题" left-text-style="font-size: 30px; color:red;" right-text="菜单" @clickleft="back" @clickTitle="showTitle"></nav_bar>

    </div>

    <text class="section">插入slot</text>

    <div class="example-body">

      <nav_bar right-icon="{{rightIcon}}" @clickleft="showCity" @clickright="scan">

        <div slot="left">

          <div>

            <text>北京</text>

            <image src="../Common/arrowdown.png"></image>

          </div>

        </div>

        <div slot="mid">

          <div class="input-view">

            <image style="height: 40px; margin-top: 15px" src="../Common/search.png"></image>

            <input enterkeytype="search" placeholder="输入搜索关键词" @enterkeyclick="confirm" />

          </div>

        </div>

      </nav_bar>

    </div>

  </div>

</template>


<script>

  import router from '@system.router'

  import prompt from '@system.prompt'

  export default {


    data() {

      return {

        city: "BeiJing",

        leftIcon: "../Common/leftIcon.png",

        rightIcon: "../Common/rightIcon.png"

      }

    },


    back() {

      router.back()

    },

    scan() {

      prompt.showToast({

        message: '扫码',

        duration: "100000",

        gravity: 'center'

      })

    },

    showCity() {

      prompt.showToast({

        message: '选择城市',

        duration: "100000",

        gravity: 'center'

      })

    },

    showTitle() {

      prompt.showToast({

        message: '标题',

        duration: "100000",

        gravity: 'center'

      })

    },

    confirm() {

      prompt.showToast({

        message: '搜索',

        duration: "100000",

        gravity: 'center'

      })

    }

  }

</script>


<style>

  .container {

    flex: 1;

    flex-direction: column;

    background-color: #ffffff;

  }


  .section {

    background-color: #afeeee;

    margin-top: 20px;

    margin-bottom: 20px;

    font-size: 30px;

    padding: 20px;

    width: 100%;

  }

  .example-body {

    flex-direction: row;

    padding: 10px;

    background-color: #ffffff;

    width: 100%;

  }


  .input-view {

    flex-direction: row;

    background-color: #f8f8f8;

    height: 60px;

    border-radius: 15px;

    margin-left: 60px;

    margin-right: 60px;

    line-height: 30px;

  }

</style>
欲了解更多更全技术文章,欢迎访问https://developer.huawei.com/consumer/cn/forum/?ha_source=zzh
 
posted @ 2022-08-10 08:47  华为开发者论坛  阅读(344)  评论(0编辑  收藏  举报