如何集成华为性能分析-cordova

简介

AppGallery Connect(简称AGC)性能管理(APM,App Performance Management)服务提供分钟级应用性能监控能力,您可以在AGC查看和分析APM收集到的应用性能数据,实时全面掌握应用在线的性能表现,帮助您快速闭环应用的性能问题,持续提升应用的用户体验。

开通服务和集成SDK

1、登录AppGallery Connect网站,点击“我的项目”。

2、在项目列表中找到您的项目,在项目下的应用列表中选择需要开通性能管理服务的应用。

cke_149.png

3、进入“质量 > 性能管理”,如果APM服务未开通,请点击“立即开通”,开通APM服务。

cke_150.png

4、选择常规页签下的“应用”区域,下载agconnect-services配置文件。

Android:下载agconnect-services.json文件。

iOS:下载agconnect-services.plist文件。

5、在Cordova开发项目中添加配置文件。

Android:将配置文件agconnect-services.json添加到Cordova项目的android/app目录下。

iOS:用Xcode打开Cordova项目的iOS模块,将配置文件agconnect-services.plist添加进项目。

6、在Cordova项目的pubspec.yaml文件中添加依赖。

cordova plugin add @cordova-plugin-agconnect/apm

7、安装成功效果如下图。

cke_151.png

界面设计

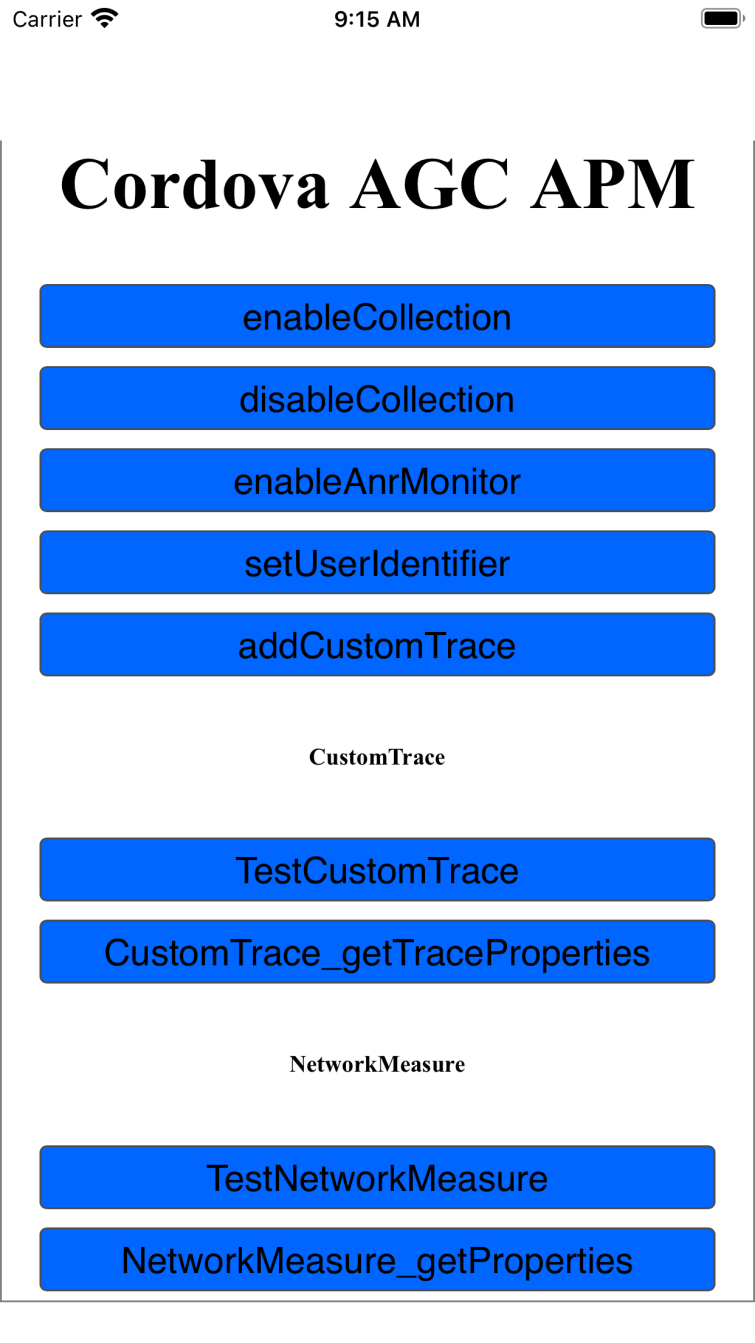
您可以在Cordova项目中创建一个布局页面,参照下图进行设计。

cke_152.png

功能按钮如下:

  1. 开启和关闭收集性能监控数据按钮
  2. 启用ANR监控功能按钮
  3. 将用户ID与报告的数据绑定按钮
  4. 设置参数追踪按钮
  5. 测试参数追踪、网络请求按钮

功能开发

1、您初始化APMS实例。

async function onDeviceReady() { 
   // Cordova is now initialized. Have fun! 
   console.log("Running cordova-" + cordova.platformId + "@" + cordova.version); 
   apmsPlugin = await AGCAPM.getInstance(); 
   alert("AGCAPM: initialized"); 
}

2、设置是否启用APM来收集性能监控数据。如果此参数设置为true,APM将收集应用性能数据。设置成false,则停止收集。

$("enableCollection").onclick = () => { 
   let enable = true; 
   apmsPlugin.enableCollection(enable).then(() => { 
      alert("enableCollection: success"); 
   }).catch((error) => alert("enableCollection :: Error! " + JSON.stringify(error, null, 1))); 
}
$("disableCollection").onclick = () => { 
   let enable = false; 
   apmsPlugin.enableCollection(enable).then(() => { 
      alert("disableCollection: success"); 
   }).catch((error) => alert("disableCollection :: Error! " + JSON.stringify(error, null, 1))); 
}

3、设置是否启用ANR监控功能。参数设置为true,表示启用了ANR 监控并报告了数据。要禁用ANR监控,将此参数设置为false。

$("enableAnrMonitor").onclick = () => { 
   let enable = true; 
   apmsPlugin.enableAnrMonitor(enable).then(() => { 
      alert("enableAnrMonitor: success"); 
   }).catch((error) => alert("enableAnrMonitor :: Error! " + JSON.stringify(error, null, 1))); 
}

4、将用户ID与报告的数据绑定。报告性能数据时,还报告用户 ID 以方便故障定位。

$("setUserIdentifier").onclick = () => { 
   let userIdentifier = "HUAWEIuserIdentifier" + Math.floor(Math.random() * 1001); 
   apmsPlugin.setUserIdentifier(userIdentifier).then(() => { 
      alert("setUserIdentifier: success"); 
   }).catch((error) => alert("setUserIdentifier :: Error! " + JSON.stringify(error, null, 1))); 
}

5、根据输入参数在应用中创建特定场景的自定义跟踪。您可以调用createCustomTrace接口创建自定义跟踪记录。创建完成后,可调用start接口启动自定义跟踪记录,调用stop接口停止自定义跟踪记录。

function traceTestSumFunc(num1, num2) { 
   return new Promise((resolve, reject) => { 
      for (let i = 0; i < num2; i++) { 
         num1 += i; 
      } 
      resolve(num1 + num2); 
   }); 
} 
$("addCustomTrace").onclick = () => { 
   let ctname = "addCustomTraceTestFunc" + Math.floor(Math.random() * 1001); 
   AGCAPM.addCustomTrace(traceTestSumFunc(7, 90000000), ctname, true).then((res) => { 
      alert("addCustomTrace: success :: " + res); 
   }).catch((error) => alert("addCustomTrace :: Error! " + JSON.stringify(error, null, 1))); 
} 
$("testCustomTrace").onclick = () => { 
   let traceName = "TNtraceName" + Math.floor(Math.random() * 1001); 
   apmsPlugin.createCustomTrace(traceName).then(async (customTrace) => { 
      mCustomTrace = customTrace; 
      await mCustomTrace.start(); 
      console.log("ct_start: success "); 
 
      let propertyName1 = "propertyName1"; 
      let propertyValue1 = "propertyValue1"; 
      await mCustomTrace.putProperty(propertyName1, propertyValue1); 
      console.log("putProperty: success "); 
 
      let propertyName2 = "propertyName2"; 
      let propertyValue2 = "propertyValue2"; 
      await mCustomTrace.putProperty(propertyName2, propertyValue2); 
      console.log("putProperty: success "); 
 
      let measureName1 = "measureName1"; 
      let measureValue1 = "1"; 
      await mCustomTrace.incrementMeasure(measureName1, measureValue1); 
      console.log("incrementMeasure: success "); 
 
      let measureName2 = "measureName2"; 
      let measureValue2 = "1"; 
      await mCustomTrace.putMeasure(measureName2, measureValue2); 
      console.log("putMeasure: success "); 
 
      await traceTestSumFunc(11, 90000000); 
      await mCustomTrace.stop(); 
      alert("testCustomTrace: success"); 
 
      }).catch((error) => alert("testCustomTrace :: Error! " + JSON.stringify(error, null, 1))); 
}

6、您可以调用createNetworkMeasure接口创建网络请求指标。创建完成后,可调用start接口启动该指标,调用stop接口停止该指标。您还可以调用putProperty接口为网络请求指标添加自定义属性。

$("testNetworkMeasure").onclick = () => { 
   let url = "https://jsonplaceholder.typicode.com/todos"; 
   let httpMethod = "GET"; 
   apmsPlugin.createNetworkMeasure(url, httpMethod).then(async (networkMeasure) => { 
      mNetworkMeasure = networkMeasure; 
 
      await mNetworkMeasure.start(); 
      console.log("start: success "); 
 
      const xhr = new XMLHttpRequest(); 
      xhr.open(httpMethod, url); 
      xhr.send(); 
      xhr.onload = async function () { 
         console.log(this.responseText); 
         statusCode = this.status; 
         await mNetworkMeasure.setStatusCode(statusCode); 
         console.log("setStatusCode: success "); 
 
         let contentType = "application/json"; 
         await mNetworkMeasure.setContentType(contentType); 
         console.log("setContentType: success "); 
 
         let bytesSent = "0"; 
         await mNetworkMeasure.setBytesSent(bytesSent); 
         console.log("setBytesSent: success "); 
 
         let bytesReceived = xhr.response.length.toString(); 
         await mNetworkMeasure.setBytesReceived(bytesReceived); 
         console.log("setBytesReceived: success "); 
 
         let propertyName1 = "propertyName1"; 
         let propertyValue1 = "propertyValue1"; 
         await mNetworkMeasure.putProperty(propertyName1, propertyValue1); 
 
         let propertyName2 = "propertyName2"; 
         let propertyValue2 = "propertyValue2"; 
         await mNetworkMeasure.putProperty(propertyName2, propertyValue2); 
         console.log("putProperty: success "); 
 
         await mNetworkMeasure.stop(); 
         console.log("stop: success "); 
 
         alert("testNetworkMeasure: success"); 
      } 
   }).catch((error) => alert("testNetworkMeasure :: Error! " + JSON.stringify(error, null, 1))); 
}

查看和分析性能数据

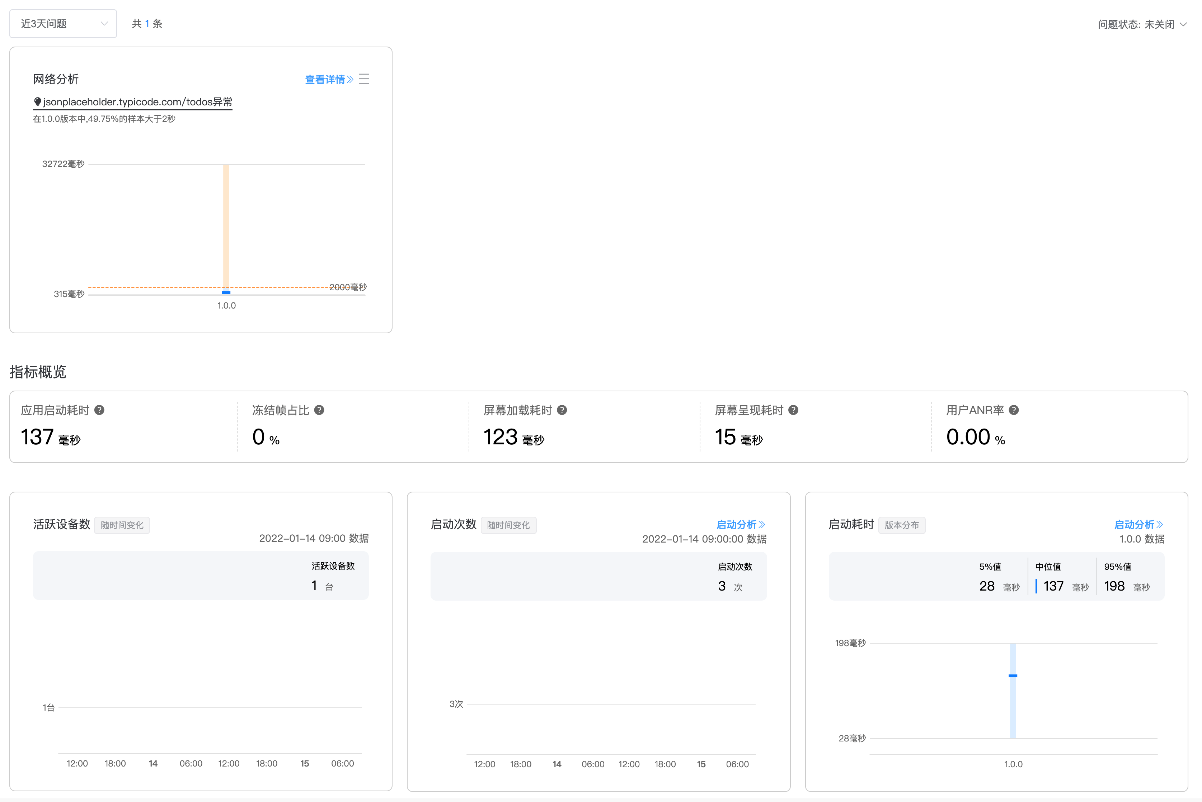
1、选择“质量 > 性能管理”,进入“应用性能管理”页面。点击“概览",进入概览页面,可以看到指标概览。指标概览包括“应用启动耗时”、“冻结帧占比”、“屏幕加载耗时”、“屏幕呈现耗时”和“用户ANR率”。

cke_153.png

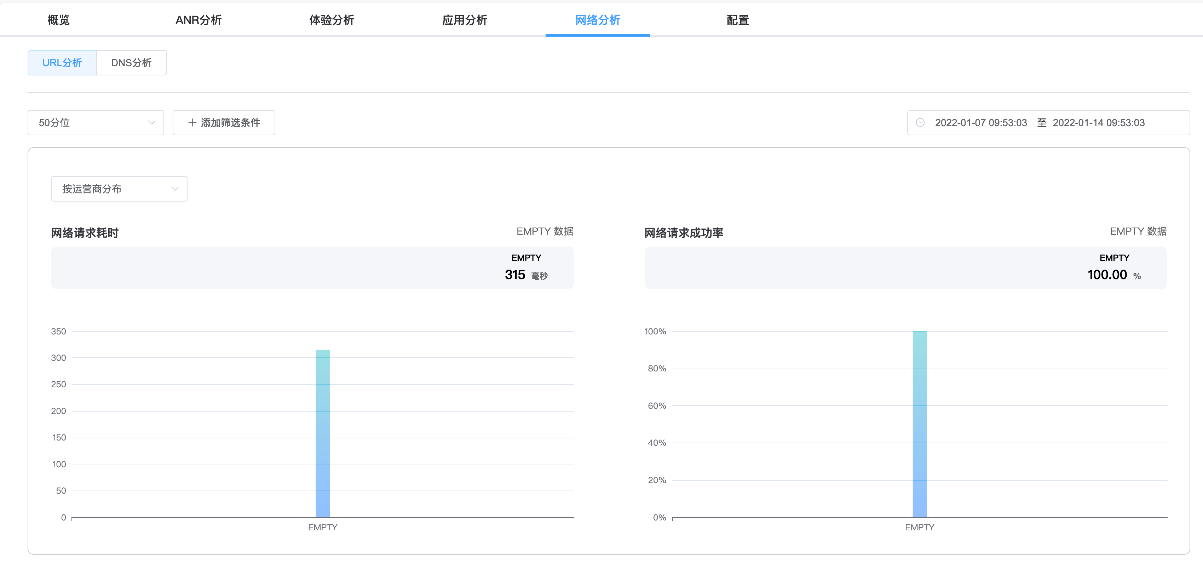
2、选择“网络分析 ",就进入了网络分析详情页面。该页面展示“网络请求耗时”和“网络请求成功率”详情。

cke_154.png

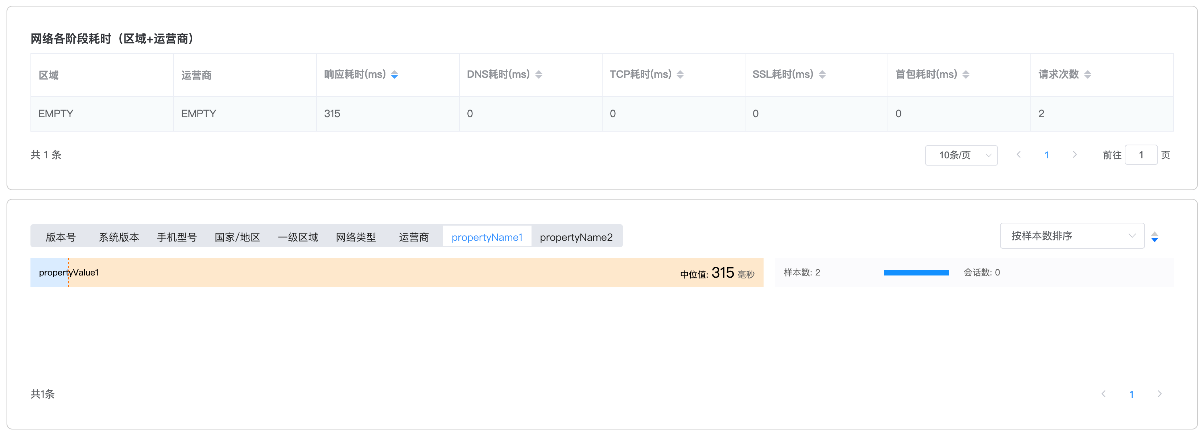
3、如果用户设定了Property,则可在“查看详情”页面中的维度栏看到对应Property下的耗时和请求成功率情况。

cke_155.png

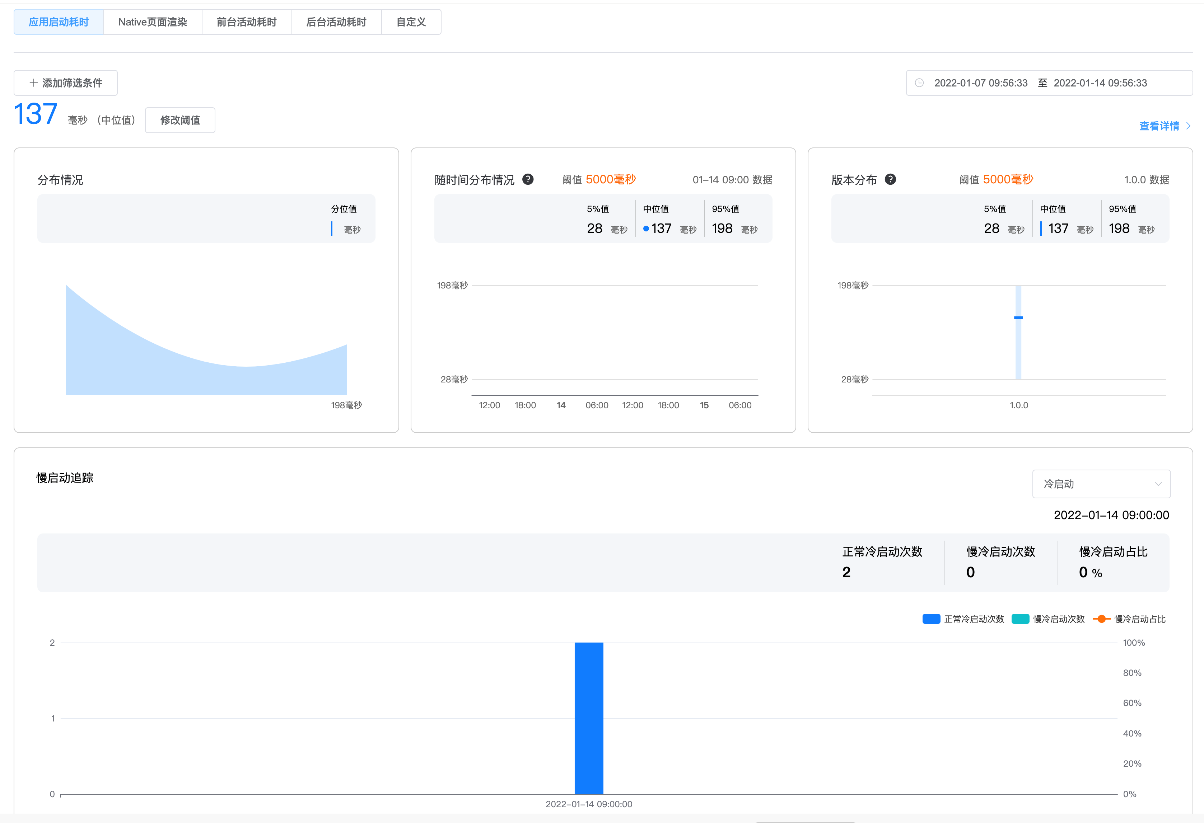
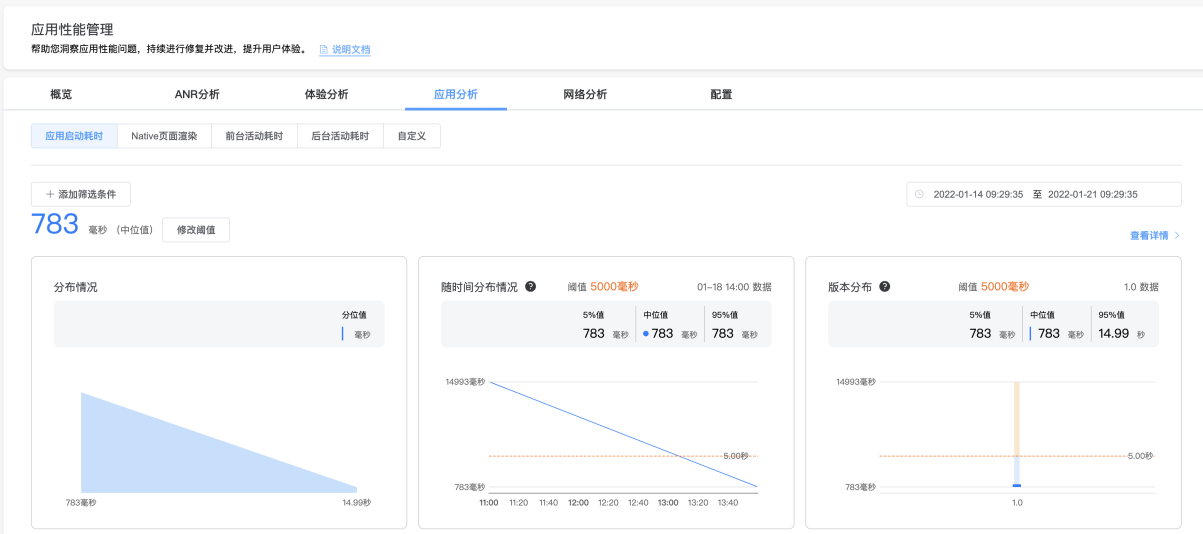
4、点击“应用分析>应用启动耗时”,可以看到应用启动时长的分布情况。

cke_156.pngcke_157.png

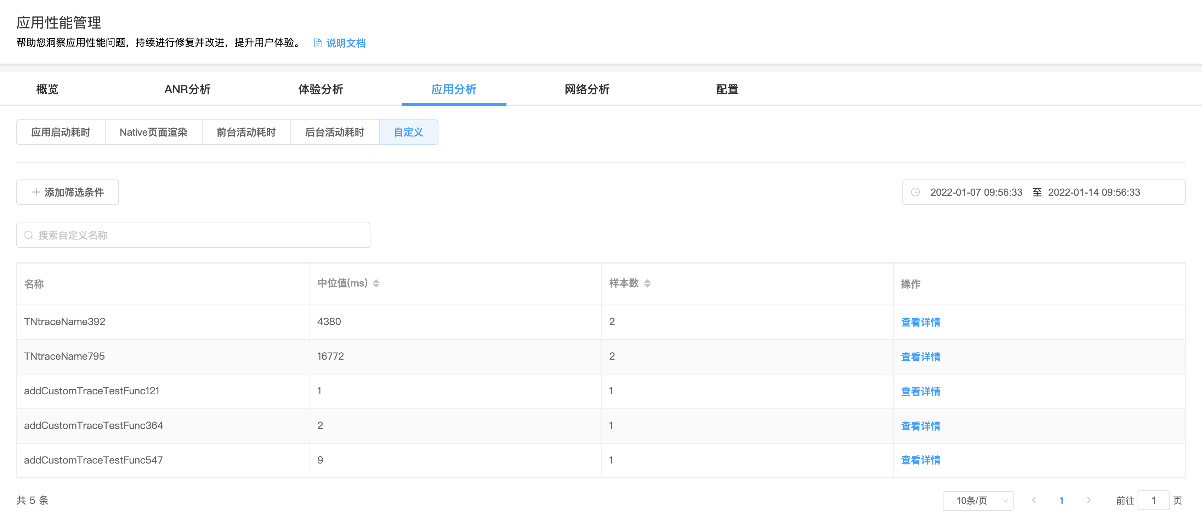
5、点击“应用分析>自定义”,该页面呈现了目前上报的自定义事件列表,包含自定义事件名称、中位值、样本数和查看详情操作。

cke_158.png

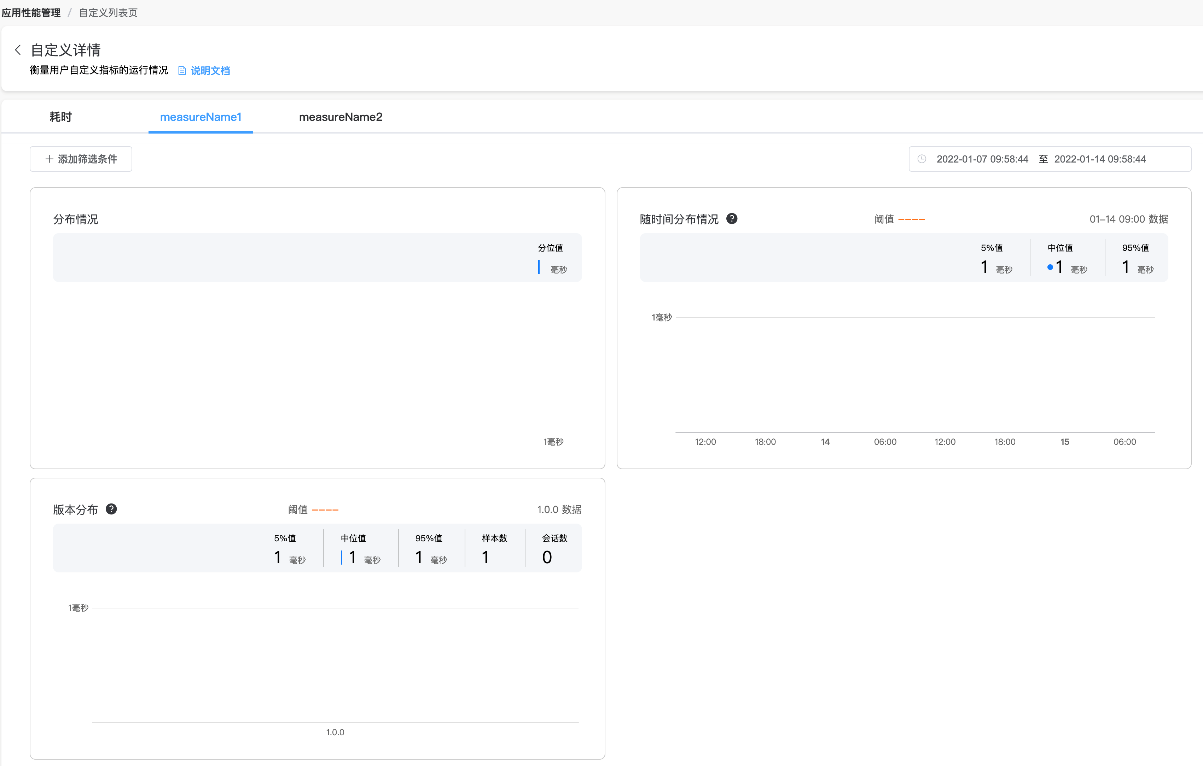
6、点击自定义事件的“查看详情"按钮,即可查看自定义事件耗时情况。

cke_159.png

参考文档

性能管理

欲了解更多更全技术文章,欢迎访问https://developer.huawei.com/consumer/cn/forum/?ha_source=zzh

posted @ 2022-07-08 08:48  华为开发者论坛  阅读(206)  评论(0编辑  收藏  举报