自定义控件的开发
很多时候,android提供的组件并不能满足我们的需求,于是我们不得不按需求开发自定义控件。
Step 1.
写好自定义控件的内部布局文件。
<?xml version="1.0" encoding="utf-8"?>
<LinearLayout xmlns:android="http://schemas.android.com/apk/res/android"
    android:layout_width="match_parent"
    android:layout_height="match_parent"
    android:background="@android:color/white"
    android:orientation="horizontal" >

    <ImageView
        android:id="@+id/image"
        android:layout_width="wrap_content"
        android:layout_height="wrap_content"
        android:layout_gravity="center_vertical"
        android:paddingBottom="5dip"
        android:paddingLeft="40dip"
        android:paddingTop="5dip"
        android:src="@drawable/confirm" />

    <TextView
        android:id="@+id/text"
        android:layout_width="wrap_content"
        android:layout_height="wrap_content"
        android:layout_gravity="center_vertical"
        android:layout_marginLeft="8dip"
        android:text="确定"
        android:textColor="#000000" />

</LinearLayout>
Step 2:
写好自定义的控件类并继承LinearLayout,并写好相关方法,用于控制自定义控件的内容。
package org.hjw.mybutton;

import android.content.Context;
import android.util.AttributeSet;
import android.view.LayoutInflater;
import android.widget.ImageView;
import android.widget.LinearLayout;
import android.widget.TextView;

public class my extends LinearLayout {

    private ImageView image;
    private TextView text;

    public my(Context context, AttributeSet attrs) {
        super(context, attrs);
        LayoutInflater ll = (LayoutInflater) context
                .getSystemService(Context.LAYOUT_INFLATER_SERVICE);
        ll.inflate(R.layout.my_button, this);
        image = (ImageView) findViewById(R.id.image);
        text = (TextView) findViewById(R.id.text);
    }

    public void setImage(int Resid) {
        image.setImageResource(Resid);
    }

    public void setText(String ext) {
        text.setText(ext);
    }

}
Step3:
需要使用自定义控件时,只需要在xml文件中加入即可,这里我们在主布局文件中加入。
<LinearLayout xmlns:android="http://schemas.android.com/apk/res/android"
    android:layout_width="match_parent"
    android:layout_height="match_parent"
    android:background="@android:color/black"
    android:orientation="horizontal" >

    <org.hjw.mybutton.my
        android:id="@+id/myButton1"
        android:layout_width="wrap_content"
        android:layout_height="wrap_content"
     android:background="@drawable/bg_button"
   />

    <org.hjw.mybutton.my
        android:id="@+id/myButton2"
        android:layout_width="wrap_content"
        android:layout_height="wrap_content"
     android:background="@drawable/bg_button"
     android:layout_marginLeft="5dp">
    </org.hjw.mybutton.my>

</LinearLayout>
Step 4:
为了使用户体验效果更好,可以加入背景图片的变化效果。
<?xml version="1.0" encoding="utf-8"?>
<selector xmlns:android="http://schemas.android.com/apk/res/android" >

    <item android:state_focused="true" android:state_pressed="false" android:drawable="@drawable/btn_normal"></item>
    <item android:state_pressed="true" android:drawable="@drawable/btn_white"></item>
    <item android:state_checked="true" android:drawable="@drawable/btn_white"></item>
    <item android:state_focused="false" android:state_pressed="false" android:drawable="@drawable/btn_normal"></item>

</selector>
Step 5:
最后在主Activity中像使用其他控件一样使用此控件。
package org.hjw.mybutton;

import android.os.Bundle;
import android.app.Activity;
import android.view.Menu;
import android.view.View;
import android.widget.Toast;

public class MainActivity extends Activity {

    private my My, My2;

    @Override
    protected void onCreate(Bundle savedInstanceState) {
        super.onCreate(savedInstanceState);
        setContentView(R.layout.activity_main);
        My = (my) findViewById(R.id.myButton1);
        My2 = (my) findViewById(R.id.myButton2);
        My2.setImage(R.drawable.cancel);
        My2.setText("取消");
        My.setImage(R.drawable.confirm);
        My.setText("确定");

        My.setOnClickListener(new View.OnClickListener() {

            @Override
            public void onClick(View v) {
                Toast.makeText(getApplicationContext(), "You just clicked!", 1)
                        .show();
            }
        });
    }

    @Override
    public boolean onCreateOptionsMenu(Menu menu) {
        // Inflate the menu; this adds items to the action bar if it is present.
        getMenuInflater().inflate(R.menu.main, menu);
        return true;
    }

}
Step 6:
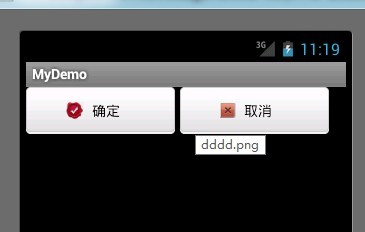
我们看看效果吧。

╭︿︿︿╮ {/ o o /} ( (oo) ) ︶ ︶︶


