caffe数据集LMDB的生成
本文主要介绍如何在caffe框架下生成LMDB。其中包含了两个任务的LMDB生成方法,一种是分类,另外一种是检测。
分类任务
第一步 生成train.txt和test.txt文件文件
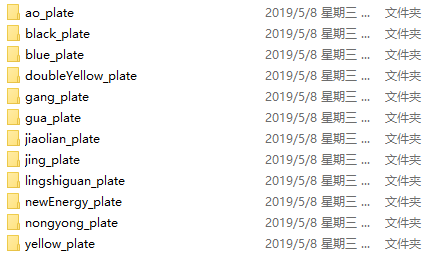
对于一个监督学习而言,通常具有训练集(train_data文件夹)和测试集(test_data文件夹),如下图所示
![]()
而多分类问题,train_data文件夹的子目录下,有会各个类别的文件夹,里面放着归属同一类的图片数据。(test_data文件夹同理)

因此,我们需要先生成train.txt和test.txt,以用作下一步处理。
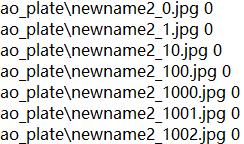
以train.txt为例,其格式应该是
 --------->
首先,为了防止命名中文的干扰问题,我们先为每个文件重新命名,如果你的文件没有中文命名,则此步可以跳过。
import os
import shutil
import random

#为每个文件改名
ToRename_train = 'C:\Users\dengshunge\Desktop\plate_dataV6\train_data'
ToRename_test = 'C:\Users\dengshunge\Desktop\plate_dataV6\test_data'
# subDict为子目录的文件夹名,需要手动填写
subDict = ['ao_plate','black_plate','blue_plate','doubleYellow_plate','gang_plate','gua_plate','jiaolian_plate','jing_plate','lingshiguan_plate','newEnergy_plate','nongyong_plate','yellow_plate']
for i in range(len(subDict)):
    ToRename_train1 = os.path.join(ToRename_train,subDict[i])
    ToRename_test1 = os.path.join(ToRename_test,subDict[i])
    if not os.path.exists(ToRename_train1) or not os.path.exists(ToRename_test1):
        raise Exception('ERROR')
    files_train = list(os.listdir(ToRename_train1))
    random.shuffle(files_train)
    files_test = list(os.listdir(ToRename_test1))
    random.shuffle(files_test)
    for s in range(len(files_train)):
        oldname = os.path.join(ToRename_train1,files_train[s])
        # newname为新的文件名
        newname = ToRename_train1+'\\newname_train_'+str(s)+'.jpg'
        os.rename(oldname,newname)
    for s in range(len(files_test)):
        oldname = os.path.join(ToRename_test1,files_test[s])
        # newname为新的文件名
        newname = ToRename_test1+'\\newname_test_'+str(s)+'.jpg'
        os.rename(oldname,newname)
当为每个文件改名后,此时就可以生成train.txt和test.txt文件。
import os
import shutil
import random

# 形成train和test.txt文件
# 需要更换train_path,test_path和restoreFile
train_path = r'C:\Users\dengshunge\Desktop\plate_dataV6\train_data'
test_path = r'C:\Users\dengshunge\Desktop\plate_dataV6\test_data'
# 文件夹下的子目录名称
subPath = ['ao_plate','black_plate','blue_plate','doubleYellow_plate','gang_plate','gua_plate','jiaolian_plate','jing_plate','lingshiguan_plate','newEnergy_plate','nongyong_plate','yellow_plate']
# 生成的train.txt或者test.txt存放的位置
restoreFile = r'C:\Users\dengshunge\Desktop'
# 生成train.txt
for i in range(len(subPath)):
    train_path1 = os.path.join(train_path,subPath[i])
    if not os.path.exists(train_path1):
        raise Exception('error')
    restoreFile_train = os.path.join(restoreFile,'train.txt')
    with open(restoreFile_train,'a') as f:
        files = os.listdir(train_path1)
        for s in files:
            f.write(os.path.join(subPath[i],s)+' '+str(i)+'\n')
# 生成test.txt
for i in range(len(subPath)):
    test_path1 = os.path.join(test_path,subPath[i])
    if not os.path.exists(test_path1):
        raise Exception('error')
    restoreFile_test = os.path.join(restoreFile,'test.txt')
    with open(restoreFile_test,'a') as f:
        files = os.listdir(test_path1)
        for s in files:
            f.write(os.path.join(subPath[i],s)+' '+str(i)+'\n')
第二步 修改create_imagenet.sh
如果你安装了caffe并且得到了train.txt和test.txt文件,可以利用caffe提供的函数来生成LMDB文件。
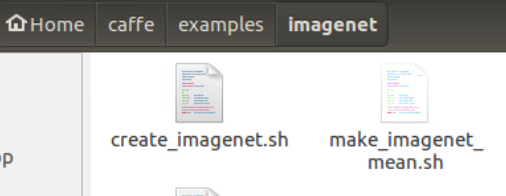
create_imagenet.sh位于/caffe/examples/imagenet中。

将create_imagenet.sh复制出来,放到一个文件夹内。例如我放到了/Desktop/convertLMDB中。将数据集,train.txt和test.txt也放在convertTMDB文件夹中,如图所示。

修改create_imagenet.sh文件,如下面的中文注释所示,大家按需更改,
#!/usr/bin/env sh
# Create the imagenet lmdb inputs
# N.B. set the path to the imagenet train + val data dirs
set -e

# 生成的LMDB文件存放的位置
EXAMPLE=/home/dengshunge/Desktop/convertLMDB
# train.txt和test.txt文件放置的位置
DATA=/home/dengshunge/Desktop/convertLMDB
# caffe/build/tools的位置
TOOLS=/home/dengshunge/caffe/build/tools

# 训练集和测试集的位置,记得,最后的 '/' 不要漏了
TRAIN_DATA_ROOT=/home/dengshunge/Desktop/convertLMDB/plate_dataV6/train_data/
VAL_DATA_ROOT=/home/dengshunge/Desktop/convertLMDB/plate_dataV6/test_data/

# Set RESIZE=true to resize the images to 256x256. Leave as false if images have
# already been resized using another tool.
# 如果需要给该输入图片的大小,将RESIZE设置成true,并图片的高度和宽度
RESIZE=true
if $RESIZE; then
  RESIZE_HEIGHT=30
  RESIZE_WIDTH=120
else
  RESIZE_HEIGHT=0
  RESIZE_WIDTH=0
fi

if [ ! -d "$TRAIN_DATA_ROOT" ]; then
  echo "Error: TRAIN_DATA_ROOT is not a path to a directory: $TRAIN_DATA_ROOT"
  echo "Set the TRAIN_DATA_ROOT variable in create_imagenet.sh to the path" \
       "where the ImageNet training data is stored."
  exit 1
fi

if [ ! -d "$VAL_DATA_ROOT" ]; then
  echo "Error: VAL_DATA_ROOT is not a path to a directory: $VAL_DATA_ROOT"
  echo "Set the VAL_DATA_ROOT variable in create_imagenet.sh to the path" \
       "where the ImageNet validation data is stored."
  exit 1
fi

echo "Creating train lmdb..."

# EXAMPLE/ilsvrc12_train_lmdb中的ilsvrc12_train_lmdb为LMDB的命名,可以按需更改
# DATA/train.txt要与自己生成train.txt名字相对应,不然得更改
# test lmdb同理
GLOG_logtostderr=1 $TOOLS/convert_imageset \
    --resize_height=$RESIZE_HEIGHT \
    --resize_width=$RESIZE_WIDTH \
    --shuffle \
    $TRAIN_DATA_ROOT \
    $DATA/train.txt \
    $EXAMPLE/train_lmdb

echo "Creating test lmdb..."

GLOG_logtostderr=1 $TOOLS/convert_imageset \
    --resize_height=$RESIZE_HEIGHT \
    --resize_width=$RESIZE_WIDTH \
    --shuffle \
    $VAL_DATA_ROOT \
    $DATA/test.txt \
    $EXAMPLE/test_lmdb

echo "Done."
第三步 生成LMDB文件
在命令行中输入,./create_imagenet.sh
dengshunge@computer-5054:~/Desktop/convertLMDB$ ./create_imagenet.sh -shuffle
最后会生成如下图所示。生成的LMDB大小如果只有十几KB的话,有可能是生成失败了。可以看到生成LMDB的时候,会自动打乱数据

最后,大家可以前去我的github来下载create_imagenet.sh文件与数据预处理.py文件,大家根据需求进行更改就行。
检测任务
生成的方法主要参考了这位博主的文章。本次使用的是github上的Tiny-DSOD版本的caffe,大家可以看一下Tiny-DSOD/data文件夹,可以清楚看到需要准备的东西。
第一步 准备image文件和xml文件
对于检测任务,当然是少不了标注信息的,因此,需要准备以下几个文件:
- 图像文件
- 标签文件,是按照pascal voc格式的 xml文件,一张图像对应一个xml文件,图片名与标签文件名相同
如图所示,左边是图像文件,右图对应的xml文件


第二步 生成train.txt和test.txt
首先,我们看一下tran.txt和test.txt的格式是怎样的。如图所示,每一行由2个部分组成,左边是图片的地址,右边是对应图片的xml地址,两者用空格相连。因此,知道了格式后,我们就可以生成了。那么地址是需要是怎样呢?下面我们会讲到,这个地址是一个相对地址,之后会与"create_data.sh"中的“data_root_dir”结合,生成绝对地址。

第三步 生成labelmap.prototxt和test_name_size.txt
首先,看一下labelmap.prototxt的格式是怎么样的。如下图所示,是有多个item组成的,label为0的item是背景,接下来就是你自己标注的label,label的编号最好连续,而且每个label对应的Name需要和xml里面的name一致。

然后再看看test_name_size.txt,如下图所示。由3列组成,第一列是图片的名称,第二、三列分别是图片的高和宽。注意,这里图片的名称没有后缀名。这个文件不知道有什么用,下面函数调用中,并没有引入这个文件。

因此,对于labelmap.prototxt的生成,可以手动进行修改;而train.txt,test.txt和test_name_size.txt的生成,这里提供了一个函数模板,大家可以按需进行修改。
第四步 生成LMDB
这里对Tiny-DSOD/data/VOC0712/create_data.sh进行了修改,如下所示。root_dir设置caffe的路径,这里主要是用于调用这个路径下的scripts/create_annoset.py;lmdbFile是生成LMDB的地址,而lmdbLink是这个lmdbFile的软连接。其他地方,都有注释了,应该能看懂。
cur_dir=$(cd $( dirname ${BASH_SOURCE[0]} ) && pwd )
# caffe的路径
root_dir="/home/dengshunge/Tiny-DSOD-master"

cd $root_dir

redo=1
# 数据的根目录,与txt的文件结合
data_root_dir="/home/dengshunge/Desktop/data"
# trainval.txt和test.txt的路径
txtFileDir="/home/dengshunge/Desktop/LMDB"
# LMDB存储位置
lmdbFile="/home/dengshunge/Desktop/LMDB/lmdb"
# LMDB存储位置的软连接
lmdbLink="/home/dengshunge/Desktop/LMDB/lmdbLink"
# mapfile位置
mapfile="/home/dengshunge/Desktop/LMDB/labelmap.prototxt"
# 任务类型
anno_type="detection"
# 格式
db="lmdb"
# 图片尺寸,若width,height=0,0,说明按原始图片输入尺寸,否则resize到(width,height)
min_dim=0
max_dim=0
width=300
height=300

extra_cmd="--encode-type=jpg --encoded"
if [ $redo ]
then
  extra_cmd="$extra_cmd --redo"
fi
for subset in test trainval
do
  python3 $root_dir/scripts/create_annoset.py --anno-type=$anno_type --label-map-file=$mapfile --min-dim=$min_dim --max-dim=$max_dim --resize-width=$width --resize-height=$height --check-label $extra_cmd $data_root_dir $txtFileDir/$subset.txt $lmdbFile/$subset"_"$db $lmdbLink
done
另外提一点,Tiny-DSOD/scripts/create_annoset.py似乎存在一点不足,对其进行了如下修改,是针对开头的部分的,其余内容不变。
import argparse
import os
import shutil
import subprocess
import sys

# 改成你的caffe路径
caffe_root = "/home/dengshunge/Tiny-DSOD-master"

# sys.path.append(caffe_root)
sys.path.insert(0,caffe_root+'/python')

from caffe.proto import caffe_pb2
from google.protobuf import text_format
运行这个create_data.sh文件,既可生成相应的LMDB文件。
我把这几个文件放在我的github上了,大家可以下载来进行使用。


