
vue-router实现SPA购物APP基本功能
概述
详细
vue-router是vue中的一个核心插件。
一、安装
1.如果安装脚手架,那么可以npm install vue-router 即可安装
然后导入并且引用就可以了。
1 2 | import VueRouter from 'vue-router'Vue.use(VueRouter) |
2.也可下载vue-router.js ,然后直接script引用也可以。
二、使用
用 Vue.js + vue-router 创建单页应用,是非常简单的。使用 Vue.js ,我们已经可以通过组合组件来组成应用程序,当你要把 vue-router 添加进来,我们需要做的是,将组件(components)映射到路由(routes),然后告诉 vue-router 在哪里渲染它们。
2.1关于渲染标签
vue-router提供了两个指令标签组件来处理导航和自动渲染的逻辑
<router-view> 渲染路径匹配到的视图组件,还可以内嵌自己的<router-view> ,根据嵌套路径渲染嵌套组件
<router-link> 路由中的应用导航
2.2关于跳转
使用router-link组件来进行导航,通过传入“to”属性指定链接
<router-link to="/home">Go to Home</router-link>
但是同样,我们需要在js中配置路由的跳转
1 2 3 4 5 6 7 8 9 10 11 | //定义好路由组件//index.js 配置路由跳转export default new Router({routes})var routes = [ { path: '/home', name: 'Home', component: Home }] |
2.3 关于传值
页面跳转时经常需要携带参数,所以路由跳转是可以携带参数的
1 2 3 4 5 6 7 8 | //动态路径传参,以冒号开头var routes = [ { path: '/detail/:id', name: 'Detail', component: Detail }] |
当然在路由中也需要配置一下
1 2 3 | <router-link :to='{name:"Detail",params:{id:x.name}}'> ...</router-link> |
2.4 关于参数结接收
一个『路径参数』使用冒号 : 标记。当匹配到一个路由时,参数值会被设置到 this.$route.params,可以在每个组件内使用。于是,我们可以更新Detail的模板,输出当前用户的商品名
1 2 3 4 5 6 | <template> <div> <h1>水果详情页</h1> <h1>{{$route.params.id}}</h1> </div> </template> |
2.5 关于渲染
默认情况下,<router-link>会被渲染成a标签输出,而有时候,为了页面的规范和美观,我们可以将其替换成其他标签,比如<router-link to:"/home" tag="div" > 最终,<router-link>就会以div的形式显示在页面上
2.6 嵌套式路由
上文说过,路由之间是可以嵌套的,所以我们可以在路由中进行子路由的嵌套
那么此时,首先,我们需要先配置路由
1 2 3 4 5 6 7 8 9 10 11 12 13 14 15 16 17 18 19 20 21 22 23 | //此时,我们在market组件下,配置2个子路由var routes = [ { path: '/market', name: 'Market', component: Market, children: [ { path: '/', component: require('../pages/market/price') }, { path: 'price', component: require('../pages/market/price') }, { path: 'rank', component: require('../pages/market/rank') } ] }]export default new Router({routes}) |
market组件中
1 2 3 4 5 6 7 8 9 | <template> <div> <ul> <router-link to='/market/price' tag="li">天天特价</router-link> <router-link to='/market/rank' tag="li">热销榜</router-link> </ul> <router-view></router-view> </div></template> |
其实这样我们对应的子路由就配置好了。
是不是有点懵,做一个系统的例子
1.根据笔者的第一篇文章,安装下vue-cli以及学习基本知识《Vue2.0(一,vue实例)》http://www.jianshu.com/p/d5272bd2db5e
2.根据笔者的第二篇vue文章,学习一下vue的基本指令《Vue2.0(vue基本指令)》http://www.jianshu.com/p/7a8f2ce9ef5e
3.看过分割线上的内容
三、案例效果
要点
1.一级路由跳转及传参
2.子路由的配置和跳转
3.基本组件的使用和传参
麻雀虽小,但是涵盖很多知识点,基本等价于一个小的app的功能
四、案例详解
3.1 构建页面组件
建立4个主页面组件以及1个详情页组件
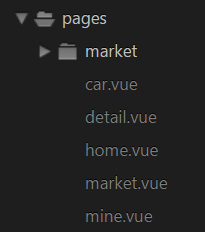
3.1.1home.vue
1 2 3 4 5 6 7 8 9 10 11 12 13 14 15 16 17 18 19 20 21 22 23 24 25 26 27 28 29 30 31 32 33 34 35 36 37 38 39 40 41 42 43 44 45 | //因为点击home.vue中的任何一个商品都跳转到商品详情页,所以在渲染每一个商品的时候,我们都加上router-link,并且进行跳转的传递参数<template> <div> <ul> <li v-for='x in list'> <router-link :to='{name:"Detail",params:{id:x.name}}'> <div>  </div> <h3> {{x.name}}{{x.price}} </h3> </router-link> </li> </ul> </div></template><script> export default{ data(){ return { list:[] } }, beforeCreate(){}, created(){}, computed:{}, mounted(){ this.$http.get('http://www.vrserver.applinzi.com/aixianfeng/apihomehot.php') .then(response=>{ this.list = response.body.data; },response=>{ }); }, methods:{}, components:{} }</script><style>ul>li{ display:block}</style> |
3.1.2market.vue
1 2 3 4 5 6 7 8 9 10 11 12 13 14 15 16 17 18 19 20 21 22 23 24 25 26 27 28 29 30 31 32 33 34 35 36 37 38 39 40 41 42 43 44 45 46 47 48 49 50 51 52 53 54 55 56 57 58 59 60 61 62 63 64 65 66 67 68 69 70 71 72 73 74 75 76 77 | <template> <div> <ul> <router-link to='/market/price' tag="li">天天特价</router-link> <router-link to='/market/rank' tag="li">热销榜</router-link> <router-link to='/market/milk' tag="li">牛奶面包</router-link> <router-link to='/market/fruit' tag="li">优选水果</router-link> </ul> <router-view></router-view> </div></template><script> export default{ data(){ return { list:[] } }, computed:{}, mounted(){}, methods:{}, components:{} }</script><style>ul,li{ list-style: none; }*{ margin: 0; padding: 0; }.nav{ position: fixed; height: 100%; width:25%; background: #dfdfdf; list-style: none; text-align: center; left: 0; top: 0;}.footer{ position: fixed; height: 40px; width:100%; background: #dfdfdf; list-style: none; text-align: center; left: 0; bottom: 0; z-index:10;}.nav li{ /*width: 25%;*/ padding: 10px;}.nav a{ text-decoration: none;}.router-link-active{ background:skyblue}.view{ position: fixed; height: 100%; width:75%; background: #fff; list-style: none; text-align: center; right: 0; top: 0; overflow-y:auto}</style> |
3.1.3car.vue和mine.vue简写
1 2 3 4 5 6 7 8 9 10 11 12 13 14 15 16 17 18 19 20 21 22 | <template> <h1>我的</h1></template><script> export default{ data(){ return { } }, computed:{}, mounted(){ }, methods:{}, components:{} }</script><style lang='css'></style> |
3.2组件引用和路由配置
安装好路由,并且进行组件的引入和路由的配置
1 2 3 4 5 6 7 8 9 10 11 12 13 14 15 16 17 18 19 20 21 22 23 24 25 26 | import Vue from 'vue'import Router from 'vue-router'import VueResource from 'vue-resource'Vue.use(Router)Vue.use(VueResource)import Home from 'pages/home.vue'import Market from 'pages/market.vue'import Car from 'pages/car.vue'import Mine from 'pages/mine.vue'import Detail from 'pages/detail.vue'var routes = [ { path: '/', name: 'Home', component: Home }, { path: '/home', name: 'Home', component: Home }, { path: '/market', name: 'Market', component: Market, children: [ { path: '/', component: require('../pages/market/price') }, { path: 'price', component: require('../pages/market/price') }, { path: 'rank', component: require('../pages/market/rank') }, { path: 'milk', component: require('../pages/market/milk') }, { path: 'fruit', component: require('../pages/market/fruit') }, ] }, { path: '/car', name: 'Car', component: Car }, { path: '/mine', name: 'Mine', component: Mine }, { path: '/detail/:id', name: 'Detail', component: Detail }]export default new Router({routes}) |
3.3detail.vue
点击home页中的每一个商品都需要跳转到商品详情页,所以我们要进行参数的接收和页面渲染
1 2 3 4 5 6 7 8 9 10 11 12 13 14 15 16 17 18 19 20 | <template> <div> <h1>水果详情页</h1> <h1>{{$route.params.id}}</h1> </div> </template><script> export default{ data(){}, computed:{}, mounted(){ }, methods:{}, components:{} }</script><style lang='css'></style> |
3.4market.vue
在market组件中,我们引用二级路由,所以需要定义router-link和router-view,因为每一个二级路由需要渲染不同的部分,比如天天特价,热销榜等等,所以我们还需要这四个组件,看3.4
1 2 3 4 5 6 7 8 9 10 11 12 13 14 15 16 17 18 19 20 21 22 23 24 25 26 27 28 29 30 31 32 33 34 35 36 37 38 39 40 41 42 43 44 45 46 47 48 49 50 51 52 53 54 55 56 57 58 59 60 61 62 63 64 65 66 67 68 69 70 71 72 73 74 75 76 77 | <template lang='html'> <div> <ul> <router-link to='/market/price' tag="li">天天特价</router-link> <router-link to='/market/rank' tag="li">热销榜</router-link> <router-link to='/market/milk' tag="li">牛奶面包</router-link> <router-link to='/market/fruit' tag="li">优选水果</router-link> </ul> <router-view></router-view> </div></template><script> export default{ data(){ return { list:[] } }, computed:{}, mounted(){}, methods:{}, components:{} }</script><style lang='css'>ul,li{ list-style: none; }*{ margin: 0; padding: 0; }.nav{ position: fixed; height: 100%; width:25%; background: #dfdfdf; list-style: none; text-align: center; left: 0; top: 0;}.footer{ position: fixed; height: 40px; width:100%; background: #dfdfdf; list-style: none; text-align: center; left: 0; bottom: 0; z-index:10;}.nav li{ /*width: 25%;*/ padding: 10px;}.nav a{ text-decoration: none;}.router-link-active{ background:skyblue}.view{ position: fixed; height: 100%; width:75%; background: #fff; list-style: none; text-align: center; right: 0; top: 0; overflow-y:auto}</style> |
3.5 market的四个组件
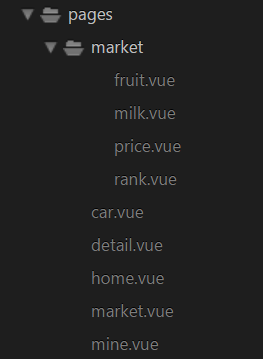
3.5.1 fruit.vue
1 2 3 4 5 6 7 8 9 10 11 12 13 14 15 16 17 18 19 20 21 22 | <template> <List type='优选水果'></List></template><script>import List from '../../components/List' export default{ data(){ return { } }, computed:{}, mounted(){ }, methods:{}, components:{ List } }</script><style></style> |
3.5.2 milk.vue
1 2 3 4 5 6 7 8 9 10 11 12 13 14 15 16 17 18 19 20 21 22 | <template> <List type='牛奶面包'></List></template><script>import List from '../../components/List' export default{ data(){ return { } }, beforeCteate(){}, create(){}, computed:{}, mounted(){}, methods:{}, components:{ List } }</script><style></style> |
3.5.3price.vue
1 2 3 4 5 6 7 8 9 10 11 12 13 14 15 16 17 18 19 20 21 22 23 | <template> <List type='天天特价'></List></template><script>import List from '../../components/List' export default{ data(){ return { } }, beforeCteate(){}, create(){}, computed:{}, mounted(){}, methods:{}, components:{ List } }</script><style></style> |
3.5.4rank.vue
1 2 3 4 5 6 7 8 9 10 11 12 13 14 15 16 17 18 19 20 21 22 | <template> <List type='热销榜'></List></template><script>import List from '../../components/List' export default{ data(){ return { } }, beforeCteate(){}, create(){}, computed:{}, mounted(){}, methods:{}, components:{ List } }</script><style></style> |
仔细看着四个小组件,是不是都是同样引用了一个List.vue的组件,以为如果这四个页面的结构是一样的,所以我们只需要引用要给共同的组件即可
3.5.5 List.vue
1 2 3 4 5 6 7 8 9 10 11 12 13 14 15 16 17 18 19 20 21 22 23 24 25 26 27 28 29 30 31 32 33 34 35 36 37 38 39 40 41 42 43 44 45 46 47 48 49 50 51 52 53 54 55 56 57 58 | <template><div class="mod-home"> <ul> <li v-for='x in list'> <div class="">  </div> <h3> {{x.name}}{{x.price}} </h3> </li> </ul> </div></template><script>export default { data () { return { list:[] } }, props:['type'], computed:{}, mounted(){ var type = this.type || '天天特价'; this.$http.get('http://www.vrserver.applinzi.com/aixianfeng/apicategory.php?category='+type) .then(response=>{ this.list = response.body.data },response =>{ }) }, methods:{}}</script><!-- Add "scoped" attribute to limit CSS to this component only --><style scoped> h1, h2 { font-weight: normal; } ul { list-style-type: none; padding: 0; } li { display: block; margin: 0 10px; } a { color: #42b983; }</style> |
这里我们在不同的父组件传入一个type,在子组件List中,我们接收type,并且根据type不同,请求不同的ajax即可。
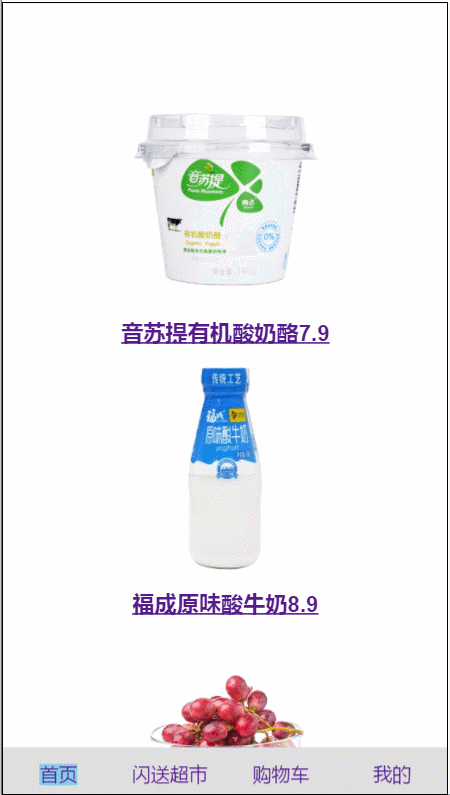
五、文件截图

六、其他补充
这样我们一个小案例就可以正常运行了。
这篇文章真心耗时,噗,单身妹子该出去浪才对,伤不起~啦啦啦
文章不定时更新~
喜欢就收藏,真爱就打赏~笔芯~


【推荐】国内首个AI IDE,深度理解中文开发场景,立即下载体验Trae
【推荐】编程新体验,更懂你的AI,立即体验豆包MarsCode编程助手
【推荐】抖音旗下AI助手豆包,你的智能百科全书,全免费不限次数
【推荐】轻量又高性能的 SSH 工具 IShell:AI 加持,快人一步
· go语言实现终端里的倒计时
· 如何编写易于单元测试的代码
· 10年+ .NET Coder 心语,封装的思维:从隐藏、稳定开始理解其本质意义
· .NET Core 中如何实现缓存的预热?
· 从 HTTP 原因短语缺失研究 HTTP/2 和 HTTP/3 的设计差异
· 分享 3 个 .NET 开源的文件压缩处理库,助力快速实现文件压缩解压功能!
· Ollama——大语言模型本地部署的极速利器
· 使用C#创建一个MCP客户端
· 分享一个免费、快速、无限量使用的满血 DeepSeek R1 模型,支持深度思考和联网搜索!
· Windows编程----内核对象竟然如此简单?