Android IntentService使用
概述
详细
原文地址:http://blog.csdn.net/VNanyesheshou/article/details/75125909
一、准备工作
开发环境:
jdk1.8
Eclipse Luna Service Release 1 (4.4.1)
运行环境:
华为荣耀6(Android4.4)、华为p9(Android7.0)
实现功能:
Android IntentService的使用
二、简介
IntentService概括
IntentService is a base class for Service that handle asynchronous requests (expressed as Intents) on demand. Clients send requests through startService(Intent) calls; the service is started as needed, handles each Intent in turn using a worker thread, and stops itself when it runs out of work.
This “work queue processor” pattern is commonly used to offload tasks from an application’s main thread. The IntentService class exists to simplify this pattern and take care of the mechanics. To use it, extend IntentService and implement onHandleIntent(Intent). IntentService will receive the Intents, launch a worker thread, and stop the service as appropriate.
All requests are handled on a single worker thread – they may take as long as necessary (and will not block the application’s main loop), but only one request will be processed at a time.
IntentService是Service的子类,根据需要处理异步请求(以intent表示)。客户端通过调用startService(Intent) 发送请求,该Service根据需要启动,使用工作线程处理依次每个Intent,并在停止工作时停止自身。
这种“工作队列处理器”模式通常用于从应用程序的主线程中卸载任务。 IntentService类的存在是为了简化这种模式。 要使用它,扩展IntentService并实现onHandleIntent(Intent)。 IntentService将收到Intents,启动一个工作线程,并根据需要停止该服务。
所有请求都在单个工作线程处理 - 它们可能需要很长的时间(并且不会阻止应用程序的主循环),但是一次只会处理一个请求
三、程序实现
工程截图:
![1500101248545015747.png 8BY31Y]N_5H4{15)JFVYJY9.png](http://www.demodashi.com/ueditor/jsp/upload/image/20170715/1500101248545015747.png)
在IntentService中处理下载请求(模拟),并将进度更新到Ui。
MyIntentService.Java代码如下:
1 2 3 4 5 6 7 8 9 10 11 12 13 14 15 16 17 18 19 20 21 22 23 24 25 26 27 28 29 30 31 32 33 34 35 36 37 38 39 40 41 42 43 44 45 46 47 48 49 50 51 52 53 54 55 56 57 58 59 60 61 62 63 64 65 66 67 68 69 70 71 72 73 74 75 76 | public class MyIntentService extends IntentService { private final static String TAG = "MyIntentService"; public static final String ACTION_DOWN_IMG = "down.image"; public static final String ACTION_DOWN_VID = "down.vid"; public static final String ACTION_DOWN_PROGRESS = "com.zpengyong.down.progress"; public static final String ACTION_SERVICE_STATE = "com.zpengyong.service.state"; public static final String PROGRESS = "progress"; public static final String SERVICE_STATE = "service_state"; //构造方法 public MyIntentService() { super("MyIntentService"); } @Override public void onCreate() { super.onCreate(); Log.i(TAG, "onCreate"); sendServiceState("onCreate"); } @Override public void onStart(Intent intent, int startId) { super.onStart(intent, startId); Log.i(TAG, ""); } @Override protected void onHandleIntent(Intent intent) { Log.i(TAG, "onHandleIntent thread:"+Thread.currentThread()); String action = intent.getAction(); if(action.equals(ACTION_DOWN_IMG)){ for(int i = 0; i < 100; i++){ try{ //模拟耗时操作 Thread.sleep(50); }catch (Exception e) { } sendProgress(i); } }else if(action.equals(ACTION_DOWN_VID)){ for(int i = 0; i < 100; i++){ try{ //模拟耗时操作 Thread.sleep(70); }catch (Exception e) { } sendProgress(i); } } Log.i(TAG, "onHandleIntent end"); } @Override public void onDestroy() { super.onDestroy(); Log.i(TAG, "onDestroy"); sendServiceState("onDestroy"); } //发送Service的状态 private void sendServiceState(String state){ Intent intent = new Intent(); intent.setAction(ACTION_SERVICE_STATE); intent.putExtra(SERVICE_STATE, state); sendBroadcast(intent); } //发送进度 private void sendProgress(int progress){ Intent intent = new Intent(); intent.setAction(ACTION_DOWN_PROGRESS); intent.putExtra(PROGRESS, progress); sendBroadcast(intent); }} |
使用IntentService的方法:
-
继承IntentService。
-
实现不带参数的构造方法,并且调用父类IntentService的构造方法。
-
实现onHandleIntent方法。
在onHandleIntent方法中可以根据intent来区分任务,这里有两个任务,一个是下载图片、一个是下载视频(模拟耗时操作)。
四、运行效果
项目下载后,导入eclipse后,右键项目:Run as -》Android Application
然后有以下效果:
1 只点击“启动任务一”。 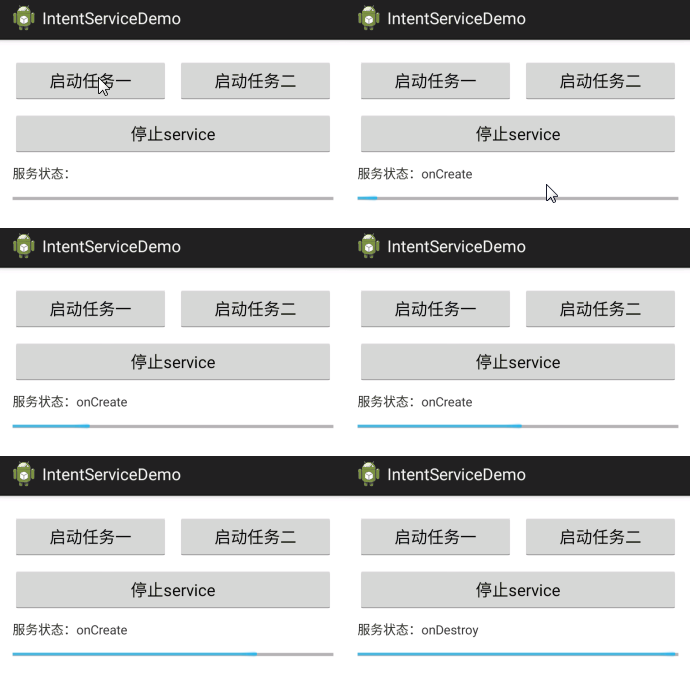
打印:
07-15 03:07:24.589: I/MyIntentService(3186): onCreate
07-15 03:07:24.593: I/MyIntentService(3186): onHandleIntent thread:Thread[IntentService[MyIntentService],5,main]
07-15 03:07:30.918: I/MyIntentService(3186): onHandleIntent end
07-15 03:07:31.017: I/MyIntentService(3186): onDestroy
IntentService启动后再onHandleIntent方法中执行任务(该方法工作在子线程中),任务执行完后,IntentService销毁。
2 点击“启动任务一”,任务未完成时点击“停止Service”。 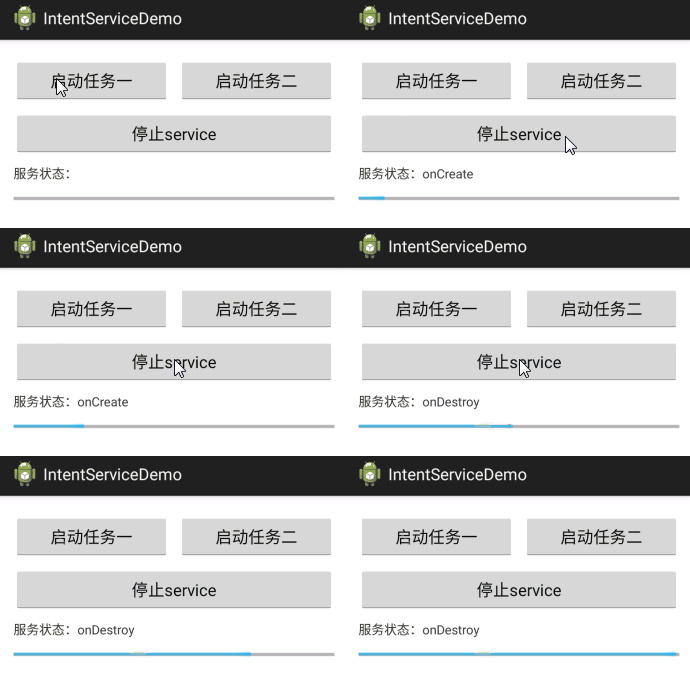
log
07-15 03:08:08.477: I/MyIntentService(3186): onCreate
07-15 03:08:08.478: I/MyIntentService(3186): onHandleIntent thread:Thread[IntentService[MyIntentService],5,main]
07-15 03:08:12.203: I/MyIntentService(3186): onDestroy
07-15 03:08:14.253: I/MyIntentService(3186): onHandleIntent end
IntentService中线程执行任务时,stopService会让IntentService销毁,但是任务继续执行,直到执行完成线程退出。
3 点击“启动任务一”,任务完成后点击“启动任务二”。 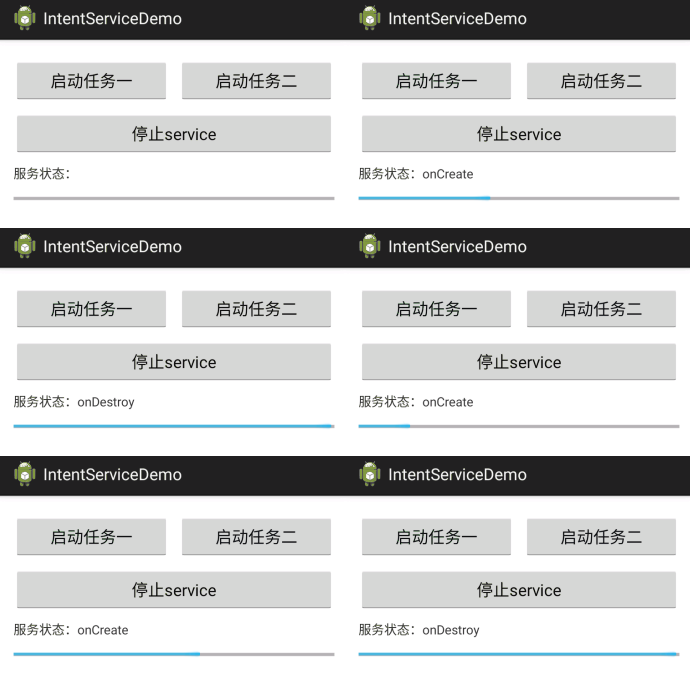
log信息:
07-15 03:11:42.366: I/MyIntentService(3186): onCreate
07-15 03:11:42.367: I/MyIntentService(3186): onHandleIntent thread:Thread[IntentService[MyIntentService],5,main]
07-15 03:11:48.285: I/MyIntentService(3186): onHandleIntent end
07-15 03:11:48.289: I/MyIntentService(3186): onDestroy
07-15 03:11:50.174: I/MyIntentService(3186): onCreate
07-15 03:11:50.205: I/MyIntentService(3186): onHandleIntent thread:Thread[IntentService[MyIntentService],5,main]
07-15 03:11:58.446: I/MyIntentService(3186): onHandleIntent end
07-15 03:11:58.510: I/MyIntentService(3186): onDestroy
由上可知,任务执行完成后,线程退出循环,Service销毁。重新开启任务则重新创建Service,执行任务。
4 点击“启动任务一”,任务完成前点击“启动任务二”。 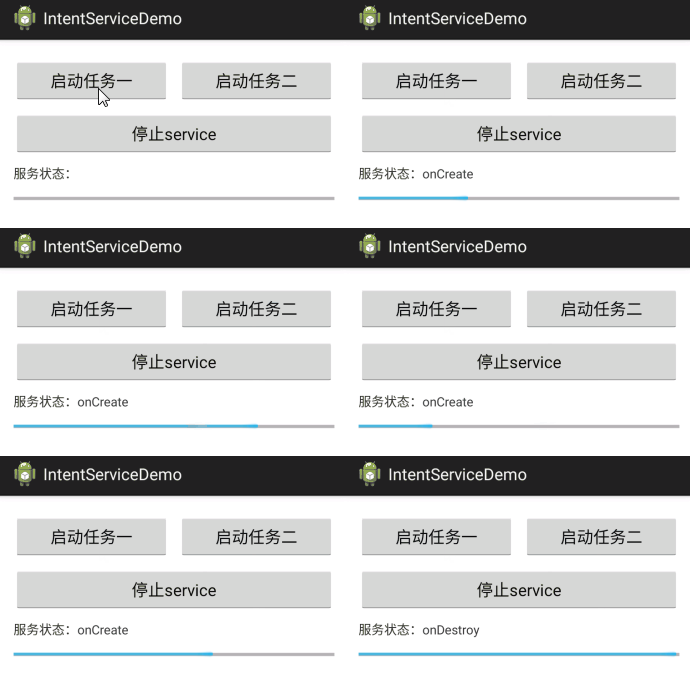
log信息
07-15 03:16:46.998: I/MyIntentService(3186): onCreate
07-15 03:16:46.998: I/MyIntentService(3186): onHandleIntent thread:Thread[IntentService[MyIntentService],5,main]
07-15 03:16:52.980: I/MyIntentService(3186): onHandleIntent end
07-15 03:16:52.980: I/MyIntentService(3186): onHandleIntent thread:Thread[IntentService[MyIntentService],5,main]
07-15 03:17:01.048: I/MyIntentService(3186): onHandleIntent end
07-15 03:17:01.053: I/MyIntentService(3186): onDestroy
正常startService启动两个任务,第一个未完成前,将第二个任务放到队列中,等待第一个完成后执行第二个任务,第二个任务完成后,Service自动销毁。
5 点击“启动任务一”,任务完成前点击“停止Service”,然后再点击“启动任务二”。 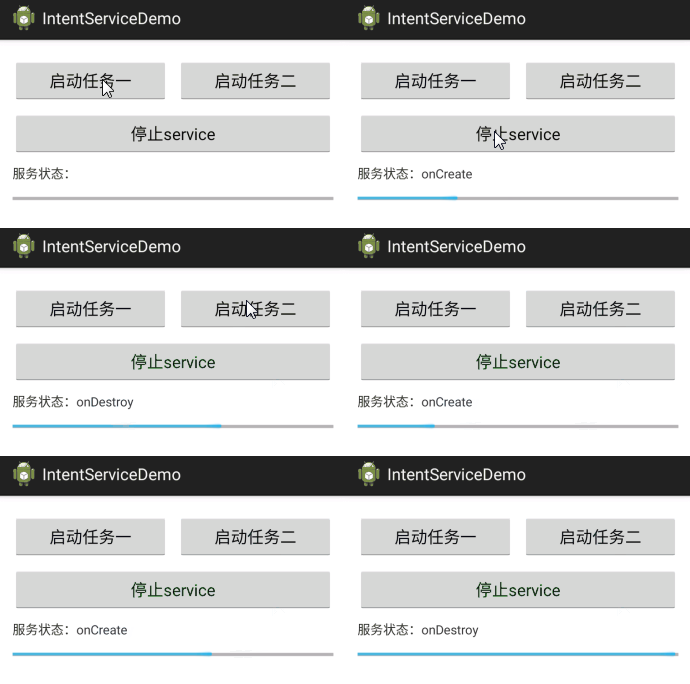
log信息 
第一个任务尚未结束时stopservice,IntentService销毁,其线程继续运行(tid 3691)。此时重新startService会开启IntentService,其会重新创建一个线程运行任务(tid 3692)。两个任务在两个线程中运行,所以其执行完的先后顺序不确定。
五、补充说明:IntentService源码解析
路径:frameworks/base/core/java/android/app/IntentService.java
先看下IntentService的构造方法和onCreate()。
1 2 3 4 5 6 7 8 9 10 11 12 13 14 15 16 17 | public abstract class IntentService extends Service { //Creates an IntentService.Invoked by your subclass's constructor. public IntentService(String name) { super(); mName = name; } @Override public void onCreate() { super.onCreate(); HandlerThread thread = new HandlerThread("IntentService[" + mName + "]"); thread.start(); mServiceLooper = thread.getLooper(); mServiceHandler = new ServiceHandler(mServiceLooper); } 。。。。} |
IntentService 是继承Service的一个抽象类,所以需要继承IntentService 并必须实现其抽象方法onHandleIntent。
继承IntentService需要实现一个空的构造器,并且调用IntentService的构造器。
在onCreate()方法中创建了一个HandlerThread,并允许该线程。HandlerThread 不太懂的可以参考我的上一篇文章Android HandlerThread详解 。
获取子线程中的Looper实例,然后创建与子线程绑定的Handler对象。
接着看IntentService的onStart()。
1 2 3 4 5 6 | public void onStart(Intent intent, int startId) { Message msg = mServiceHandler.obtainMessage(); msg.arg1 = startId; msg.obj = intent; mServiceHandler.sendMessage(msg);} |
在onStart方法中,创建Message对象,并将“消息”通过mServiceHandler发送到子线程中的消息队列中。
我们知道这些消息处理还是会分发到Handler中。接着看mServiceHandler
1 2 3 4 5 6 7 8 9 10 | private final class ServiceHandler extends Handler { public ServiceHandler(Looper looper) { super(looper); } @Override public void handleMessage(Message msg) { onHandleIntent((Intent)msg.obj); stopSelf(msg.arg1); }} |
消息会在handlerMessage中处理,该方法中调用了onHandleIntent,所以我们需要实现onHandleIntent,在该方法中做我们要做的任务。而消息处理完成后,调用stopSelf将自身Service销毁。这里可能会有疑问,既然一个任务执行完成后就会执行stopSelf,那多个任务是怎么处理的呢?这里stopSelf(msg.arg1),会先看队列中是否有消息待处理,如果有则继续处理后面的消息,没有才会将Service销毁。
接着看IntentService的onDestroy方法。
1 2 3 | @Overridepublic void onDestroy() { mServiceLooper.quit();} |
在IntentService的onDestroy方法中会调用looper的quit方法,将子线程的消息循环停止,等待任务完成后结束子线程。
六、总结
IntentService是一个比较便捷的类,省了我们在创建Thread,但是并不能适合所有的情况,它会创建一个线程,多个任务按顺序执行,并且执行过程中不能够取消该任务。所以还是需要根据情况进行使用。


【推荐】国内首个AI IDE,深度理解中文开发场景,立即下载体验Trae
【推荐】编程新体验,更懂你的AI,立即体验豆包MarsCode编程助手
【推荐】抖音旗下AI助手豆包,你的智能百科全书,全免费不限次数
【推荐】轻量又高性能的 SSH 工具 IShell:AI 加持,快人一步
· go语言实现终端里的倒计时
· 如何编写易于单元测试的代码
· 10年+ .NET Coder 心语,封装的思维:从隐藏、稳定开始理解其本质意义
· .NET Core 中如何实现缓存的预热?
· 从 HTTP 原因短语缺失研究 HTTP/2 和 HTTP/3 的设计差异
· 分享 3 个 .NET 开源的文件压缩处理库,助力快速实现文件压缩解压功能!
· Ollama——大语言模型本地部署的极速利器
· 使用C#创建一个MCP客户端
· 分享一个免费、快速、无限量使用的满血 DeepSeek R1 模型,支持深度思考和联网搜索!
· Windows编程----内核对象竟然如此简单?