
自定义控件概述
前言
在android开发过程中,我们不免会遇到一些特殊的情况,有时系统给的ui控件并不能满足我们的开发需求,于是自定义view就显得十分紧迫了,这篇文章就是让大家步入自定义控件的殿堂,让大家了解自定义控件的基本步骤
今天要讲的内容包括:
- 自定义控件的基本步骤
1.1 继承View,并实现它的几个主要构造方法
1.2 重写View的onDraw(Canvas canvas)方法 - 自定义圆圈控件的示例
- 项目结构图和效果图
一.自定义控件的基本步骤
1.1 继承View,并实现它的几个主要构造方法
view有几个重要的构造方法:
View(Context context);
View(Context context, AttributeSet attrs);
View(Context context, AttributeSet attrs, int defStyleAttr);
当然,view的构造方法不只这几个,这里只是重写这几个会用到的。
下面我们以自定义一个CustomerView类来做讲解,CustomerView需要继承view,那么在CustomerView类中就要有这么一句代码:
public class CustomerView extends View{
     //中间代码省略
}
然后重写view的几个重要的构造方法,于是于是代码扩充成这样:
public class CustomerView extends View{

    public CustomerView(Context context) {
        super(context);
    }

    public CustomerView(Context context, @Nullable AttributeSet attrs) {
        super(context, attrs);
    }

    public CustomerView(Context context, @Nullable AttributeSet attrs, int defStyleAttr) {
        super(context, attrs, defStyleAttr);
    }
}
1.2 重写View的onDraw(Canvas canvas)方法
View类的方法有很多,但自定义view的话,基本要重写view的onDraw(Canvas canvas)方法,于是代码继续扩充:
public class CustomerView extends View{

    public CustomerView(Context context) {
        super(context);
    }

    public CustomerView(Context context, @Nullable AttributeSet attrs) {
        super(context, attrs);
    }

    public CustomerView(Context context, @Nullable AttributeSet attrs, int defStyleAttr) {
        super(context, attrs, defStyleAttr);
    }

    @Override
    protected void onDraw(Canvas canvas) {
        super.onDraw(canvas);
       //实现你的业务逻辑
       //......
    }
}
二.自定义圆圈控件的示例
在这里,我们写了一个自定义圆圈的控件CustomerView,具体代码在demo有详细解释,这里就不赘述了,下面讲下CustomerView在mainActivity中的引用。
在MainActivity对应的activity_main.xml中引用控件代码如下:
<?xml version="1.0" encoding="utf-8"?>
<android.support.constraint.ConstraintLayout xmlns:android="http://schemas.android.com/apk/res/android"
    xmlns:app="http://schemas.android.com/apk/res-auto"
    xmlns:tools="http://schemas.android.com/tools"
    android:layout_width="match_parent"
    android:layout_height="match_parent"
    android:background="@color/white"
    tools:context="com.android.testdemo.main.MainActivity">

    <com.android.testdemo.animation.CustomerView
        android:layout_width="match_parent"
        android:layout_height="match_parent"/>

</android.support.constraint.ConstraintLayout>
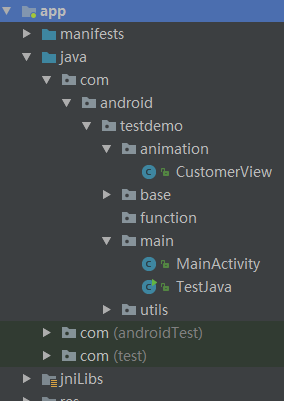
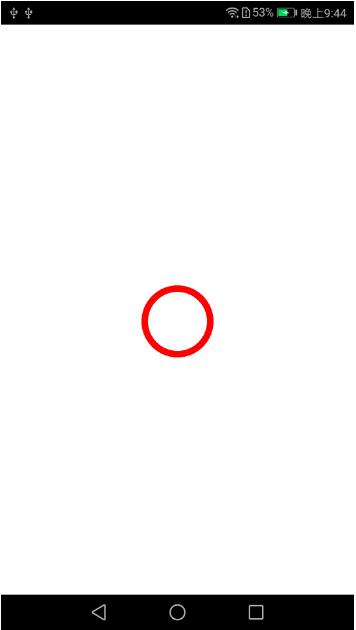
三.项目结构图和效果图
项目结构图
运行效果图
自定义控件概述


【推荐】国内首个AI IDE,深度理解中文开发场景,立即下载体验Trae
【推荐】编程新体验,更懂你的AI,立即体验豆包MarsCode编程助手
【推荐】抖音旗下AI助手豆包,你的智能百科全书,全免费不限次数
【推荐】轻量又高性能的 SSH 工具 IShell:AI 加持,快人一步
· go语言实现终端里的倒计时
· 如何编写易于单元测试的代码
· 10年+ .NET Coder 心语,封装的思维:从隐藏、稳定开始理解其本质意义
· .NET Core 中如何实现缓存的预热?
· 从 HTTP 原因短语缺失研究 HTTP/2 和 HTTP/3 的设计差异
· 分享 3 个 .NET 开源的文件压缩处理库,助力快速实现文件压缩解压功能!
· Ollama——大语言模型本地部署的极速利器
· 使用C#创建一个MCP客户端
· 分享一个免费、快速、无限量使用的满血 DeepSeek R1 模型,支持深度思考和联网搜索!
· Windows编程----内核对象竟然如此简单?
2018-03-05 Android基于UDP的局域网聊天通信
2018-03-05 基于React实现的【绿色版电子书阅读器】,支持离线下载
2018-03-05 破解 zip 压缩包程序
2018-03-05 小小数据统计(柱状图、折线图、扇形图)
2018-03-05 iOS活体人脸识别的Demo和一些思路
2018-03-05 iOS蓝牙原生封装,助力智能硬件开发
2018-03-05 基于python实现的DDoS