Ubuntu 14 环境下编译安装 Redis 并将其注册为系统服务
$ cat /etc/issue
Ubuntu 14.04.2 LTS \n \l
1. 下载安装
1.1 下载
官方下载地址: http://redis.io/download下载最新稳定版 redis-3.2.0.tar.gz,大小仅 1.49 MB。
1.2 安装
将下载的安装包放在用户目录下,如 /home/webapp,打算将其安装到 /opt/redis:$ sudo mkdir /opt/redis
$ cd /home/webapp
$ tar xzf redis-3.2.0.tar.gz
$ cd redis-3.2.0
$ sudo make PREFIX=/opt/redis install
之后查看 /opt/redis,下边只生成了一个 bin 目录,该目录下只有六个文件:
redis-benchmark redis-check-dump redis-sentinel
redis-check-aof redis-cli redis-server
安装完成。
2. 注册为系统服务
2.1 编辑服务脚本
查看安装包自带服务脚本:$ cat /home/webapp/redis-3.2.0/utils/redis_init_script
#!/bin/sh
#
# Simple Redis init.d script conceived to work on Linux systems
# as it does use of the /proc filesystem.
REDISPORT=6379
EXEC=/usr/local/bin/redis-server
CLIEXEC=/usr/local/bin/redis-cli
PIDFILE=/var/run/redis_${REDISPORT}.pid
CONF="/etc/redis/${REDISPORT}.conf"
case "$1" in
start)
if [ -f $PIDFILE ]
then
echo "$PIDFILE exists, process is already running or crashed"
else
echo "Starting Redis server..."
$EXEC $CONF
fi
;;
stop)
if [ ! -f $PIDFILE ]
then
echo "$PIDFILE does not exist, process is not running"
else
PID=$(cat $PIDFILE)
echo "Stopping ..."
$CLIEXEC -p $REDISPORT shutdown
while [ -x /proc/${PID} ]
do
echo "Waiting for Redis to shutdown ..."
sleep 1
done
echo "Redis stopped"
fi
;;
*)
echo "Please use start or stop as first argument"
;;
esac
将其拷贝到 /etc/init.d 目录并重命名为 redis:
$ sudo cp /home/webapp/redis-3.2.0/utils/redis_init_script /etc/init.d/redis
然后依据 redis 的安装路径修改 /etc/init.d/redis 为:
#!/bin/sh
# Simple Redis init.d script conceived to work on Linux systems
# as it does use of the /proc filesystem.
REDISPORT=6379
EXEC=/opt/redis/bin/redis-server
CLIEXEC=/opt/redis/bin/redis-cli
PIDFILE=/var/run/redis_${REDISPORT}.pid
CONF="/opt/redis/${REDISPORT}.conf"
case "$1" in
start)
if [ -f $PIDFILE ]
then
echo "$PIDFILE exists, process is already running or crashed"
else
echo "Starting Redis server..."
$EXEC $CONF &
fi
;;
stop)
if [ ! -f $PIDFILE ]
then
echo "$PIDFILE does not exist, process is not running"
else
PID=$(cat $PIDFILE)
echo "Stopping ..."
$CLIEXEC -p $REDISPORT shutdown
while [ -x /proc/${PID} ]
do
echo "Waiting for Redis to shutdown ..."
sleep 1
done
echo "Redis stopped"
fi
;;
*)
echo "Please use start or stop as first argument"
;;
esac
注意红色字体部分:
- $EXEC $CONF &,后边的 &,表示将服务转到后台运行;
- EXEC、CLIEXEC、CONF 等三处路径都要改。
2.2 复制配置文件
将 /home/webapp/redis-3.2.0 下提供的 redis.conf 默认配置文件拷贝到 redis 安装根目录下并重命名为 6379.conf:$ sudo cp /home/webapp/redis-3.2.0/redis.conf /opt/redis/6379.conf
2.3 环境变量设置
追加以下内容到 /etc/profile 文件:export PATH=/opt/redis/bin:$PATH
执行 . /etc/profile 以使配置立即生效并使用 echo $PATH 验证之。
2.4 服务注册
Ubuntu 在 10.04 之前的版本在配置开机启动服务时都是使用 chkconfig,而在之后的版本就没有 chkconfig 命令了:$ sudo chkconfig --add redis
sudo: chkconfig: command not found
chkconfig 的替代方案为 update-rc.d :
$ sudo update-rc.d redis defaults
服务注册成功会有以下输出:
/etc/rc0.d/K20redis -> ../init.d/redis
/etc/rc1.d/K20redis -> ../init.d/redis
/etc/rc6.d/K20redis -> ../init.d/redis
/etc/rc2.d/S20redis -> ../init.d/redis
/etc/rc3.d/S20redis -> ../init.d/redis
/etc/rc4.d/S20redis -> ../init.d/redis
/etc/rc5.d/S20redis -> ../init.d/redis
3. 服务启动及验证
$ sudo service redis start服务启动,执行
$ redis-cli ping
PONG
表明服务已启动。
$ netstat -an | grep 6379
tcp 0 0 127.0.0.1:6379 0.0.0.0:* LISTEN
本地 6379 端口号已被 redis 监听。
4. 远程连接的问题
4.1 远程主机拼不通 redis
telnet 的时候提示 connection refused
解决办法:
将 /opt/redis/6379.conf 中的(第 61 行)
bind 127.0.0.1
行给注释掉,然后重启 redis 服务即可。BTW,redis-3.0.4 版本中这里还是默认注释掉的,参考《Redhat5.8 环境下编译安装 Redis 并将其注册为系统服务》。
4.2 远程主机连接 redis 的一些问题
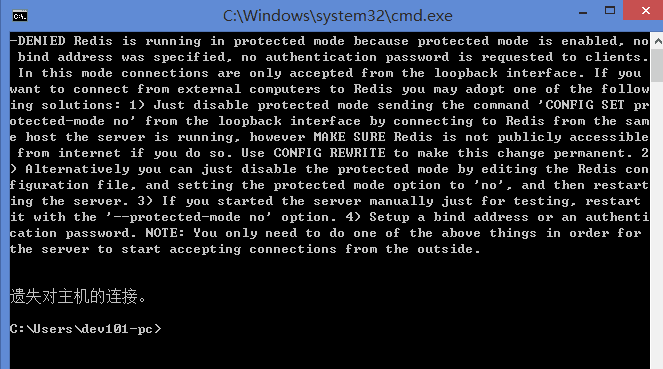
远程主机对 redis 端口进行 telnet 的时候报这个错误:
-DENIED Redis is running in protected mode because protected mode is enabled, no bind address was specified, no authentication password is requested to clients. In this mode connections are only accepted from the loopback interface. If you want to connect from external computers to Redis you may adopt one of the following solutions: 1) Just disable protected mode sending the command 'CONFIG SET protected-mode no' from the loopback interface by connecting to Redis from the same host the server is running, however MAKE SURE Redis is not publicly accessible from internet if you do so. Use CONFIG REWRITE to make this change permanent. 2) Alternatively you can just disable the protected mode by editing the Redis configuration file, and setting the protected mode option to 'no', and then restarting the server. 3) If you started the server manually just for testing, restart it with the '--protected-mode no' option. 4) Setup a bind address or an authentication password. NOTE: You only need to do one of the above things in order for the server to start accepting connections from the outside.
Redis 3.2 以后安全考虑,远程访问必须进行授权。
$ redis-cli
127.0.0.1:6379> config set requirepass defonds
OK
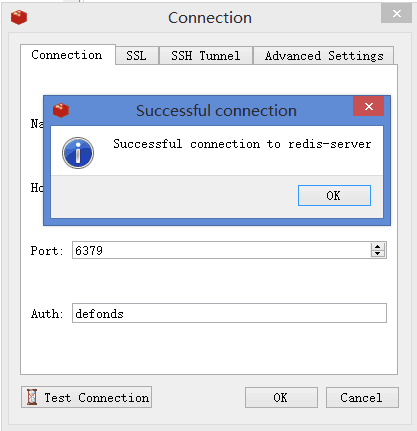
授权之后就能 telnet 通了,可以进行远程访问了:
这种授权方式在 redis 重启后会失效。可以启用 6379.conf 第 450 行的配置:
requirepass defonds
5. 持久化文件和日志
5.1 持久化
Redis 默认的持久化方式是快照方式,默认会将快照 dump.rdb 文件放在启动目录下(服务方式启动是在根目录下),我们可以通过更改 6379.conf 文件里 SNAPSHOTTING 大项下的 dir 配置(第 246 行)将快照文件放在指定目录下,以防被误删:
dir ./
改为
dir /opt/redis/
5.2 日志
Redis 默认将日志输出到 /dev/null(即舍弃),我们可以通过更改 6379.conf 文件里 GENERAL 大项下的 logfile 配置(第 162 行)将日志保留到指定文件:
logfile ""
改为
logfile /opt/redis/redis.log
重启 Redis 后,
$ ls -alt
total 88
-rw-r--r-- 1 root root 23236 Jun 24 22:16 redis.log
drwxr-xr-x 3 root root 4096 Jun 24 22:16 .
-rw-r--r-- 1 root root 1167 Jun 24 22:16 dump.rdb
-rw-r--r-- 1 root root 45413 Jun 24 20:17 6379.conf
drwxr-xr-x 2 root root 4096 Jun 21 16:02 bin
drwxr-xr-x 18 webapp root 4096 Jun 21 15:57 ..
6. Redis 服务关不掉的问题
$ sudo service redis stop
redis_6379 does not exist, process is not running
可以先将 redis 进程 kill 掉,然后找到 6379.conf 第 149 行
pidfile /var/run/redis.pid
改为:
pidfile /var/run/redis_6379.pid
找到 /etc/init.d/redis 第 30 行
$CLIEXEC -p $REDISPORT shutdown
改为:
$CLIEXEC -p $REDISPORT -a defonds shutdown
注意红色部分是你的 redis 的授权密码(上文第 4 步里所述)。这样,sudo service redis start 服务启动之后,用 sudo service redis stop 就可以将服务关闭了。


